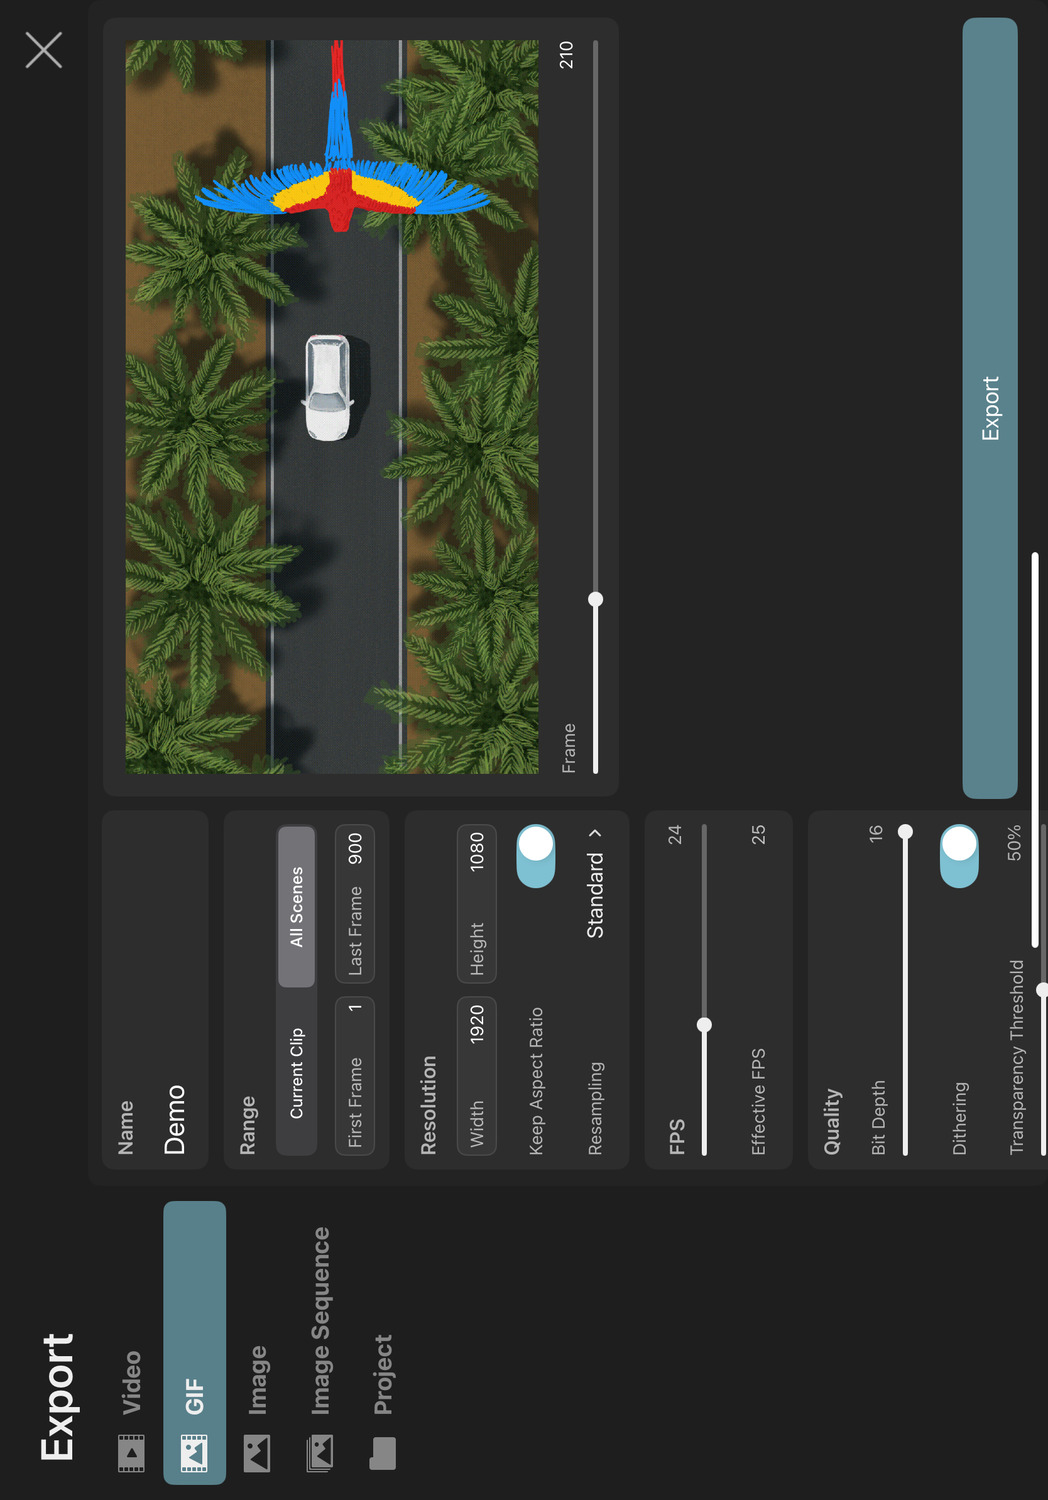
Export
GIF
The GIF image format is commonly encountered on the internet and is supported by web browsers. It can be a good choice for exporting short animations without sound.

Limitations#
This format does not support semi-transparent pixels (i.e. pixels are either fully opaque or fully transparent) and it does not support audio.
Long and high-resolution animations can lead to very large files, so it is not recommended in this case.
Settings#
Name#
This will be the name of the exported GIF file.
Range#
Controls which part of your timeline should be exported.
Current Clip#
Only frames from the clip or scene currently selected in the editor should be exported.
All Scenes#
Every scene of the current project should be exported as one GIF.
First Frame / Last Frame#
The range of frames to be exported.
Resolution#
The resolution of the exported GIF. Choosing a different value here will simply scale the export and not crop anything. Changing the resolution disproportionately will therefore stretch the animation in the final export.
Tip#
Choose a low resolution if you are trying to reduce the size of the exported GIF.
Keep Aspect Ratio#
Whether changing the resolution's width or height should also update the other value proportionally to keep the current resolution's aspect ratio.
Resampling#
How the animation contents should be rendered and resampled at the export resolution.
Standard#
Vector contents are rasterized at the export resolution, which keeps their edges perfectly sharp and prevents upscaling artifacts.
Pixel contents are scaled using either bilinear interpolation or nearest neighbor interpolation, depending on the magnitude of the scaling factor.
Nearest Neighbor#
The animation is first rendered at the project resolution and then resampled to the export resolution using nearest neighbor interpolation.
The nearest neighbor interpolation is also applied when sampling pixel layer contents during the initial render at the project resolution, which prevents blurring if they are animated with keyframes.
Vector contents other than text are rendered without antialiasing.
Nearest With Sharp Vectors#
Nearest neighbor interpolation is applied when sampling pixel layer contents at the export resolution.
Vector contents - including text - are rasterized at the export resolution as opposed to the project resolution.
Vector contents other than text are rendered without antialiasing.
The Nearest Neighbor and Nearest With Sharp Vectors options are recommended when exporting pixel art.
FPS#
The frame rate of the exported GIF.
Choosing a different frame rate here will not cause the animation to be slowed down or sped up in the export. The animation will be resampled to match the desired output frame rate.
Effective FPS#
The GIF format does not support arbitrary frame rates, so the user-chosen value is rounded to the closest supported frame rate. This label shows the actual frame rate that the exported GIF will have.
Tip#
Choose a low frame rate if you are trying to reduce the size of the exported GIF.
Quality#
The quality settings that can be used to reduce the visual quality of the GIF in favor of reducing the file size or reducing export times.
Bit Depth#
The bit depth to use for each pixel. Choosing higher values results in a better quality GIF and larger file size, whereas lower values will result in lower quality but also smaller files.
Dithering#
Dithering refers to the use of dot patterns to emulate more colors and gradients with fewer distinct colors stored in the GIF.
If this option is enabled, the visual output quality is significantly improved, but the export takes slightly more time to complete.
Transparency Threshold#
Each pixel in a GIF can only be either fully transparent or fully opaque. Every pixel of your animation whose original transparency is above this limit will be fully opaque in the exported GIF and all other pixels will be invisible.
Setting this to 0% will cause all fully-transparent pixels of your animation to be black in the export.
Anti-Aliasing Quality#
The quality of the anti-aliasing that should be applied to the rendered export output to avoid jagged edges and other aliasing artefacts. Higher quality settings result in smoother edges but also significantly increase the export time.
Note that anti-aliasing is only applied to a frame if necessary, e.g. when it contains vector contents or certain effects, so this setting has no impact on scenes without such contents.
Reset#
Use this button to reset all settings back to their defaults.
Preview#
You can use the frame slider under the preview on the right to preview the range of the animation that will be exported.
No search results