ToonSquid Handbook
Version
- Interface
- Projects
- Layers
- Keyframes
- Brushes
- Drawing Guides
- Transform
- Text
- Path
- Symbols
- Selection
- Colors
- Effects
- Export
- Settings
- Guides
#
Interface
Overview
This chapter provides a general overview of ToonSquid's user interface. Some topics like the individual tools are covered in more detail in the following chapters.
Editor
Knowing about all the details of the editor interface is the key to making sure that you can bring your ideas to life as efficiently as possible with ToonSquid.
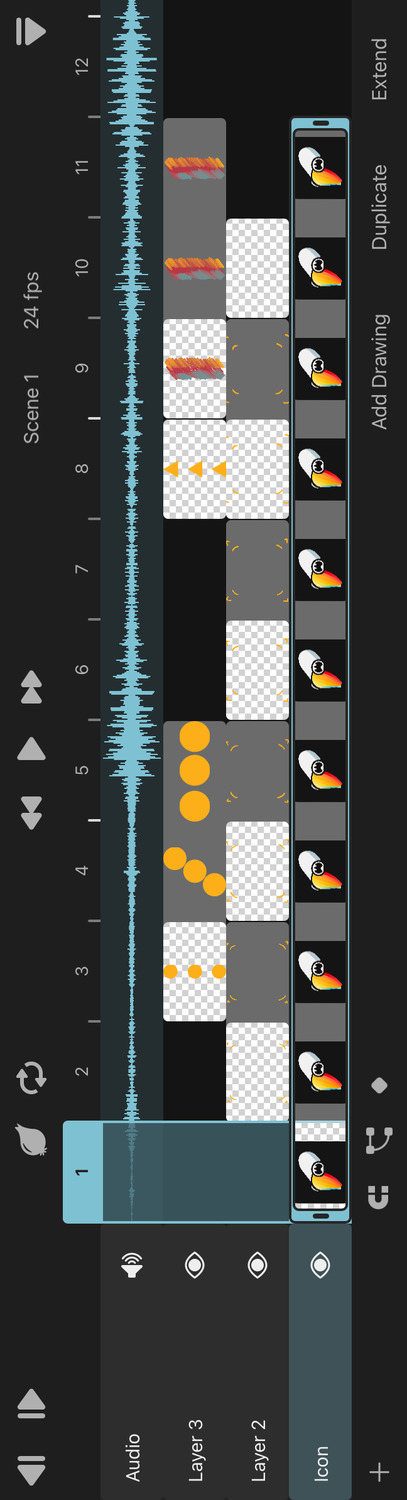
Timeline
The timeline is your window into everything regarding animation. Mastering the timeline is a must if you want to create more than static pieces of art with ToonSquid.
Library
Projects, animation clips, video clips, audio clips and brush textures are all organized in different variations of the library interface.
Gestures
ToonSquid takes advantage of the iPad's multitouch screen and offers a variety of intuitive touch gestures to help ease your workflow.
Keyboard Shortcuts
If you like to work with an attached keyboard you can use keyboard shortcuts to quickly navigate through the editor and perform common edits.
#
Interface
Editor
The editor interface is the workspace where you spend most of your time creating your animation.
Canvas#
The canvas is the central area of the editor where you can see and edit your animation directly on the screen.
You can navigate the canvas by pinching to zoom and moving your two fingers around to move and rotate the animation on the screen.
Depending on the selected tool, you have different editing options on the canvas for the selected layer. More details on this follow in later chapters.
Tools#
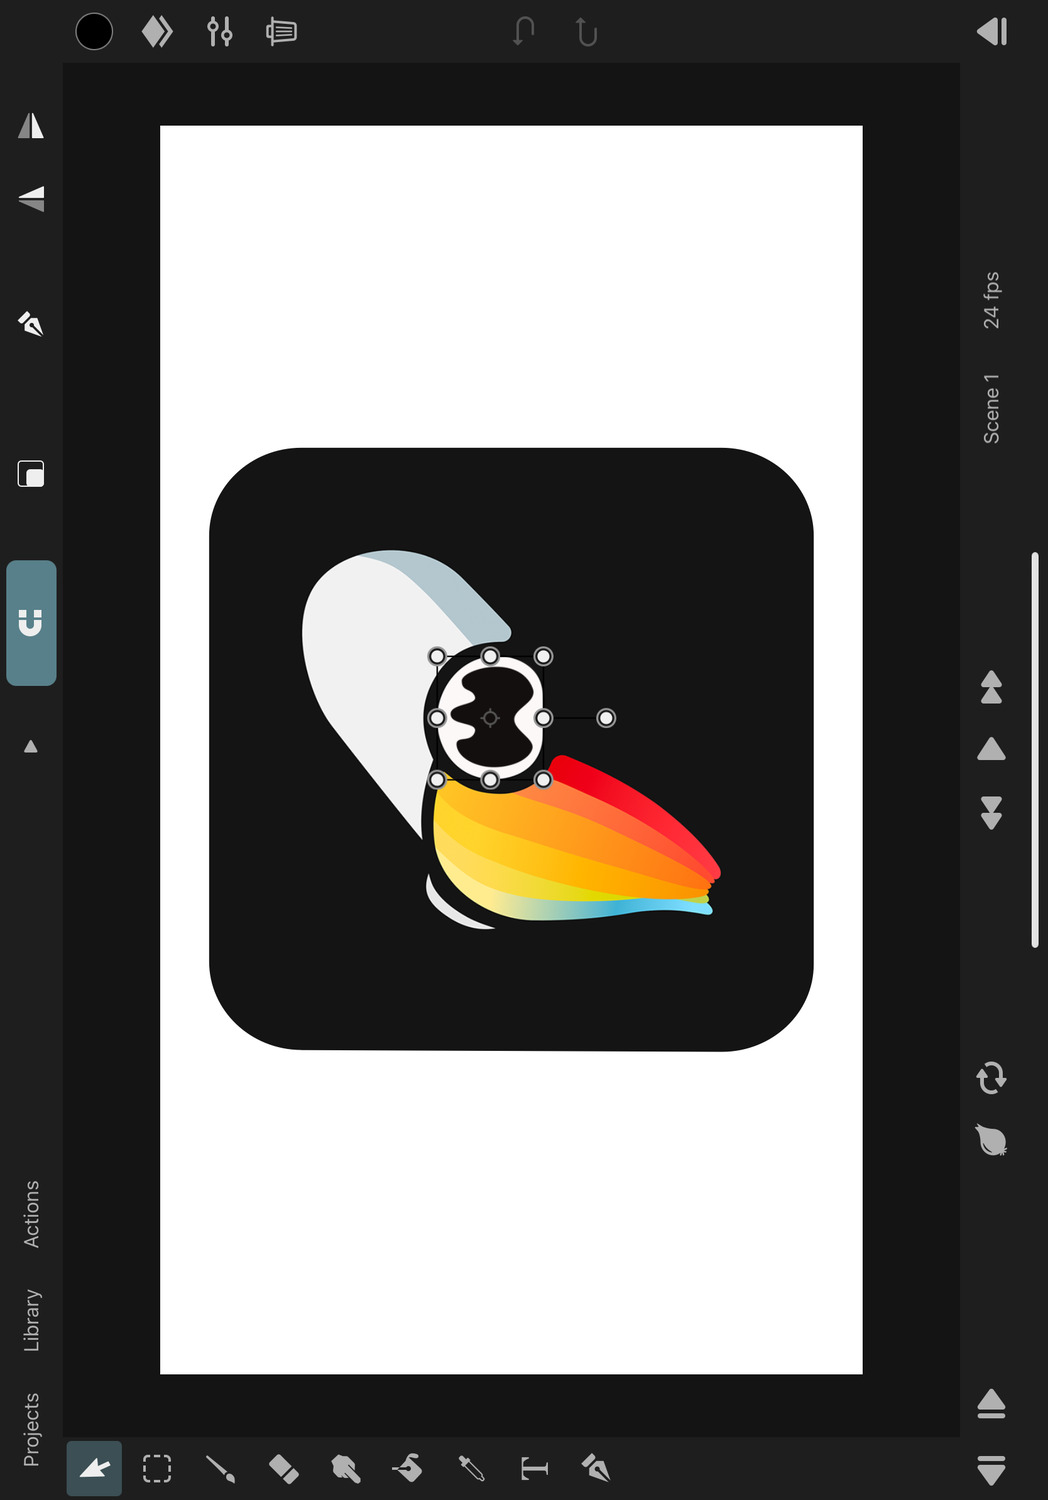
The sidebar on the left contains the list of tools that you can use to edit your animation in different ways on the canvas. These are the tools from top to bottom: transform, selection, brush, eraser, smudge, fill, pipette, text, path.

Select a tool by tapping its icon in the sidebar. After selecting a tool, its name shortly appears at the top of the screen and the icon becomes highlighted.
Some tools (like the brush, eraser and smudge tools and the path tool) allow you to tap their icon again to show more options.
Tip#
Tapping the current selection again to show more options works almost anywhere in the editor interface. You can do it on the selected layer, the selected drawing, the frame number in the timeline etc.
Some tools (like the bone tools or the mesh tools) are only shown in the sidebar when the corresponding effect is selected.
Navigation Buttons#
The three buttons in the top left corner of the editor are used to navigate from the editor to other important screens.
Projects#
Takes you back to the project library where you can select a different project to work on.
Library#
Opens the asset library of the current project. The asset library contains videos and audio clip assets that were imported and animation clips that were created as part of this project. This is also where you can import more assets, such as images. The library interface is covered in more detail on this page
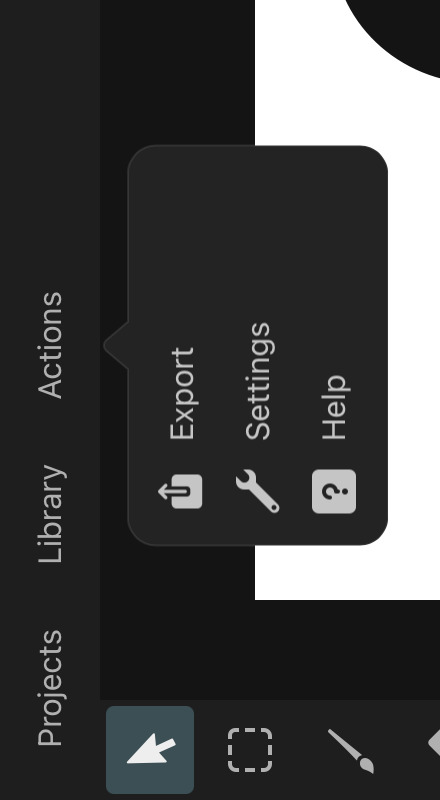
Actions#
The actions button opens a popover with further navigation and action options.
Export#
At some point, you are going to want to export your animation from ToonSquid as a video or image to share with others. This button opens the interface to configure such an export. The exporting process is explained in this chapter.
Settings#
Opens the preferences which you can use to configure the behavior of the ToonSquid editor. All available settings are covered in this chapter.
Help#
Opens a list of various support and informational links. You'll find a quick link to the handbook and one for contacting support, the privacy policy and other legal information if you are ever looking for it.
The help popover also shows you the current app version at the top.
Flip Canvas X & Y#
These buttons allow you to temporarily flip the canvas. This can for example be useful if you want to check your drawing for symmetry errors.
This can also be done via the General settings.
Enable Guides#
This button allows you to quickly enable or disable drawing guides on the canvas.
Enable Ruler#
This button allows you to quickly enable or disable the ruler on the canvas.
Edit Guides#
Opens the drawing guides and ruler settings in the inspector so you can customize them to your needs.
Tool Options#

Options that are specific to the selected tool such as a brush size slider or a button for enabling and disabling snapping are shown in the top bar on the right. The available options are explained on the different pages that present each tool in more detail.
Tip#
Labels for the tool options are hidden by default, but you can tap the little disclosure triangle to the left of them to expand the options and see their labels as well.
Sidebar (Right)#
The sidebar on the right contains buttons for commonly used editor features.

Color Picker#
The color button on the right shows the current editor color, which is used for the brush. Tapping it opens the color picker interface for choosing a different color.
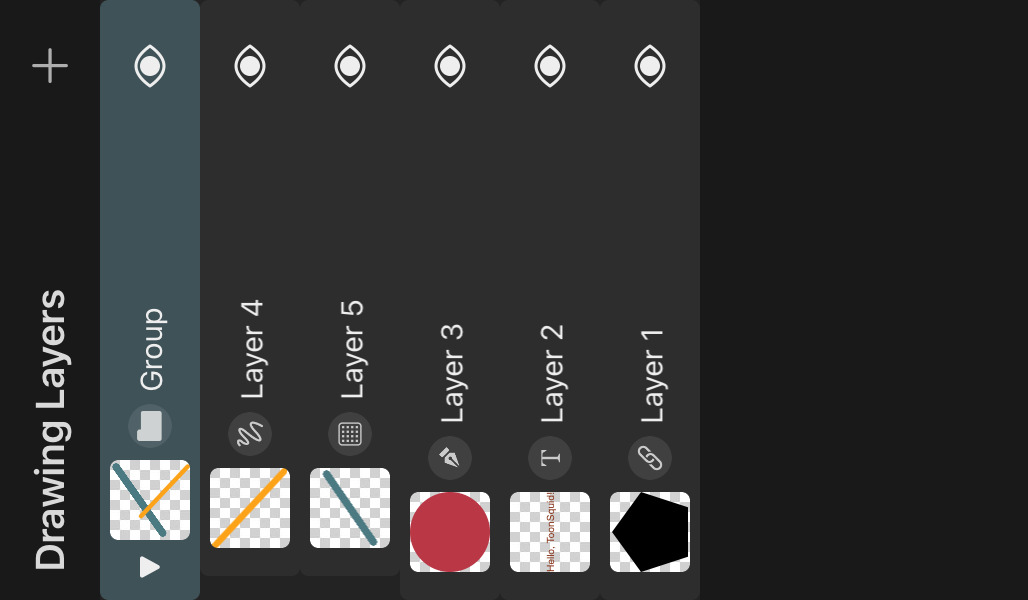
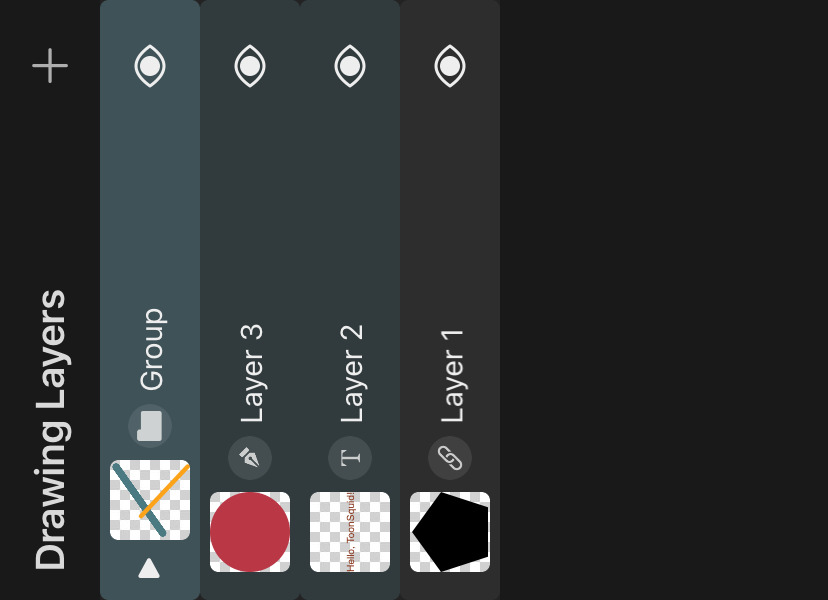
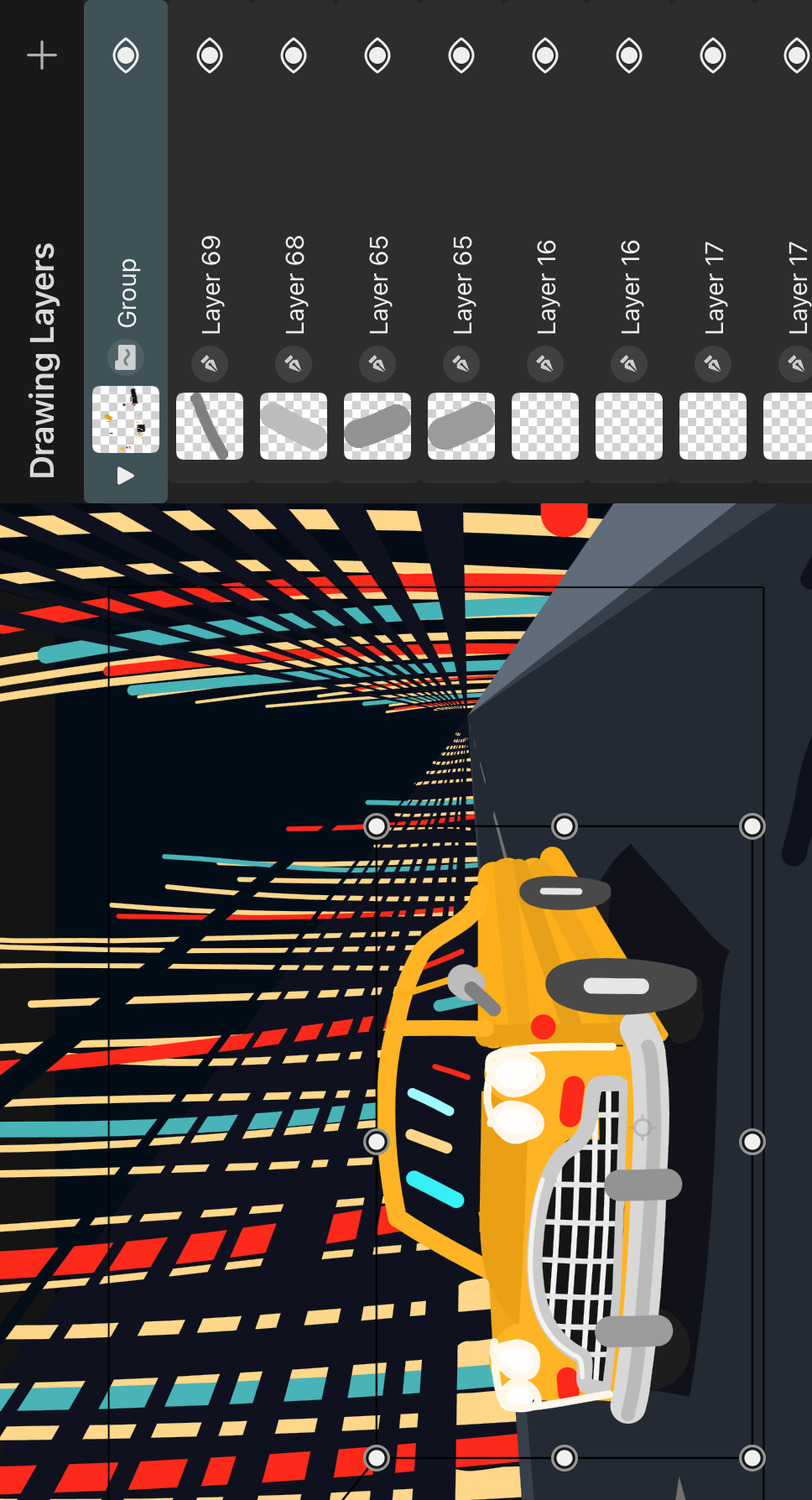
Drawing Layers#
The layers button opens the list of drawing layers of the currently selected drawing. Learn more about these concepts in the Layers chapter.
Inspector#
The inspector shows all properties of the currently selected layer. You can switch between the properties of the selected animation layer and the selected drawing layer at the top.
Different layers have different properties, which are covered in detail in the Layers chapter.
Quick Delete#
If a layer is selected, a delete button (trash icon) is shown below the inspector, which can be used to delete the selected layer. By default, the drawing layer is deleted, but this behavior can be adjusted in the settings.
If this button has been configured to delete the selected drawing layer and there is an active selection area on the canvas, only the selected region of the layer is cleared (as long as the selected layer type supports this).
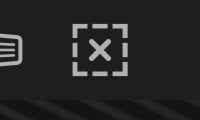
Quick Deselect#
When there is an active selection area in the editor, you can use the deselect button in the right sidebar in order to quickly deselect the current selection no matter which tool you are currently in.
Undo and Redo#
Exploring different ideas and making mistakes is part of everybody's creative process. In ToonSquid you don't have to worry about making mistakes because every edit to your project can be undone. Either tap the screen with two fingers or use the undo button (arrow to the left) in the sidebar. And if you accidentally undo too much, tap with three fingers or use the redo button (arrow to the right) to re-apply the edit.
Undo and redo steps continue to exist until the editor is closed, for example by going back to the project library.
Breadcrumbs#
If you open an animation clip in the editor, you can navigate back to the previously edited clip or scene via the breadcrumbs buttons in the top left corner of the canvas.
Fullscreen Mode#
In the top right corner of the editor, you can find the fullscreen mode button. Tap this button to hide all other UI elements and focus only on the canvas. Tap the button again to exit fullscreen mode.
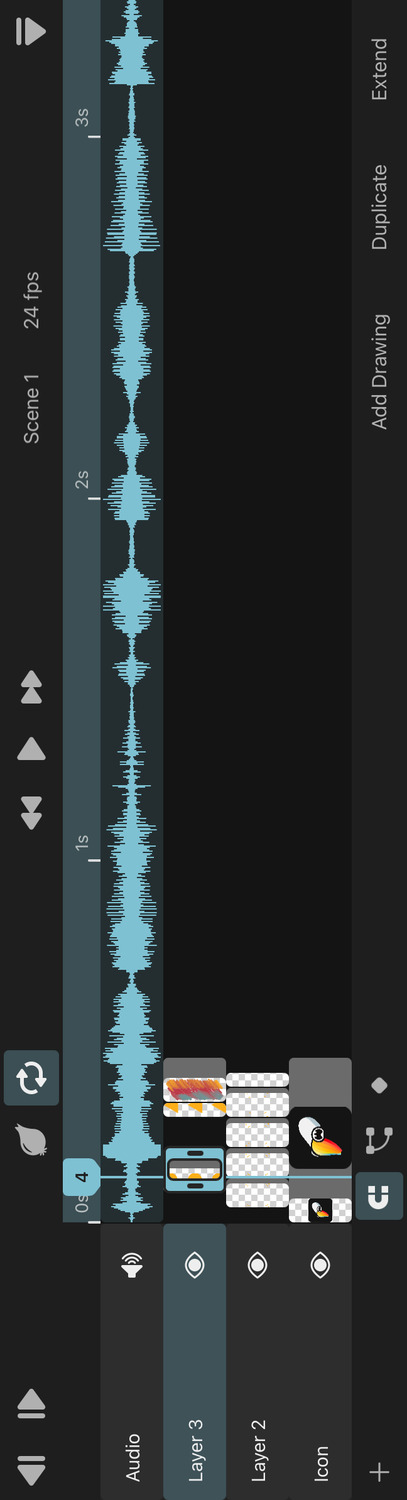
Timeline#
You can find the timeline at the bottom of the screen. It can be expanded and collapsed with the button in the bottom right corner.
The timeline is where you see and edit the different parts of your animation over time. It is essential to any animation workflow and is covered in full detail on the next page.
#
Interface
Timeline
The timeline is where you see and edit the different parts of your animation over time and is therefore essential to every animation workflow.
Expand and Collapse#
You expand the timeline with the button in the bottom-right corner with the eject icon. Tapping the button again when the timeline is expanded collapses it again so that you have more space to work on your animation on the canvas.
The timeline height automatically grows as you add more layers to your animation. Once there are more than four layers, the timeline stops growing and lets you scroll through your layers instead.
Custom Timeline Height#
You can manually change the timeline height to see more or fewer layers at once by touching and holding the playback toolbar and dragging it up or down. If you want to go back to the default height, just tap the playback toolbar once and choose the Reset Timeline Height to Default option that appears.
Playback Toolbar#

The playback toolbar sits at the top of the timeline and always stays visible, even when the timeline is collapsed.
Next / Previous Frame#
Use the two buttons on the far left of the playback toolbar to move to the next or previous frame in the timeline.
In the settings you can also change this behaviour to instead move to the next or previous drawings in the selected layer.
Effects (FX)#
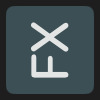
Use the FX button to view your animation with or without effects in the editor. This button is only visible if the current scene contains any effects.
Many tools (e.g. the brush tool or the selection tool) automatically disable effects when you switch to them, since they edit the state of the layer contents before effects are applied to them.
Certain tools such as the transform bones tool or the transform mesh tool behave differently depending on whether effects are enabled or not. You can find more details about this on the corresponding handbook pages.
Onion Skin#

Toggles onion skinning on and off, allowing you to see the contents of the previous and next drawings. Hold the button for more options. The Onion Skinning feature and the available options are covered in detail on this page.
Loop#
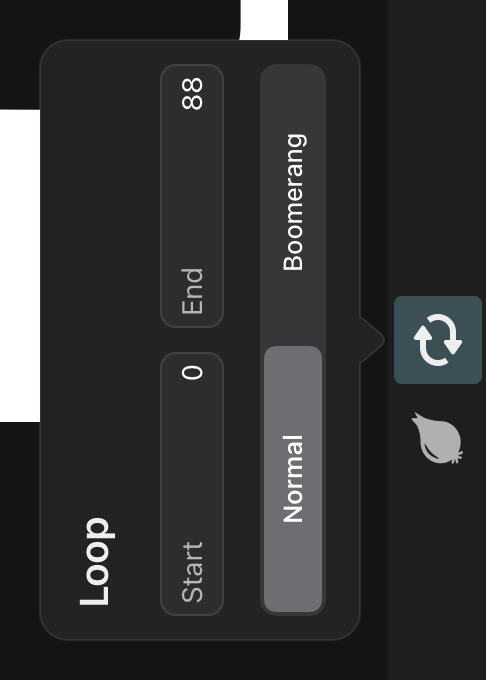
Toggles looped playback on and off. When looping is enabled, playback of your animation in the editor will continue when the last frame of the animation is reached. This does not affect the export. Hold the button for more options.
By default, the entire animation will play in a loop. You can change the range of the loop in the Loop options or tap the selected frame number in the timeline and set it as the start or end frame of the loop.
When looping is enabled, there are the following two modes.
Normal
Once playback reaches the last frame, it continues from the first frame of the loop again.
Boomerang
Once playback reaches the last frame, the animation starts playing in reverse until the first frame of the loop is reached. Then it switches back to forward playback and the cycle repeats.
During the reverse playback phase, the audio playback is muted.
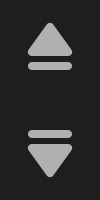
Fast-Forward / Fast-Backward#
You can use the fast-forward and fast-backward buttons to quickly navigate to the beginning and end of the animation in the timeline. If looping is enabled, tapping the buttons once takes you to the start or end of the loop region first before then jumping to the start or end of the animation with the second tap.
Play and Pause#
Use the play button to start the playback of your animation in the editor. During playback, the button turns into a pause button which you can use to stop the playback on the current frame.
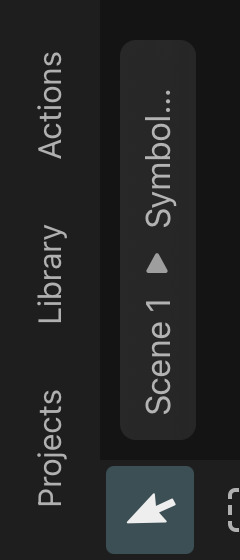
Scene Selection#
To the right of the playback buttons the playback toolbar shows the name of the scene or clip that is currently open in the editor. Tap the name to select a different scene. More information on scene management can be found here.
FPS#
The playback frame rate of the current animation is displayed next to the scene name. Tap it to bring up a slider that you can use to choose a different frame rate between 1 and 60 frames per second.
If a scene is selected, this changes the FPS of all scenes. If an animation clip is selected, only the FPS of that clip will be changed.
Tip#
Keep in mind that the frame rate is typically something you decide at the very beginning and then never change, because it affects the timing of your animation. If you have audio layers in the animation, they will go out-of-sync with the visuals if you change the FPS.
Layers#
The timeline shows you the layers that make up your animation in the layer list on the left.
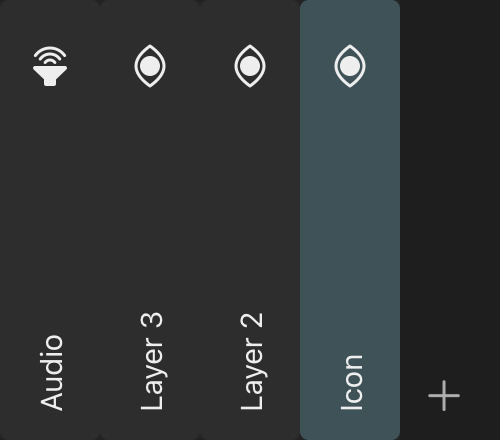
Tap the + button in the bottom left corner to add a new layer to the animation.
Frames#

Frames are the different points in time of an animation. The frame rate defines how many frames of the animation are shown during each second of playback.
The timeline shows the frame numbers to the right of the layer list with a play cursor on the currently selected frame. You can either tap a different frame or drag the play cursor to change the selected frame.
The canvas will show the contents of your animation on this frame.
Drawings#
Drawings are used to show different contents in an animation layer for different periods of time. Learn all about how layers and drawings are used in ToonSquid in the Layers chapter.

You can see all the drawings in the different animation layers to the right of the layer list and below the frame numbers in the timeline.
The selected drawings are highlighted and show retiming handles on the sides.
Retiming Handles#
Drag the retiming handles on the left and right edge of the selected drawing to change the first and last frame on which this drawing should be shown.
Note that dragging the right retiming handle only changes the duration of your drawing, whereas dragging the left handle changes both the duration and the start frame of the drawing. This might not make a difference if your drawing only has static content, but if the drawing layers inside have multiple keyframes or contain a symbol, this affects the animation. Keyframes start on the first frame of the drawing, so they will all be shifted when this first frame changes. It is therefore not possible to trim the start of a drawing in the same way that you can with the end of a drawing.
With multiple drawings selected, dragging the retiming handles of one drawing will edit all selected drawings simultaneously.
Magnetic#
If the magnetic timeline mode is enabled, the next and previous drawings will automatically be shifted back or retimed if necessary when you drag the retiming handles of a neighboring drawing. Drawings without a gap between them will continue to "stick together" when they get retimed.
If you don't want any other drawing to be affected by the retiming of the current drawing, disable the magnetic mode.
Additionally, when the timeline is zoomed out and magnetic mode is enabled, dragging the retiming handles will snap them to the edges of other drawings in the timeline in order to make it easier to align drawings in different layers to each other.
This will also snap the play cursor to the first and last frame of visible drawings when you drag it.
Actions#
Tap the selected drawing again to see further actions that can be performed on this drawing.

Select All Layers#
Selects all drawing layers in the drawing. (Only shown if the drawing contains multiple layers.)
Select Multiple#
Whether the next touch and drag inside of the timeline should start selecting multiple drawings and keyframes instead of scrolling the timeline. This can be used as a slower but more reliable alternative to the double-tap and drag gesture.
Add Drawing#
Has the same behavior as the Add Drawing button at the bottom of the timeline.
Split Drawing#
Splits the drawing at the selected frame, resulting in two drawings with the same contents. If the drawing contains a symbol layer, its timing will be adjusted to seamlessly continue its playback from the previous into the next drawing.
Keyframes within the new drawing are automatically adjusted to maintain their previous positions in the timeline. Note that depending on the choice of easing curve of the keyframes around the split frame, this can lead to small changes in the animation.
Loop Drawings#
Loops the selected drawings by placing them in a group layer with its loop mode set to Normal. You can also create such a looping group configuration manually with any group layer in the timeline.
This option is only available if you have multiple drawings selected.
Reverse Drawings#
Reverses the order of the drawings in the selected layer.
This option is only available if you have multiple drawings selected and they are all in the same layer.
Create Symbol#
Turns the contents of the drawing into a symbol. Learn more about the power of symbols in ToonSquid in this chapter.
Separate Layers#
Converts the drawing layers inside of the single selected drawing into separate animation layers in the timeline with one drawing layer in each of them.
Clear#
Removes the drawing layers from all selected drawings in the timeline while keeping the timing of the drawings intact.
Delete#
Removes the drawing and all of its content from the animation.
Select multiple drawings#
Double-tap the timeline and drag your finger to create a selection box to select multiple drawings at once.

Alternatively, use the Select Multiple drawing action.
When multiple drawings are selected, just tap somewhere else in the timeline to deselect them again.
Drag and Drop#
Touch and hold a drawing and then start dragging it around in the timeline. You can use this to either move the drawing within the layer that it's already in or to move it to a different layer. You can also use this to quickly move multiple selected drawings at once.
While you are dragging, the timeline shows a preview of where exactly the dragged drawings will be moved to.
Drawings cannot be dropped onto frames that already contain other drawings. If the magnetic timeline mode is enabled, the drawings of a layer will automatically be shifted back and forth to make space for the drawing being dragged.
Bottom Toolbar#
The toolbar at the bottom of the timeline contains various buttons for basic and advanced editing.
Magnetic Mode#

The magnetic timeline mode affects the behavior of the retiming handles and the drag and drop gesture as explained in those sections above.
Transform Hierarchy#

This button opens the transform hierarchy interface, which you use to edit the transform hierarchy of the animation layers.
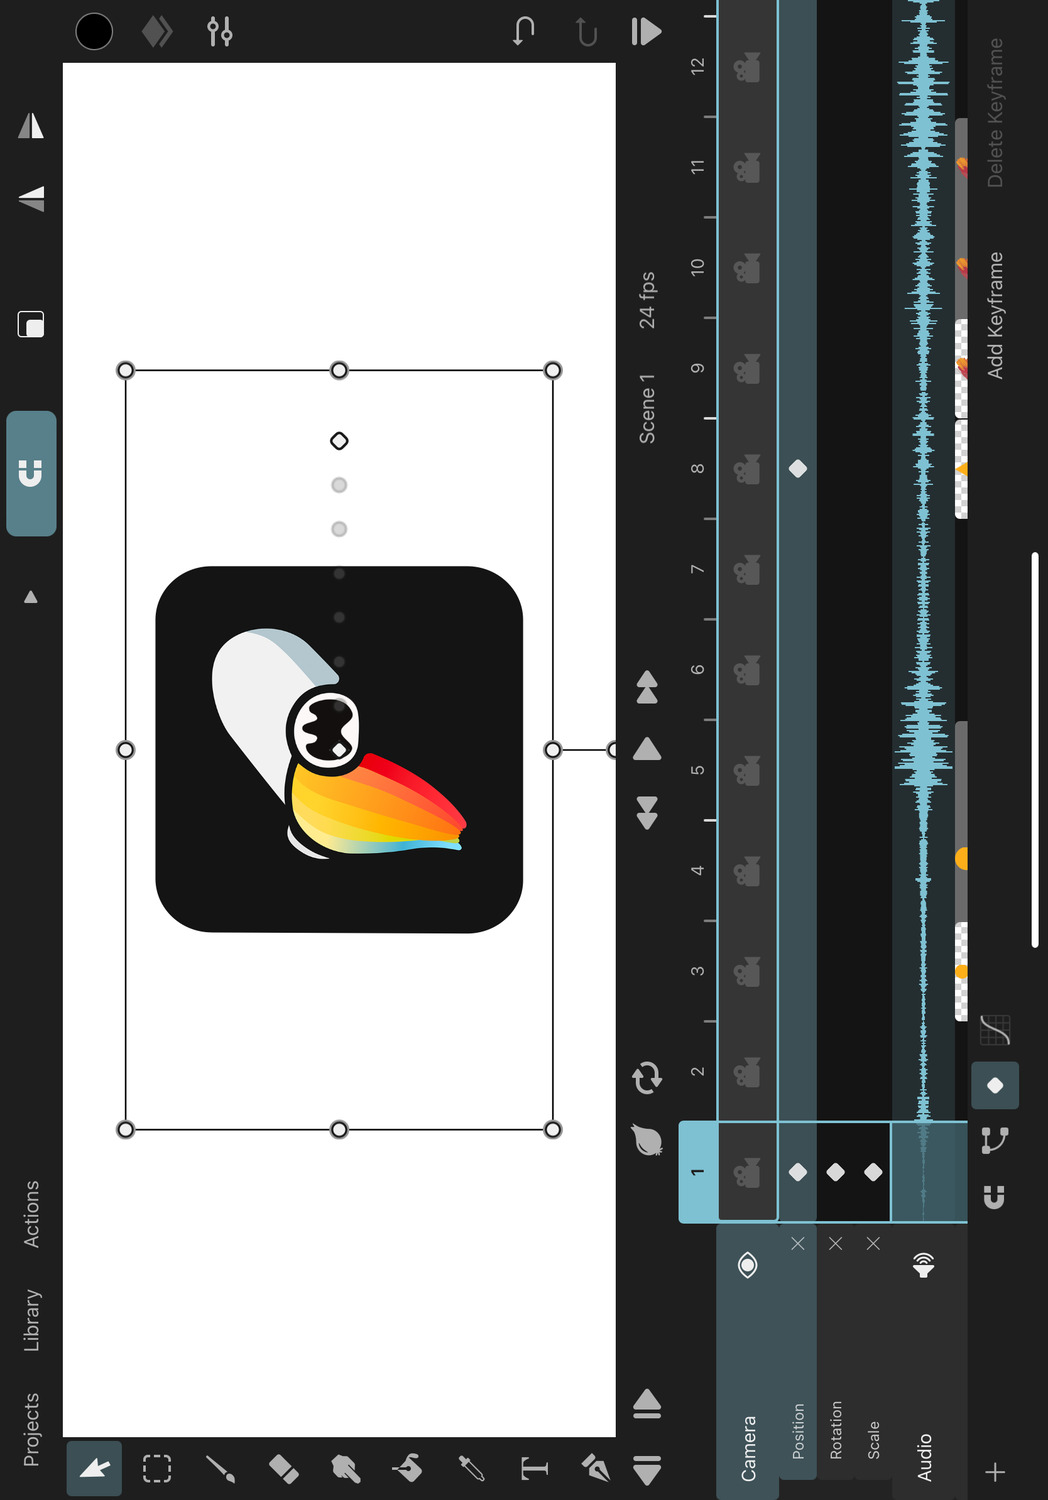
Keyframing#

Use the button with the keyframe icon to switch the editor in and out of keyframing mode. This is the basis of ToonSquid's powerful keyframing workflow.
By default, keyframes are automatically added if you have the keyframing mode enabled, so make sure that you don't leave this mode enabled unintentionally. Alternatively, disable this behavior in the settings.
Easing Curves#

When keyframing is enabled and a layer property is selected, this button is shown next to the keyframing button. Use this to open up the easing curve editor for the selected keyframe.
Add Drawing#
The Add Drawing button adds a new empty drawing to the timeline at the selected frame.
The exact behavior of this button depends on the content that already exists in the selected layer at the selected frame:
If there is no drawing on the selected frame already, a new drawing is created. The previous drawing is extended to fill the gap between the two.
If there is already a drawing that is longer than one frame, it is split into two parts: The existing drawing, which now ends on the previous frame and a new empty drawing, which starts on the current frame and ends on the frame that the existing drawing previously ended on.
If there is already a drawing that only spans a single frame, then a new drawing is inserted into the layer after the existing drawing. Following drawings are automatically shifted back to make space.
Tip#
You might not need to use this button very often since drawings are automatically added whenever you draw or otherwise add content on a frame without an existing drawing (e.g. using the text or path tools).
You can disable the Split Existing Drawings When Adding New Drawings setting if you prefer new drawings to always be added on the frame after the current drawing ends, instead of the current drawing being shortened.
Duplicate#
Use this button to duplicate the contents of the selected drawing into a new drawing.
If there is no drawing on the selected frame, the previous drawing on the selected layer is duplicated and extended to fill the gap to the current frame.
Existing drawings on the selected frame are split into two and keyframes within the new drawing are automatically adjusted to maintain their previous positions in the timeline. Note that depending on the choice of easing curve of the keyframes around the split frame, this can lead to small changes in the animation.
Extend#
If a drawing is selected, this button will increase the length of that drawing by one frame.
If there is no drawing on the selected frame, the previous drawing on the selected layer is extended to the selected frame.
Tip#
Use this button to quickly set the length of drawings that you want to show for a long time. Add the drawing on the frame on which it should appear, then go to the last frame on which it should be visible and hit "Extend Drawing".
Zoom#
You can pinch your fingers in the timeline to change the zoom level of the timeline. This allows you to see more of your animation at once.
If you zoom out far enough, the timeline will switch to displaying the time in seconds instead of frames. The play cursor will continue to show the current frame number.
Frame Markers#
Frame markers can be used to highlight and add comments to different frames of your animation. In combination with symbol layers, they also allow you to quickly animate the time property of a symbol layer by selecting from the list of markers in the linked clip. This process, which can be very helpful for workflows such as lip-syncing, is described in more detail here.
Add a Frame Marker#
- Select the frame on which you want to add the marker
- Tap the frame number again
- Select
Set Markerfrom the list of options.
The frame markers are shown above their corresponding frame numbers in the timeline.
Edit Frame Markers#
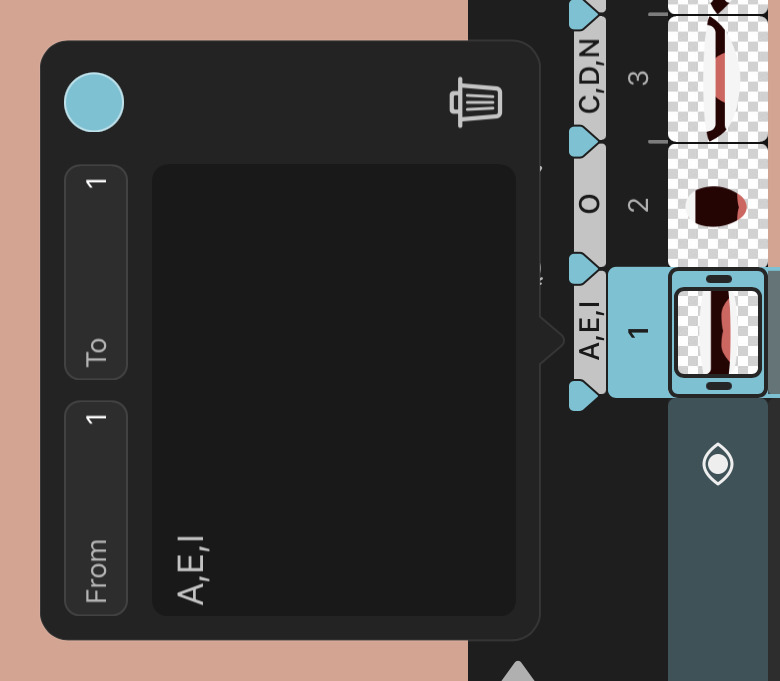
Tapping a frame marker opens a popover in which you can edit the selected marker. You can add a comment to be shown in the timeline, change the color of the marker and change the frames that it applies to with the From and To inputs.
By default, frame markers start and end on a single frame but you can also extend them to apply to multiple frames at once. There can be at most one marker on each frame of the timeline.
Looped Frame Markers#
Frame markers that span multiple frames can be defined as looping by tapping the loop button in the popover. When you now select this marker in a symbol layer, the inserted time keyframes are automatically configured to loop the animation.
Delete Frame Markers#
In order to delete markers from your timeline, either use the delete button in the frame marker editing popover shown above or select a frame with a marker, tap the frame number again and then tap Delete Marker in the list of options.
#
Interface
Library
The library interface is used in multiple places across ToonSquid. You'll use it to organize projects, assets such as animation clips, audio and video clips and brush textures.
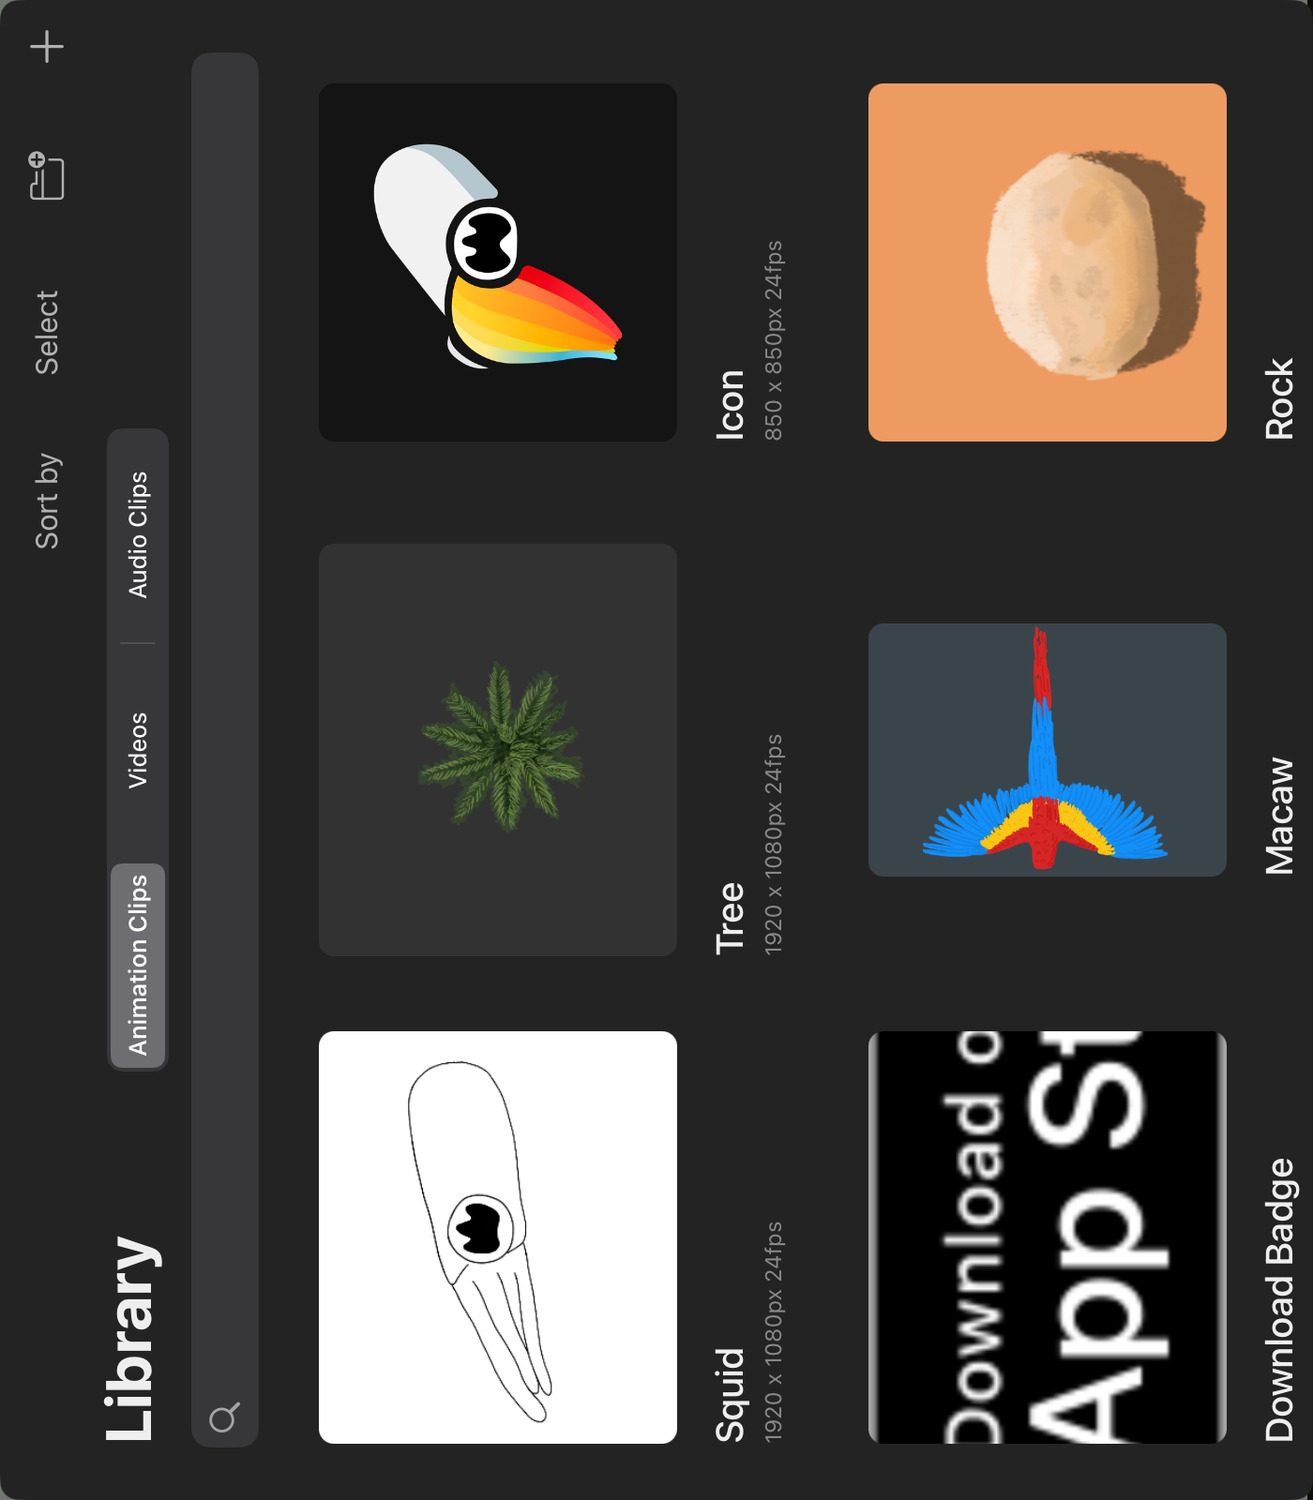
The different occurrences of the library behave very similarly with the exception that not all buttons are available everywhere.
This interface shows the items within a library with their name, commonly a thumbnail and some additional information, such as the resolution and frame rate of a project.
Tabs#
If the library contains different types of content such as animation, video and audio clips, you can select which type should be visible with the tabs at the top.
Add Content#
Tap the + button in the top right corner to add more content to the library. Other pages cover the process of creating new animation clips, creating new projects and importing video clips and audio clips in detail.
Tip#
You can also drag and drop files with supported file types from other apps to import them into ToonSquid.
Folders#
Tap the button with the folder icon to add a new folder to the library. Alternatively, drag and drop an item onto another item in the library to combine them into a new folder.
You can use folders to organize your projects and assets. Note that the folders that you add to the asset library of a project exist in all tabs of the library.
Tap on a folder to open it and see its contents. Tap the name of the folder in the top left corner to go back to the previous folder.
You can use drag-and-drop to move items into folders. In order to move an item out of the folder that it's currently in, drag it to the name of the folder in the top left corner and hold it there for a moment. The name will start flickering and the library interface will switch to the parent folder, where you can then drop the item. Similarly, drag and hold an item over a folder to navigate into it.
Search#
Use the search bar above the contents of the library to quickly find the items that you are looking for. This searches the items based on their name.
Use the small cross icon to clear the search and see all items in the library again.
Sort#
Use the Sort by button to change the order of the items in the library. You can sort them by name and by their last modified date. The project library can also be sorted by creation date or by kind, which sorts folders before projects and otherwise alphabetically.
Rename#
Tap the name of an item in the library to start editing it. When you are done, dismiss the keyboard or tap outside the name label.
Select#
You can switch into selection mode by either long-pressing on an item or by using the Select button.
Use the Done button (which replaces the Select button) to exit the selection mode once you are done.
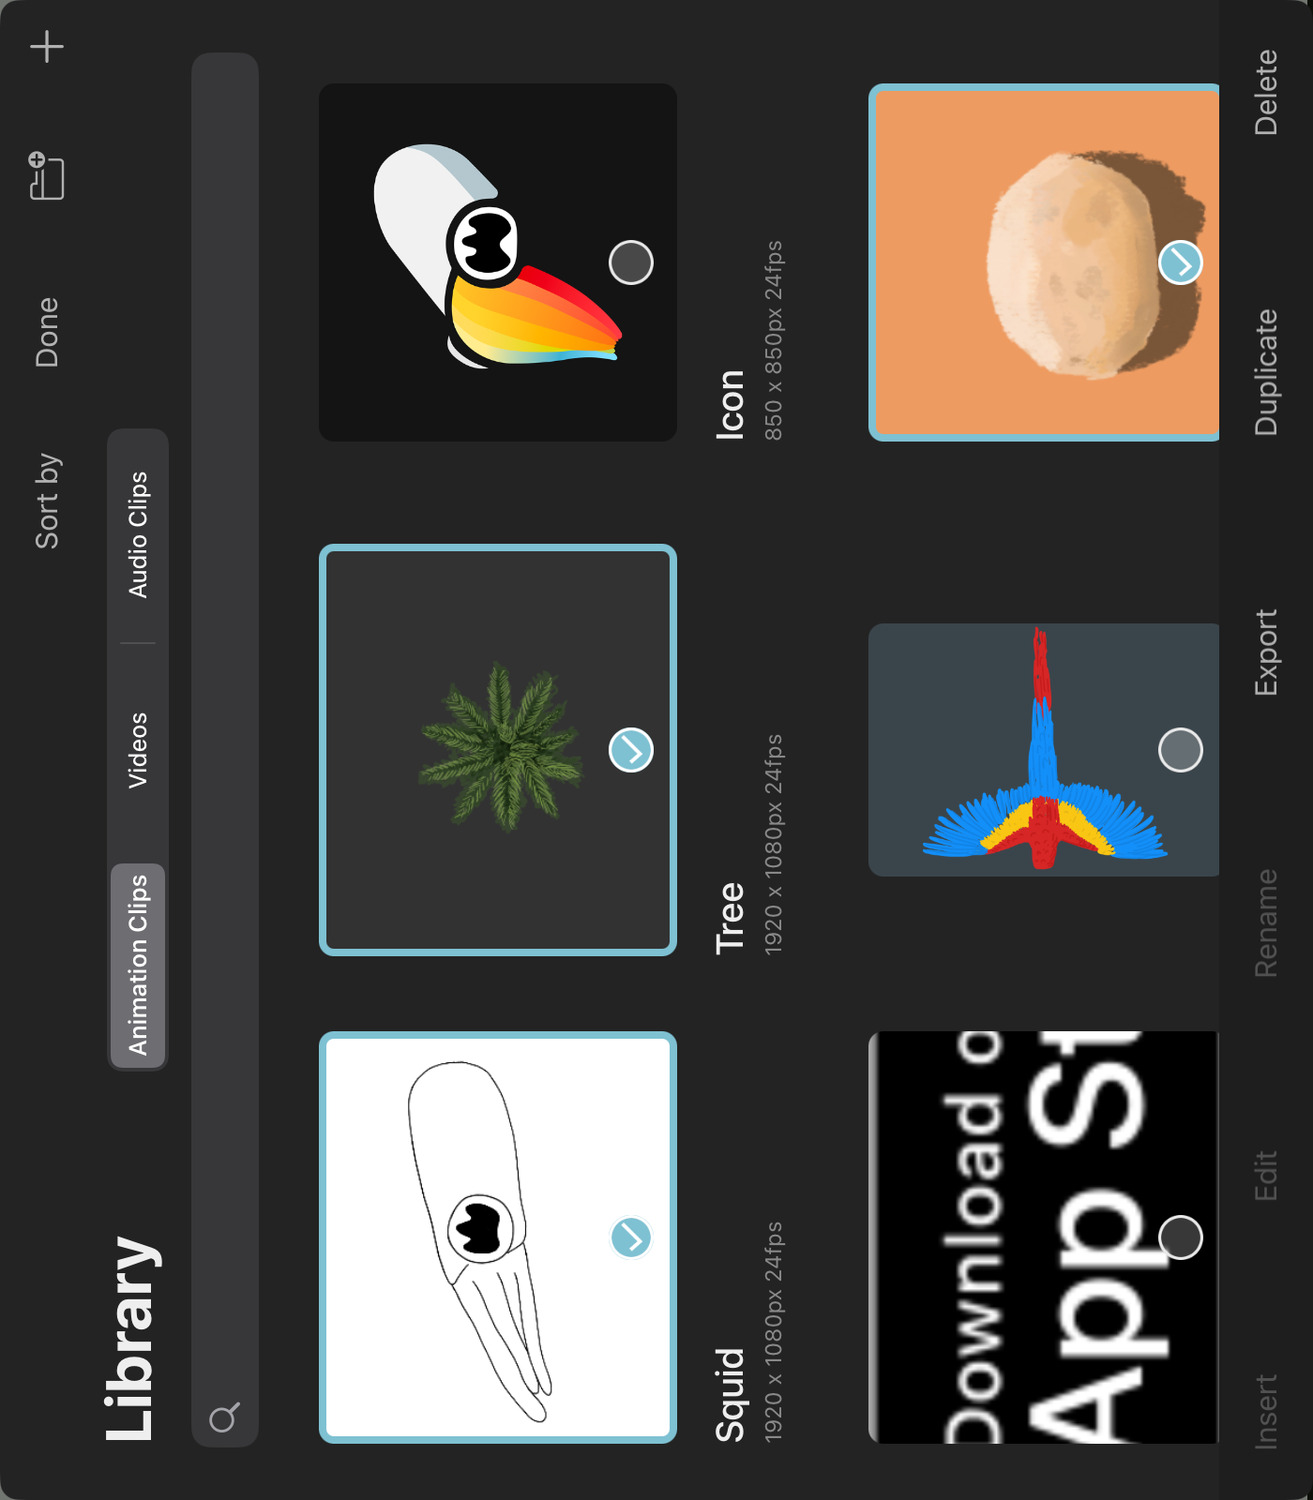
In the selection mode, you can tap individual items to add or remove them from the selection.
A toolbar at the bottom of the library shows the available options for the current selection of items. Some options are only available if exactly one item is selected.
Insert#
Inserts the selected animation clip, video clip or audio clip into the current animation timeline.
This is the default behavior of tapping an item in the asset library outside of the selection mode.
Edit#
Opens the selected project or animation clip to be edited in the editor.
Rename#
Prompts the item to be renamed.
Export#
If the selected item is a project, the project is exported and a screen is opened for you to choose a location to save it.
If the selected item is an animation clip, the export interface is opened to export the selected clip.
When you have one or more assets selected, open the export interface and choose the project export option, the exported project will only contain your selected assets.
Duplicate#
Duplicates the item in the library.
Delete#
Deletes the item from the library.
Deleting assets (animation clips, videos, audio clips) from the asset library is undoable. However, deleting projects is not undoable, so consider creating a backup of your projects before you delete them.
#
Interface
Gestures
ToonSquid takes advantage of the iPad's multitouch screen and offers multiple intuitive touch gestures to ease your workflow.
Pinch to Zoom#
Pinch on the canvas with two fingers to zoom in and out. Move your two fingers while pinching to move the canvas.
Pinch out quickly to re-focus the canvas and center the pixel brush drawing area on the screen.
This behaviour can be disabled in the settings.
Undo and Redo#
Tap with two fingers to undo the previous edit.
Tap with three fingers to re-apply the previously undone edit.
Pipette#
Touch and hold on the canvas to temporarily switch to the pipette tool to select a color from the canvas. By default, this is only enabled for touches with your finger, but you can also enable it for the Apple Pencil in the settings.
Page Flip#
Swipe three fingers down or up on the canvas to scrub forwards and backward through your animation. This can be used to quickly preview the motion that you are animating without the need to even expand the timeline.
Read more about all the configuration options of this gesture in the settings.
Multi-selection of Drawings#
Double-tap the timeline and drag your finger to create a selection box in order to select multiple drawings or keyframes at once.
Alternatively, if you don't find the double-tap and drag gesture intuitive or reliable enough, you can disable it in the settings and use the Select Multiple drawing action instead.
Multi-selection of Layers#
Select multiple layers by swiping them to the right in the layer list and then letting go.
Apple Pencil Double Tap#
ToonSquid supports Apple Pencil's double-tap gesture. Go to the Apple Pencil section of your iPad's settings to configure whether a double tap on Apple Pencil should switch the selected tool, show the color palette or do nothing.
#
Interface
Keyboard Shortcuts
If you have a keyboard attached to your iPad, you can use a variety of keyboard shortcuts to efficiently navigate the editor. You can find the list of all default shortcuts below and in the settings.
Custom Shortcuts#
All of these keyboard shortcuts can be customized to fit your personal preferences.
In order to use a custom shortcut:
- Tap the shortcut that you want to change. It should now read
Press Shortcut Keys…. - Press the key combination on your keyboard that you would like to use as the new shortcut.
You will be notified if the same shortcut is already used for a different action. In this case, either choose a different shortcut or change or remove the existing use of it. Each shortcut can only be used for a single action at a time.
Custom shortcuts are highlighted in a different color than default shortcuts.
Removing Shortcuts#
In order to remove a shortcut, tap the small x next to the shortcut.
- Tap the
xto replace a custom shortcut with the default shortcut for the same action. - Tap the
xto remove a default shortcut and leave the action without a shortcut. - Tap the
xto restore the default shortcut if the action has no shortcut.
If you try to restore the default shortcut, but the same default is already used as a custom shortcut for another action, you will be notified and the selected action is left without any shortcut.
Default Shortcuts#
Here is the list of default keyboard shortcuts in ToonSquid. ⇧ represents the shift key, ← ↑ ↓ → are the arrow keys, ⌥ the option key and ⌘ is the command key on your keyboard.
Undo#
⌘Z
Redo#
⇧⌘Z
Copy#
⌘C
Paste#
⌘V
Copy Animation Layer#
⇧⌘C
Select All Layers#
⌘A
Delete#
⌫
Duplicate#
⌘D
Add Drawing#
⇧A
Duplicate Drawing#
⇧D
Extend Drawing#
⇧E
Previous Frame#
,
Moves the play cursor to the previous frame.
Next Frame#
.
Moves the play cursor to the next frame.
Previous Drawing#
⇧,
Moves the play cursor to the previous drawing.
Next Drawing#
⇧.
Moves the play cursor to the next drawing.
First Frame#
⌥⌘,
Moves the play cursor to the first frame.
Last Frame#
⌥⌘.
Moves the play cursor to the last frame.
Play / Pause#
Space
Move by 1 pixel#
←, ↑, ↓, →
Move by 10 pixels#
⇧←, ⇧↑, ⇧↓, ⇧→
Tool Selection#
Transform#
V
Selection#
M
Brush#
B
Eraser#
E
Smudge#
S
Fill#
G
Pipette#
I
Text#
T
Path#
P
Other Shortcuts#
Decrease Brush Size#
[
Increase Brush Size#
]
Decrease Brush Strength#
{
Increase Brush Strength#
}
Export#
⌘E
Settings#
⌘,
Library#
⌥L
Drawing Guides#
⌥G
Ruler#
⌥R
Edit Drawing Guides#
⌥⇧G
Fullscreen Mode#
F
Color Picker#
⌥C
Drawing Layer List#
⌥D
Properties#
⌥P
Timeline#
⌥T
Close Menu#
Esc
Zoom In#
⌘=
Zoom Out#
⌘-
Zoom To Fit#
⌘0
Rotate Canvas by 15°#
⌥=
Rotate Canvas by -15°#
⌥-
Flip Canvas Horizontally#
⌥H
Flip Canvas Vertically#
⌥V
#
Projects
Overview
ToonSquid projects store your drawings, layers, scenes, animation clips and all other data that you need while working on an animation.
Create a new Project
Creating a new project is the first step in the life of each one of your animations. Learn about all available project configuration options.
Manage Projects
Explore the project library, where you manage all of your animation projects.
Scenes
Every ToonSquid project consists of one or more scenes within which you will create and organize your animations.
Crop
Learn how you can use the crop tool to change the resolution of your project or of an animation clip after it was created.
Backup
ToonSquid gives you direct access to all of your valuable user data such as projects, brushes and color palettes and various options to create backups of that data outside of the app.
#
Projects
Create a new Project
In the project library, tap the + button in the top right corner. You are then presented with different configuration options for your new project.
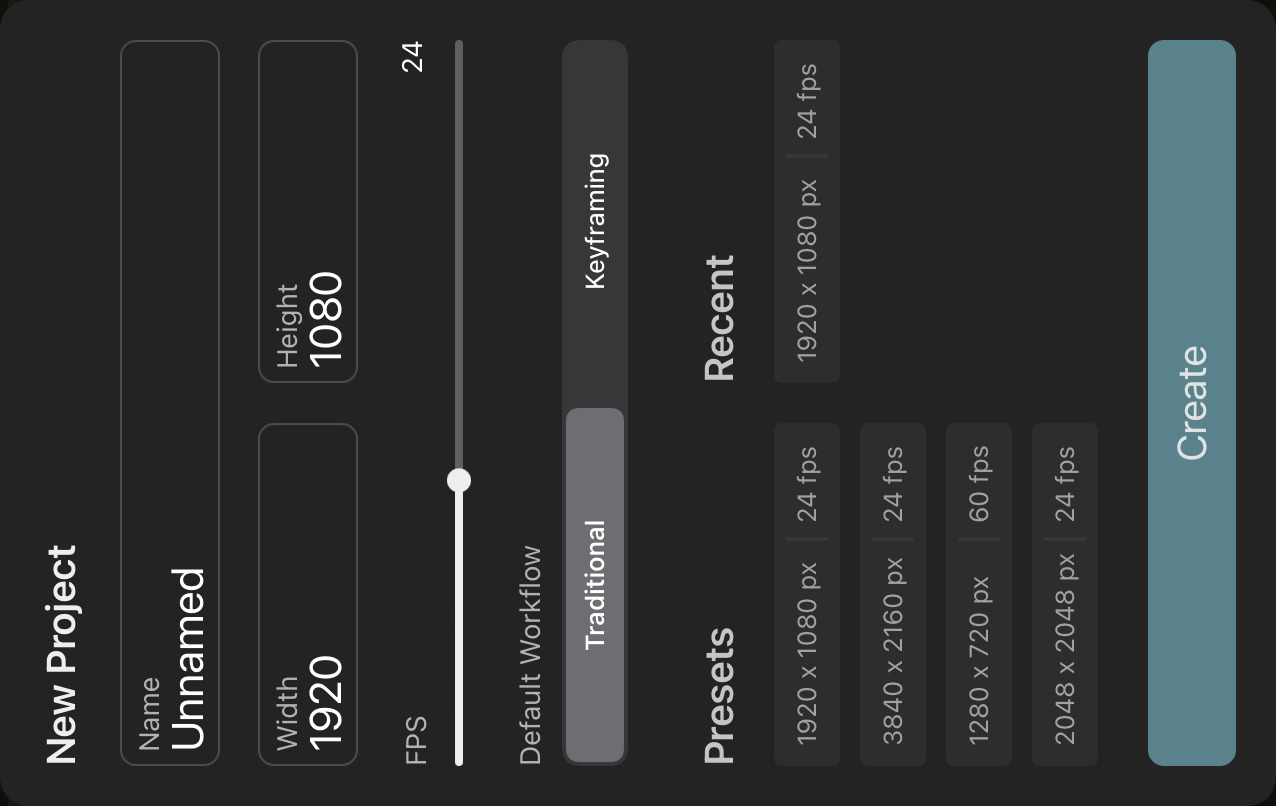
Name#
The name under which the project shows up in the project library. The name can also be changed later at any point. Multiple projects can have the same name.
Resolution (Width and Height)#
The pixel resolution of the project.
The resolution determines how much space you have to draw on pixel layers. The higher the resolution is, the more detailed your drawings can be, which also leads to larger project folder sizes.
It is also used as the default export resolution and the size of the area that will be exported by default. However, both of these aspects can be adjusted later on, either in the export settings or by using a camera layer.
All scenes in a project have the same resolution as the project, but it is also always possible to create animation clips with different resolutions than the project they are in.
You can change the resolution of the project or the current clip after it has been created with the crop tool.
The maximum project resolution is 4096x4096 pixels.
FPS#
The FPS (frames per second) or frame rate of a project determines how many frames of your animation are played back during each second of playback. A high frame rate causes a smoother playback, whereas a low frame rate can make your animation feel choppy.
The frame rate is not used to speed up or slow down animations. For that purpose, you should adjust the timing of your drawings and keyframes in the timeline.
ToonSquid supports frame rates between 1 and 60 fps.
You can change the frame rate of a project later on, even though this is not common practice in a typical animation workflow.
Default Workflow#
The project can be created with different default editor settings to help you in your primary workflow.
You can choose between defaults for a traditional animation workflow or a keyframing / motion graphics workflow.
Traditional#
- New drawings have a default length of 1 frame and start at the currently selected frame.
- The timeline is initially zoomed in and shows a few frames at a time.
Keyframing#
- New drawings have a default length of 5 seconds and start at the beginning of the timeline.
- The timeline is initially zoomed out and shows a range of multiple seconds.
All of these settings can be adjusted later on in the editor. Every project is inherently compatible with all workflows - i.e. you can always use traditional animation and keyframing in the same project.
Presets#
The project configuration screen shows both a list of generally common configuration presets for the resolution and frame rate as well as the most recently selected configurations that you can use to quickly set up your project.
Create#
Tap this button to create a new project with the current configuration. The project is immediately opened in the editor for you to start working on your next masterpiece.
#
Projects
Manage Projects
The project library is the first screen you see when you open ToonSquid. This is where you manage all of your ToonSquid projects.
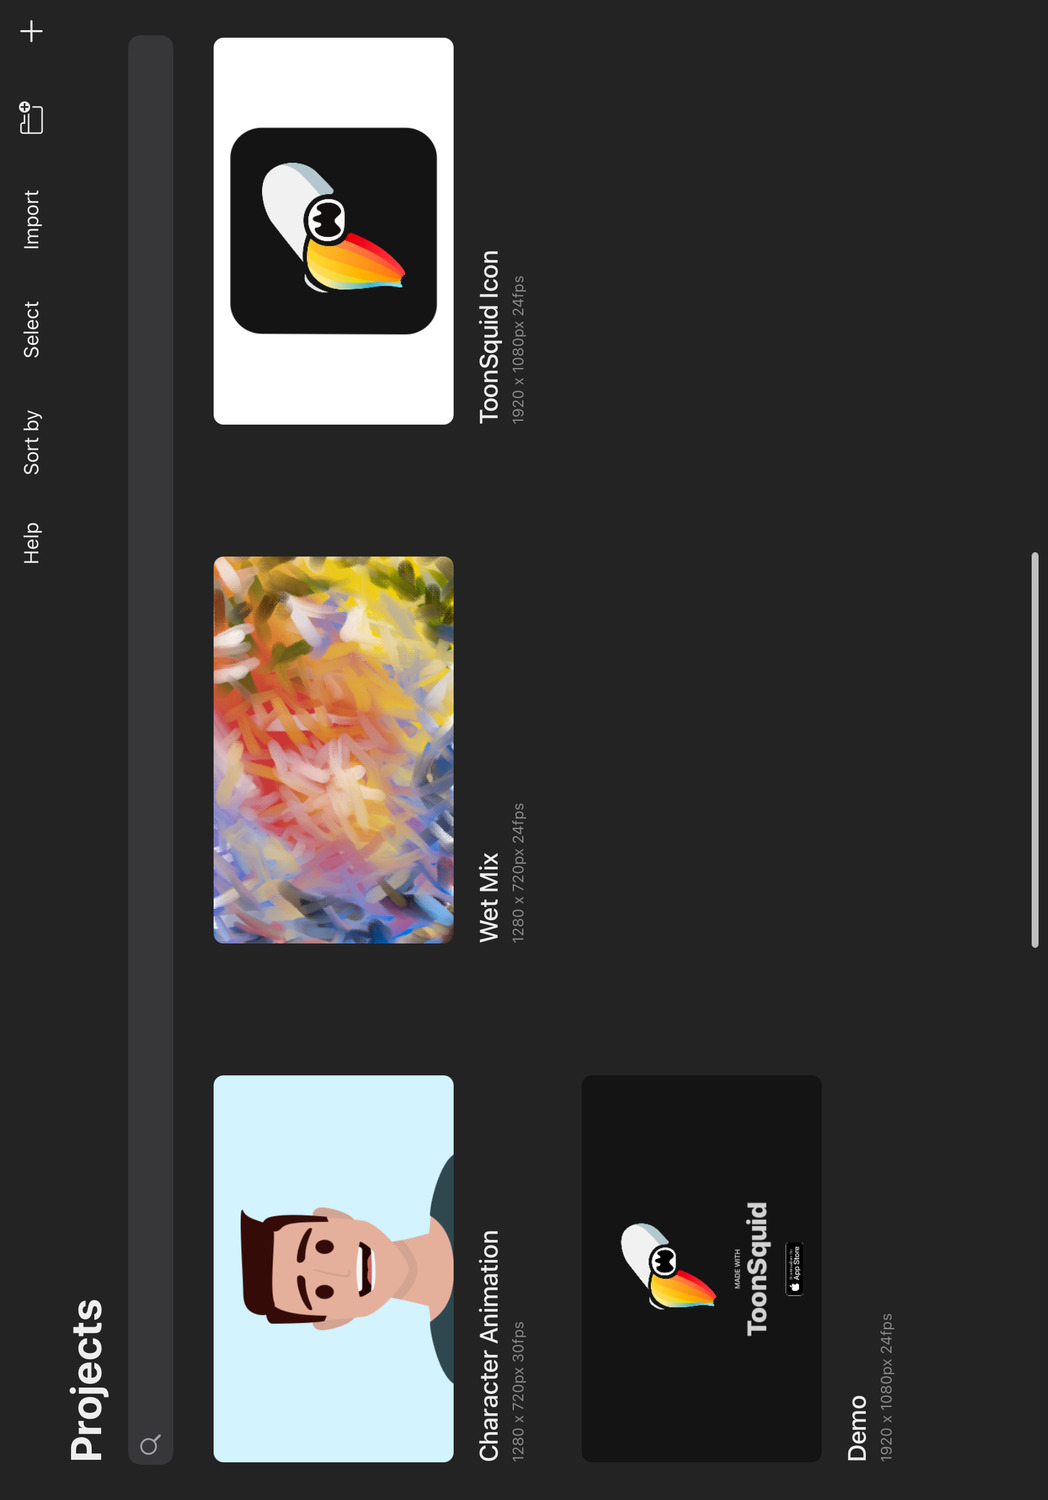
The project library uses the general structure of the library interface.
To create a new project, tap the + button in the top right corner. The exact steps for this are explained here.
Import#
Use the Import button in the toolbar to select and import a project file with the .tsproj extension into your project library.
Export#
You can export your projects either directly from the project library, or via the export interface of the editor. Follow the steps described on the library interface page to select and export the selected project.
The resulting file will have a .tsproj extension, indicating that it is a ToonSquid animation project.
Help#
In addition to the other library toolbar buttons, a help button is also shown in the project library so that you can quickly access support resources if needed from the very first screen of the app.
#
Projects
Scenes
Scenes are used to organize your animations in a ToonSquid project. Each project is made up of one or more scenes, which all have the same resolution and frame rate as the project. Each scene has a timeline in which you can create your animation.
The first scene of a project is created automatically when the project is created. It is possible, but not necessary, to create additional scenes. A single scene is usually enough for most projects. If you have a very long animation, you can consider splitting it up into different scenes, which you can then later export as a single long video. Whether and how exactly you use scenes to organize your project is ultimately your choice.
The name of the currently selected scene is shown in the playback toolbar of the timeline.
Manage Scenes#
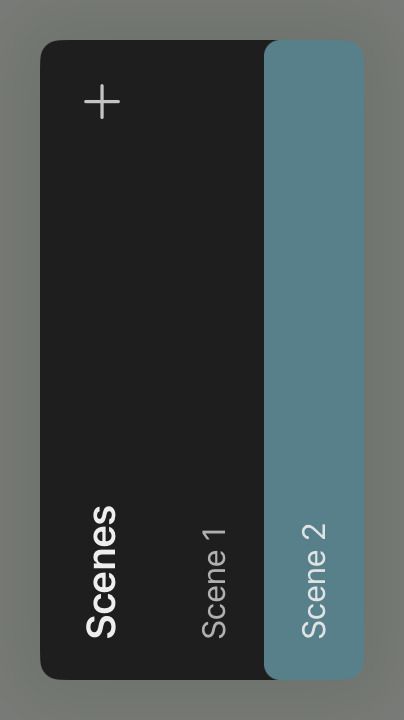
Tap the name of the current scene in the timeline to see the list of all scenes in the current project.
Add Scenes#
Use the + button at the top to create a new scene. New scenes are created and opened in the editor immediately. Tap the name of the selected scene again to switch between your scenes.
Rename, Duplicate and Delete#
Swipe left on the name of a scene in the list of all scenes to reveal the options to rename, duplicate or delete that scene.
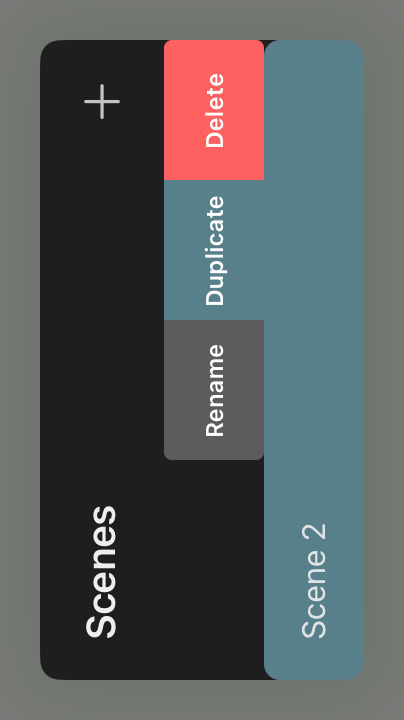
If the only remaining scene of a project is deleted, a new empty scene is automatically created.
Just like all other edits within a project, deleting a scene can be undone.
Reorder#
You can use drag and drop in this list to change the order of the scenes in a project. The order is only important if you want to export all scenes of the project as a single video. Otherwise, the order does not matter.
#
Projects
Crop
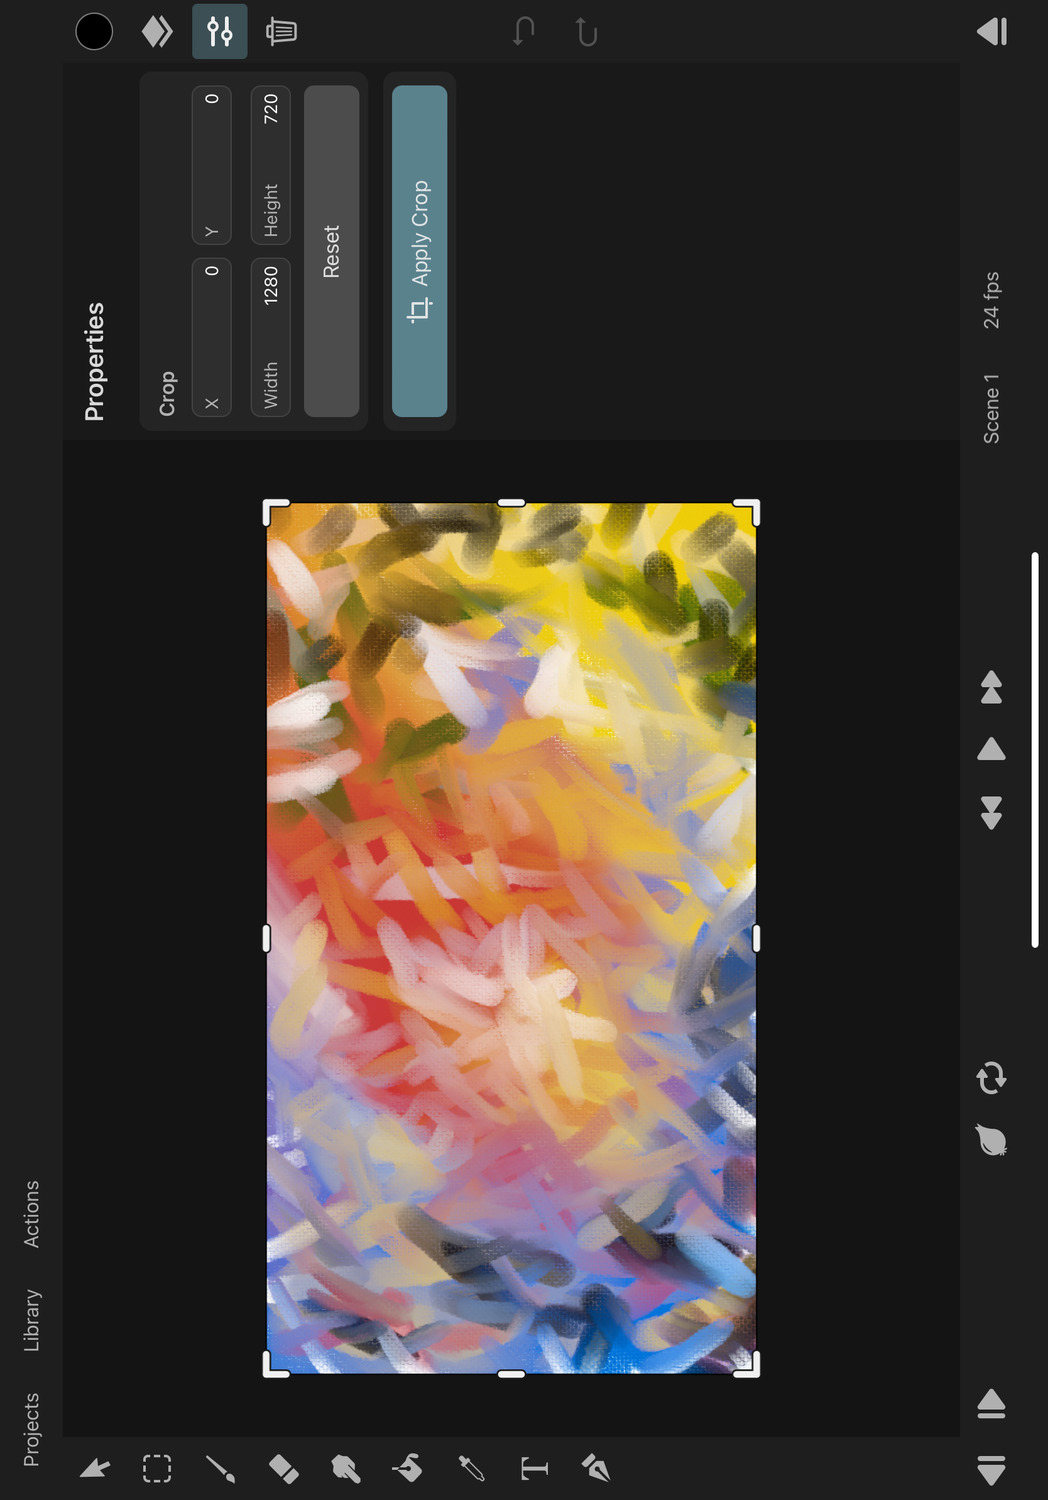
The crop tool lets you change the available pixel layer drawing region and resolution of a project or animation clip.
Open the Crop Tool#
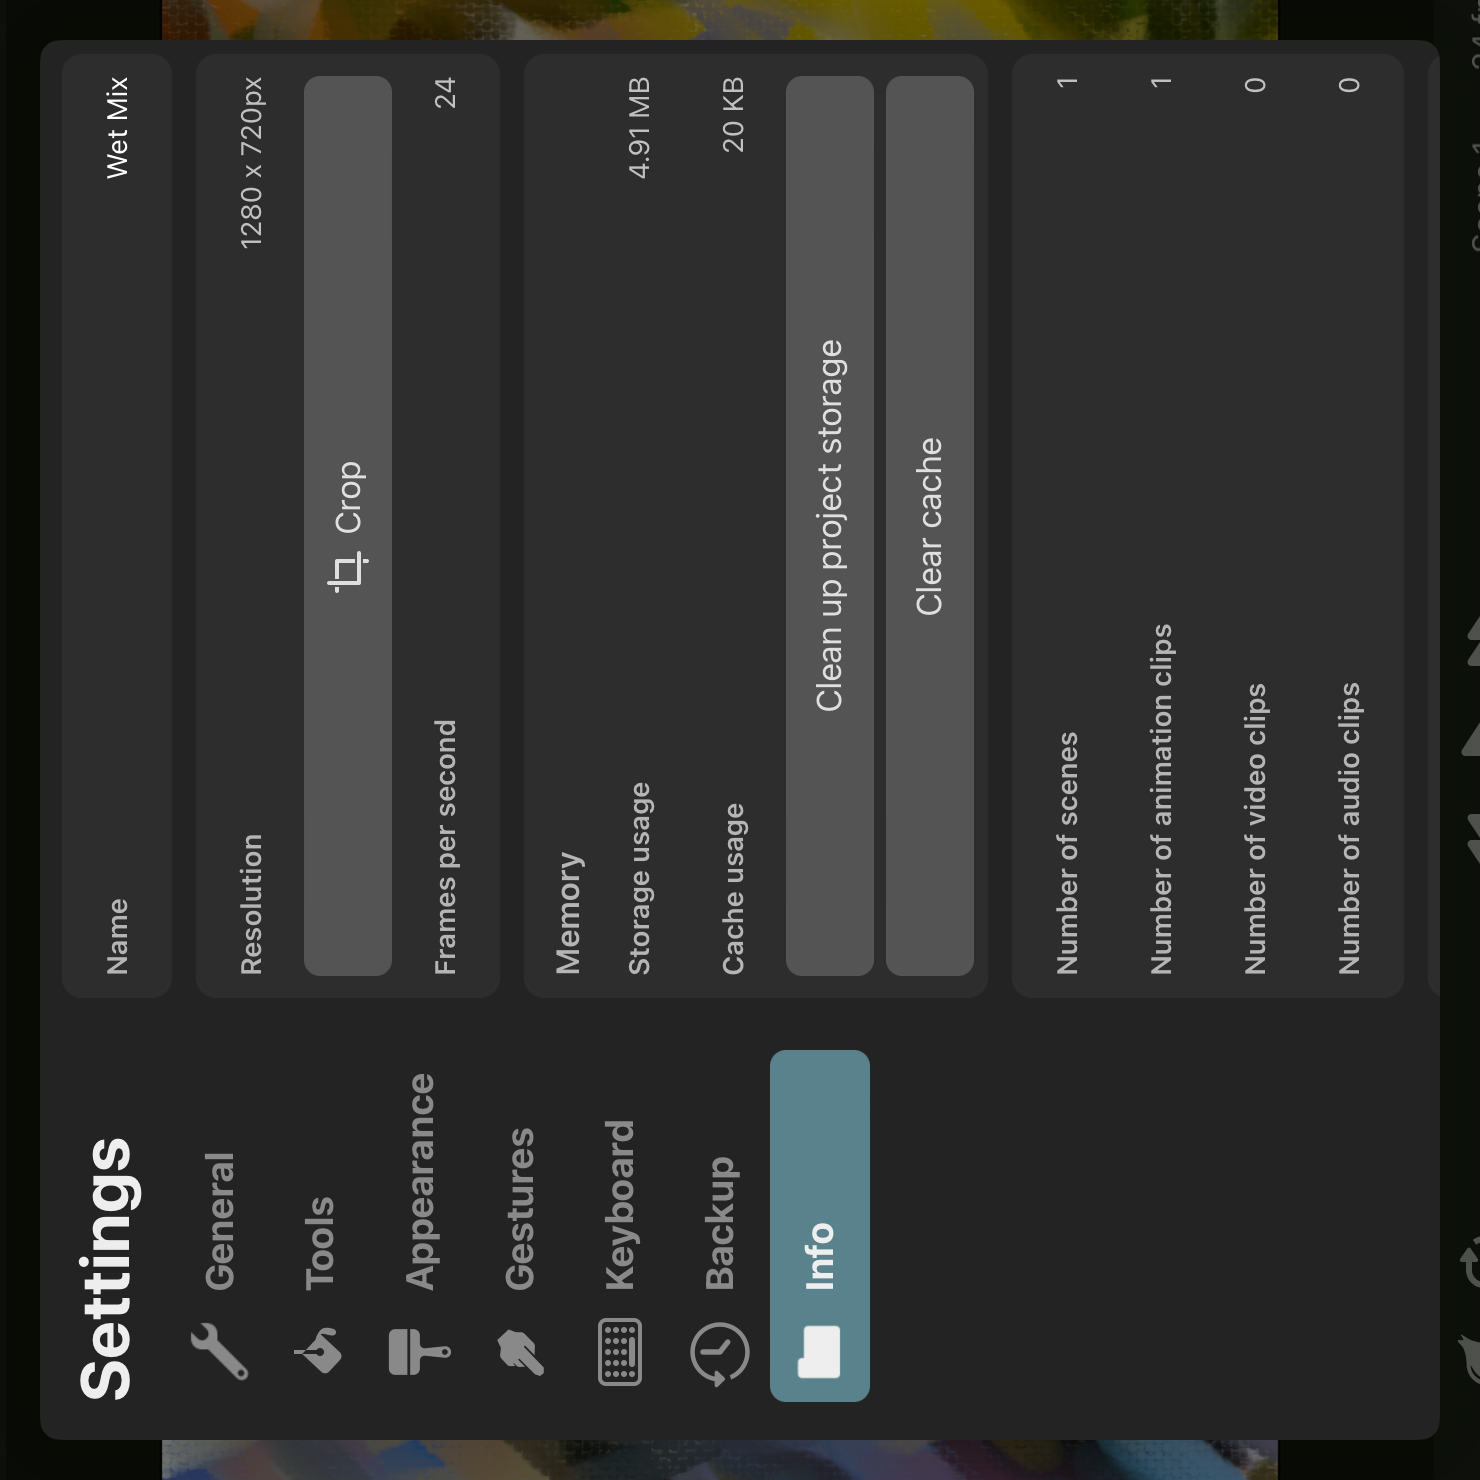
To switch to the crop tool, open the settings menu, select the Info tab and tap the Crop button.
Edit the Crop#
With the crop tool selected, drag the handles on the edges of the canvas to edit the crop region. Alternatively, you can use the X, Y, Width and Height input fields in the inspector to enter the exact offset and size of the crop region.
You can also touch and drag the crop region around on the canvas without changing its size.
The Reset button resets the crop region to its default values.
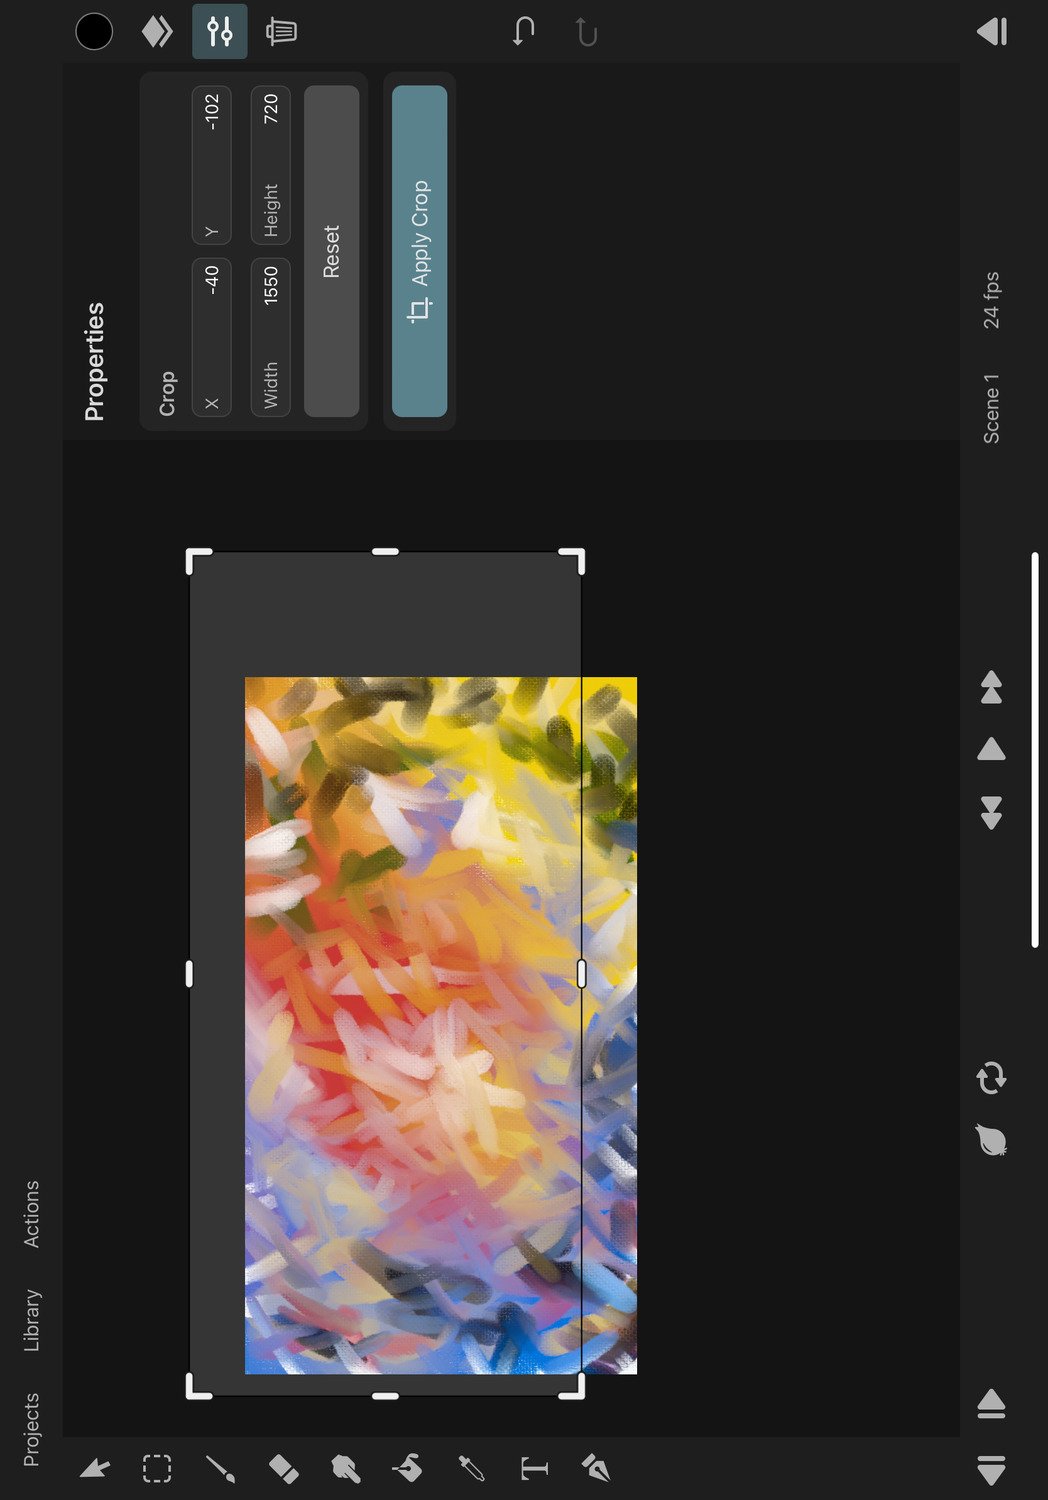
Apply the Crop#
Once you are happy with the crop region, tap the Apply Crop button to apply the crop to the current project or animation clip.
If you are currently editing one of the scenes of the project, the crop will be applied to all other scenes as well, because all scenes need to have the same resolution. If you are editing a separate animation clip, the crop will only be applied to that clip.
All crop edits are undoable.
Pixel Layers#
Most layer types - e.g. vector, text, symbol or transform layers - are not affected by the resolution of the project or animation clip, so applying a crop edit only shifts them so that they maintain their previous global position in the animation.
However, pixel layers have a resolution limit that is defined by the project or the resolution of the animation clip that they are in. Applying a crop changes this resolution limit and therefore the drawable area of every pixel layer. All pixels that are outside of the new crop region of each layer will be deleted.
If some of the pixel layers have been shifted away from their original position or have been rotated or scaled, it is important to understand that the crop is applied in each pixel layer's local coordinate system. This means that the pixels in the layer are cropped as if the layer was not moved, rotated or scaled. This can be easy to forget, therefore causing potential confusion in such cases, so it is generally recommended to apply the crop before editing the transform properties of pixel layers.
Camera Layer#
The resolution of the camera layer is not changed when applying a crop. You can change its resolution afterwards in the inspector.
#
Projects
Backup
Learn about the mechanisms that ToonSquid provides to keep your valuable work safe.
Autosave#
ToonSquid automatically saves your projects at regular intervals while you are working on them. Your project is also saved each time you go back to the project library or close the app.
Backup#
As with any other of your important data, you should always keep a copy of your ToonSquid projects somewhere else so that you can recover your work in case something unexpected happens to the main project file that you are working on.
This could for example be caused by your iPad running out of storage, the operating system quitting the app without a warning, your iPad turning off due to an empty battery, a yet undiscovered bug in the app or if you made a mistake such as drawing over the wrong layer or accidentally deleted a layer with lots of important drawings without noticing the error until after you already closed the project.
Backup Process#
Fortunately, ToonSquid makes the backup process easy for you: By default - after every 20 minutes of working on a project - an alert will pop up on screen to give you the option to quickly create a backup of that project with a single button tap. You can also go to the settings to change the interval of this reminder or to create a new backup immediately.
This will store a full copy of your current project in a separate folder under On My iPad > ToonSquid > Backup. In this directory you will find one folder for each one of your projects which contains all of the backups for that project. Each backup file is numbered increasingly (i.e. Backup 1.tsproj, Backup 2.tsproj …).
By default, ToonSquid keeps the latest two backups for each project and deletes older ones automatically every time a new backup is created in order to limit how much storage space these backups use on your iPad. You can also change this number in the settings.
In addition to these short-term backups, the oldest of which is automatically deleted, ToonSquid also keeps one backup file for up to one day before it is replaced with the latest state of the project. This ensures that even if your project partially corrupts without you noticing and you then overwrite the short-term backups with new backups, you are still likely to be left with an older backup to hopefully restore your animation from. This file is named Backup LT.tsproj.
Importing a Backup#
In order to import a project backup, follow these steps:
- Tap the Import button.
- Go to
On My iPad > ToonSquid > Backup. - Find the folder that starts with the name of your project.
- Select one of the backups in that folder.
What to do in case of a possibly corrupted project?#
- Do not create new backups of this project, since they will replace your old backups that hopefully contain the undamaged state of the project.
- Import the latest backup as described here.
- Just to be sure, copy those backup files from the backup folder onto a separate device (e.g. a desktop computer or USB stick).
- Notify contact@toonsquid.com and include the corrupted project file if possible so that the underlying reason can be investigated. Finding and fixing bugs related to potential data loss has a very high priority!
File Export#
Projects, brushes and color palettes all have in-app export options that generate easily shareable files. Follow the links above to learn where you can find those options. Always use these built-in ways to back up your data outside of your iPad whenever possible.
All of these files are automatically included in a full backup of your iPad.
Direct Data Access#
In addition to the options presented above, ToonSquid also gives you direct access to all your valuable data (projects, brushes, color palettes, fonts) for easy backup and data recovery purposes in cases of emergency.
You can find all of this data in the Files app of your iPad under
On my iPad > ToonSquid
Warning
Only use the in-app approaches to exporting these files from ToonSquid whenever possible. This access is only for emergency scenarios in case you cannot open the app for whatever reason and are preparing to reinstall it. This way you won't lose any of your valuable data after re-installing.
Only use this for backing up your files, never delete or edit or otherwise modify any of the files in the "Projects", "Brushes" and "Palettes" folders.
You can copy the entire contents of these folders and then paste them to the same location on a different iPad or the same iPad after deleting and re-installing the app.
#
Layers
Overview
Add content to your animation and define their order using layers.
Animation Layer
Animation layers are the most common layer type that you will find in the timeline. They let you add drawings, which hold the actual contents of your animation.
Drawings
A drawing is a collection of layers that are displayed together for a given period of time within an animation layer. Learn about how drawings and their content can be created and edited.
Layer Types
ToonSquid offers different types of layers, each one for a particular purpose and with a unique set of properties.
Layer List
The layer list is the interface to let you see and edit your layers and their order in the timeline and in a drawing.
Inspector
View and edit all properties of the selected layer in the inspector.
Pixel Layer
Pixel layers are the drawing destination for pixel brushes. The size of these layers is limited by the project or clip resolution.
Vector Layer
Vector layers are the default drawing destination for vector brushes. They store their contents as vector shapes and can be edited with the brush, eraser, smudge, fill and transform tools.
Group Layer
Group layers allow you to organize other layers together, both in the timeline and within a drawing.
Background Layer
The background layer exists in every animation. It is very simple but still has some interesting properties to be aware of.
Camera
Add a camera layer to an animation to define which portions of the animation should be seen during the export.
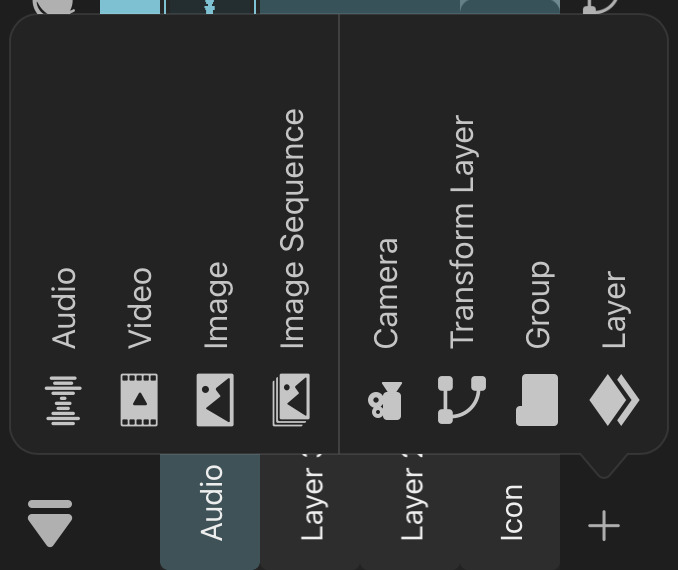
Audio
ToonSquid allows you to add audio clips into the timeline via audio layers.
Video
Learn how to import and add videos into your animation.
Onion Skinning
Onion skinning lets you see the contents of the previous and next drawings to help with drawing in-betweens in a traditional animation workflow.
Masking
Layers can be masked by the contents of another layer, even if both layers are animated. The mask itself can also be hidden and inverted, allowing you to quickly achieve impressive effects with ease.
Blend Modes
Every visual layer has a blend mode property. Explore the behavior of every blend mode in detail.
#
Layers
Animation Layer
Animation layers are the most common layer type that is placed directly in the timeline. They hold drawings, which contain the actual visual contents of your animation.
The handbook might sometimes also loosely refer to any layer in the timeline as an "animation layer" as opposed to the drawing layers within drawings.
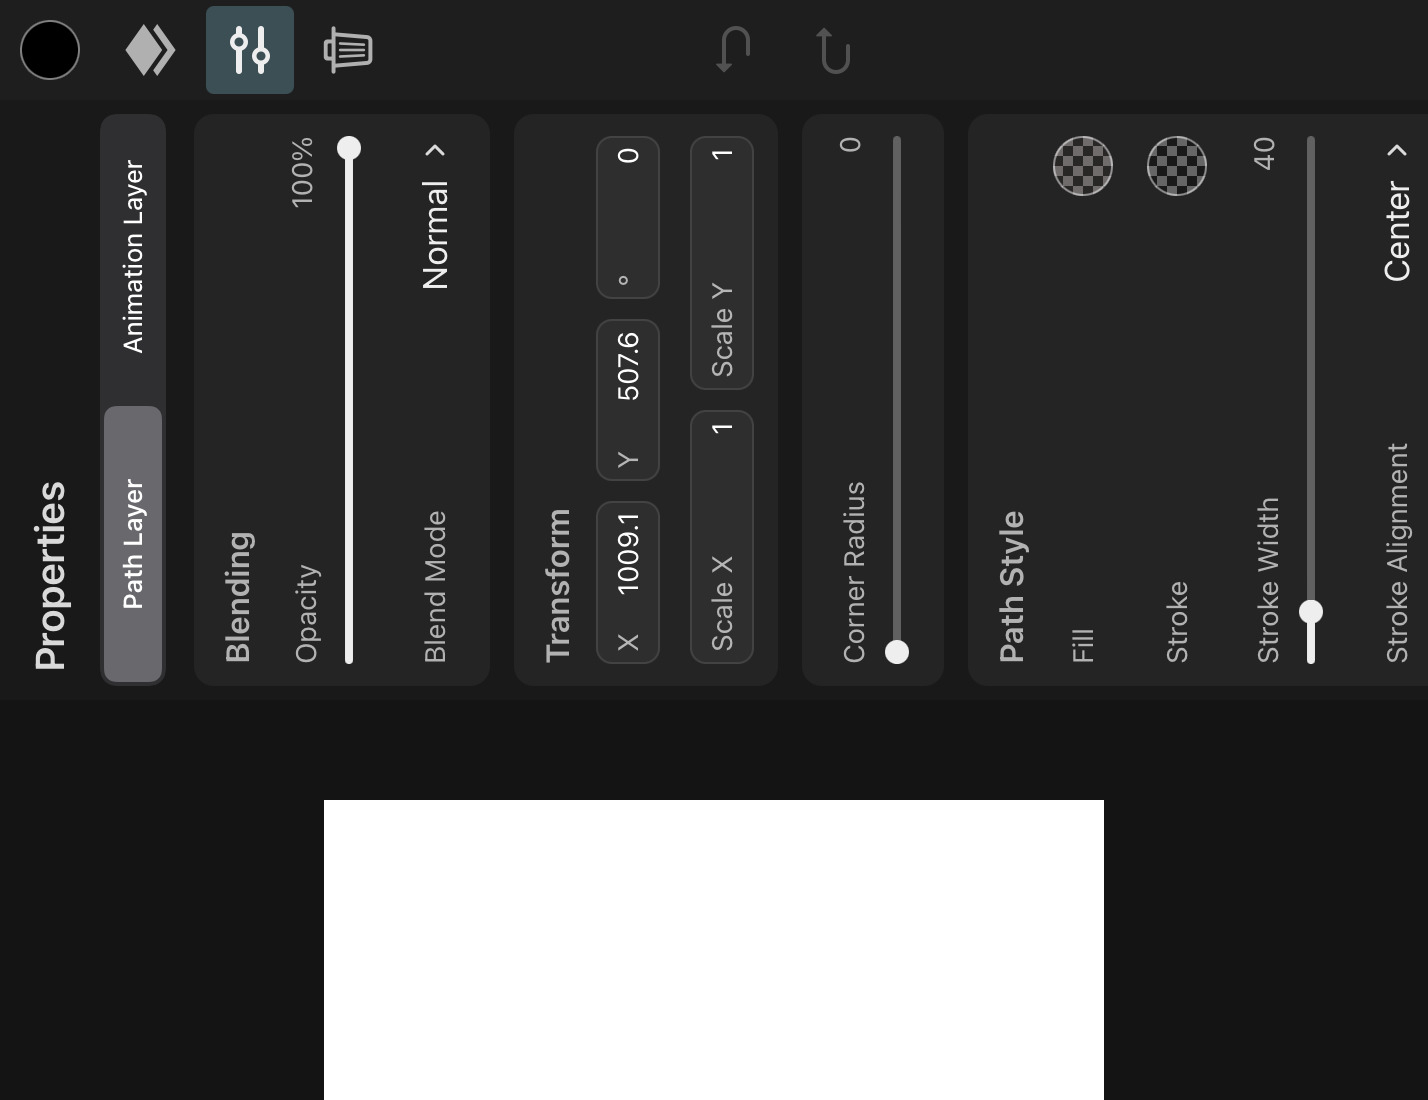
Properties#
Open the inspector and select the Animation Layer tab to see the properties of the selected animation layer.
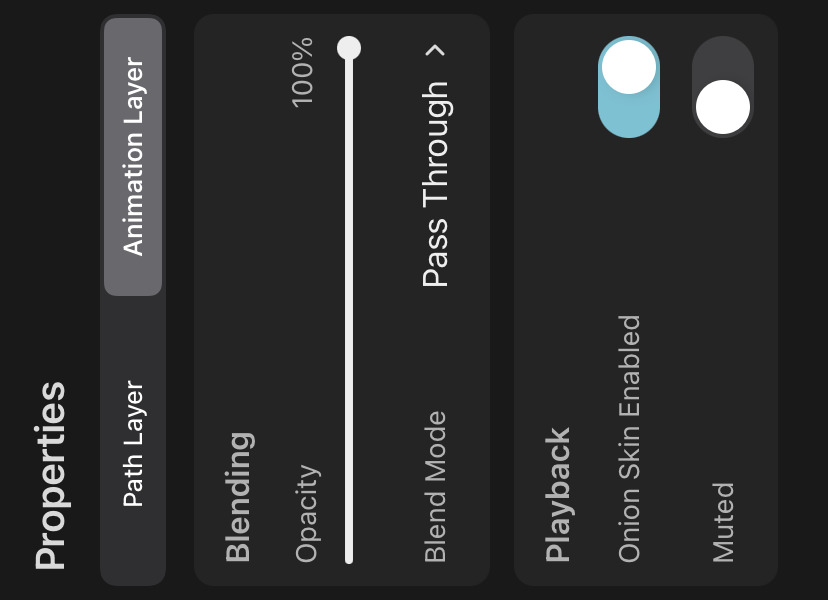
Opacity#
The opacity with which all layer contents (in all drawings of this layer) should be blended onto the layers below.
Blend Mode#
The blend mode with which all layer contents (in all drawings of this layer) should be blended onto the layers.
Onion Skin Enabled#
Whether onion skinning should be enabled for this layer or not. Layers for which onion skinning is disabled show a small greyed-out onion skin icon next to their name.
Muted#
Used to mute audio playback for this animation layer.
Audio can be played back through animation layers if they contain symbol layers that reference an animation clip with audio.
#
Layers
Drawings
A drawing is a collection of drawing layers that are displayed together for a given period of time within an animation layer. They define the first and last frame on which those layers should be shown.
The drawing layers inside hold the actual visual content of your animation. You can see the list of drawing layers in the selected drawing using the layers button in the editor sidebar.
Timeline#
You can see the drawings of an animation layer in the timeline. This is also where you can select and retime drawings.
The timeline page covers all the details about editing drawings, ranging from creating drawings and multi-selecting them, over retiming to moving them in the timeline via drag and drop.
#
Layers
Layer Types
Layers in the Timeline#
Animation Layer#
Contains drawings with the visual contents of your animation.
Background Layer#
Adds a solid background color to the animation.
Audio Layer#
Allows you to add audio clips to the timeline.
Video Layer#
Allows you to add videos to the timeline. You usually don't interact with these directly but via a symbol in an animation layer instead.
Transform Layer#
Can be used to apply the same animated transformation to multiple layers at once by adding a new coordinate system to the transform hierarchy.
Camera Layer#
Defines the visible region of the animation during export and can be moved around like any other layer.
Group Layer#

Group layers can be used for organizational purposes, to collapse multiple layers in the layer list and to transform multiple layers at once. They also provide blending options which turn the layer into a pre-composite group.
Group layers can be placed both in the timeline and inside of drawings. Groups in the timeline can be used to loop their contents.
The brush, eraser, fill and transform tools and the cut & paste feature provide special treatment for vector groups, allowing you to edit the vector contents of the group similarly to how you can edit the contents of a single vector layer.
Drawing Layers#
Drawing layers cannot be placed directly in the timeline but must always be added inside a drawing.
Pixel Layer#
The drawing destination for pixel brushes. These layers store their contents as a raster-image.
Vector Layer#

The default drawing destination for vector brushes. These layers store their contents as vector shapes.
Path Layer#

Path layers are used to editable vector shapes to your animation, e.g. using vector brushes or the path tool. Each path layer can contain exactly one shape with one or more subpaths.
Text Layer#

Text layers are used to add text to your animation.
Symbol Layer #

Symbol layers are used to add other animation clips to a timeline. Referencing a different clip through a symbol layer allows you to reuse your animations efficiently.
#
Layers
Layer List
ToonSquid has two layer lists with the same basic interface. One shows you the layers in the timeline and the other shows the drawing layers in the selected drawing.
Add Layers#
Use the + button to add new layers. After tapping the button, you can choose which type of layer you would like to add.
When you add a new layer within a drawing, it is empty and has no specific type yet. Once you use a tool (e.g. the brush tool or the text tool) to draw on that layer, the layer automatically becomes one of the different types of drawing layers listed here.
If you have a group selected when you add a new layer, the layer is added inside the group.
Layer Order#
The layer list shows the order of the layers. The order of the layers in this list determines the order in which the layers are blended to form the final animation. In your artwork, lower layers appear behind layers that are further up in the layer list.
You can change the layer order by touching and holding a layer and then dragging it to its new position in the list.
If you drop a layer onto a group layer, it will be moved into that group.
Selecting Layers#
The layer list can also be used to select which layer you want to currently edit with the selected tool. Simply tap the layer that you want to select. The selected layer is highlighted in a different color than the other layers. You can edit the properties of this selected layer in the inspector.
You can also select additional layers, for example, to move them all at once using the transform tool. Swipe a layer to the right and then let go to add it to the selection. Repeat this gesture to remove it from the selection again.
Other editing actions that can be performed on multiple selected layers include deleting and locking.
If you tap the selected layer again, you will see further actions that can be performed on this layer.
The options for locking, duplicating and deleting the selected layer can also be accessed quickly by dragging the layer to the left.
Visibility#

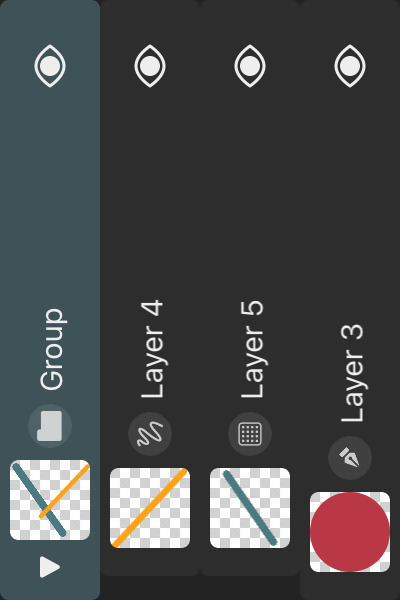
The visibility icon on every layer shows whether the layer should be visible or not. You can use it to completely hide the layer from the animation. When a layer is hidden, the visibility icon is greyed-out. Hidden layers cannot be selected on the canvas by tapping them.
Hiding a group layer will also hide all layers inside that group.
The different tools will generally avoid editing hidden layers to prevent you from making accidental edits without noticing.
Thumbnail and Layer Type#
Drawing layers show a thumbnail of their contents.
The type of the layer is shown to the right of the thumbnail.
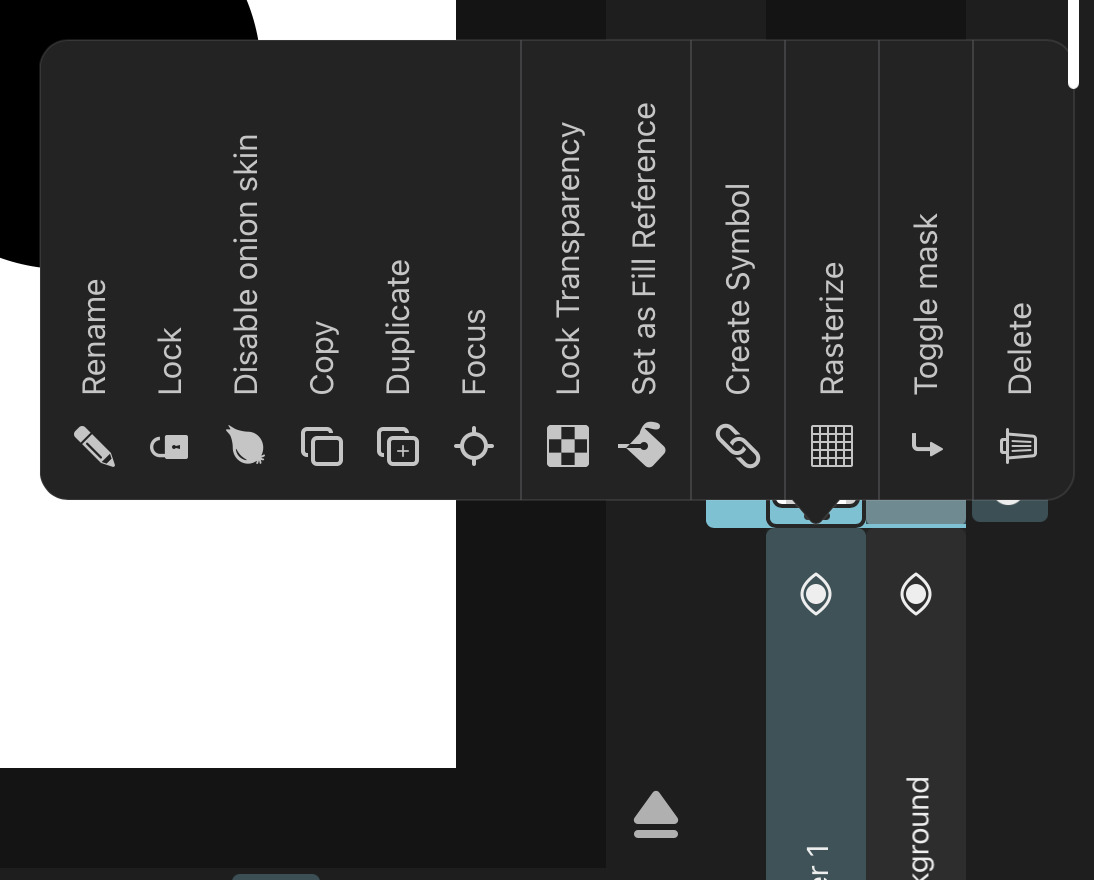
Layer Actions#
Tap the selected layer again to show further actions.
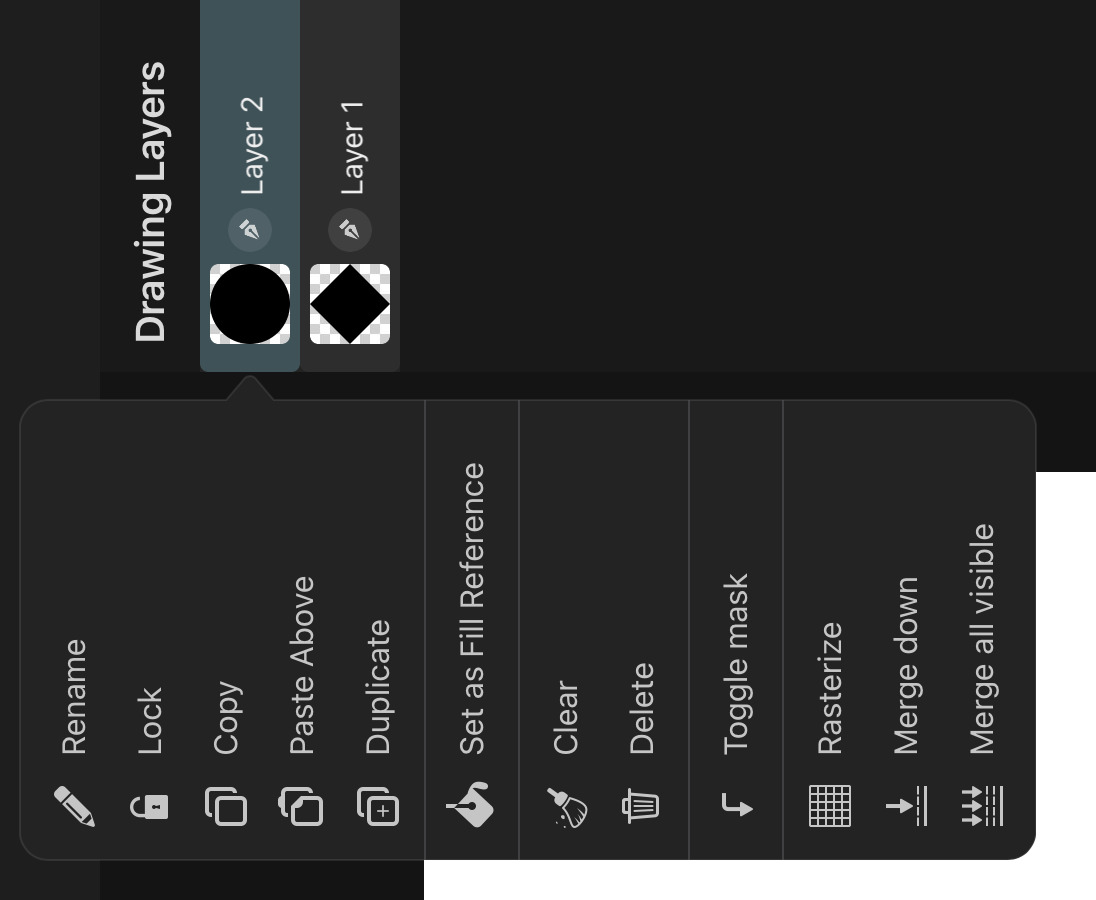
Rename#
Use this option to change the name of the layer.
Lock and Unlock#
Layers can be locked to prevent them from being edited accidentally. If a layer is locked, it shows a small lock next to the visibility button.
Locked layers cannot be selected by tapping on the canvas. Locked animation layers prevent any drawing and layer inside from being edited.
Copy#
Copies the layer so that it can be pasted somewhere else.
Paste Above#
Pastes the previously copied layers above the selected layer.
Duplicate#
Duplicates all selected layers.
Delete#
Deletes the selected layers.
Deleting a group layer also deletes all layers inside that group. And just like any other edit, deleting a layer is undoable.
Clear#
Removes all layer contents without deleting the layer itself.
If there is an active selection area and the selected layer type supports it, only the selected regions in the layer will be cleared.
For animation layers in the timeline, this option deletes all drawing layers from the drawings in the animation layer while keeping the timing of the drawings intact.
Masking#
Layers can be masked by each other's contents. Read all about masking and the available options here.
Rasterize#
Turns the layer into a pixel layer. In doing so, layers lose their vector functionality. Shapes and text that were previously in the layer won't be editable as such anymore.
The new pixel layer will contain the contents of the original layer on the currently selected frame. If the layer previously had keyframes to animate its contents, those are lost as well.
Effects that may be applied to the layer are not rasterized and remain editable after the layer has been turned into a pixel layer. You can rasterize effects as described here.
Merge Down#
Merges the selected layer and the layer below into a single layer, replacing the original two layers.
- If the layers are both vector groups with an opacity of 100%, a
Normalblend mode, no effects and are not being masked to other layers, then their contents are merged into a new vector group. - If the layers are both vector layers with an opacity of 100%, a
Normalblend mode, no effects and are not being masked to other layers, then their contents are merged into a new vector layer. - If the layers are both path layers with matching visual properties (fill, stroke, opacity, blend mode etc.), no effects and no keyframes and are not being masked, their shapes are combined into a single path layer. If the visual properties don't match, the path layers are merged into a vector layer Otherwise, the layers are rasterized and merged into a pixel layer.
When merging animation layers in the timeline, the drawings in both of the layers are merged together. How exactly the drawing layers inside of these drawings should be merged depends on various properties of the layers themselves, as well as the Drawing Layer Merge Behaviour setting.
By default, the drawing layers remain as separate layers if they contain animated properties. Otherwise, they are merged into a new layer, which follows the same rules as the regular drawing layer merging described above (i.e. vector contents remain vector contents if possible).
However, the following situations force the drawing layers to be rasterized and merged - no matter which merge behaviour setting was chosen - in order to maintain their visual appearance after the animation layer merge.
- Either of the animation layers has an opacity that is not 100% or a blend mode that is not
NormalorPass Through. - The animation layers are masked to each other.
- Either of the animation layers is part of a transform hierarchy.
- A drawing layer has a keyframe animation and the merged drawings have different starting frames.
Merge All Visible#
Merges all visible layers and combines them into a new layer. The original layers remain unmodified.
- If the layers all contain vector contents (vector layers, vector groups or path layers) and can be merged into a vector layer, a new vector layer with the combined contents is created.
- Otherwise, if the layers are all vector groups with an opacity of 100%, a
Normalblend mode and are not being masked to other layers, then their contents are merged into a new vector group. - Otherwise, the layers are rasterized and merged into a pixel layer.
Edit Clip#
This option only exists for symbol layers. Opens the clip referenced by the symbol layer in the editor
Lock / Unlock Transparency#
This option only exists for pixel layers and animation layers. Locks the transparency of all pixels in the layer to not be modifiable by the brush or fill tool.
When set on an animation layer, the setting applies to all pixel layers in all drawings of the animation layer.
Set as Fill Reference#
Defines this layer as the reference layer for the fill tool. This allows you to use the fill tool on a separate layer while limiting the fill regions based on the contents of this layer.
Create Vector Group#
This option only exists for vecgtor layers. Converts the selected vector layer into a vector group.
Create Vector Layer#
This option only exists for vector groups that can be converted to vector layers. Converts the selected vector group into a vector layer.
Timeline Layer Actions#
Only layers in the timeline have the following actions:
Enable Onion Skin#
By default, onion skins are only shown for the drawings of the selected animation layer, but you can also manually enable it on individual animation layers if you want to see onion skins on multiple layers at once.
Layers for which onion skinning is enabled regardless of their selection state show a small onion skin icon next to their name.
Focus#
Brings the layer contents on the current frame into view on the canvas.
Create Symbol#
Creates a symbol from the selected layers.
Rasterize#
You can rasterize the entire contents of one or multiple selected animation layers into a frame by frame animation.
This will create a new animation layer with separate drawings on each frame. Each drawing will contain a single pixel layer with the combined rasterized contents of the selected animation layers at that frame. Note that only the region of your canvas defined by the project resolution will contain any visible content after rasterization. Any animation outside of this region will not appear in the new pixel layers.
The original layers remain in the timeline and are automatically set to be hidden.
#
Layers
Inspector
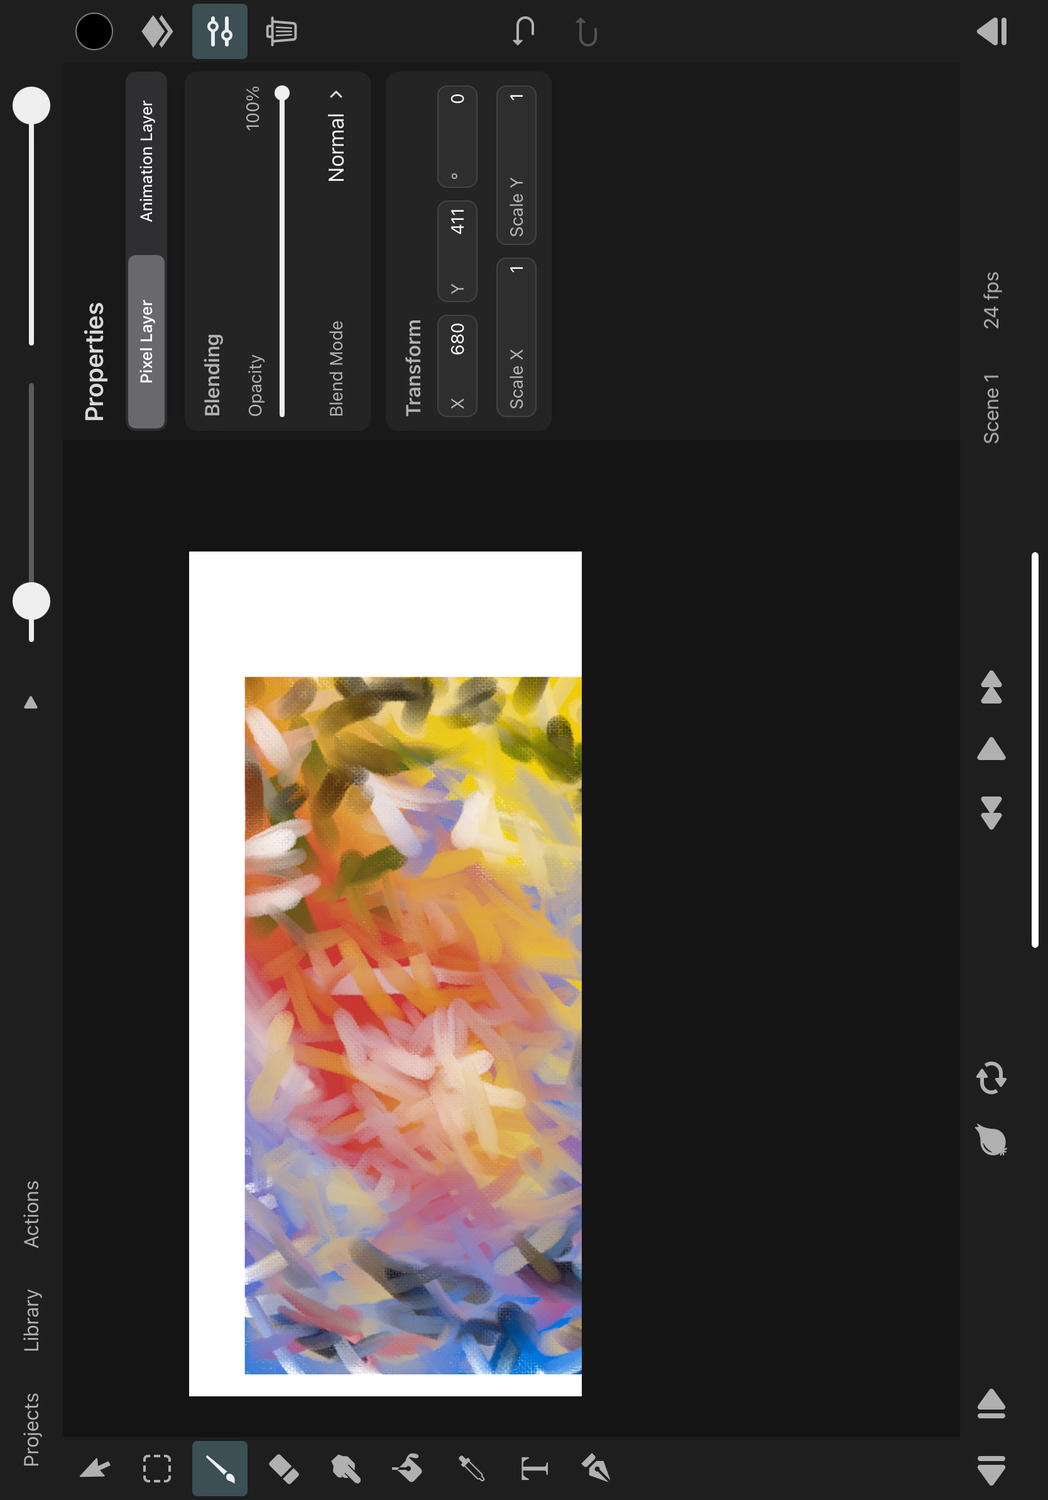
The inspector is where you can find all properties of the currently selected layer. Open it with the inspector button in the sidebar on the right.
Layer Type Selection#
Select the tab based on whether you want to edit the properties of the selected animation layer or the selected drawing layer.
Common Layer Properties#
The following properties are available on most layers. Layer properties that are specific to a certain layer type are covered on the handbook page of that respective layer type.
Effects#
Effects that are applied to the layer are listed here. Use the + button to add new effects to the selected layer.

Blending#
Options for how the layer contents should be combined with the contents of the layers below it when the animation is rendered.
Opacity#
Controls the opacity with which the layer is blended onto the layers below. Lower the opacity value to make the layer more transparent.
Tip#
Tap the number value of a slider to input a new value with your keyboard instead of having to drag the slider to the correct position.
Blend Mode#
The blend mode using which this layer should be combined with the layers below.
Transform#
All visual layers have transform properties, which can be used to change the position, rotation and scale of that layer. These properties can also be animated over time using keyframes.
Keyframing#
The inspector shows property values at the most recent keyframe.
Changing values in the inspector when a property has more than one keyframe will automatically insert more keyframes if necessary. You can find more info on keyframes in the keyframes chapter.
#
Layers
Pixel Layer
Pixel layers are the drawing destination for pixel brushes, which are the most common type of brush in the brush library. They store their contents as a raster image, i.e. in a grid of pixels that can each store a single color.
The resolution of a pixel layer is determined by the scene or animation clip that it is in. Pixel layers with a large resolution result in larger project folder sizes and more system memory usage during editing. You can only draw on a pixel layer within the area defined by this resolution.
Pixel layers are also created when rasterizing vector-based layers.
By default, the transform tool can be used to edit and animate the transform property of the Pixel Layer, just like with any other layer. This moves the entire layer (and with that the area in which you can draw). However, you can also use the transform tool to edit the layer's pixel contents while keeping the transform properties unmodified.
Lock Transparency#
You can lock and unlock the transparency of the pixels via the layer actions. Drawing on a pixel layer with locked transparency will only modify the colors of the pixels but not their opacity.
This means that fully transparent areas of the layer will remain transparent when you move a brush over them. You can use this feature to easily shade the contents of your layers without having to worry about going over your carefully drawn edges.
The brush, smudge and fill tools all respect the "Lock Transparency" option. You can still edit the pixels without any limitations using the transform tool, even with this option enabled. You can also still use the eraser on such a layer. If you want to prevent both of these types of edits, you can use the lock option instead.
Tip#
You can also set the transparency lock on an animation layer, which then automatically applies to all pixel layers in all drawings of that animation layer.
Images#
When you import raster images, they are rasterized into pixel layers in a separate, automatically created animation clip.
SVGs are imported as vector groups.
Adding Images#
You can import an image into the timeline by tapping the + button in the timeline and selecting Image.
Alternatively, you can also import images into your project via the library with these steps:
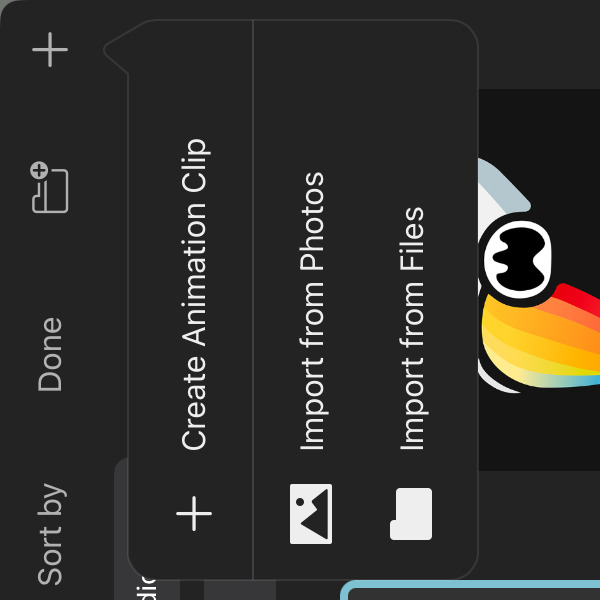
- Open the library.
- Tap the
+button in the top right corner. - Tap
Import from FilesorImport from Photos. - Select one or more images.
For raster images, this will
- load the image pixels into new pixel layers,
- automatically create new animation clips into which the pixel layers are inserted,
- insert a symbol of this clip into the current timeline if only one image was selected.
Supported File Formats#
ToonSquid supports images with the following formats to be imported into your projects.
- PNG
- JPEG
- TIFF
- BMP
- HEIF
- GIF
- SVG
- PSD
Image Sequence Import#
To import a sequence of images directly into multiple drawings of a new animation layer, you can
- Tap the
+button in the timeline.
- Select
Image Sequence. - Choose the images that should be imported in the file dialog.
All selected images will be imported in alphanumeric order of their filenames into pixel layers in consecutive drawings. Each drawing is set to last one frame and the images are scaled to fit into the current project's resolution.
#
Layers
Vector Layer
Vector layers are the default drawing destination for vector brushes. They store their contents as vector shapes and can be edited with the brush, eraser, smudge, fill and transform tools.

Vector Layers vs Vector Groups#
Vector layers are effectively a simplified alternative to vector groups. Here is an overview of the benefits and limitations of vector layers compared to vector groups in ToonSquid.
Benefits of Vector Layers#
- Vector layers can have editing performance benefits over vector groups when working with a large number of vector shapes since they do not require each shape to be stored in a separate layer.
- Some users find it easier to navigate the drawing layer list without vector groups, especially when the layers are also organized using regular group layers.
Limitations of Vector Layers#
- The vector shapes inside of a vector layer cannot be independently selected.
- The order of the vector shapes inside of a vector layer cannot be changed.
- The individual shapes inside of a vector layer cannot be animated independently.
- The path control points of the vector shapes inside of a vector layer cannot be viewed or edited using the path tool.
- The individual shapes inside of a vector layer don't support masking, corner radii, or the trim properties of path layers.
- The shapes inside of the vector layer can only have a normal blend mode and no opacity reduction that affects their combined stroke and fill colors (unlike the path layer's opacity property).
- Effects cannot be assigned to the individual shapes inside of a vector layer.
Converting Vector Layers to Vector Groups#
Any vector layer can always be manually converted into an equivalent vector group.
- Tap the vector layer in the drawing layer list.
- Select
Create Vector Group.
Converting Vector Groups to Vector Layers#
Vector groups can be converted into vector layers if all of the path layers in the group are compatible with the limitations of shapes inside of vector layers as described above.
- Tap the vector group in the drawing layer list.
- Select
Create Vector Layer.
Converting All Vector Groups to Vector Layers#
If you would like to convert all of the compatible vector groups in a project into vector layers at once, follow these steps:
- Open the project.
- Tap on
Actionsat the top. - Tap on
Settings. - Select the
Infotab on the left. - Scroll down and select
Convert Vector Groups to Vector Layers.
#
Layers
Group Layer
Groups can be used to group layers in the timeline and within drawing layers for organizational purposes or to transform them together.
Create a Group#
Create a group by tapping the + button of the layer list and selecting Group.
Add Layers to Groups#
There are two options for adding layers to a group.
- Select the group and add a new layer. The new layer will be added to the selected group layer if the group is expanded. If it is collaped, the new layer will be added above the group.
- Drag and drop an existing layer onto a group layer.
Removing Layers from Groups#
Drag and drop layers out of the group into a different part of the layer list to remove them from the group.
Collapse#
You can collapse and expand each group in the layer list using the small disclosure triangle to the left of its thumbnail. Collapsing a group will hide all the layers inside that group from the layer list.
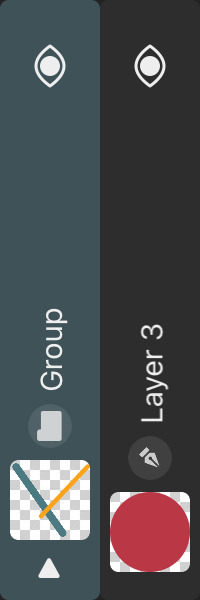
Collapsing a group has no impact on the appearance of the animation.
Blending#
By default, group layers use the Pass Through blend mode, which means that the group does not affect the rendering of the layers inside (assuming that the group also has an opacity of 100%).
Changing the blend mode or opacity of a group causes all layers inside to be composited (blended) together first before then being blended with the layers outside of the group using the group's blend mode and opacity.
Toggling the group's visibility will also hide all layers inside the group.
Loop Mode#
Groups in the timeline have a Loop Mode property, which can be used to loop the contents of the group. These are the available loop modes:
Don't Loop#
This is the default mode. The contents of the group are played once and then stop, just like how they appear in the timeline.
Normal#
The contents of the group start playing from the beginning again once they reach the end.
Note that the beginning of the loop is the first frame of the group layer, not the first frame of the contents of the group. Align the contents of the group with the beginning of the group layer and shift the entire group layer to a different position in the timeline if you want the loop to start at a different frame.
Boomerang#
The contents of the group repeatedly play forwards and then backwards.
Timeline#
By default, group layers in the timeline stretch across the entire length of your animation, even if they don't contain layers with drawings on all of those frames. However, just like with drawings, you can drag the retiming handles to change the start or end frame of a group.
When you change the start frame, all layers inside the group are shifted by the same amount.
If you change the end frame of a group, it will only display its contents until this manually defined end frame, even if the drawings inside the group extend beyond this frame. In order to reset this end frame so that the group automatically extends to the last frame of the scene again, tap the group and select Extend to End.
Just like with drawings, it is also possible to use drag and drop for moving a group in the timeline. Note that groups in the timeline and drawings cannot be mixed in the same layer. Groups are always in their own separate layer in the timeline.

Vector Groups#

Group drawing layers that only contain path layers are referred to as "vector groups".
The brush, eraser, fill and transform tools and the cut & paste feature provide special treatment for such vector groups, allowing you to edit the vector contents of the group similarly to how you can edit the contents of a single vector layer.
For example, if you use the eraser on a vector group, it will erase from all of the path layers inside of the group at once.
To further mimic the behaviour of singular vector layers, it is not possible to drop another layer into a vector group via drag and drop if the vector group is collapsed.
You can find more information on the differences between vector layers and vector groups and how to convert from one to the other here.
Note#
Vector groups may not contain vector layers, only path layers. The vector group itself mimics the behaviour of a single vector layer.
#
Layers
Background Layer
Background layers provide a solid background color to the animation. By default, they are the lowest layer in the timeline but can be reordered like any other layer as well.
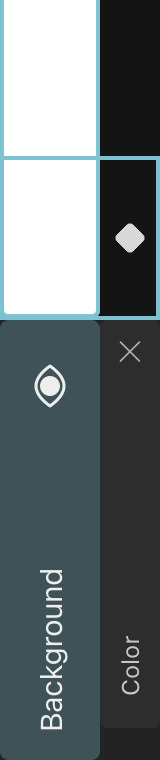
There is always exactly one background layer in every timeline. Background layers cannot be duplicated or deleted. You also cannot draw on the background layer with the brush or other tools.
Properties#
Background layers have no transform or blending properties.
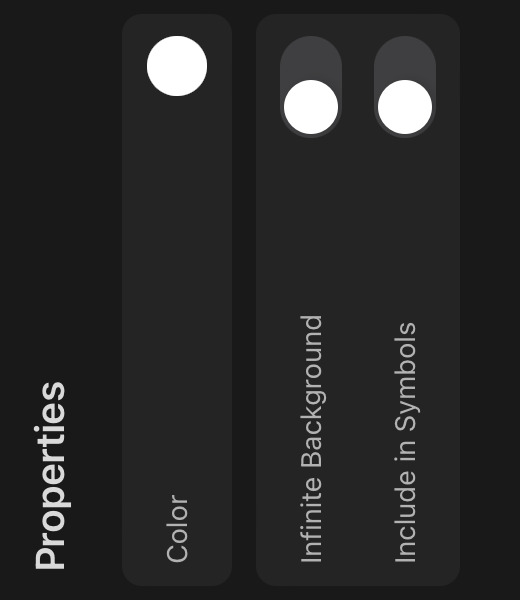
Color#
The solid color of the background layer. The background color can be animated using keyframes.
Infinite Background#
Whether the background layer should fill the entire canvas instead of only being as large as the resolution of the current scene or animation clip.
This is particularly useful if you intend on using a camera layer.
Include in Symbols#
Whether the background layer should be visible in a symbol layer that references this clip. This is disabled by default.
#
Layers
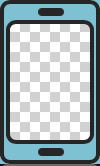
Camera
Add a camera layer to your timeline to define the visible region of your animation. Only this region will be visible in the final export and in every symbol that references the clip with this camera.
The camera is shown on the canvas as a rectangular outline.
The camera layer can only be selected via the layer list in the timeline and not by tapping the canvas.
There can only be at most one camera layer in each timeline.
Properties#
You can use the transform property of the camera to move the camera and even animate it over time like a normal layer. This makes it easy to create appealing camera movements without having to manually animate everything on the canvas to move in the opposite direction. Just add a camera and animate it instead.
Resolution#
Defines the size of the visible region of the camera layer in pixels.
When a clip with a camera layer is referenced by a symbol layer, the resolution property of the camera determines at what resolution the clip will be rendered in place of the symbol.
The resolution property is also used as the default resolution for the export, but this can be changed with the export settings.
Outside Darkening#
The outside region of the camera can be darkened to help focus your attention on the parts of the animation that will be visible in the final export.
Amount#
By how much the outside regions of the camera should be darkened.
Always Enabled#
Whether the outside of the camera should always be darkened during both editing and playback. By default, it is only darkened during playback.
Visibility#
The visibility of the camera layer only affects its visualization in the editor. Therefore, hiding a camera layer does not change the export behavior.
Delete the camera layer instead if you don't want it to be used during the export.
Reset Parallax Origin#
This button is only available if any layer in the current scene has a Parallax effect. It lets you reset the camera's parallax origin position.
After you press this button, no parallax offset will be applied to any layer with the parallax effect when the camera is at its current position.
#
Layers
Audio
Use audio layers in order to add audio clips to the timeline to be played back together with the animation.

Audio clips behave similarly to drawings in the timeline. You can use the retiming handles to trim and shift them.
Importing Audio#
You can import audio files into the timeline by tapping the + button in the timeline and selecting Audio.
Choose between directly recording audio in the app with your microphone or importing audio clips from the Files app or the Photos app. If you select a video file, only its audio will be imported.
Alternatively, you can import audio files via the library with the following steps:
- Open the library.
- Tap the
+button in the top right corner. - Tap
Import from Files. - Select one or more audio files.
This will add the files to the library under the Audio Clips tab. If only one file was selected, an audio layer with this clip will be automatically inserted into the timeline.
Supported File Formats#
ToonSquid supports audio files with the following formats to be imported into your projects.
- .wav
- .mp3
- .aiff
- .m4a
- .flac
All audio files are converted to 44.1 kHz .wav files during the import for more efficient playback. The converted audio file is saved as part of the project.
Recording Audio#
To record audio directly within ToonSquid
- Tap the
+button in the timeline. - Select
Audio. - Tap
Record.
This opens the audio recording interface.
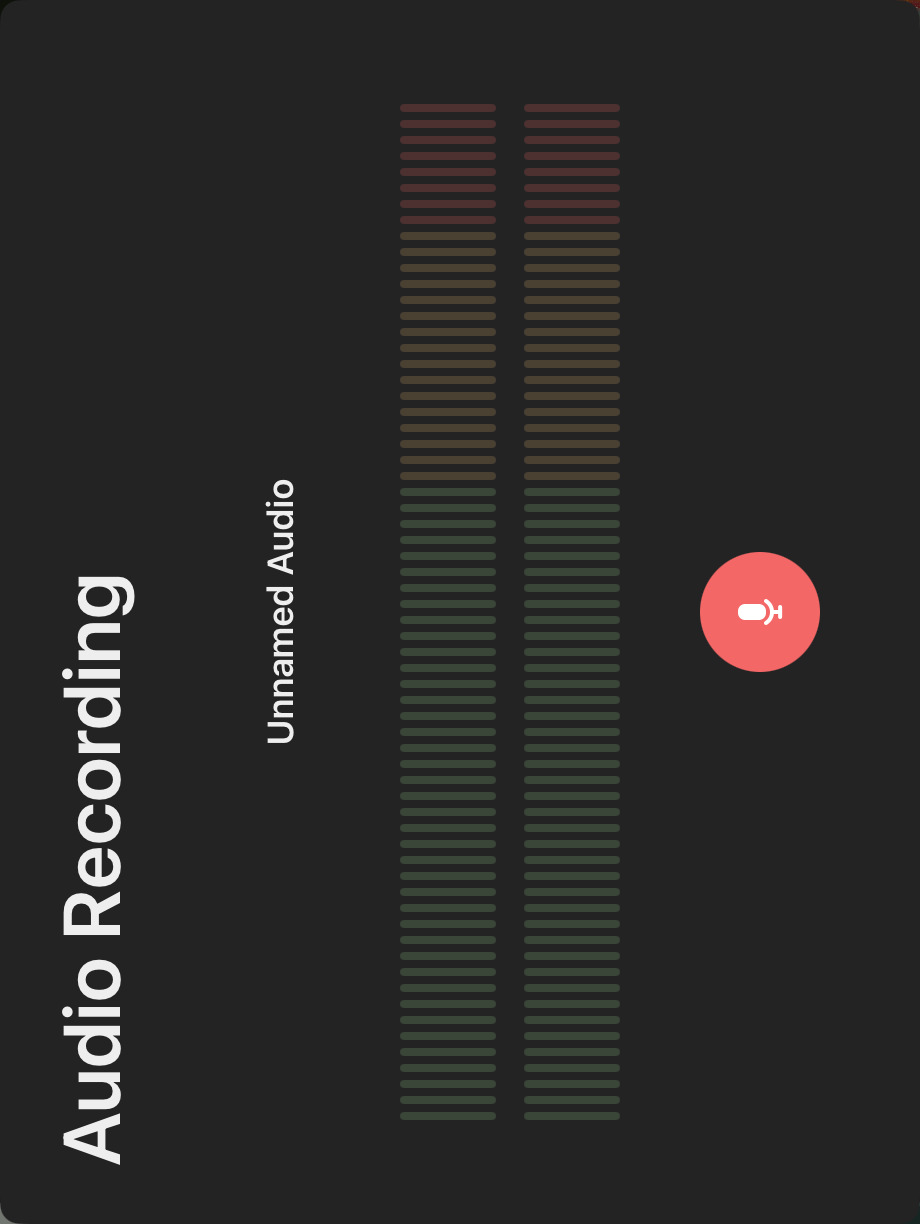
If you like, you can choose a name for the new audio clip by tapping on "Unnamed Audio".
Once you are ready, tap the red button to start the recording and then tap it again to stop recording once you are done. This immediately inserts the recorded audio clip into the timeline.
While recording, you can use the audio level meters to monitor your volume and ensure that the audio is not too loud or even clipping.
Note#
The first time you try to record audio in the app, you will be asked to grant ToonSquid permission to access your microphone. You can change this setting at any time in the iPad's Settings app under
Privacy & Security.
ToonSquid will only ever access the microphone when you are actively recording audio as described above. Whenever any app is accessing your microphone, an orange indicator will appear in the status bar at the top of the screen.
Properties#
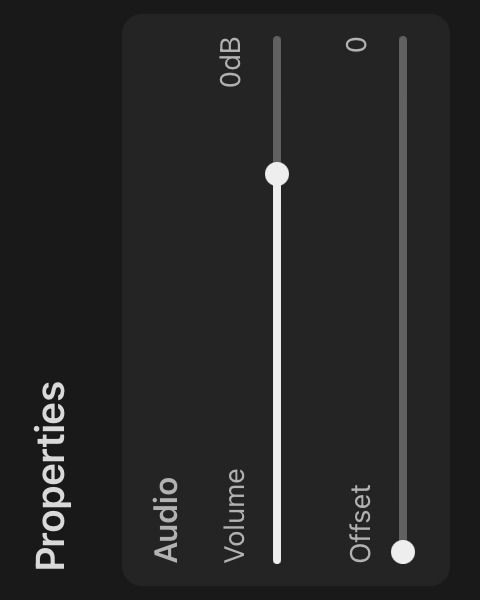
Mute#
Audio layers can be muted entirely using the mute button (which is shown instead of the visibility button).
Volume#
Specifies by how many decibels the volume of the audio clip should be changed. Can be animated using keyframes.
Offset#
The number of (visual) frames worth of audio that should be skipped when the current clip starts playing. This is used to trim the beginning of an audio clip, since dragging the left retiming handle just shifts the audio clip in the timeline.
This offset is automatically updated when you split an audio clip.
Audio Settings#
Play Audio While Scrubbing the Timeline#
Whether the audio of individual frames should be played while you scrub through the timeline. This can be helpful when performing lip-syncing or when you are otherwise trying to sync your animation to an audio layer.
Disable this to only play audio during playback.
Split Audio Clip#
When an audio clip is selected, you can use the "Split Audio Clip" button to split the clip into two clips at the current frame.
Playback#
Audio will always play in real-time. Therefore, changing the frame rate of a clip that has an audio layer can lead to the audio going out of sync with the rest of the animation. Attempting to do so will show a warning.
Export#
You can choose whether you would like to include the audio from your animation in the exported video in the video export settings.
#
Layers
Video
Video layers allow videos to be added to an animation. You typically don't interact with the video layer directly but via an automatically generated symbol, which references a clip with the video layer.
Importing Videos#
You can import a video into the timeline by tapping the + button in the timeline and selecting Video.
Alternatively, you can also import videos into your project via the library with these steps:
- Open the library.
- Tap the
+button in the top right corner. - Tap
Import from FilesorImport from Photos. - Select one or more videos.
This will
- add the videos to the library under the
Videostab and - automatically create new animation clips into which a video layer and an audio layer containing the video's audio track are inserted.
If only one file was selected, a symbol of this clip will be automatically inserted into the timeline.
Supported File Formats#
ToonSquid supports video files with the following formats to be imported into your projects.
- MP4
- M4V
- MOV (H.264 and H.265 with transparency)
The video is copied and saved as part of the project.
Note#
It is important to keep in mind that videos use significant amounts of limited system resources such as hardware video decoders and RAM. It is therefore recommended that you don't use more than 5 videos simultaneously on any frame of the animation, especially on older iPads with only small amounts of available RAM.
ToonSquid does not have full control over the shared system process that performs the hardware-accelerated video decoding. In rare situations, this process has been observed to run out of memory and crash, which can lead to a crash of ToonSquid or to failed exports. If you encounter this scenario in one of your projects, you can open the iPad's Settings app, go to
ToonSquid > Resources > Video Decoding Memory Usageand change the value from the default ofMediumtoLow.
This causes ToonSquid to more aggressively limit the amount of simultaneous video decoding requests it makes at the cost of video playback performance in the editor.
#
Layers
Onion Skinning
Use the onion skinning feature to see the drawings or frames before and after the current frame. This helps with drawing in-betweens in a traditional animation workflow.
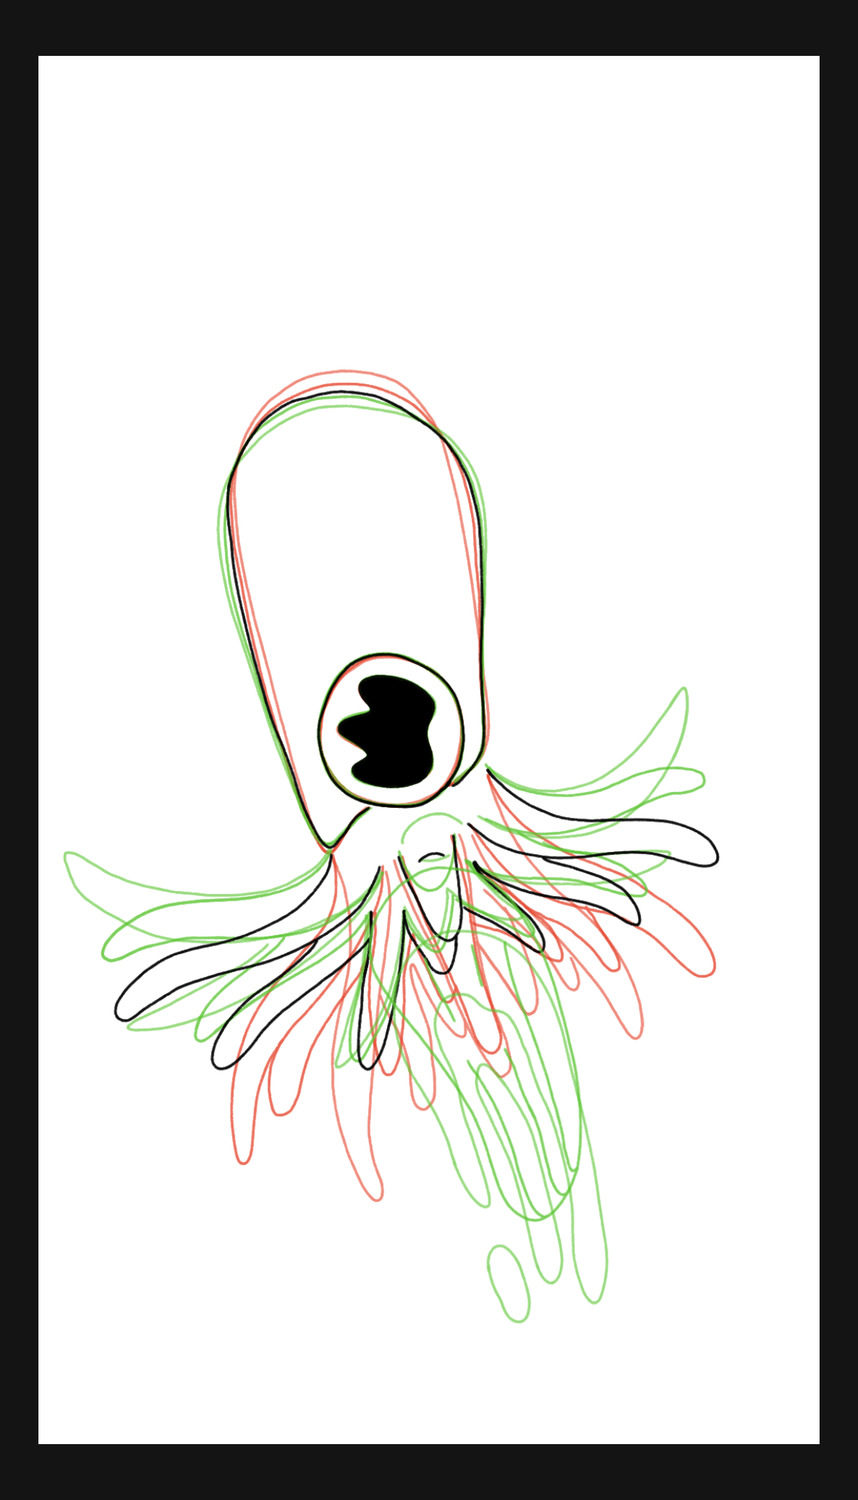
Enabling Onion Skinning#
Tap the onion skin button in the timeline to enable or disable onion skinning in the editor.
Settings#
Hold down the onion skin button to see more configuration options.
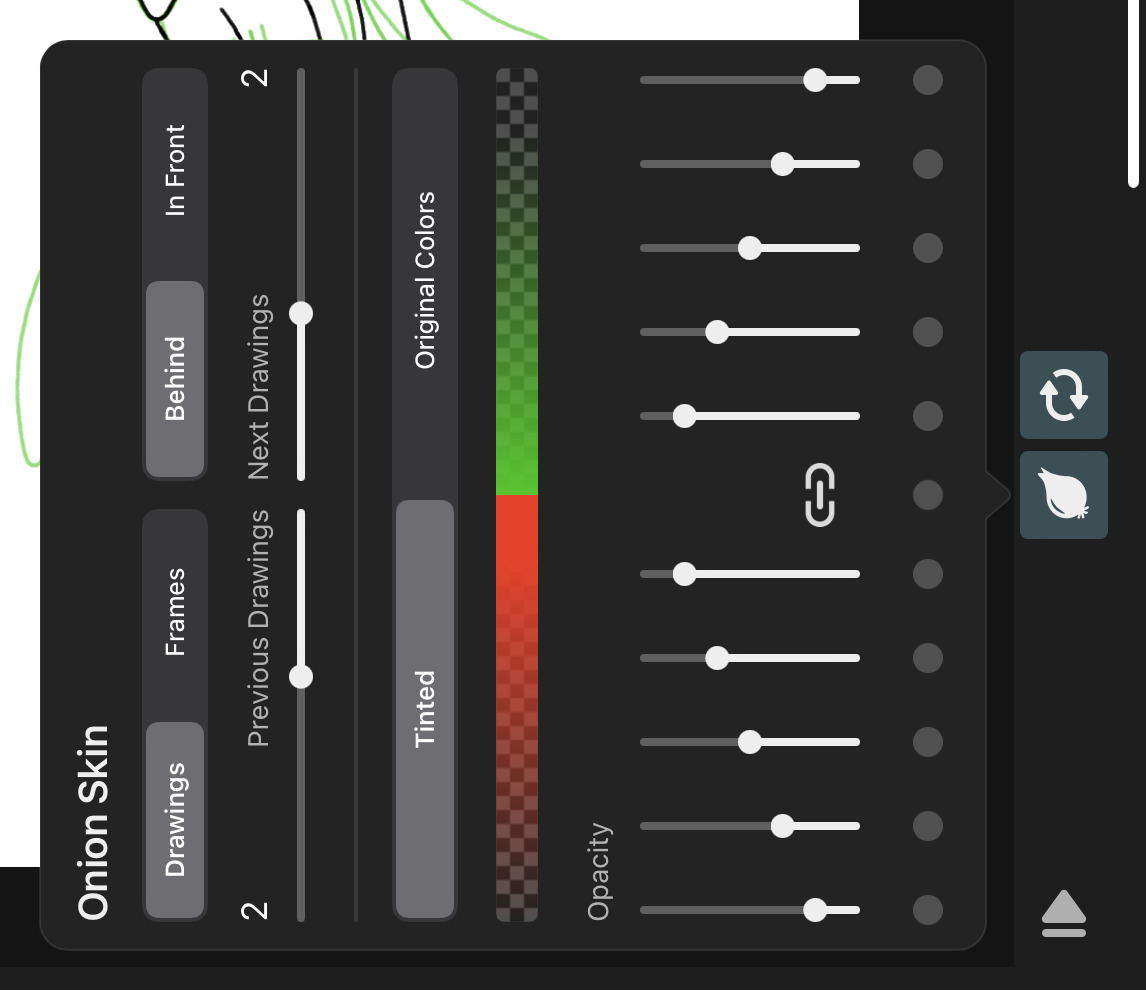
Mode#
Whether the onion skins should show neighboring drawings or neighboring frames.
Drawings#
In this mode, the onion skin numbers refer to how many drawings before and after the current drawing should be shown as onion skins. Only the first frame of each onion-skinned drawing is shown.
This mode is most useful for traditional frame-by-frame animation where the contents of each drawing don't change over the course of the drawing.
Frames#
In this mode, the onion skin numbers refer to how many frames before and after the current frame should be shown as onion skins. This way you can see multiple frames within the same drawing.
You probably want to choose this mode if you are animating the contents of your drawings using keyframes.
Order#
Controls the order of onion skins and the current drawing.
Behind#
Onion skin frames appear behind the current drawing. This is the default.
In Front#
Onion skin frames appear in front of the current drawing.
Previous Drawings / Next Drawings#
You can configure how many of the drawings or frames before and after the current drawing you would like to see when onion skinning is enabled.
Loop#
Wraps the onion skins around past the first and last drawing in the layer.
When working on a cycle / looping animation, this lets you see the first drawings of your cycle when you are working on the last drawings and vice versa, without having to manually copy and paste any drawings.
Tint Mode#
Controls how the onion skin drawings should be colored.
Tinted#
The colors of the onion skin drawings are replaced with a configurable tint color and a lowered opacity.
Original Colors#
The onion skins show the original colors of the drawings and only their opacity is reduced.
Colors#
You can customize the tint color for the previous and next drawings. Make sure that the tint mode of the onion skins is set to Tinted.
Opacity#
By default, the opacity of the previous and next onion skin drawings decreases the further their distance is from the current drawing. You can use the opacity sliders in order to adjust the individual opacity of each onion skin frame.
Linked Opacity#

Initially, the opacity sliders are linked together for easier adjustment. You can unlink them with this button if you want to change only one slider value at a time.
Layer Settings#
By default, onion skins are only shown for the drawings of the selected animation layer, but you can also manually enable it on individual animation layers if you want to see onion skins on multiple layers at once.
Either use the layer actions or the inspector to enable onion-skins on a particular layer.
Such layers will show an onion skin icon next to the layer name to indicate that they always render onion skins (if onion skins are enabled in the editor).
Out-of-Pegs#
The "Out-of-Pegs" feature lets you temporarily shift the position of surrounding onion skin frames to simplify the creation of inbetween drawings. Overlapping neighboring drawings can help to keep proportions consistent especially when the animation contains non-trivial movement.
This feature is sometimes also known as "Shift-and-Trace".
This is purely a visual aid as part of the onion skinning feature and does not affect the actual position of the drawings in the timeline or in the export.
Let's look at an example:
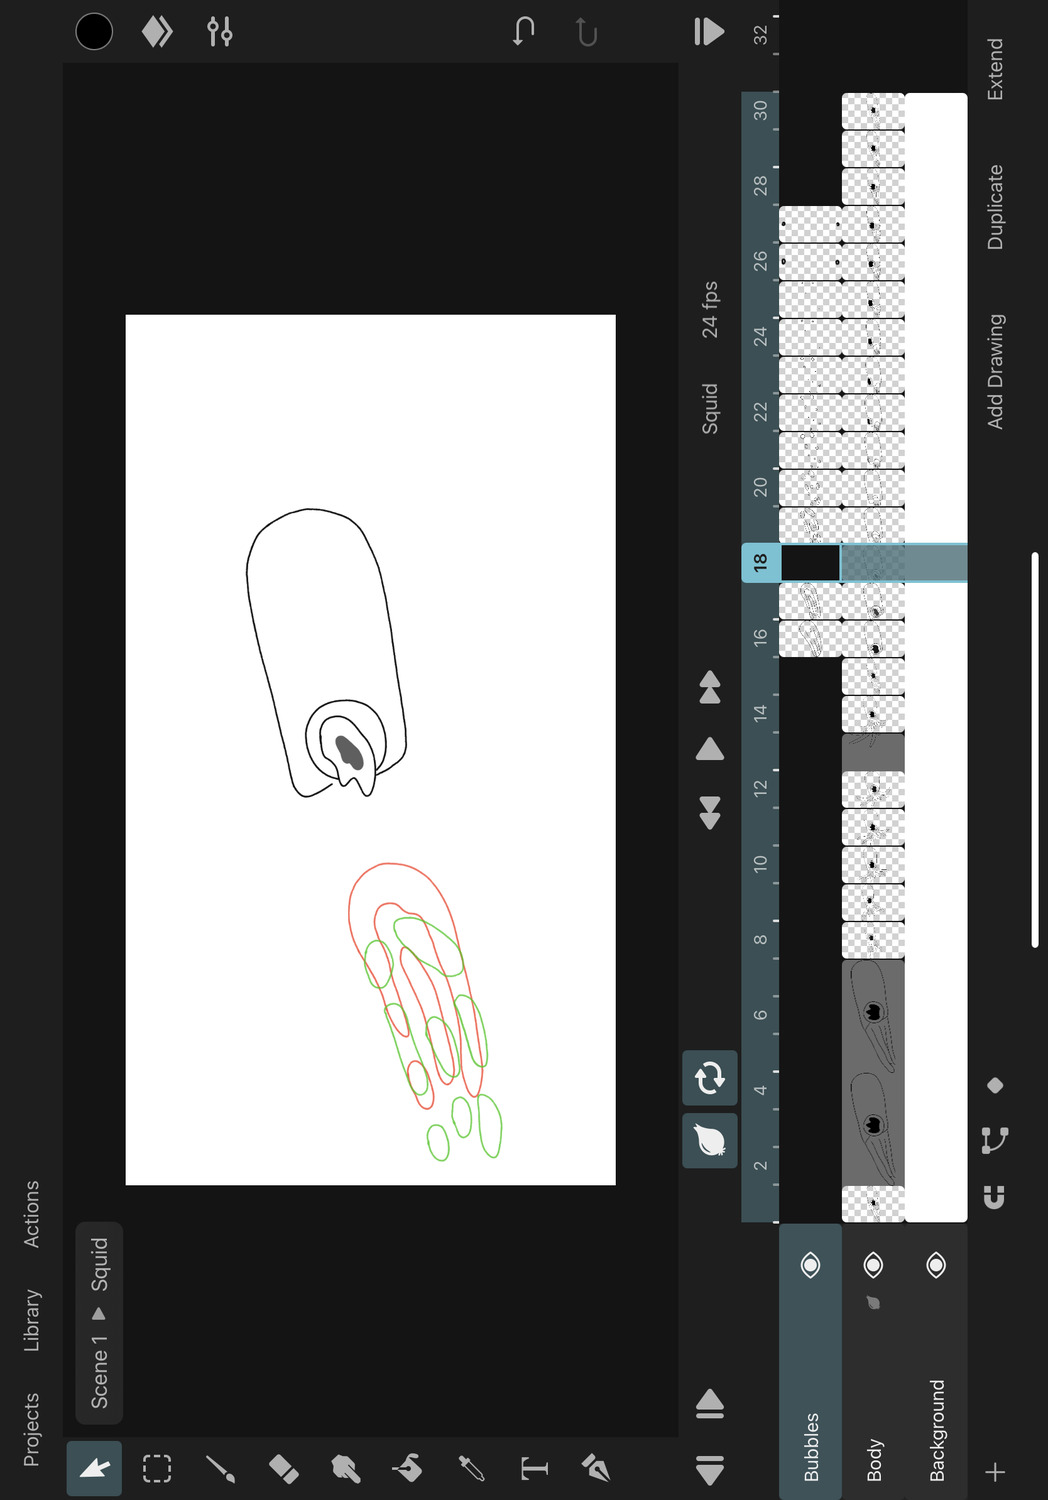
In the animation of the squid in the demo project, the bubbles need to dissipate while simultaneously moving away from the squid. We can use the "Out-of-Pegs" feature to help us add the missing inbetween drawing.
When you open the onion skin options, you will see a row of dots below the opacity sliders. Each of these buttons can be used to enable or disable the out-of-pegs feature for a particular onion skin drawing. The button in the middle is used to disable and enable all current out-of-pegs offsets at once.

We want to move the previous and next onion skin drawings of the bubble layer into the middle where we are going to add the new inbetween. To do this, we tap the out-of-pegs button under the first opacity slider on the right. This brings up the transform handles on the canvas which we can use to move that onion skin.
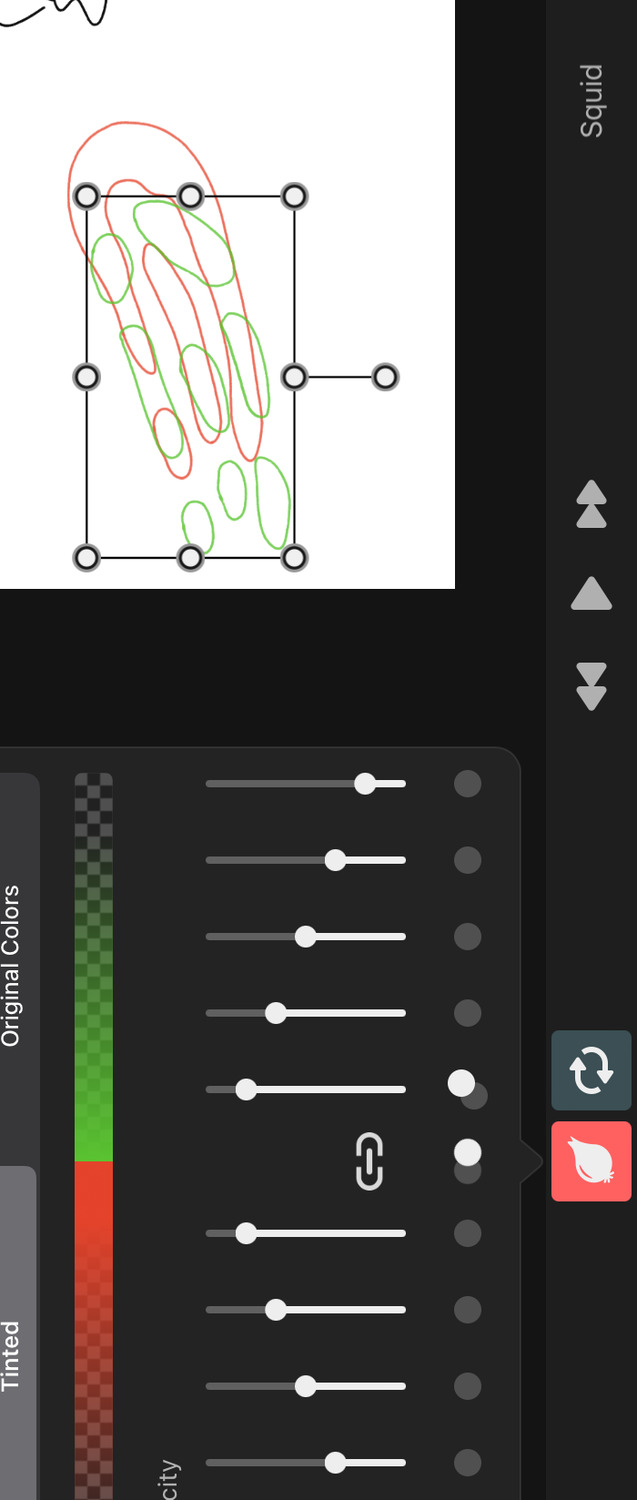
We can repeat the same process with the onion skin before the current drawing and move it to overlap the other onion skin.
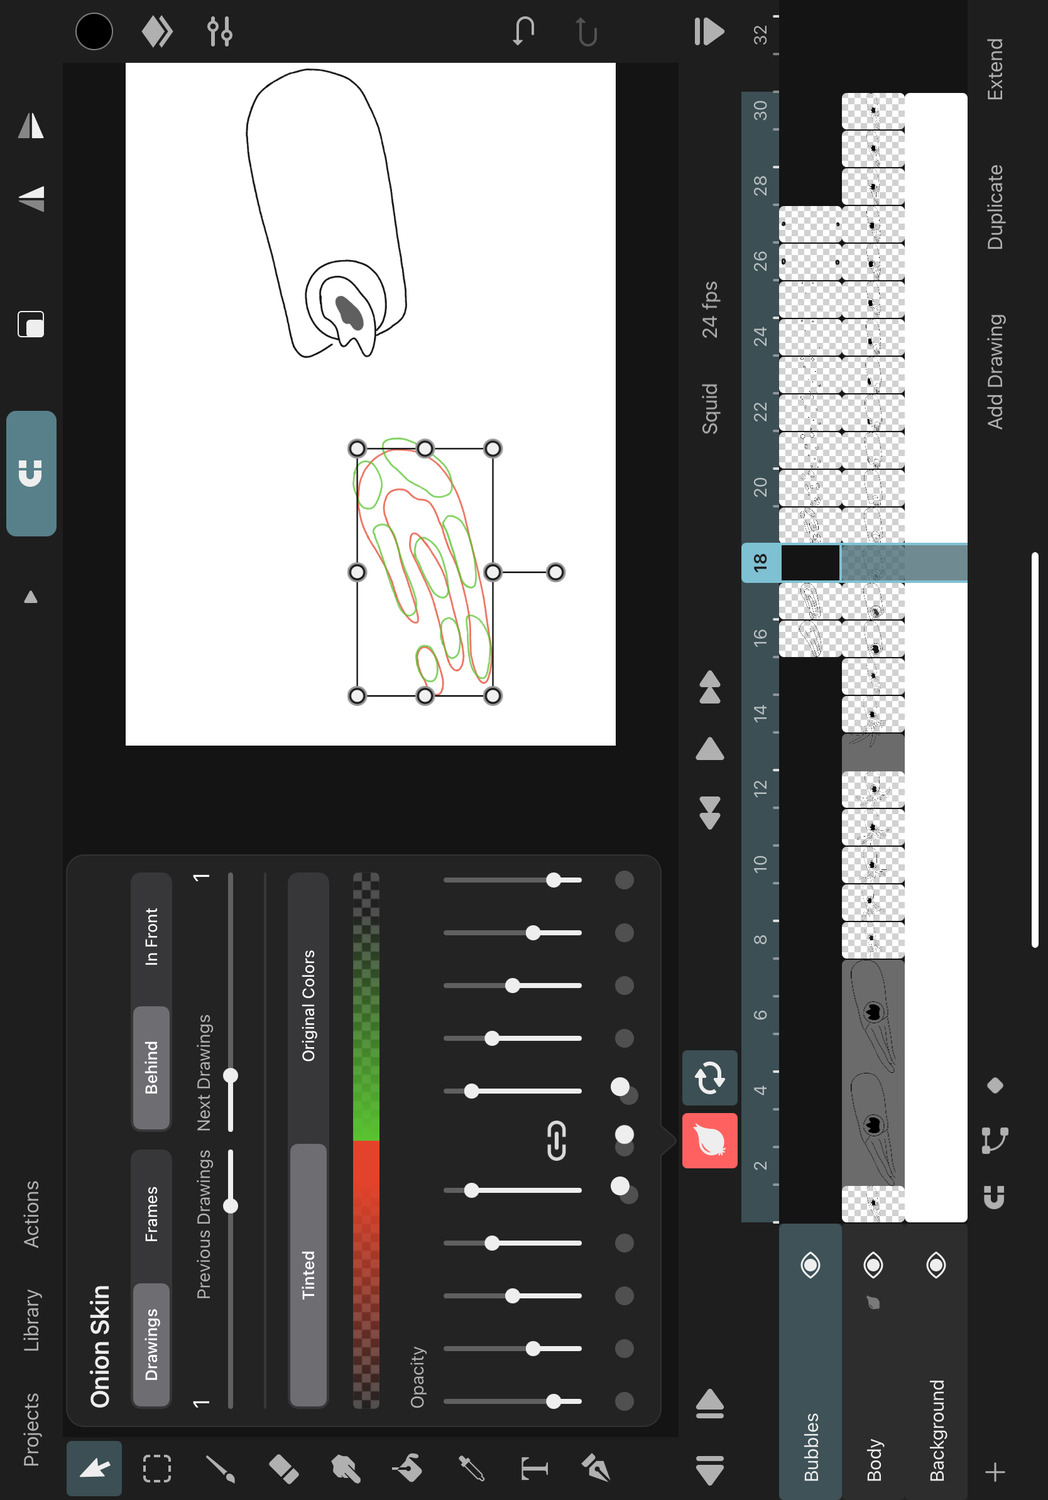
Tip#
Notice that the onion skin button in the timeline turns red when the "Out-of-Pegs" feature is active. This is a visual reminder that you might not be looking at the true position of all drawings through the onion skins.
Now we can draw the inbetween drawing in the middle. The onion skins will help us to keep the proportions of the bubble consistent with the previous and next drawings.
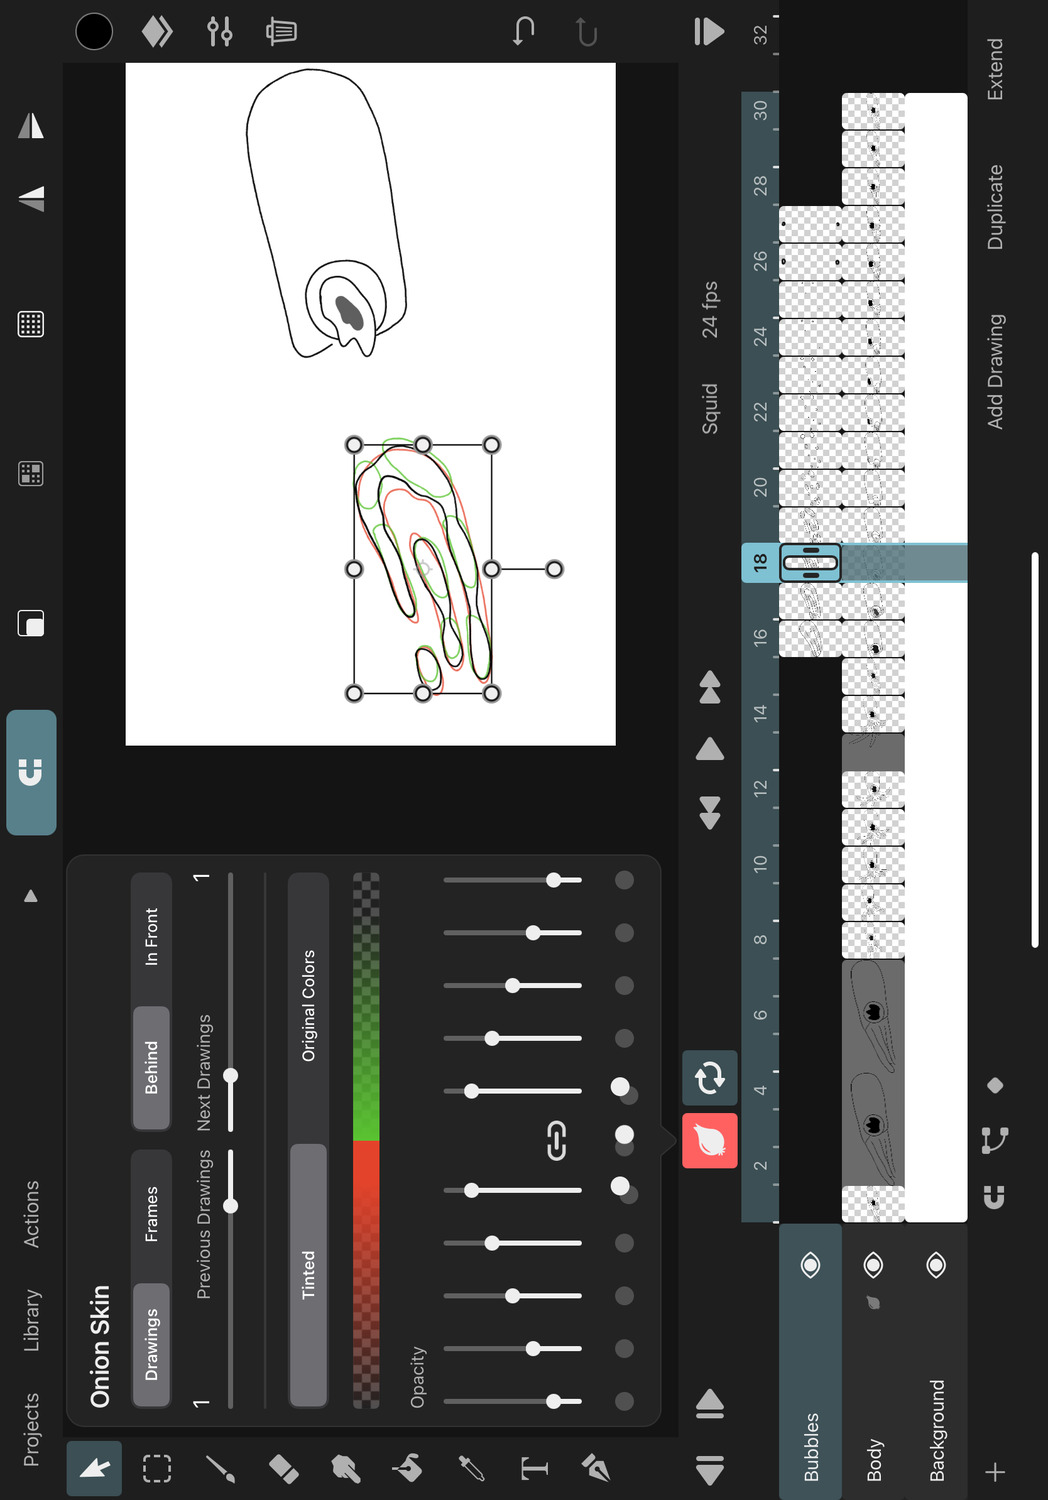
Resetting Out-of-Pegs#
If you want to reset the out-of-pegs transform for one of the onion skins, you can tap the out-of-pegs button which corresponds to that onion skin again.

This will remove the temporary transform edit and show the original position of the onion skinned drawing again.
Tap the out-of-pegs button in the center to instead only temporarily disable all out-of-pegs transforms.
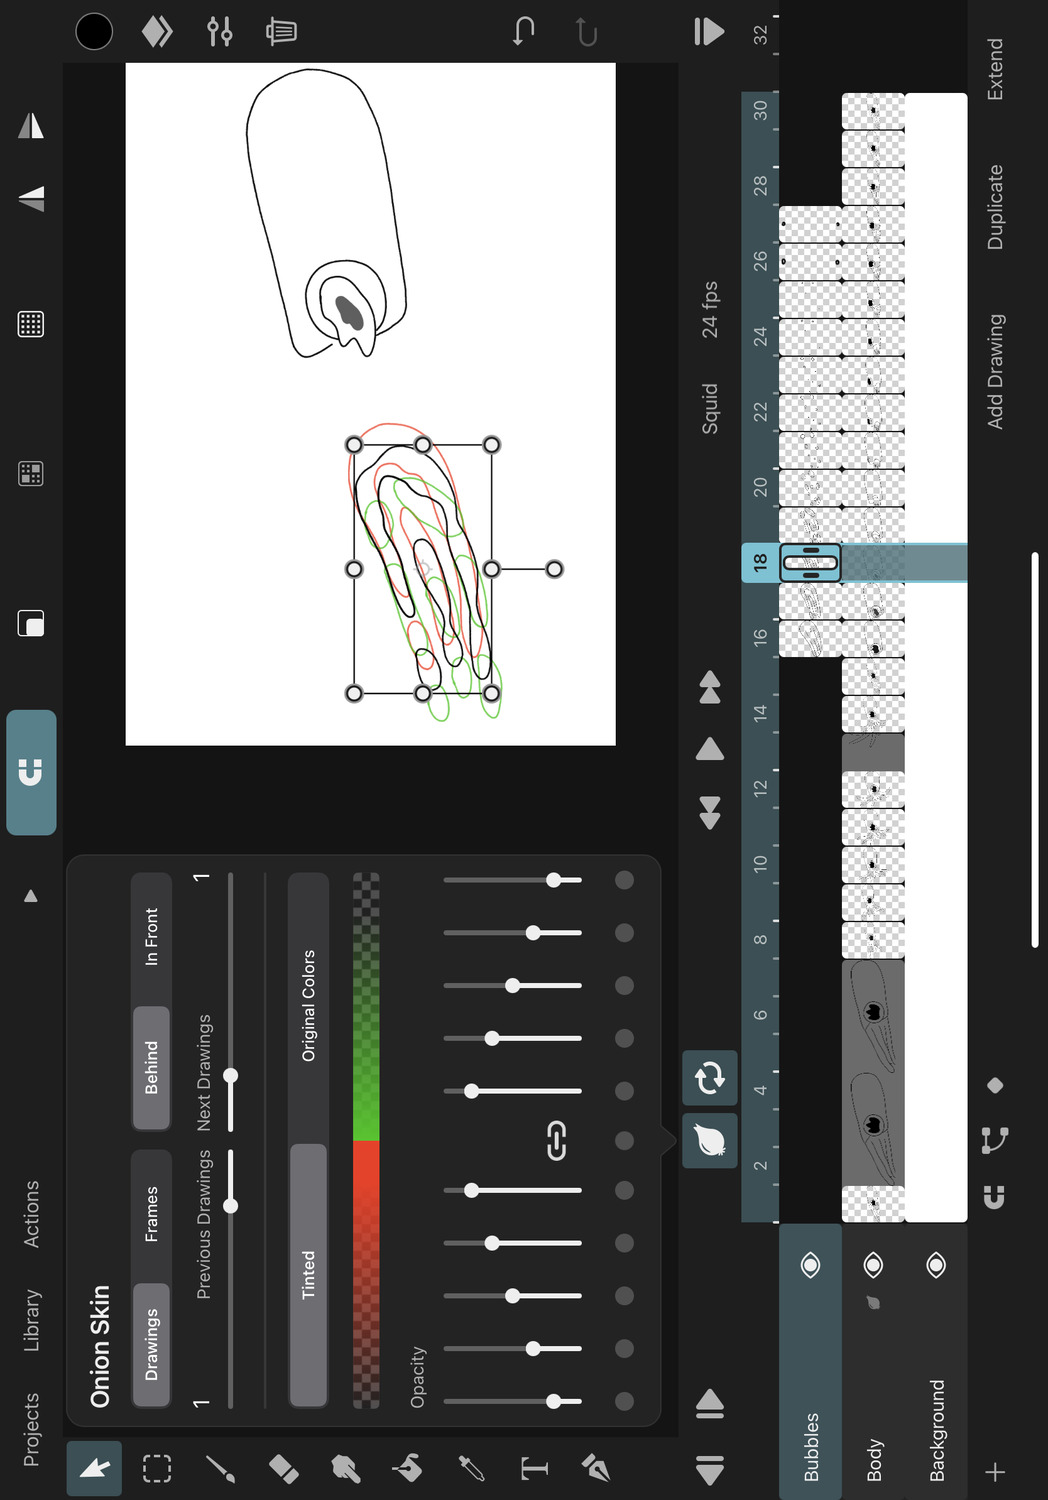
If you tap the center button again, the previous out-of-pegs edits will be restored. However, if you instead tap one of the other out-of-pegs buttons to start editing that onion skin, all the other temporary transforms are automatically reset.
This makes it convenient to quickly move to a different frame where you want to work on an inbetween using out-of-pegs edits without having to manually reset the previous out-of-pegs edits first.
#
Layers
Masking
Layers can be masked using the alpha channel (i.e. the opacity of each pixel) of another layer.
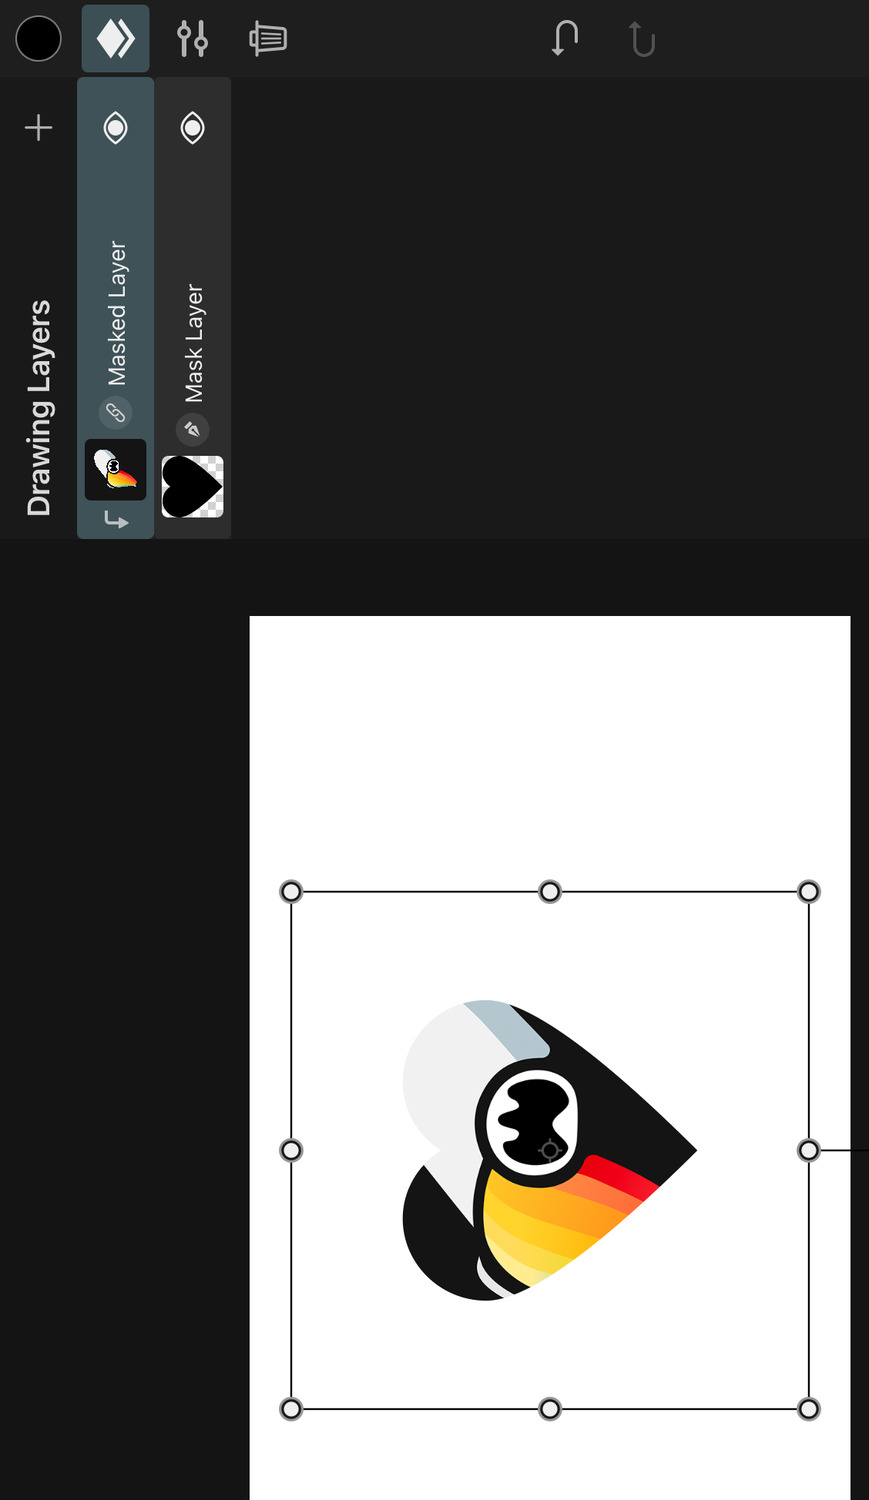
Definitions#
Mask Layer#
The layer that defines the mask using its alpha channel is referred to as the "mask layer".
The colors in the mask layer have no impact on the mask - only the alpha channel is important.
Only layers with visual content can be mask layers. The camera layer, transform layer etc. cannot be used as mask layers.
Mask layers can also have animated contents. You can perform masking with both animation layers and drawing layers.
Masked Layer#
The layers whose contents are only visible in the areas defined by a mask layer are called "masked layers".
Masked layers show a small arrow next to their thumbnail pointing down towards the mask layer.
Multiple masked layers in a row all refer to the same layer as their mask.
How to create Masks#
- Place the mask layer immediately below the layer to be masked in the layer list.
- Select the layer to be masked.
- Tap it again to show the layer actions.
- Tap
Toggle Mask.
Hide Mask Layer#
By default, the mask layer itself remains visible and continues to behave like any other layer. You can hide the mask layer using the Hide Mask layer action.
The mask will continue to work as it did before, but the contents of the mask layer will not be shown as part of the animation. This is in contrast to just toggling the visibility of the mask layer, which will also make all masked layers disappear.
Invert Mask#
Mask layers with hidden contents can be inverted using the Invert Mask layer action.
This causes previously visible areas of the masked layers to be invisible and previously hidden areas to now be visible.
Groups#
Group layers can also be used as mask layers. In that case, all group contents are combined to define the mask.
#
Layers
Blend Modes
A blend mode defines how two colors should be blended to create a new resulting color.
Every visual layer in ToonSquid has a blend mode which controls how each pixel of that layer should be blended with the layers below. Brushes also have a blend mode which defines how the brush stroke should be blended with the existing surface.
Definitions#
In the explanations of every blend mode, we use the following vocabulary:
When blending color A onto color B, we refer to A as the "top color" and B as the "bottom color". The result of the blending operation is called the "result color".
The red, green and blue components of a color are known as "channels".
Normal#
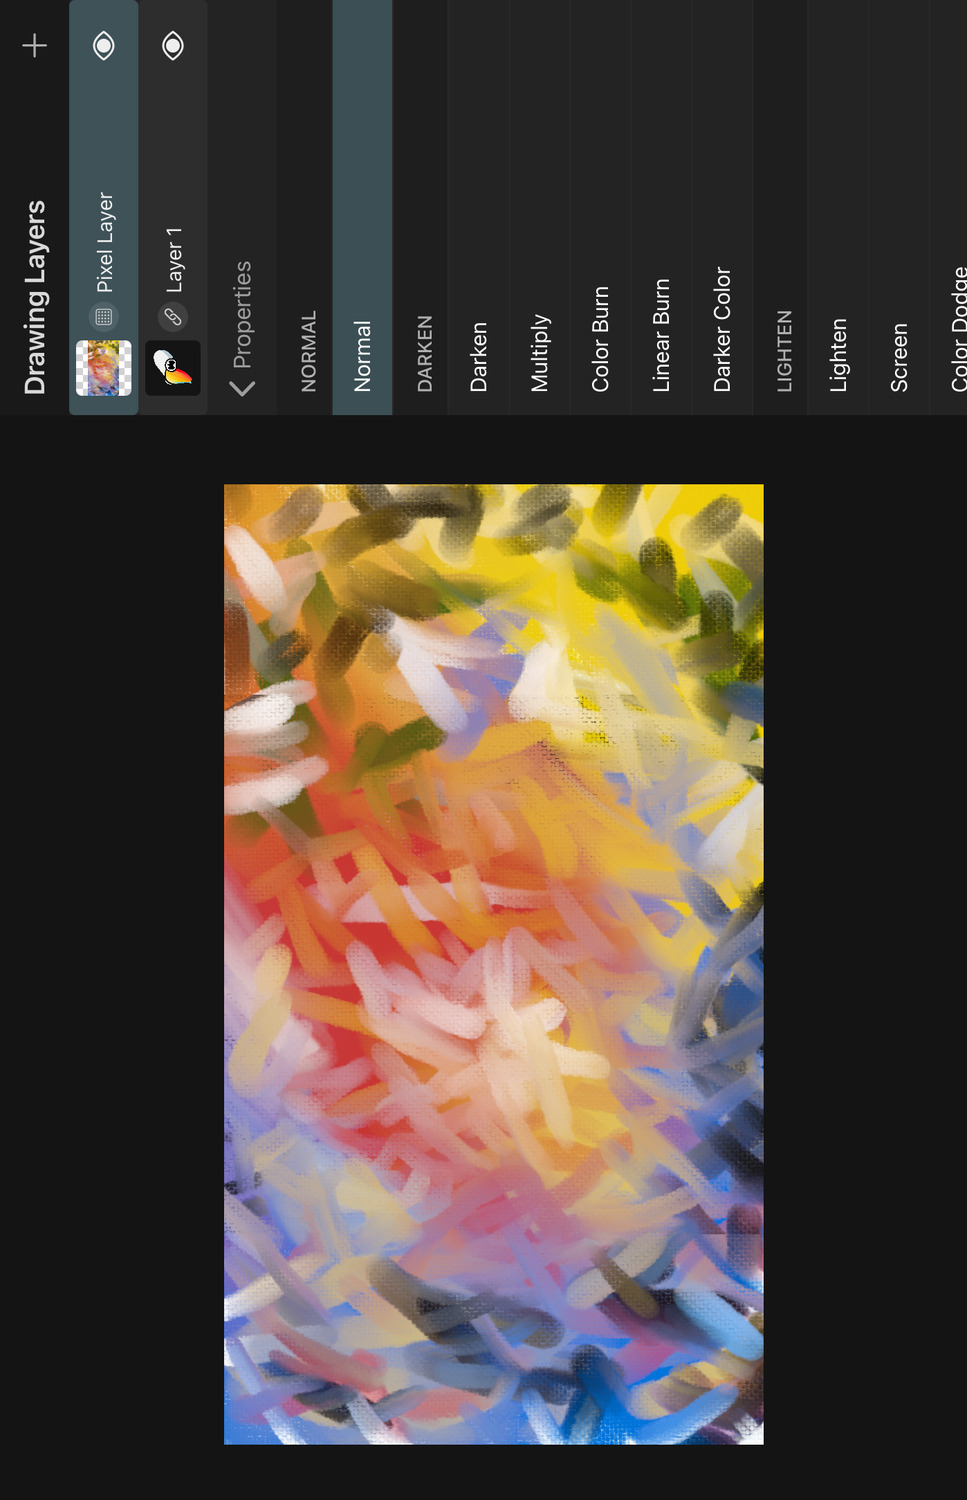
This is the most common default blend mode of layers. The top color is mixed over the bottom color based on their transparency. If the top color is fully opaque, it simply replaces the bottom color.
Pass Through#
This is a special blend mode that does not blend any colors itself. It is the default blend mode of the symbol layer, group layer and animation layer, i.e. all layers that themselves contain other layers.
It causes the blending to behave as if the layer with the Pass Through blend mode was simply replaced by all the layers inside of it, i.e. the layer should not perform any blending itself.
If the layer is forced to blend its contents - for example, due to an opacity of less than 100% - this behaves the same as the Normal blend mode.
Darken#
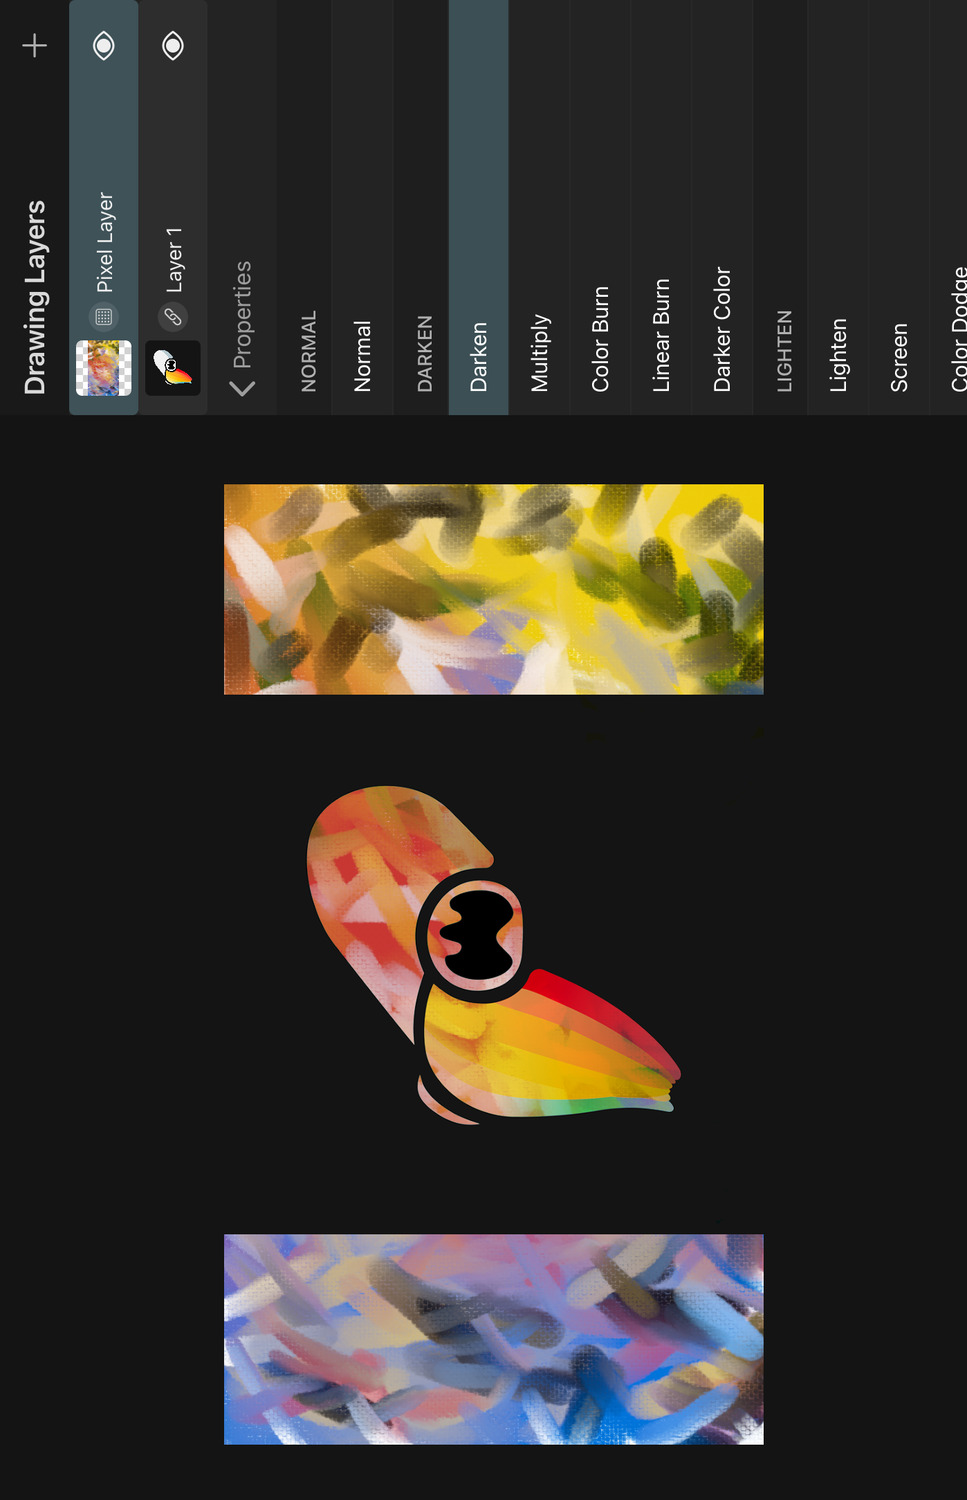
The result color uses the darkest channels of the top and the bottom color.
Multiply#
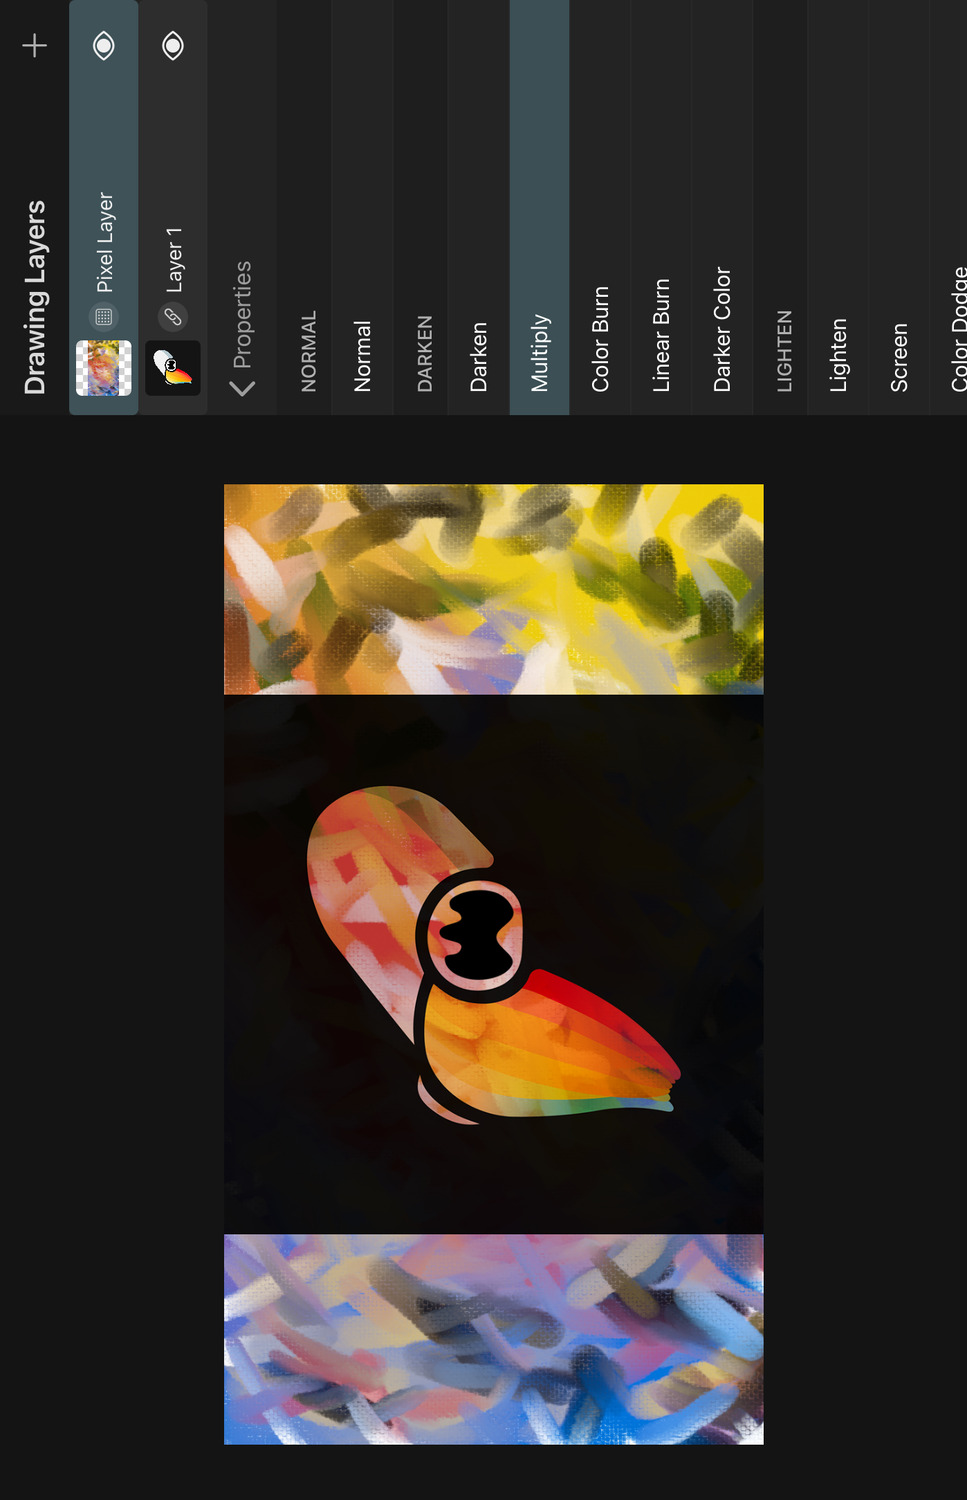
Multiplies the channels of the top color with the channels of the bottom color. The result is never brighter than either the top or the bottom color. When one of the colors is white, the result will be the other color. In all other cases, the result is darker than both initial colors. When either of the colors is black, the result is also black.
Color Burn#
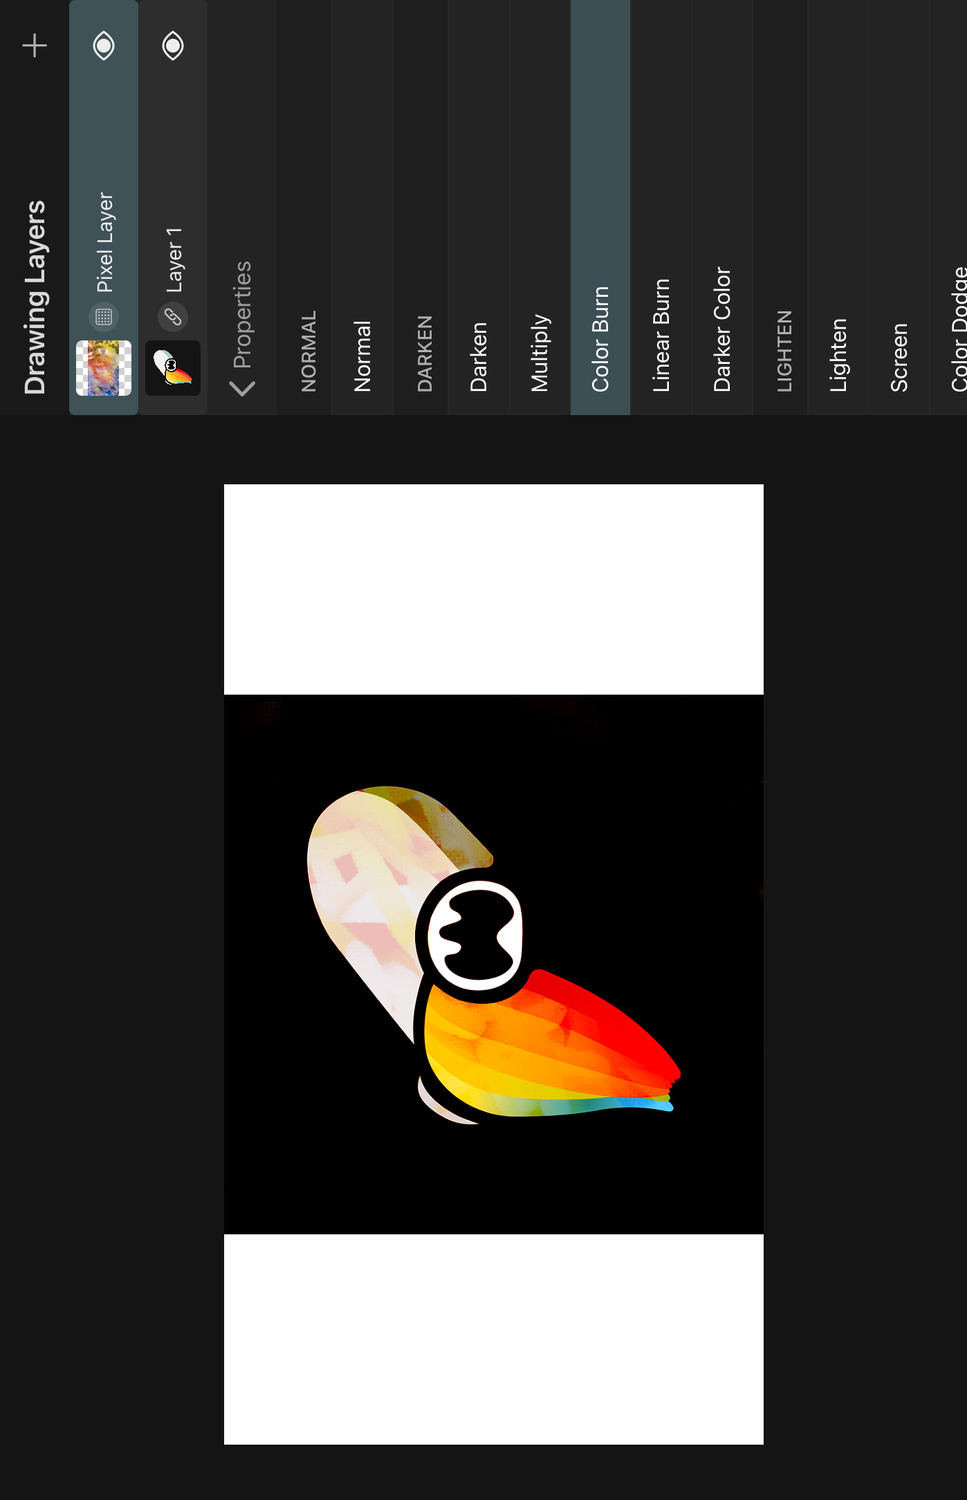
Darkens the bottom color channels to increase the contrast to the top color and then blends the top color on top.
Linear Burn#
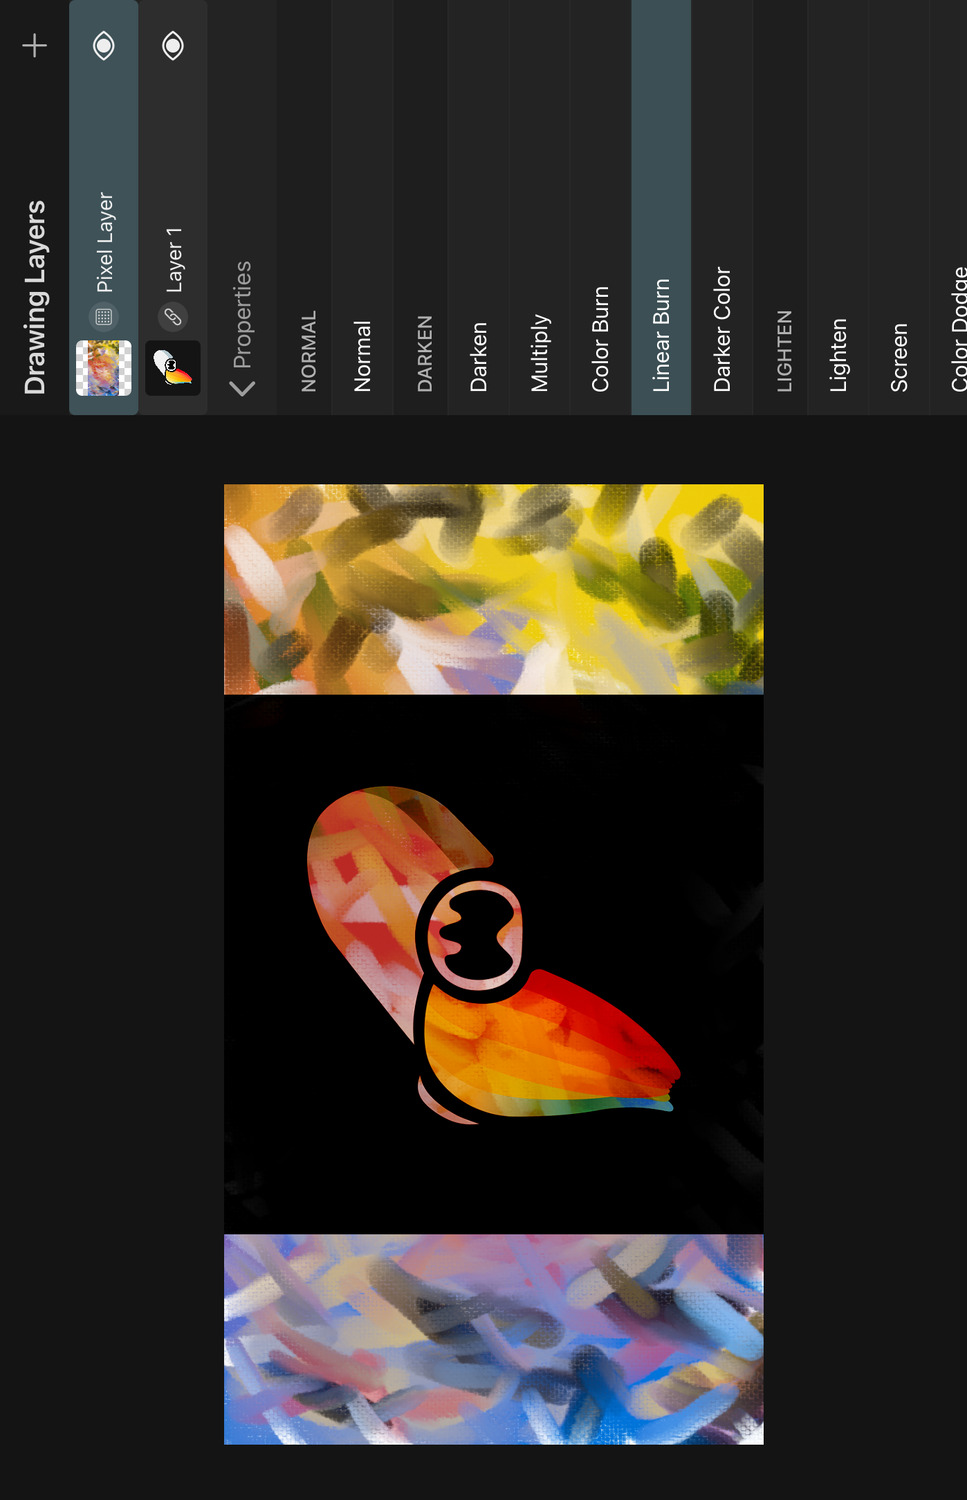
Darkens the bottom color channels based on the top color by reducing their brightness. The result is less saturated than with Color Burn.
Darker Color#
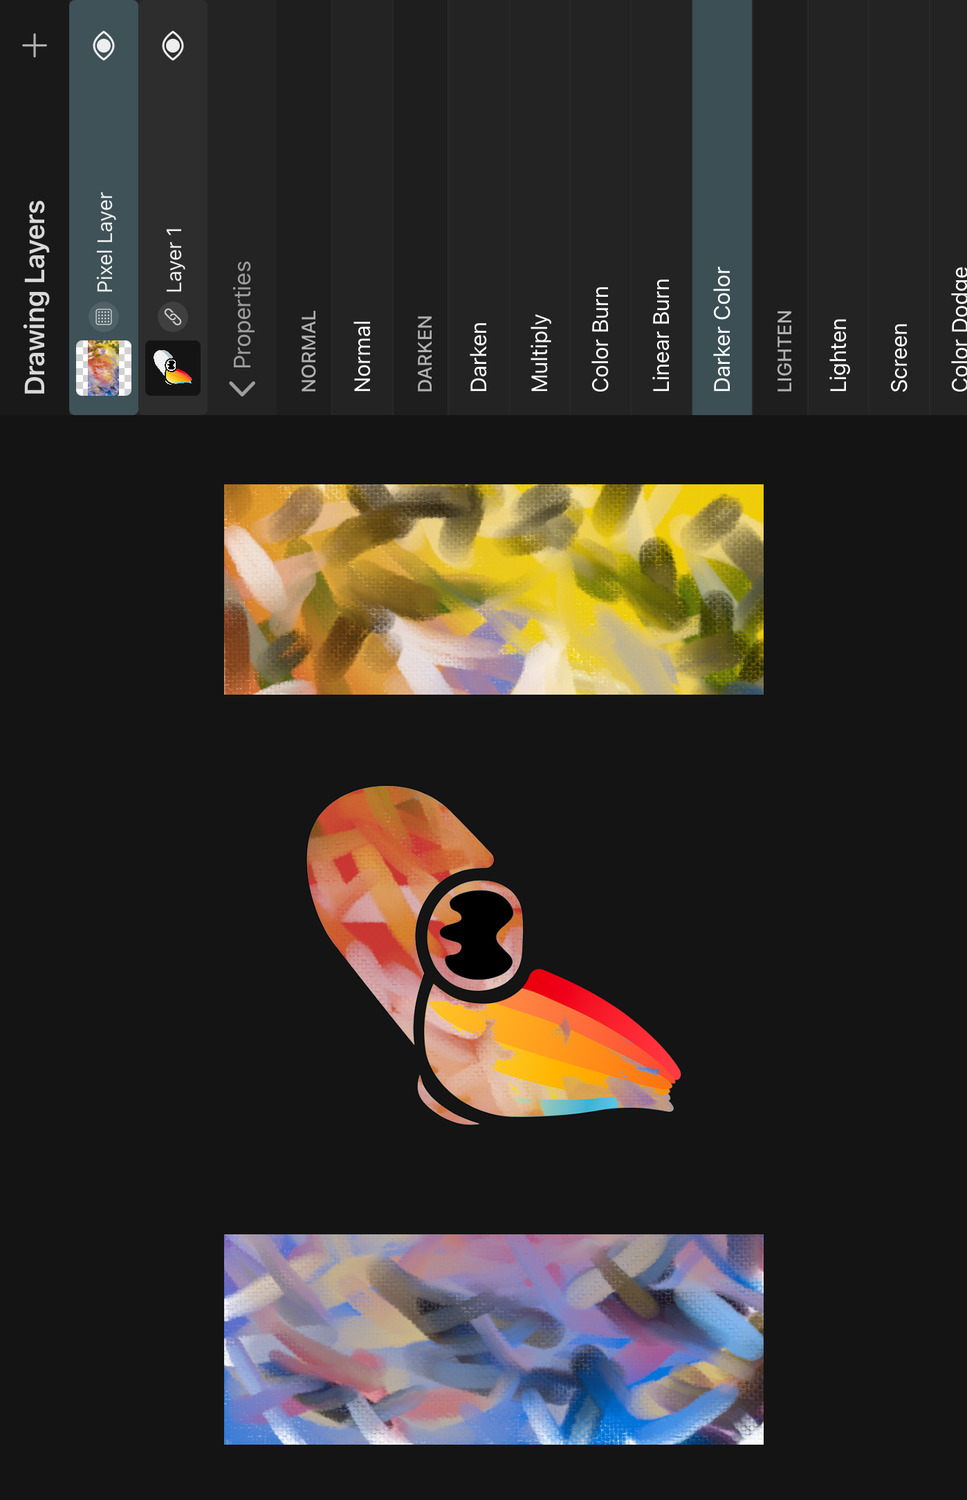
The result color is either the top color or the bottom color, depending on which one is darker. (The difference to the Darken blend mode is that Darken picks the darker value of each channel whereas Darker Color only cares about which color is darker overall).
Lighten#

The result color uses the lighter channels of the top and the bottom color.
Screen#
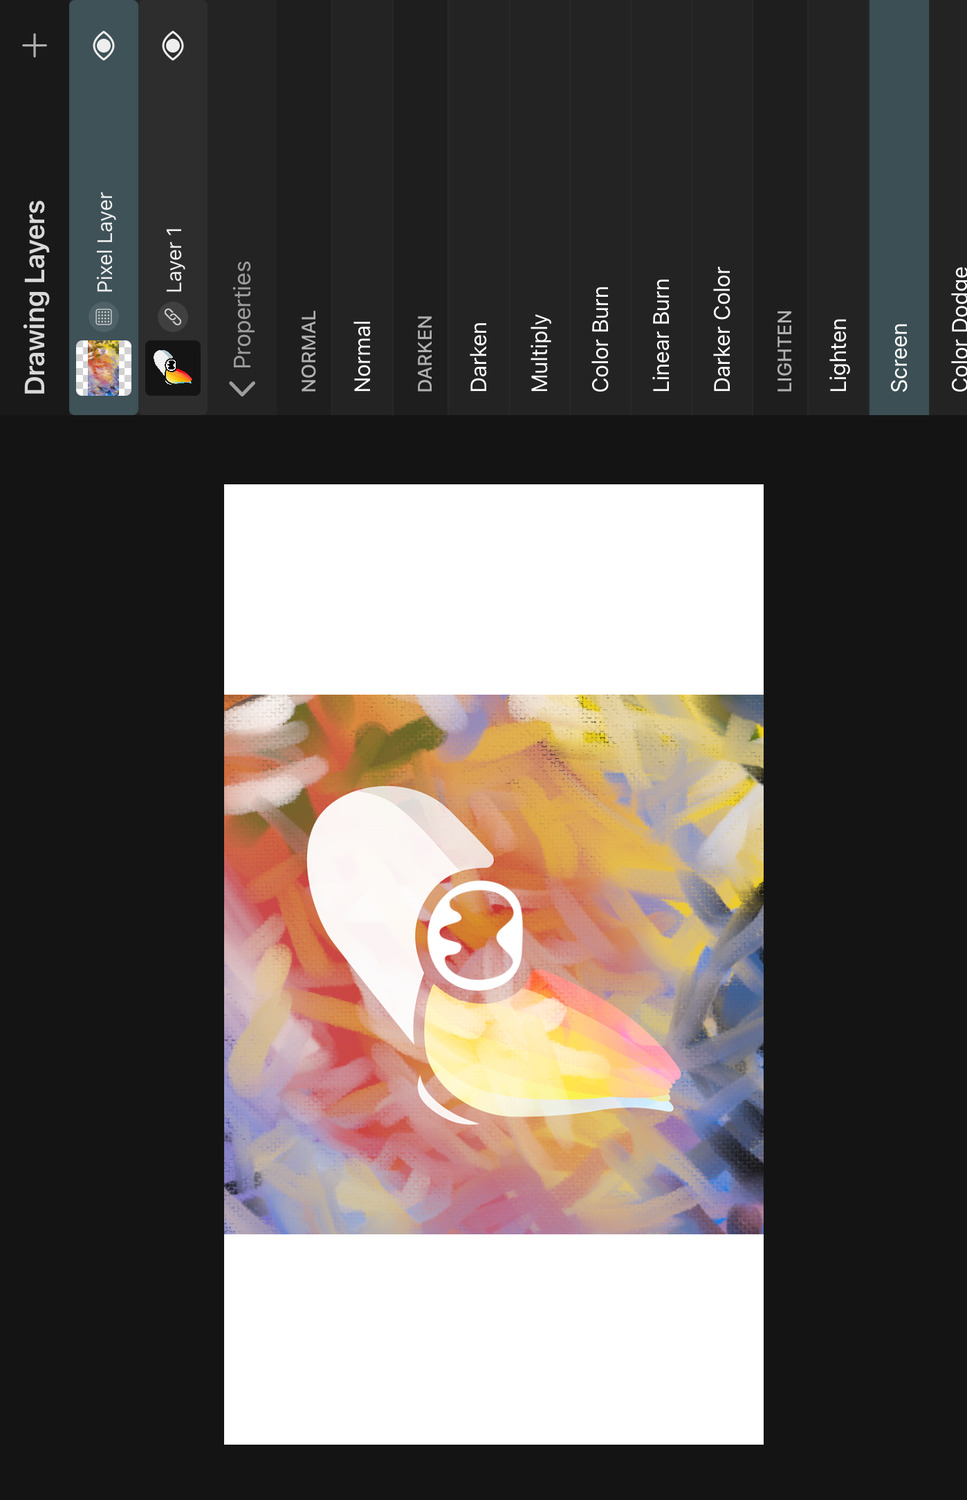
This is the inverse of the Multiply blend mode. It multiplies the inverse channel values of the top and bottom colors. The result is never darker than either the top or the bottom color. When one of the colors is black, the result will be the other color. When either of the colors is white, the result is also white.
Color Dodge#
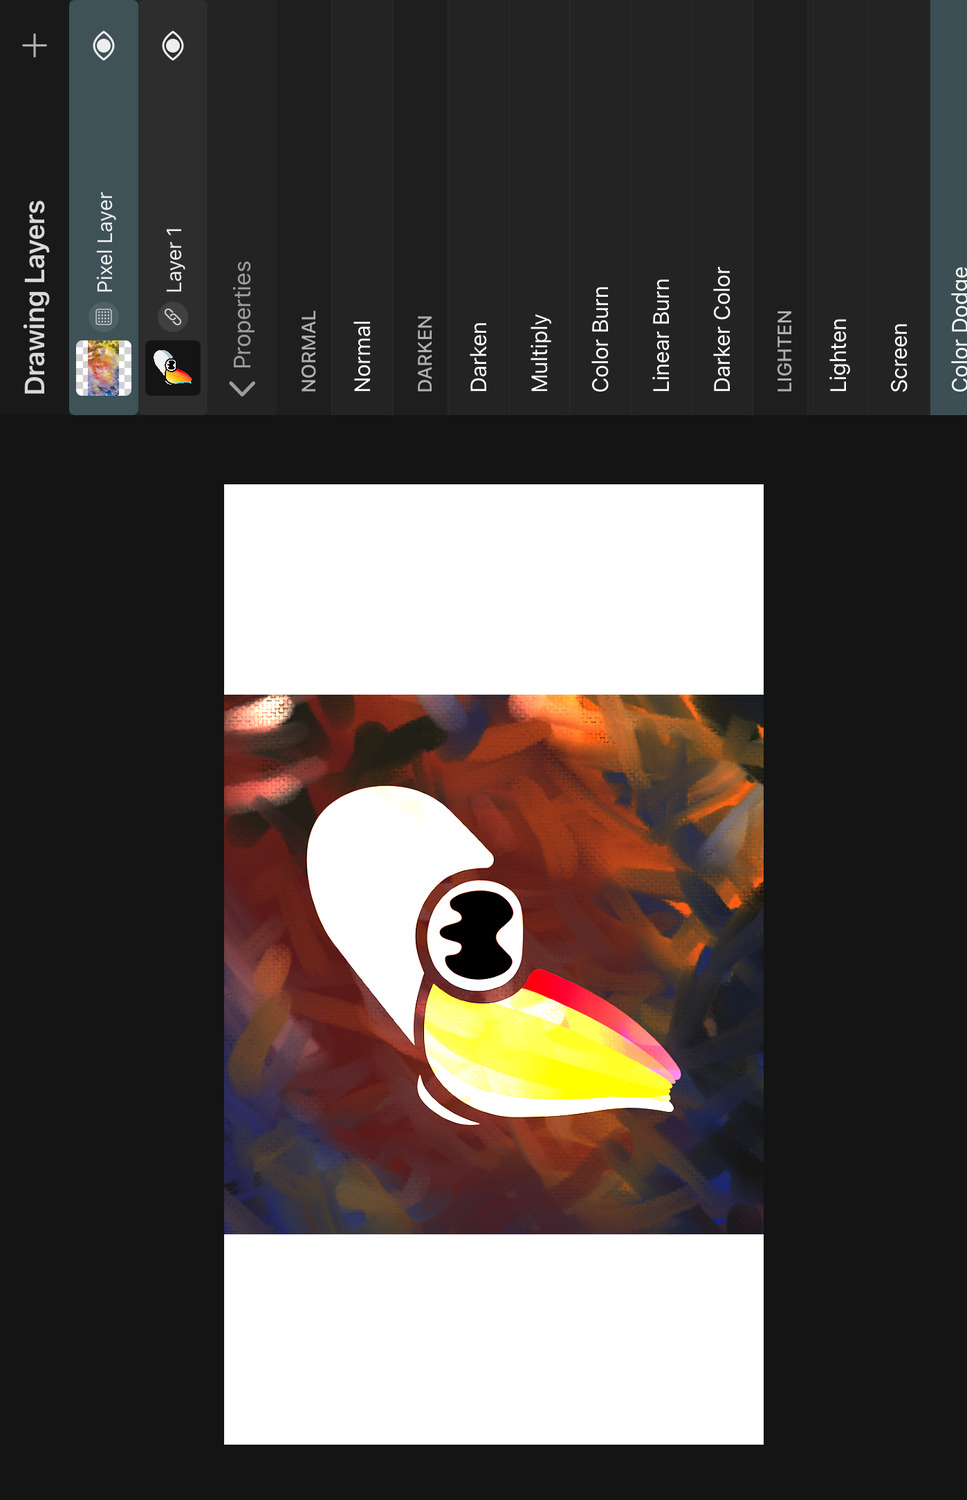
Lightens the bottom color channels to decrease the contrast to the top color and then blends the top color on top.
Add#

Lightens the bottom color channels based on the top color by increasing their brightness and then blends the top color on top.
Lighter Color#
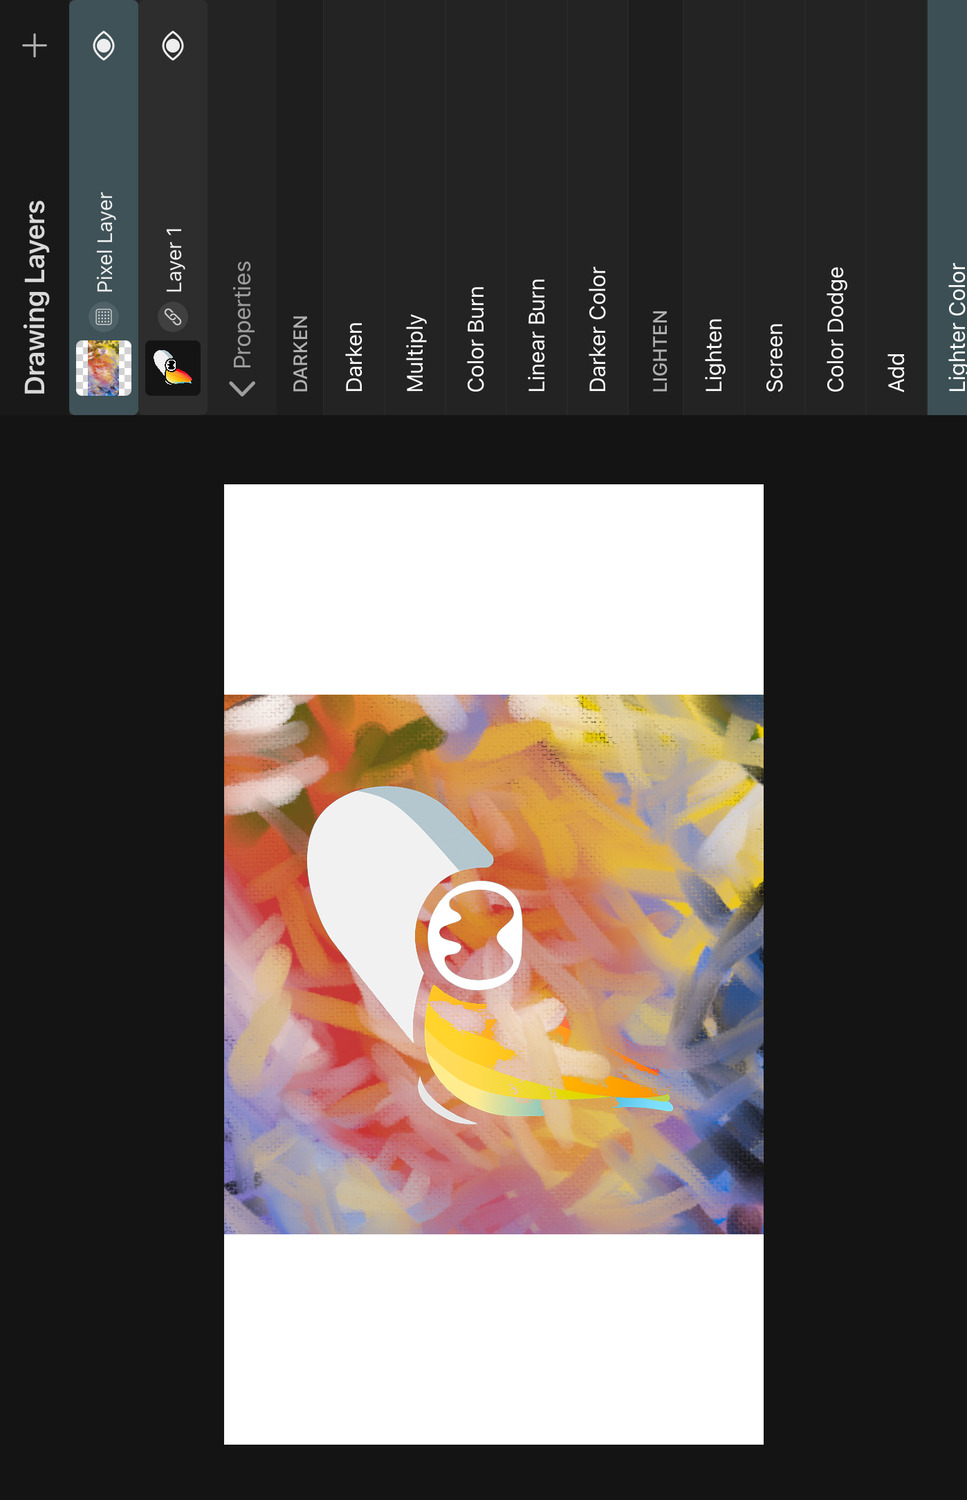
The result color is either the top color or the bottom color, depending on which one is lighter. (The difference to the Lighten blend mode is that Lighten picks the lighter value of each channel whereas Lighter Color only cares about which color is lighter overall).
Overlay#
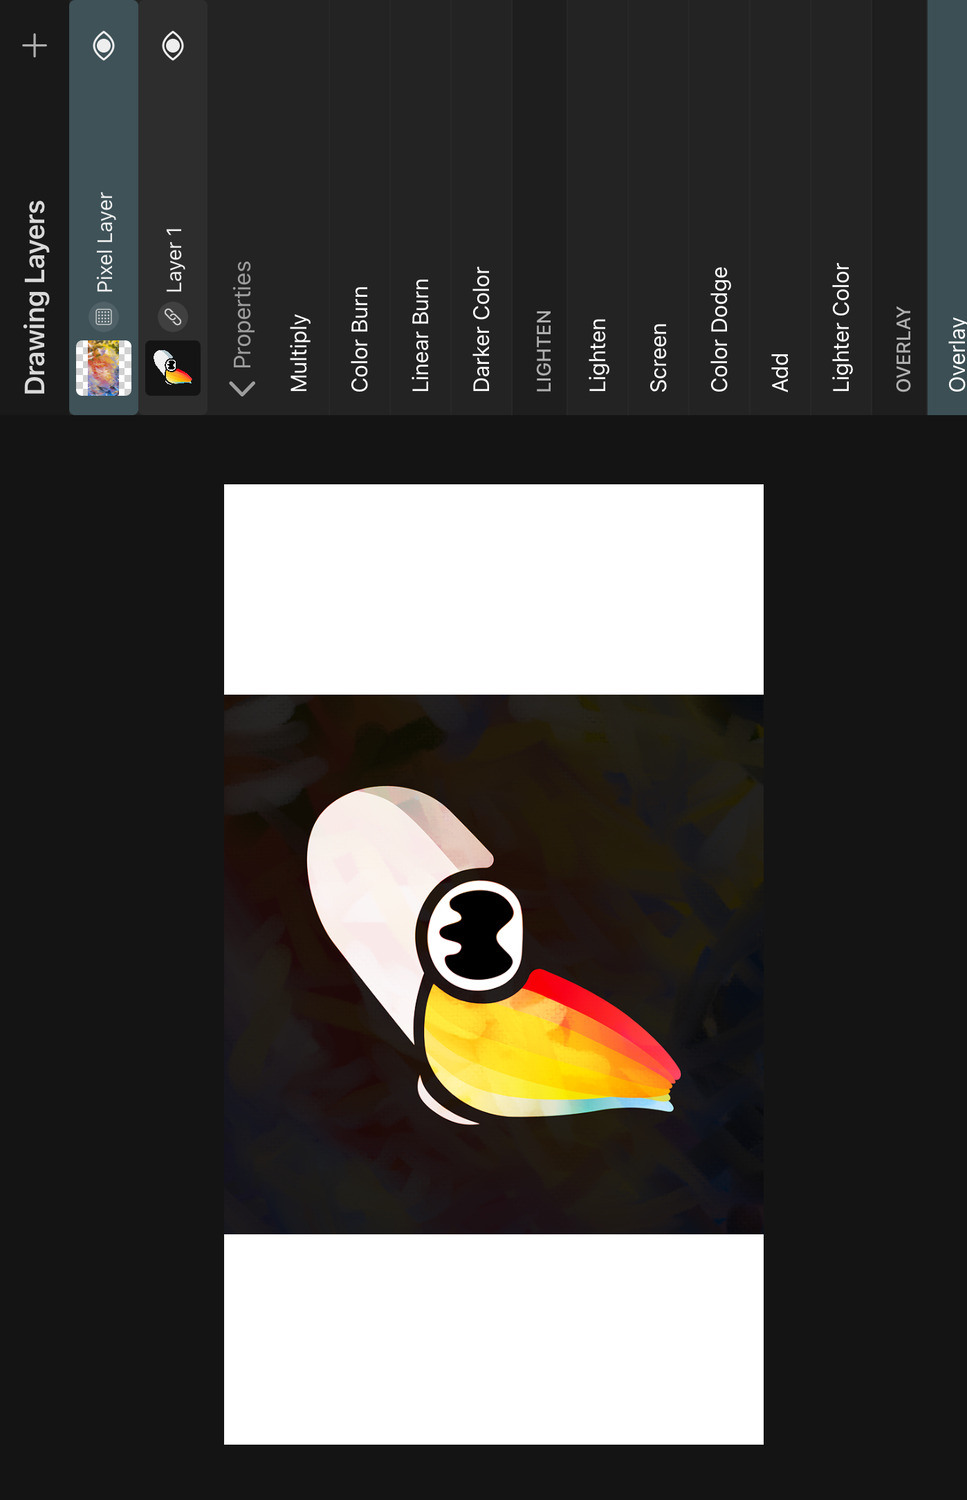
The Overlay blend mode performs Multiply blending at half strength if the bottom channel is darker than 50% gray and Screen blending at half strength if the bottom channel is lighter than 50% gray.
Soft Light#
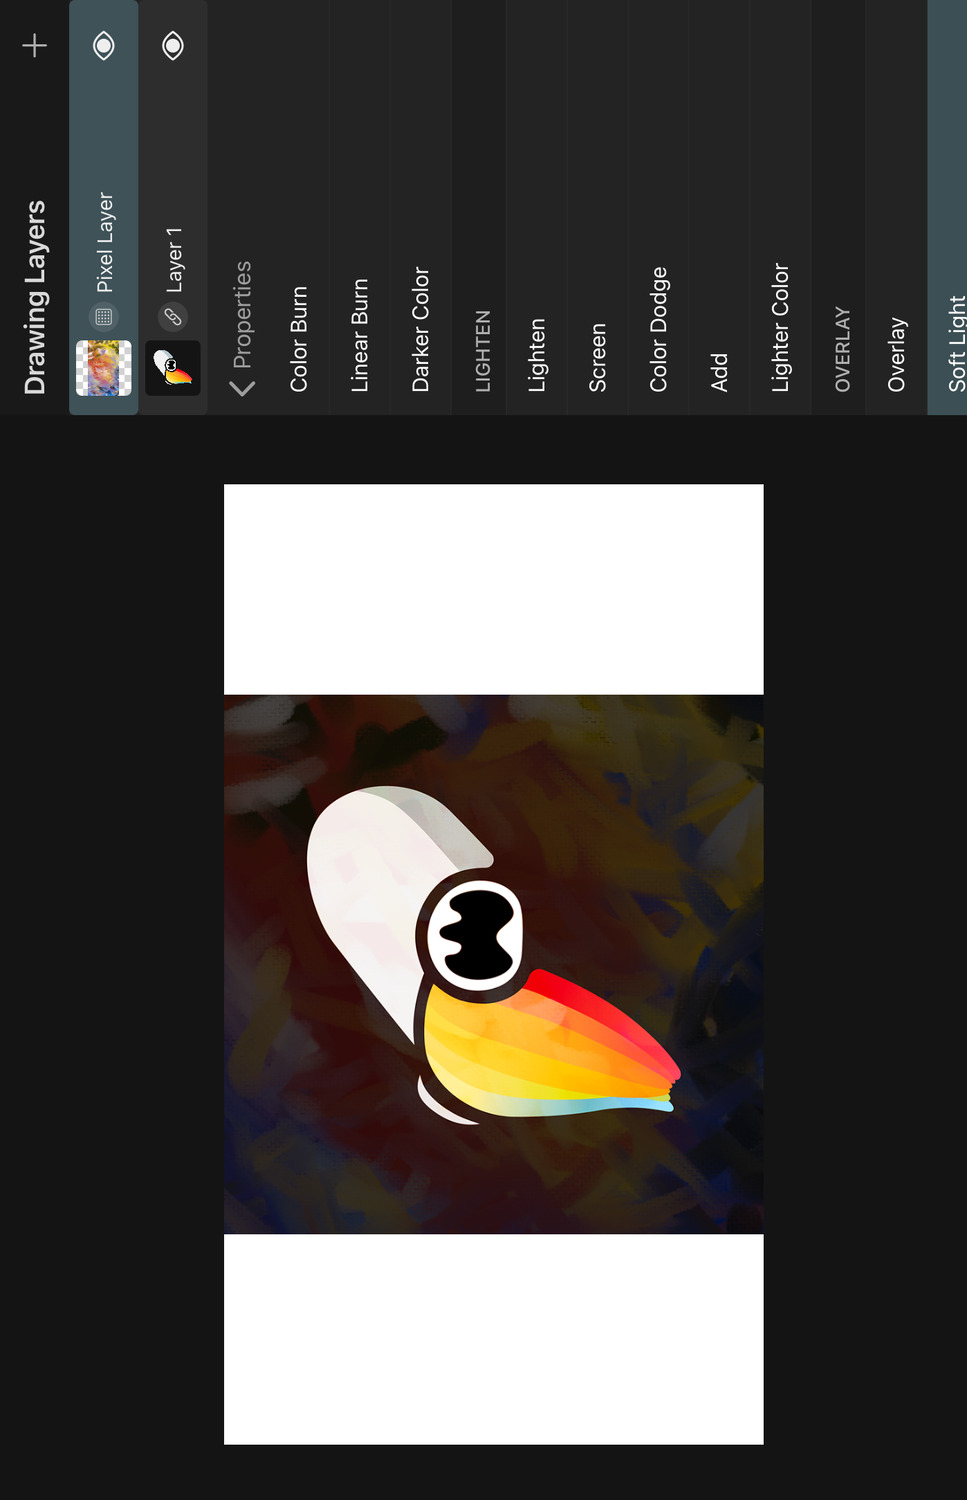
This mode darkens the colors if the top color is darker than 50% gray and lightens the colors if the top color is lighter than 50% gray.
Hard Light#
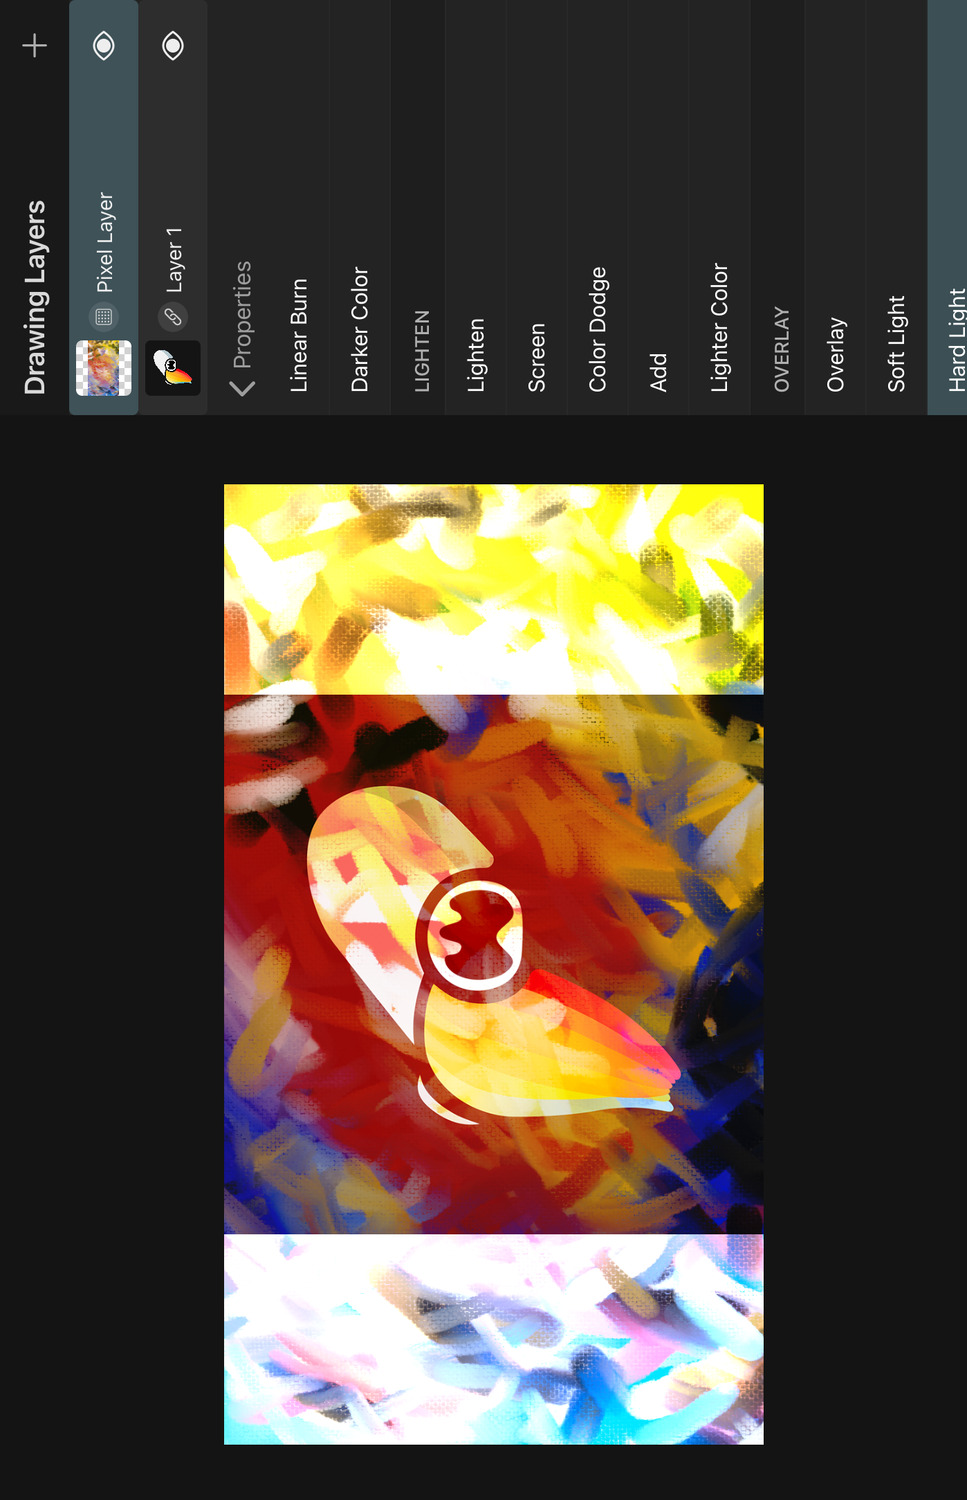
Similar to Overlay, but uses the colors of the top layer instead to determine whether to multiply or to screen the colors.
Vivid Light#
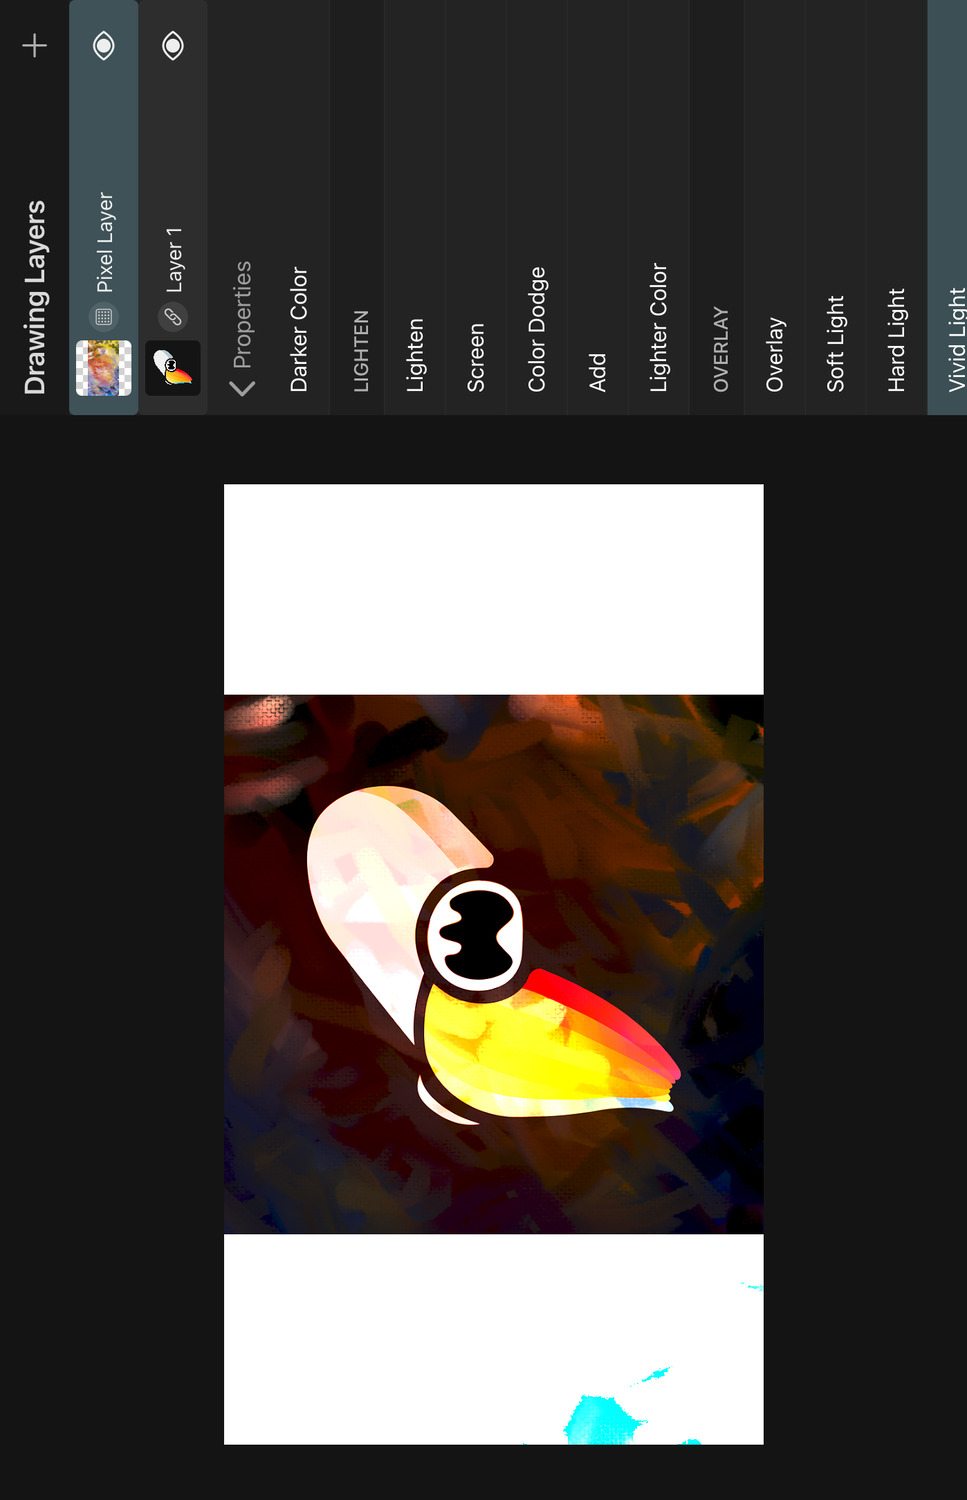
Increases or decreases the contrast depending on if the top color is darker or lighter than 50% gray.
Linear Light#

Increases or decreases the brightness depending on if the top color is lighter or darker than 50% gray.
Pin Light#
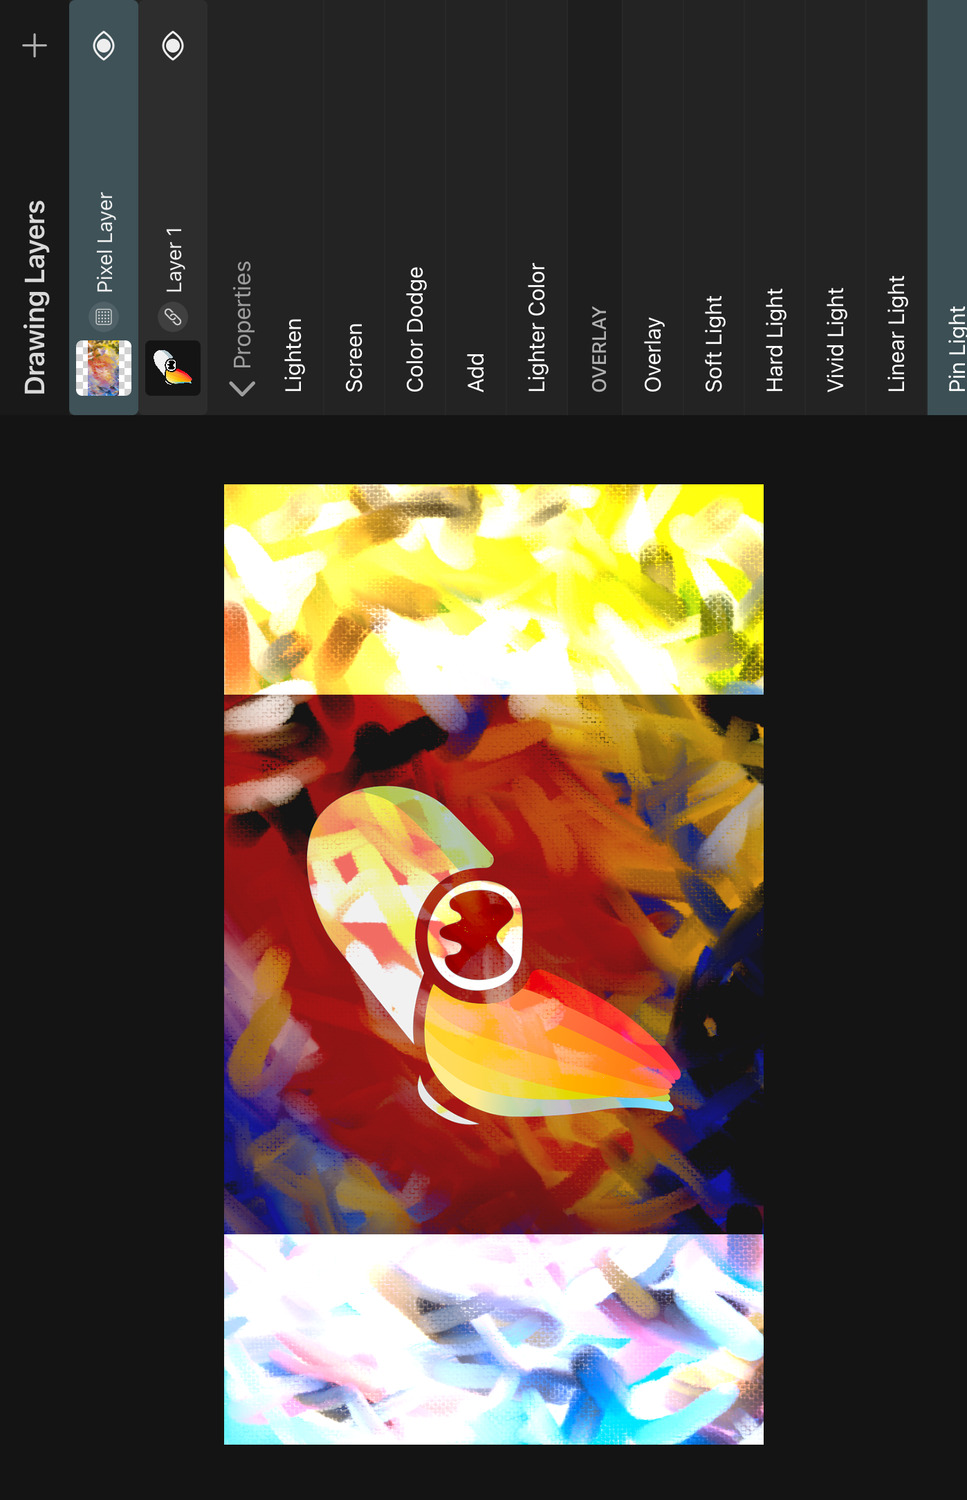
Performs the Darken blend mode if the top color is darker than 50% gray and performs the Lighten blend mode if the top color is lighter than 50% gray.
Hard Mix#
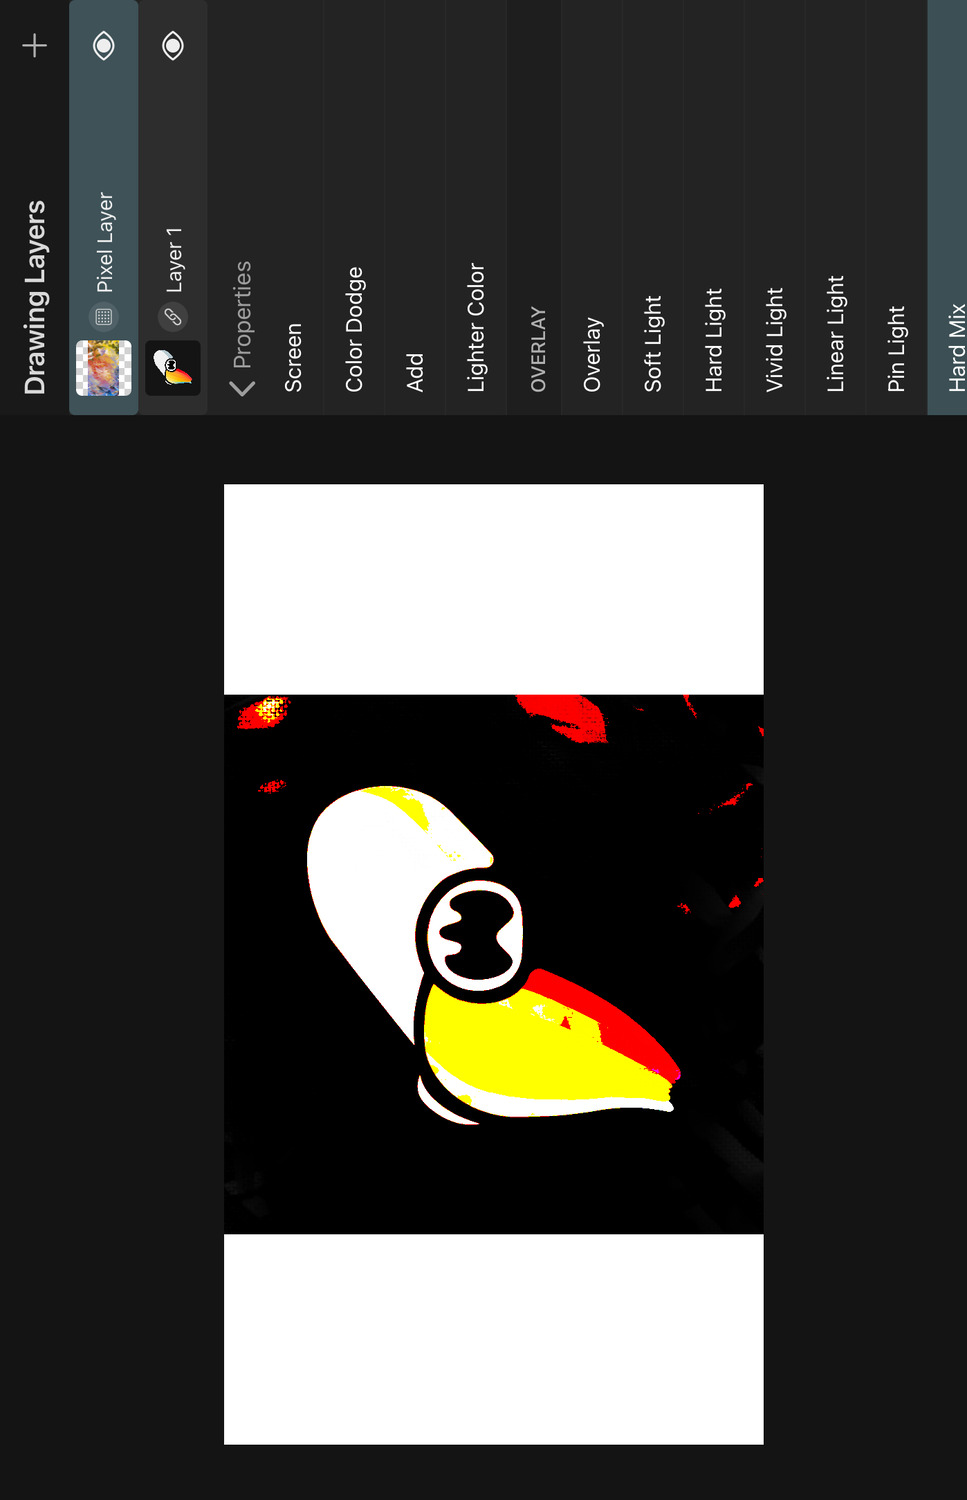
Adds the channels of the top and bottom colors together. If the resulting value in a channel is 100%, this channel is set to 100% in the result color. Otherwise, it is set to 0%.
Therefore, the result color is always either, red, green, blue, black or white.
Difference#
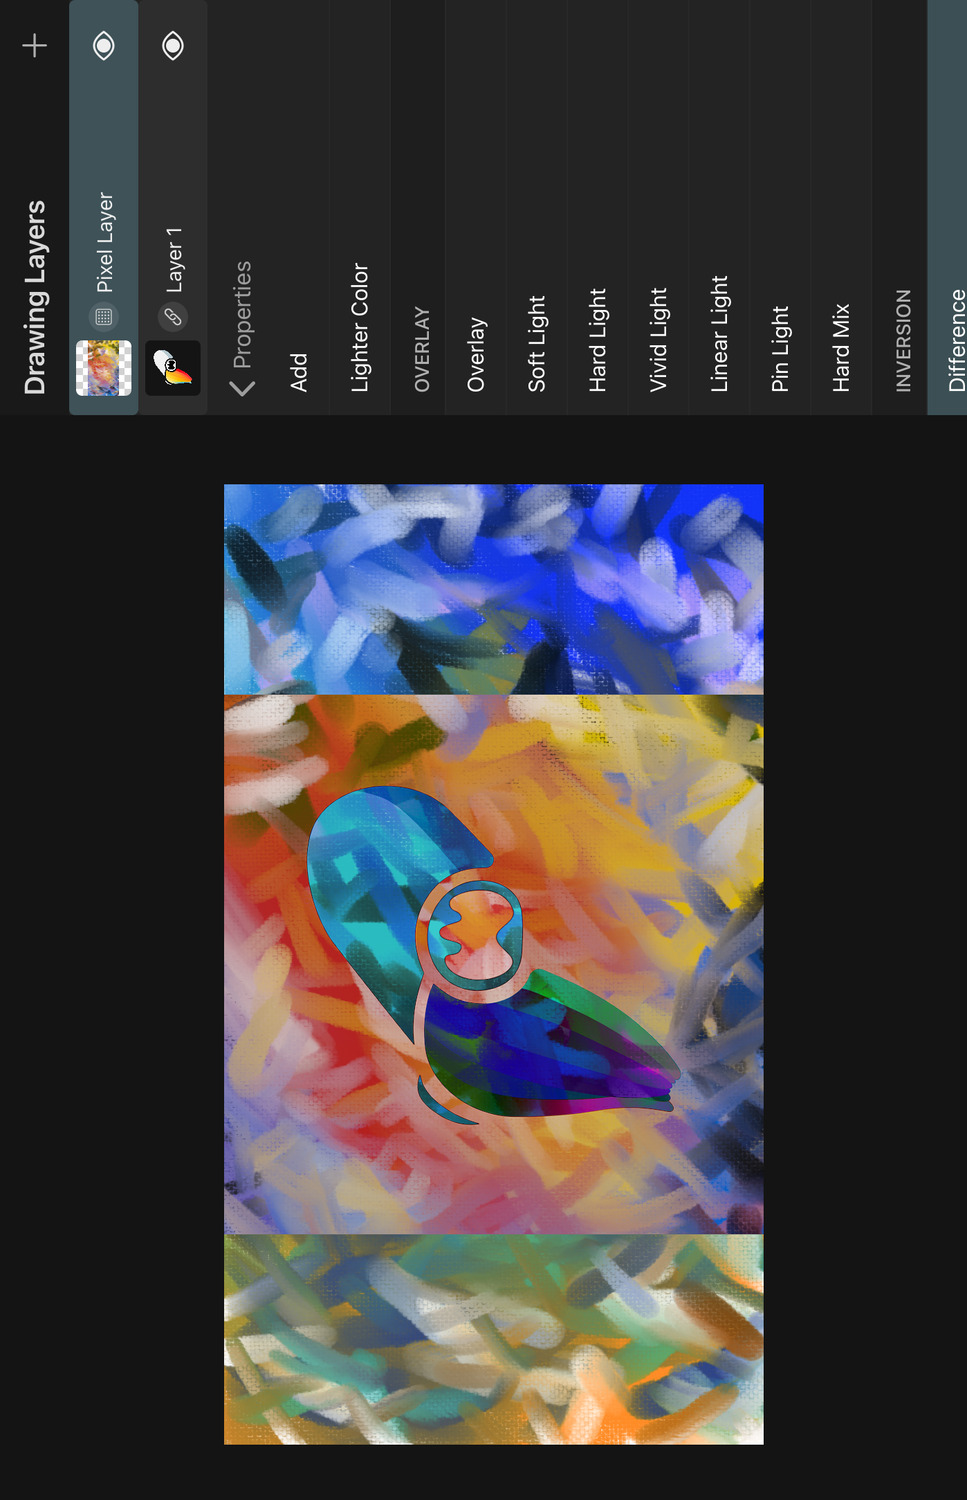
Subtracts the channel with the smaller value from the channel with the larger value for each of the three channels. Blend with white to invert the bottom color values.
Exclusion#
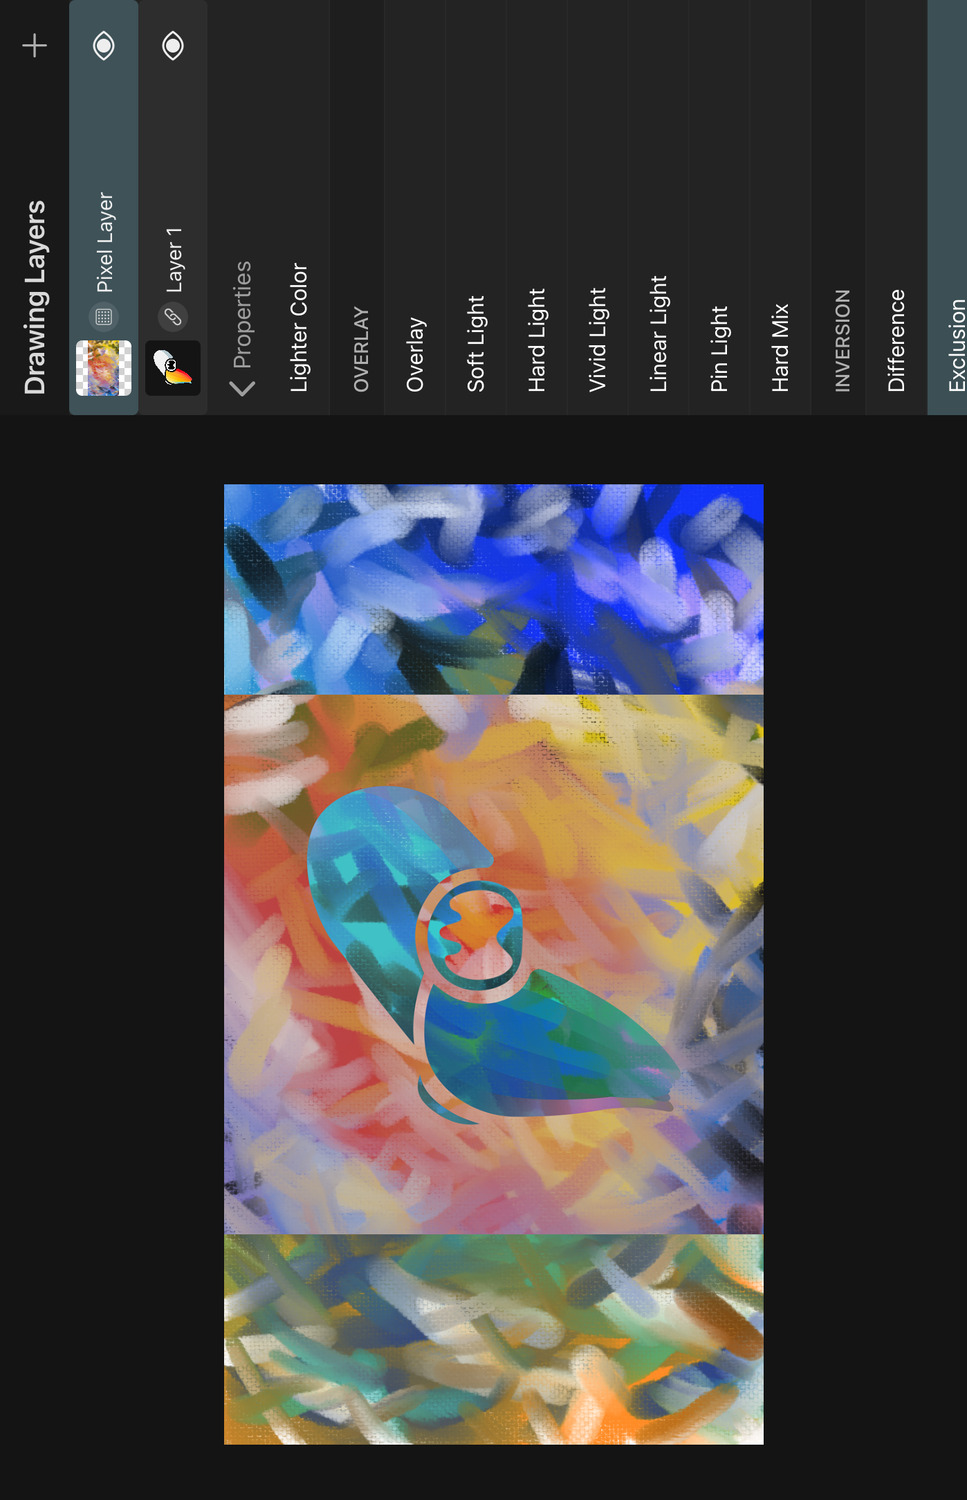
Behaves similarly to the Difference mode but results in lower contrast.
Subtract#
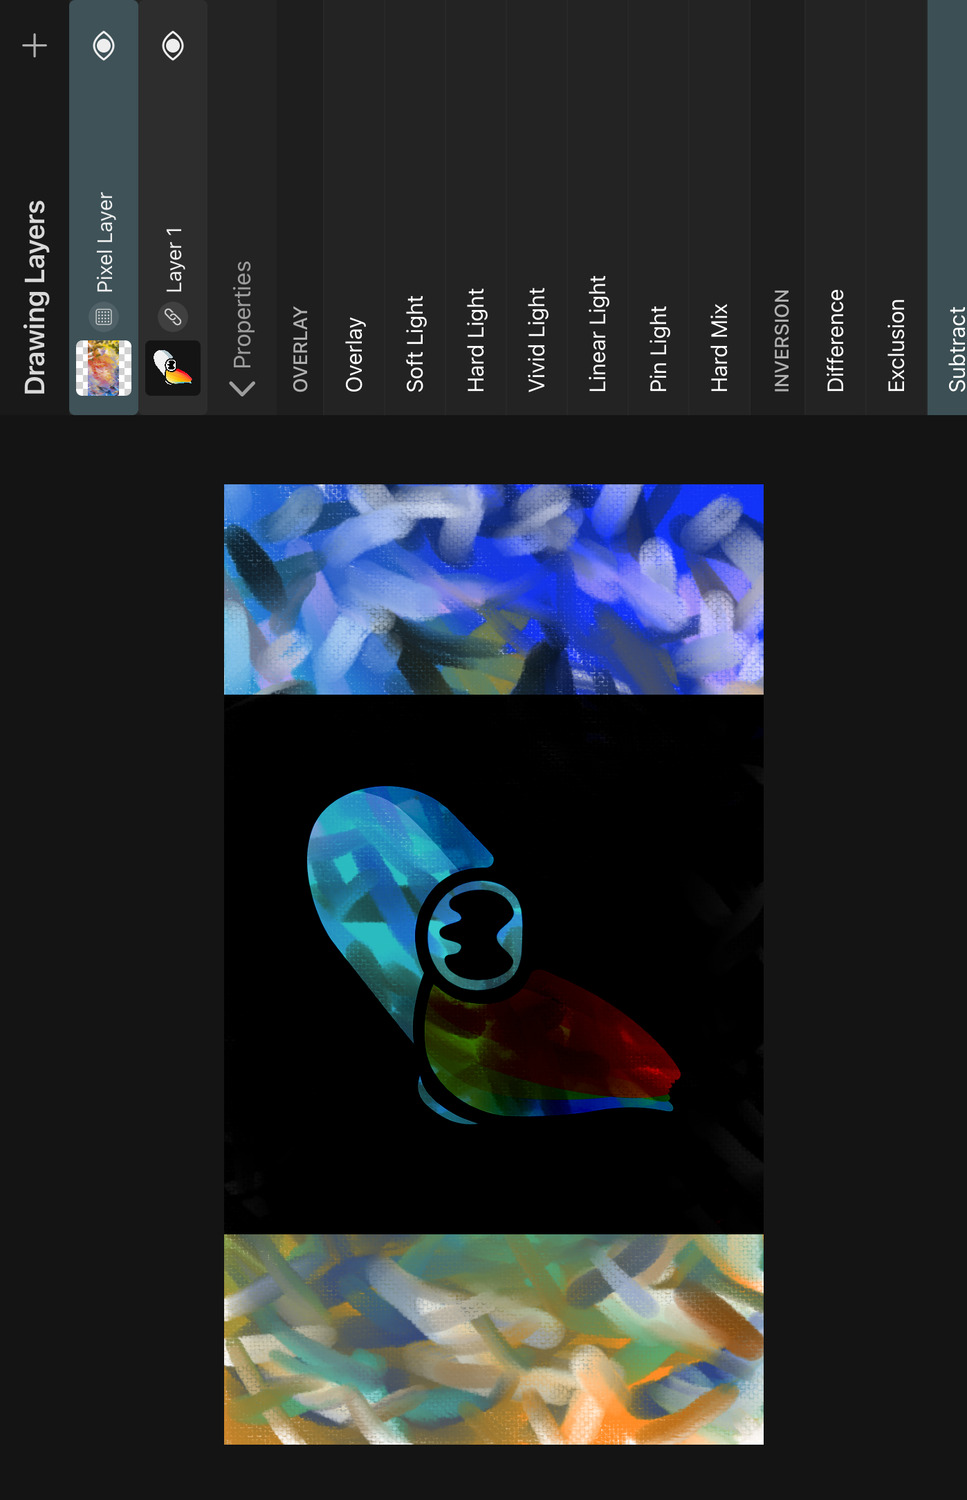
Subtracts the channels of the top color from the channels of the bottom color. Results less than 0 will be clamped to 0.
Divide#
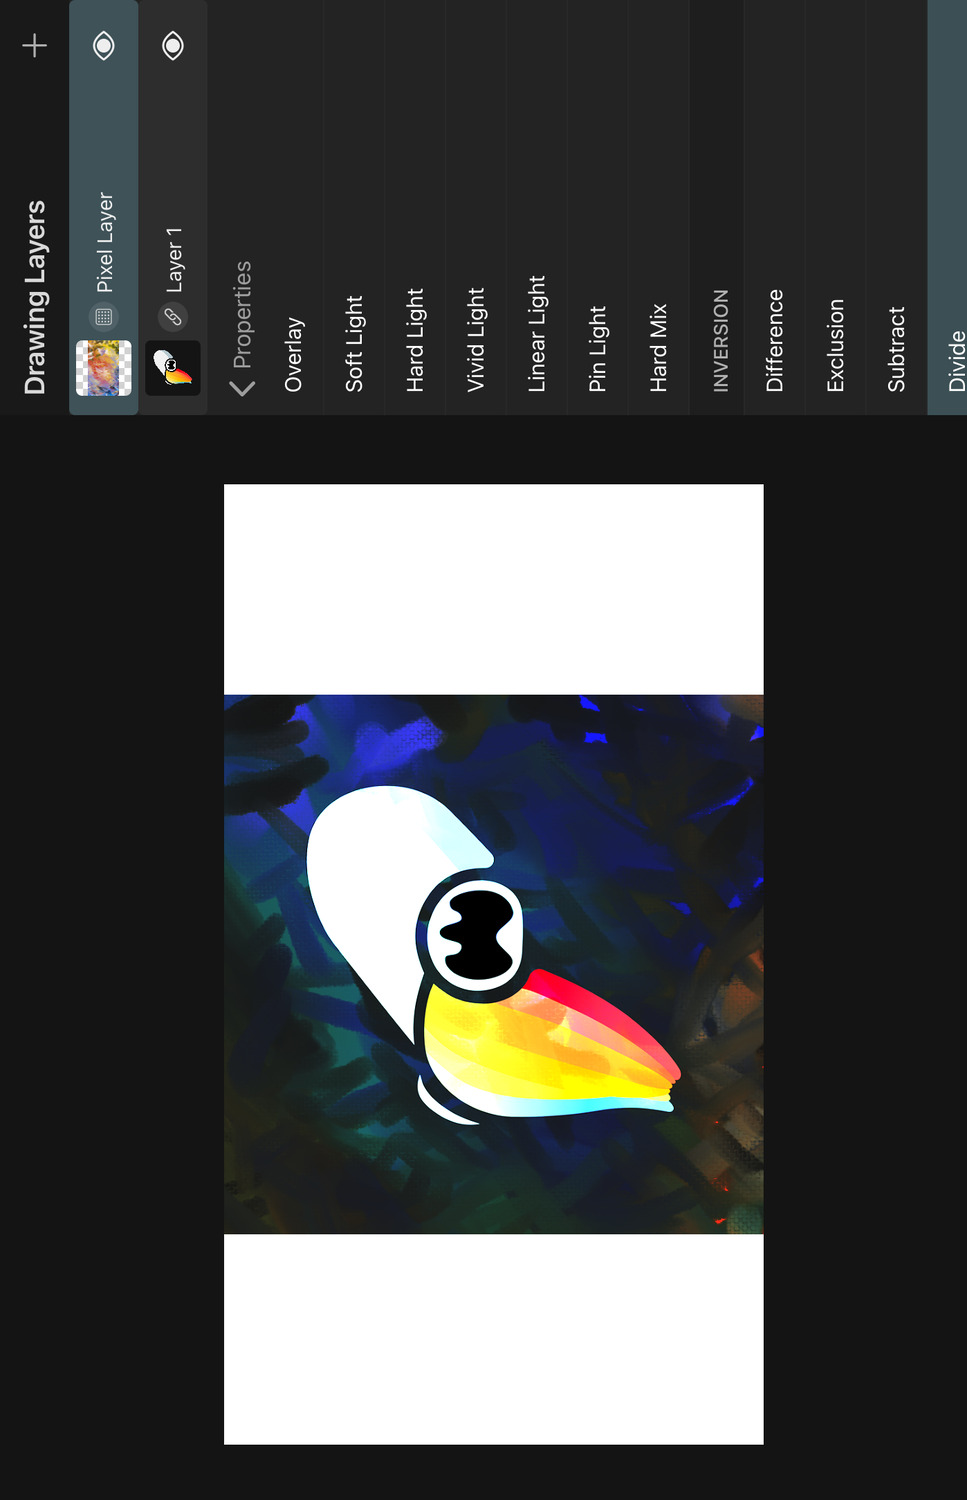
Divides the bottom color by the top color channels.
Hue#
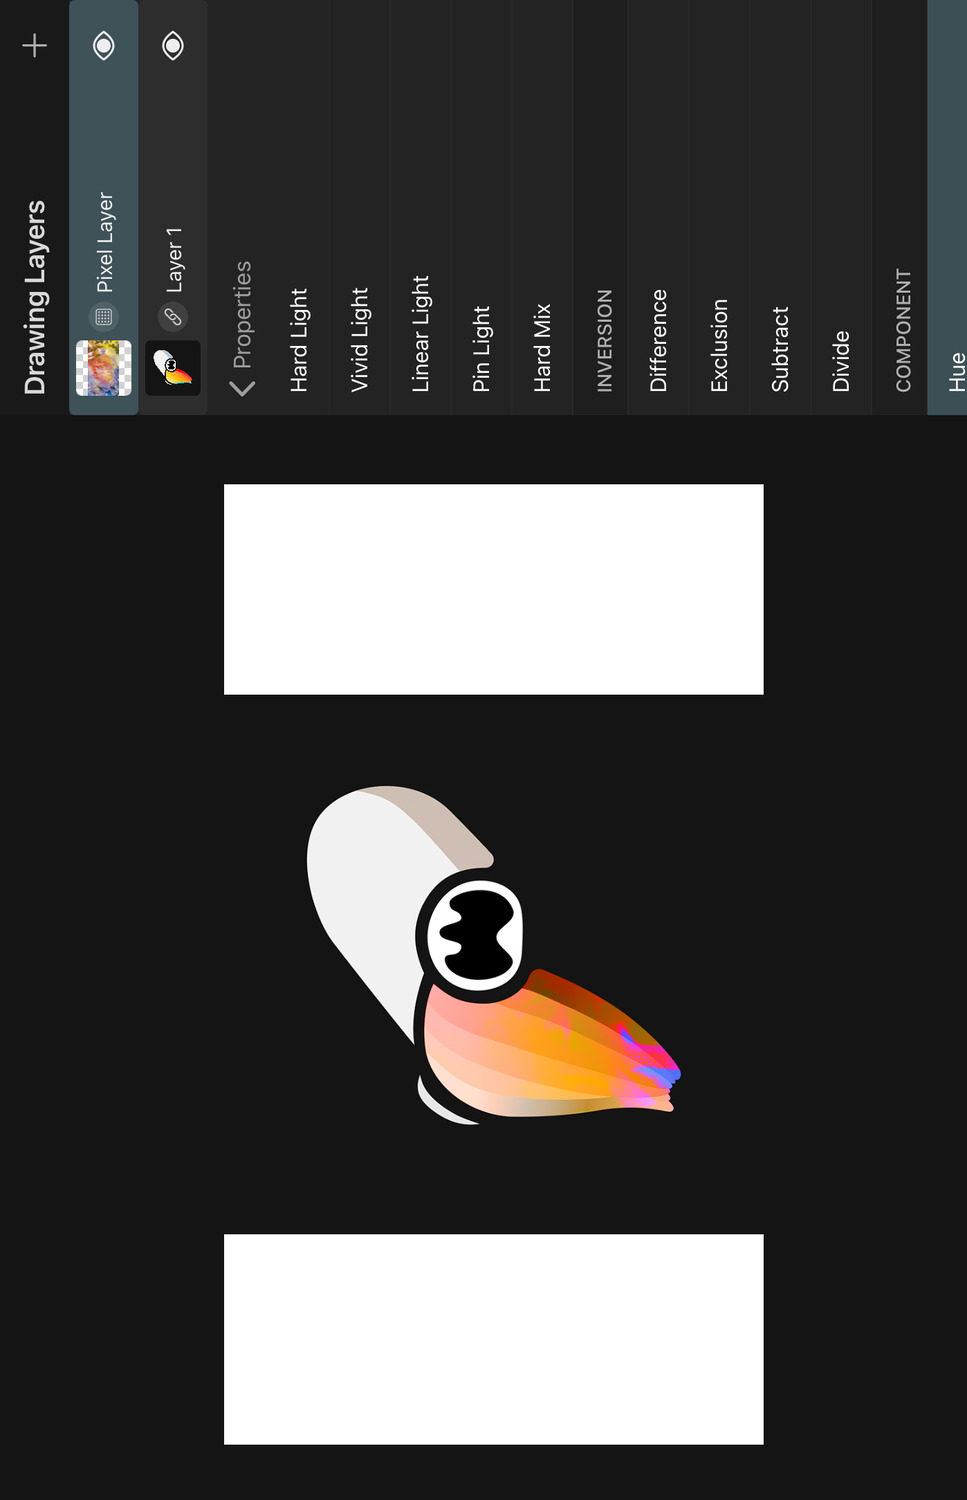
The result color uses the hue of the top color and the luminosity and saturation of the bottom color.
Saturation#
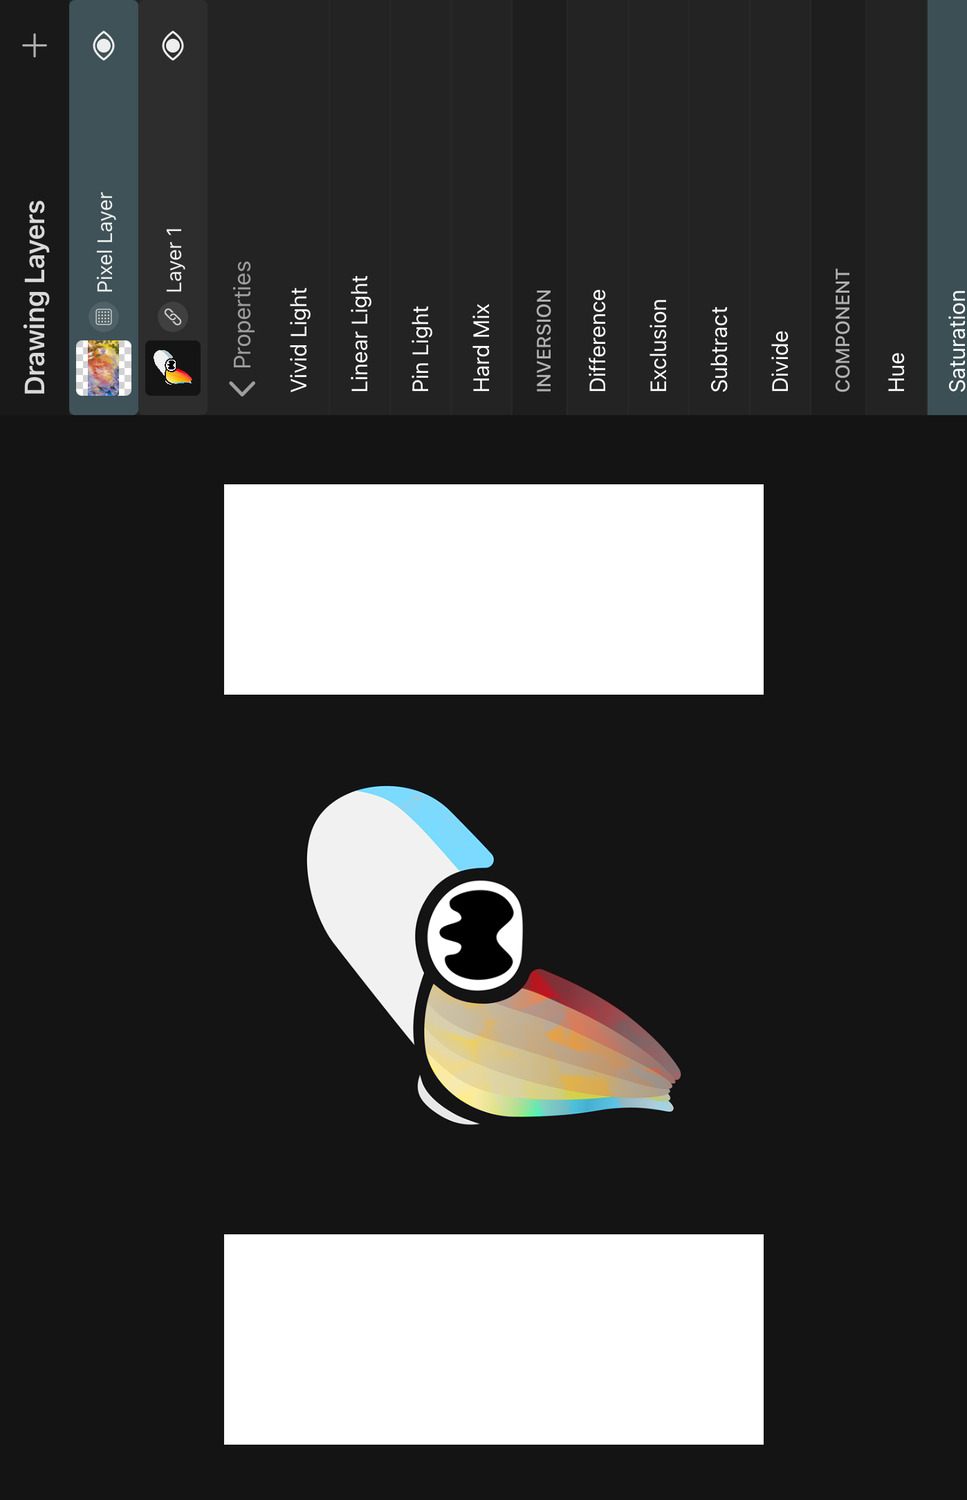
The result color uses the saturation of the top color and the luminosity and hue of the bottom color.
Color#

The result color uses the hue and saturation of the top color and the luminosity of the bottom color.
Luminosity#
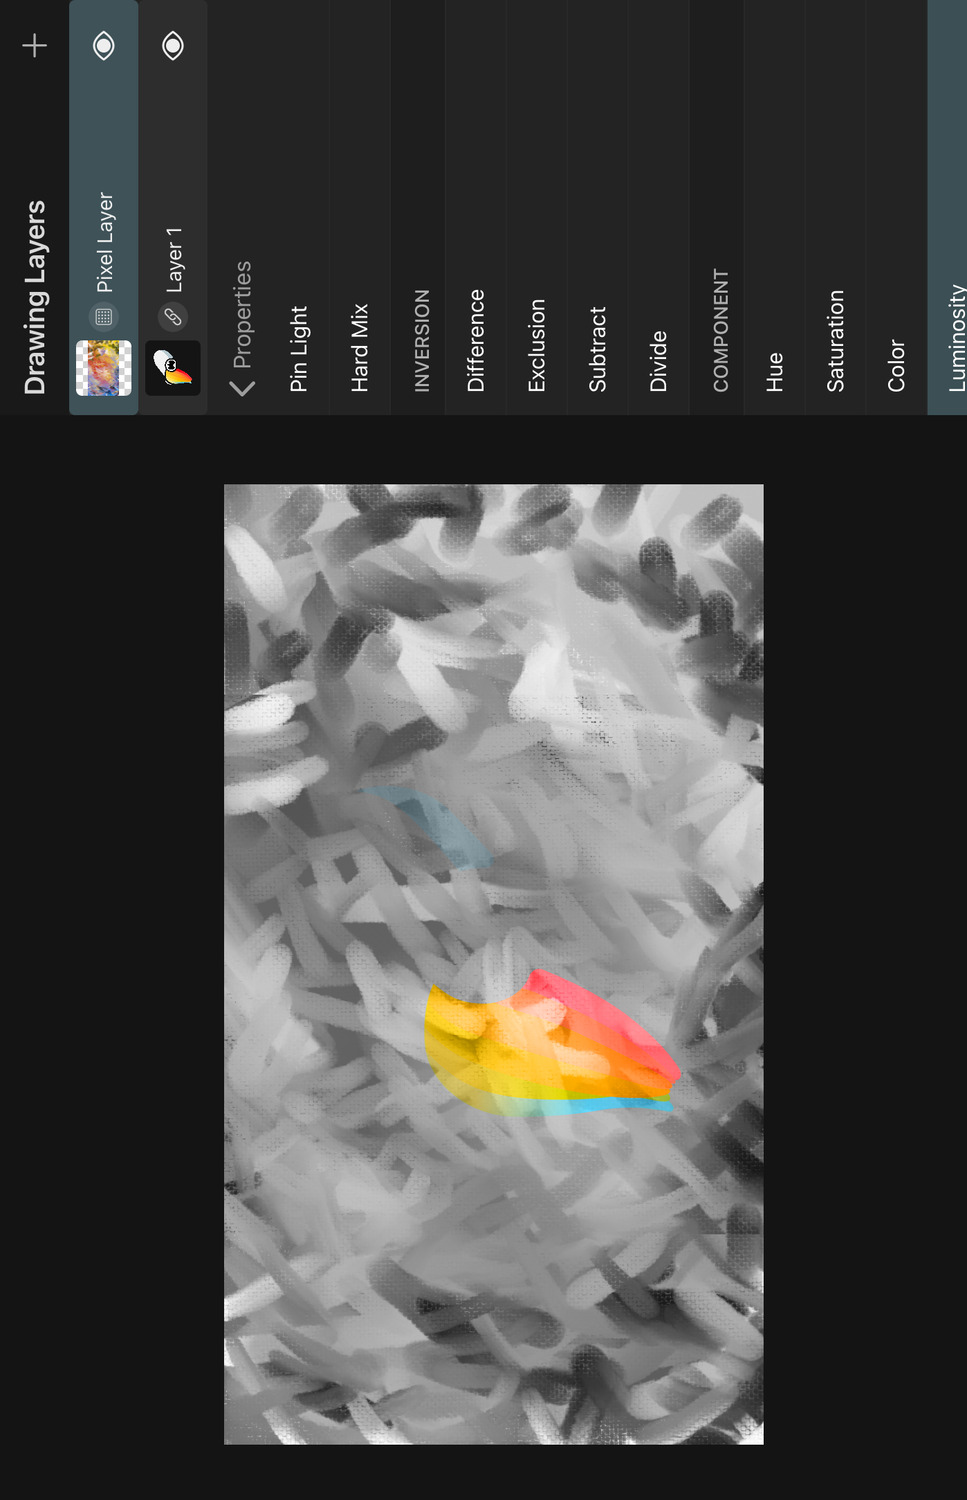
The result color uses the luminosity of the top color and the hue and saturation of the bottom color.
#
Keyframes
Overview
Keyframes allow you to define different values for layer properties at different points in time. ToonSquid will then take care of automatically animating the layer between those keyframes.
Keyframes
Learn how to effectively use a keyframing workflow to create animations quickly without having to draw every frame separately by hand.
Easing Curves
Easing curves define how the animation between two keyframes behaves. Use the customizable set of easing curve presets to create more organic motion.
#
Keyframes
Keyframes
A keyframe is a value of a property at a specific point in time. Add keyframes to your layers to let ToonSquid automatically animate properties over time.
Many but not all layer properties support keyframes.

Keyframing Mode#
To start adding keyframes you need to switch the editor into keyframing mode. For this, tap the keyframing button in the timeline.
When the keyframing mode is enabled, the timeline shows layer properties and keyframes underneath the selected layer. You can configure the editor to also show keyframes in all layers in the timeline at once instead of just for the selected layer.
If an animation layer is selected, only the keyframes of the selected drawing layer inside the selected drawing are shown. If the layer has any effects, the properties and keyframes of those effects are also shown alongside the layer's own properties.
Keyframes are visualized in the timeline with a rhombus icon.
Automatic Keyframe Insertion#
By default, new keyframes are automatically inserted when a property is edited if either
- the keyframing mode is enabled
- the property already has more than 1 keyframe
Automatic keyframe insertion can be disabled in the settings.
Note#
By default, the keyframing mode does not just show you the keyframes of a layer, but also changes the editing behavior regarding automatic keyframe insertion, so make sure that you don't keep this mode enabled unintentionally.
When the first keyframe of a property is added, another keyframe is automatically added to the first frame of the layer as well so that the property animates between the two frames. This behavior can be disabled in the settings.
Manual Keyframe Insertion#
You can always manually add keyframes to a property using the following steps.
- Select one or more properties.
- Select the frame on which the keyframes should be added.
- Tap the
Add Keyframebutton at the bottom of the timeline.
Delete Keyframes#
Use the following steps to delete keyframes.
- Select one or more keyframes.
- Tap the
Delete Keyframebutton at the bottom of the timeline.
Alternatively, select a keyframe in the timeline, tap it again and select the Delete action.
You can also delete all keyframes of a property at once by tapping the selected property again and choosing the Delete Keyframes action.
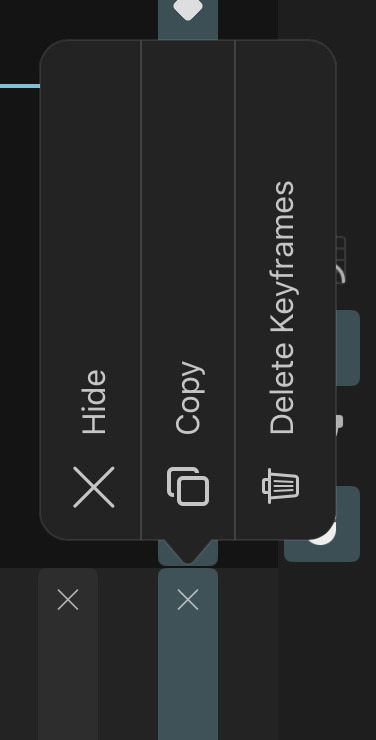
Copy and Paste#
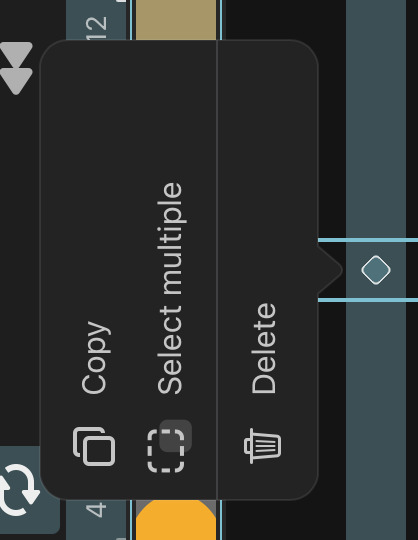
All keyframes of a property can be copied using the Copy action. Paste the copied data on a different property to overwrite its existing keyframes.
You can also copy a selection of keyframes using the Copy action on the keyframes.
Pasting the selected keyframes maintains their relative distances between each other. Pasting a keyframe on an existing keyframe overwrites the existing values.
Select Properties and Keyframes#
Properties and keyframes can be selected by tapping them once. Selected properties and keyframes are highlighted in the timeline.
Multiple properties can be selected just like layers by swiping them to the right and then letting go. Multiple keyframes can be selected similarly to drawings using a double tap and drag gesture.
When a layer has effects, the names of the layer and effects are also shown in the timeline above their respective properties. You can tap this name of the layer or effect to quickly select all of its properties.
Move Keyframes#
Keyframes can be moved using drag and drop, which also works for multiple selected keyframes at once. Similarly to when multiple keyframes are copied and pasted, dragging them also maintains their distance between each other (i.e. their timing).
Dropping keyframes onto other existing keyframes overwrites them, just like with copy and paste. Keyframes cannot be dropped in other properties.
Property Visibility#
By default, all keyframeable properties of a layer are shown in the timeline. You can hide the ones you don't want to see using the X button on the property.
Note#
It is important to remember that keyframes are still automatically added for hidden properties as well. If you find this behavior unexpected, you can disable it in the settings.
In order to show all properties again after you have hidden some of them, tap either on a property or on the layer and select Show All Properties.
Property Groups#
Some properties (such as Scale and Path Control Points) are multidimensional, which means that in reality they are groups of two or more properties.
Such property groups can be expanded into their separate properties using the Expand Property Group property action.
They can then be collapsed again using the Collapse Property Group action. When you edit a collapsed property group, your edits are automatically applied to all of the underlying properties.
When a property group is collapsed, it shows keyframes on the frames where any of its underlying properties have keyframes.
Position Property#
The Position layer property is a special case and is not a property group in the same way that is described above.
You can expand it into separate X and Y properties using the Expand X and Y property action. For normal property groups, this would only result in a visual change of how the properties appear in the timeline. However, doing so for the Position property has a consequence for the layer behaviour. Motion paths are not available for layers with split Position properties.
The two choices have different benefits and limitations:
Collapsed Position
You can use motion paths to animate a layer's position. Easing curves of Position keyframes apply to the position of the layer along the motion path curve segments. This makes it easy to create controlled movement along a curved path at constant or consistently changing speeds.
Expanded Position
You can animate the X and Y properties independently, position their keyframes on different frames, have a different number of keyframes and apply different easing curves to each value. However, you cannot use motion paths.
Separate easing curves can also make it a lot more difficult to achieve a constant movement speed along curved paths. It is therefore generally recommended to keep the Position property collapsed unless you need the additional fine-grained control over each dimension.
Looping Keyframes#
In order to loop keyframes, follow these steps:
- Select the group of keyframes that you want to loop.
- Tap any of the selected keyframes.
- Select the
Loopaction.
This will loop the selected keyframes until the next keyframe is reached.
The looping is performed using the Loop easing curve on the last keyframe of each property being looped. You can change this easing curve to remove the looping behaviour again.
If you choose to loop a selection of keyframes across multiple properties, the last selected keyframe defines the end of the loop cycle. New keyframes are automatically inserted on other selected properties on this frame if necessary in order for the entire selection to loop as a block in sync.
#
Keyframes
Easing Curves
Easing curves control the interpolation behavior of the animation of a property between two keyframes. Every keyframe has an associated easing curve which controls the easing from that keyframe to the next.
Note that if the start and end keyframe values are the same, the easing curve has no effect, since it only controls the interpolation percentage over time. The loop keyframe is an exception to this since it just repeats the previous keyframe values.
Easing Curve Editor#
When the keyframing mode is enabled and a property is selected, the easing curve button will be shown next to the keyframing mode button, which you can use to open the easing curve editor for the easing curve of the most recent keyframe of that property.
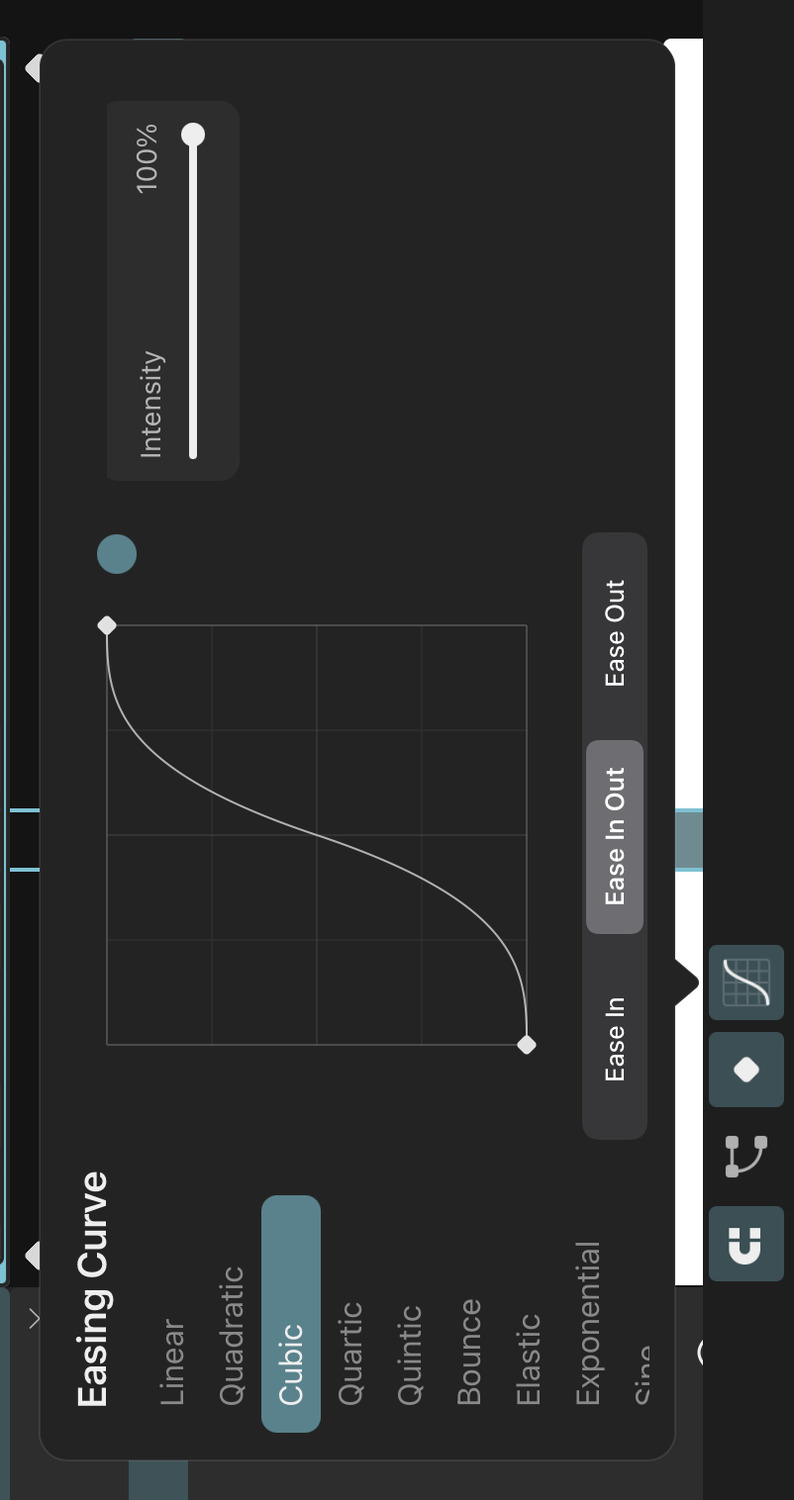
The Easing Curve Graph#
The easing curve editor shows a graph of the current easing curve. It has the time on the horizontal axis and the values of the previous and next keyframes on the vertical axis.
The circle to the right of the graph previews the behavior of the current easing curve if it were applied to two position keyframes.
Easing Mode#
Every easing curve has a mode which can be one of the following. The mode controls the basic shape of the curve
Ease In#
Slow at the start - fast at the end.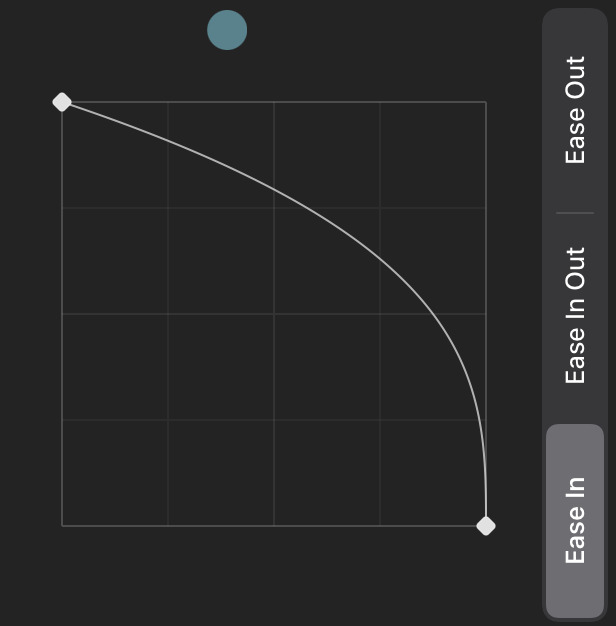
Ease Out#
Fast at the start - slow at the end.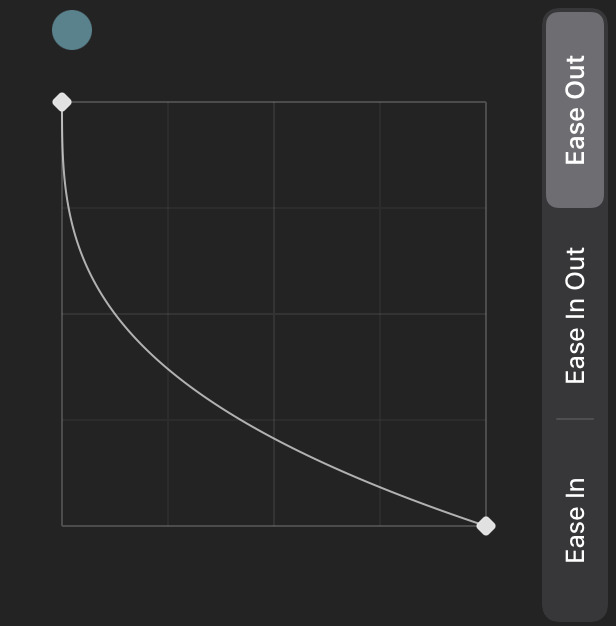
Ease In Out#
Slow at the start - fast in the middle - slow at the end.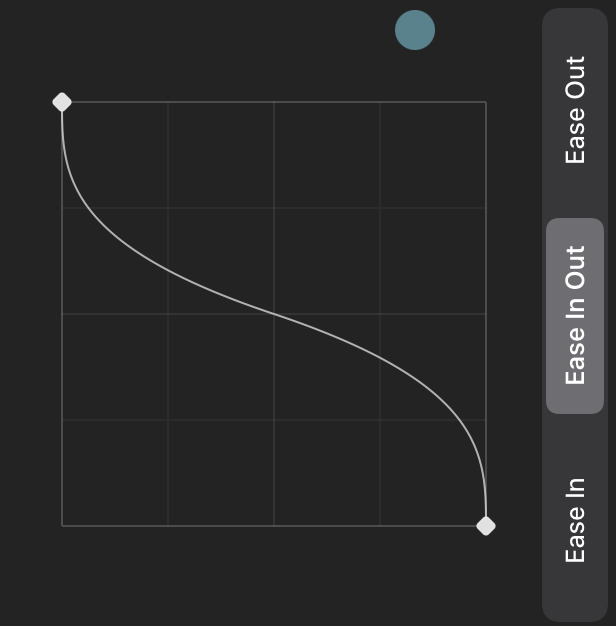
Presets#
ToonSquid provides a variety of customizable easing curve presets that you can pick to quickly get the easing behavior that you are looking for.
Linear#
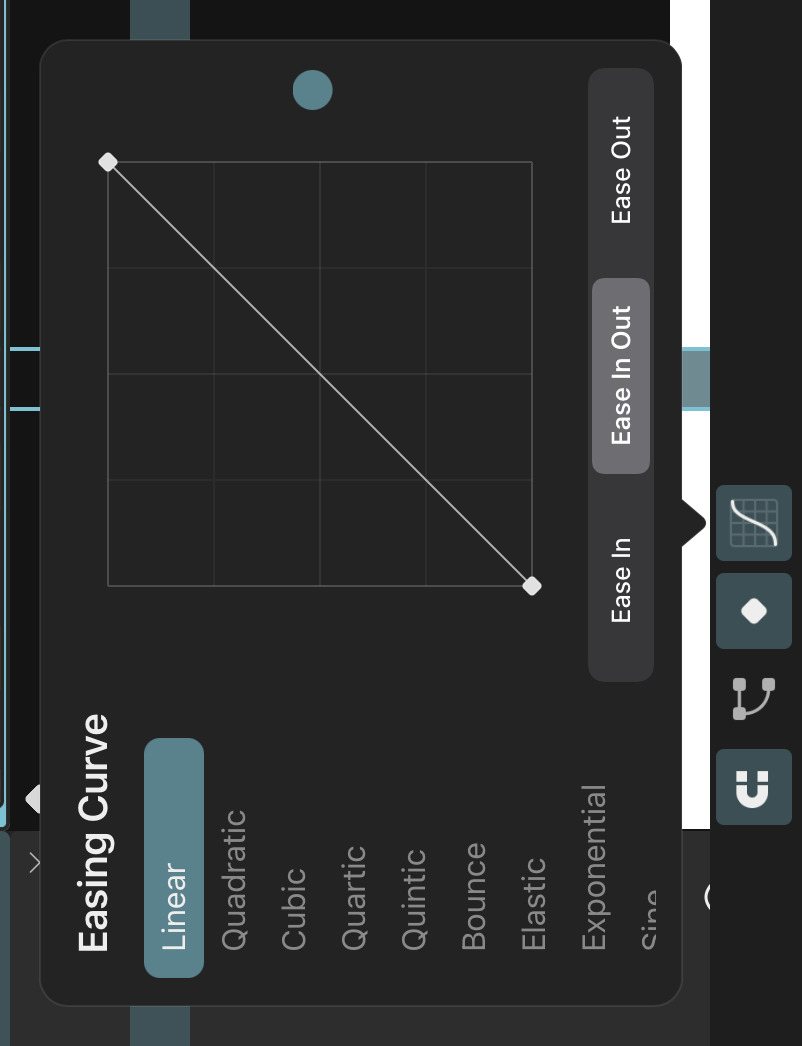
This is the default easing curve. It interpolates at a constant speed from the start to the end value.
Polynomial (Quadratic / Cubic / Quartic / Quintic)#
These presets use a polynomial function as the basis for the easing curve. The higher the polynomial degree, the more extreme the difference between the slow and fast segments of the curve.
Intensity
The polynomial easing curves provide an intensity setting to fine-tune the curve. Setting the intensity to 0 results in a linear easing curve.
Bounce#
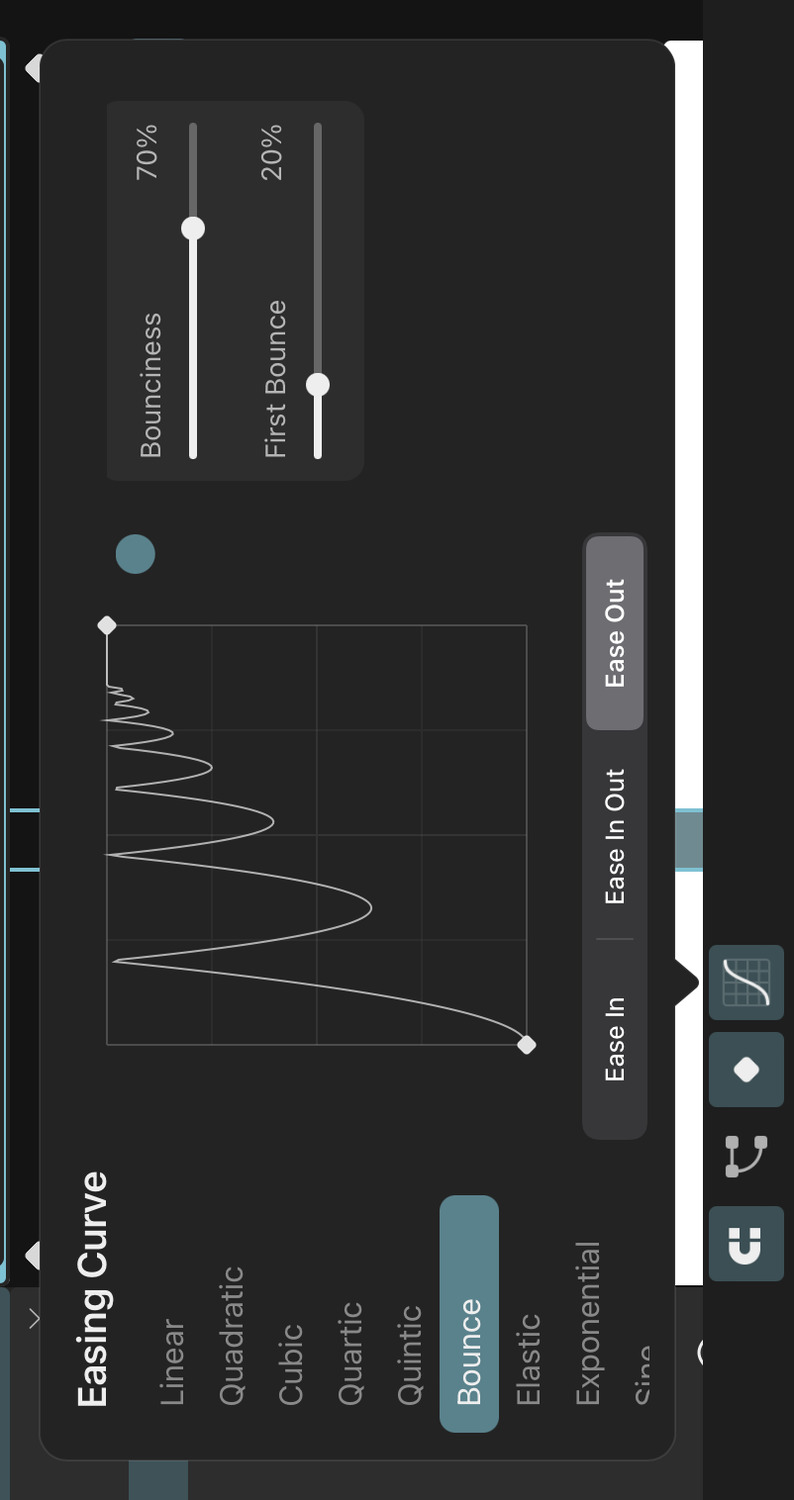
This curve approximates the behavior of a bouncing ball. It is typically used with Ease Out mode.
Bounciness
How far the value should bounce back after each bounce.
First Bounce
How far down the time axis the first bounce should occur. This effectively squashes and stretches the curve along the time axis.
Elastic#

This easing curve models damped harmonic motion. It overshoots and oscillates around the start and/or target values and is typically used with the Ease Out mode.
Intensity
It provides an intensity slider to control the amount of overshoot.
Exponential#
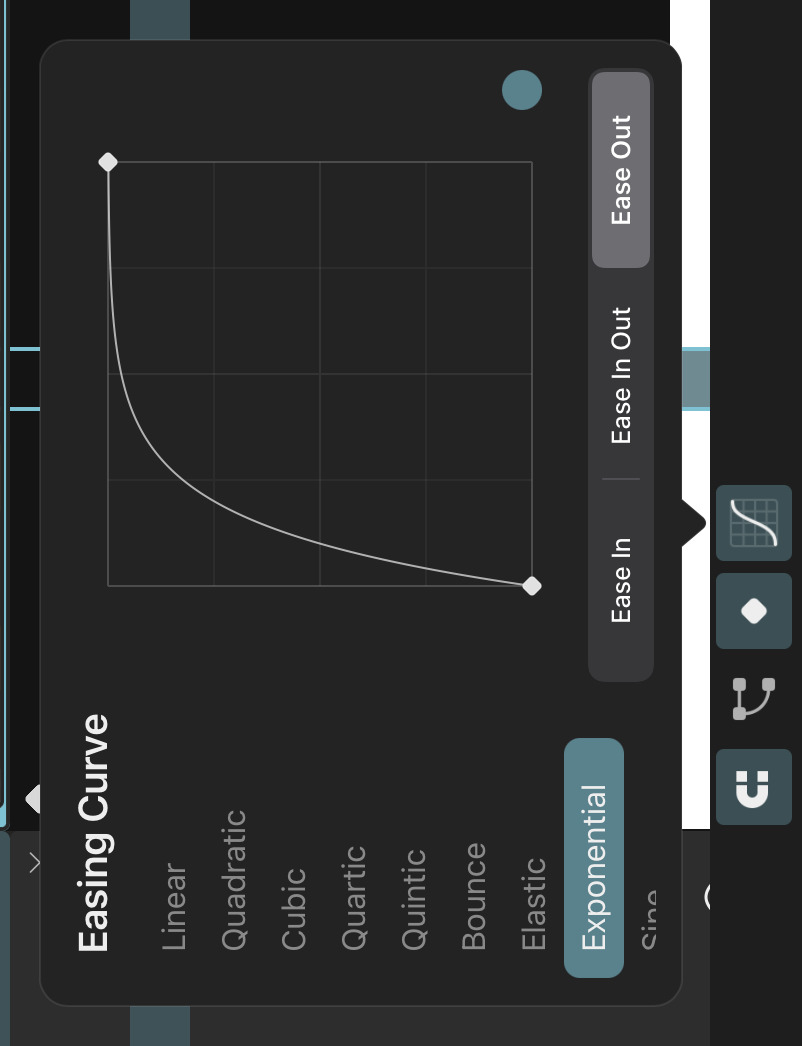
With this preset, an exponential function forms the basis of the curve. It is similar to polynomial curves in its behavior but more extreme.
Sine#

A partial sine curve forms the basic shape of the easing curve.
Circular#
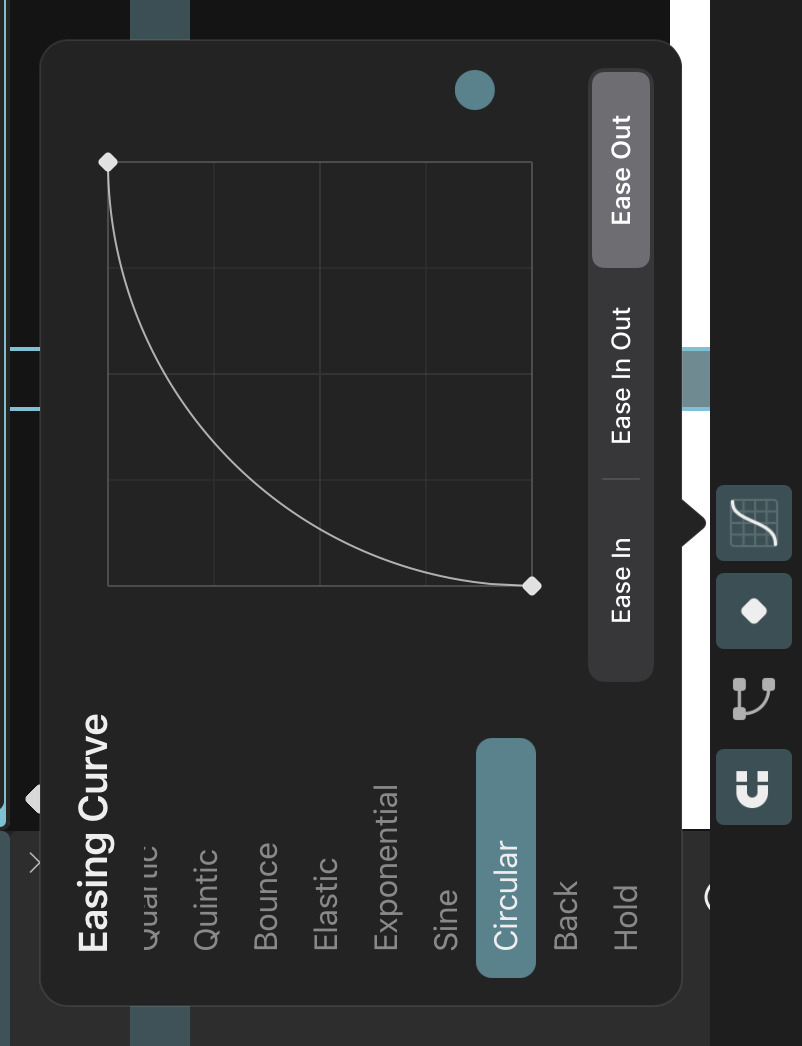
A square root function forms the basic shape of this easing curve.
Back#
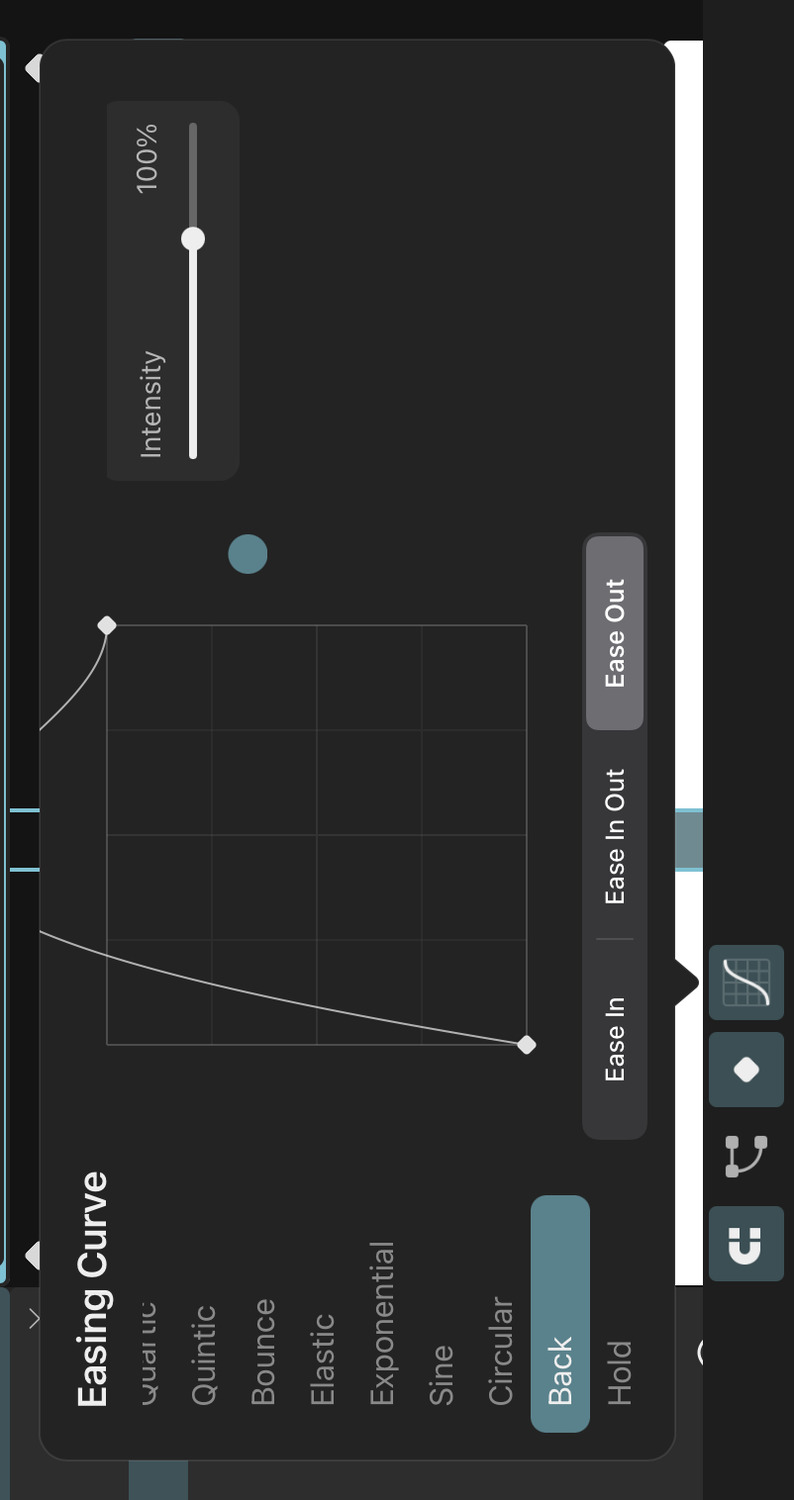
This easing curve behaves similarly to Elastic but only overshoots once and has no harmonic motion.
Intensity
The intensity slider controls the amount of overshoot.
Hold#
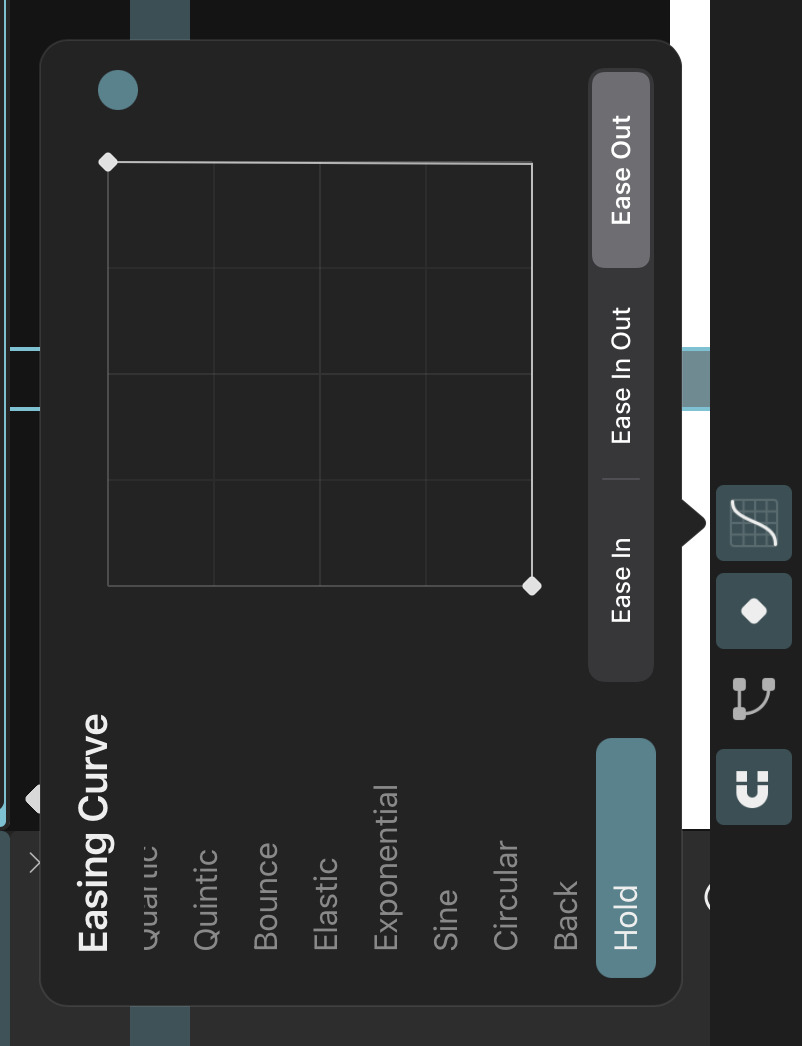
The value of the keyframe stays constant until the next keyframe, where it then jumps to the new value.
Loop#
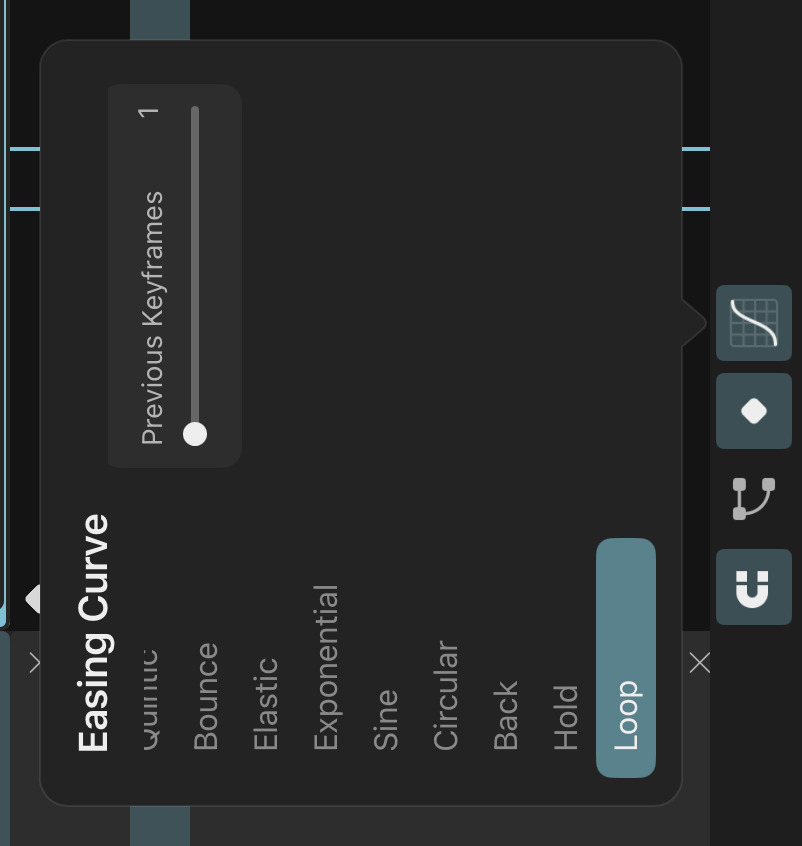
This easing curve has a fundamentally different behavior than the others. It repeats the previous keyframe values until the next keyframe is reached. The next keyframe value has no impact on the animation on the frames controlled by this easing curve.
Previous Keyframes
The number of previous keyframes to repeat.
Example: if a property has keyframes on frames 1, 4, 6, and 20 and you set the easing curve of the keyframe on frame 6 to loop with the Previous Keyframes property set to 1, the animation will play until frame 6 as normal. Then, the values of the keyframes on frames 4 through 6 are repeated on the frames 7 - 9, 10 - 12, 13 - 15, and so on until the keyframe on frame 20 is reached.
If Previous Keyframes was set to 2 in the above example, the values of the keyframes on frames 1 through 6 would be repeated on the frames 7 - 12, 13 - 18, and so on.
Custom#
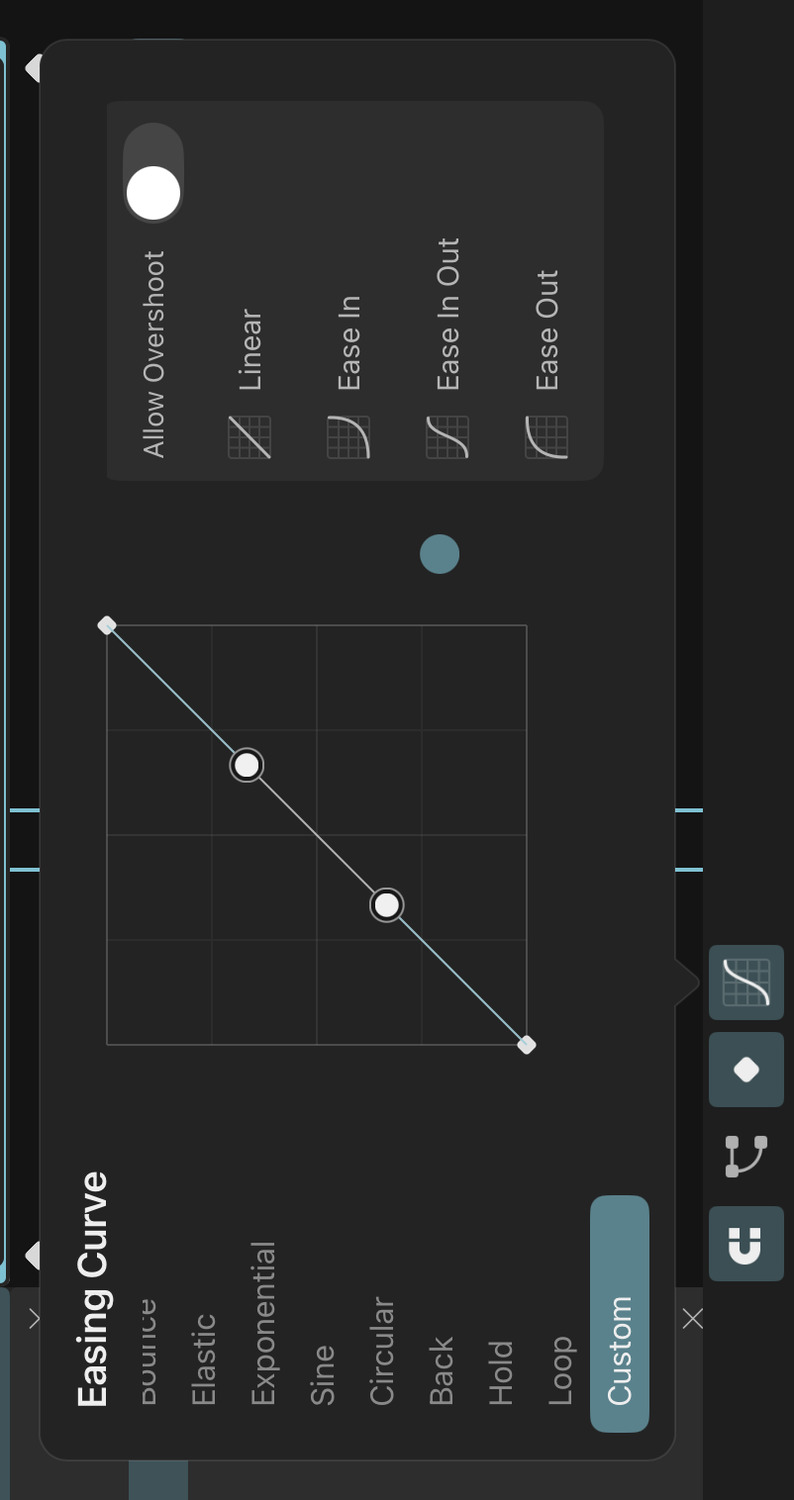
This curve provides two control handles that you can drag to create a custom easing curve shape.
Allow Overshoot
By default, the custom easing curve cannot extend past the start and end values of the keyframes. Enabling this option allows you to create a custom easing curve that overshoots the start and/or end values by dragging the control handles above or below the graph area.
Linear / Ease In / Ease In Out / Ease Out
These buttons allow you to quickly set the custom easing curve to one of these common easing shapes.
Default Easing Curve#
By default, all keyframes are added with a Linear easing curve. You can change this default easing curve at any time:
- Select the easing curve you want to set as the new default.
- Configure its properties as desired.
- Tap on the easing curve name again and choose
Set as Default.
Copy and Paste#
You can copy and paste easing curves between keyframes.
- Select the easing curve you want to copy.
- Configure its properties as desired.
- Tap on the easing curve name and choose
Copy.
To paste the copied easing curve to one or more keyframes:
- Select the keyframes you want to paste the easing curve to.
- Open the easing curve editor.
- Tap on the name of the currently selected easing curve and choose
Paste.
#
Brushes
Overview
ToonSquid's powerful state-of-the-art brush engine offers fully customizable and shareable brushes that take full advantage of the iPad Pro's 120Hz display.
Brush Tool
Learn how to draw, erase and smudge with brushes in ToonSquid using the brush, eraser and smudge tools.
Vector Brushes
Use vector brushes to draw brush strokes that have perfectly sharp edges, no matter how far you scale them up afterwards.
Brush Editor
The brush editor is your interface to the many customizable brush settings of every ToonSquid brush. Modify the existing brushes or create your own from scratch and share them with others.
Brush Settings
Explore every available brush setting in detail and become a master at creating your own custom brushes.
Brush Textures
Most brushes use textures to generate a unique look and feel. Learn how to change brush textures and even import your own.
Import and Export
ToonSquid brushes and brush collections can be easily shared with others by exporting them from the app. ToonSquid also allows you to import your existing collection of Adobe Photoshop® brushes.
#
Brushes
Brush Tool
ToonSquid provides different variations of the brush tool that allows you to create hand-drawn artwork using ToonSquid's powerful digital brushes.
Select the brush tool to draw, the eraser tool to erase and the smudge tool to smear pixel layer, vector layers and path layer contents using brushes.
While ToonSquid brushes can take full advantage of Apple Pencil, it is not required to use them. However, certain brush properties (such as pressure-sensitive controls) will not work when you use your finger instead of Apple Pencil to draw.
Drawing#
Touch and drag on the canvas to draw brush strokes with the selected brush. A drawing and layer for the brush to draw on are created automatically if needed, so you can just select a frame in the timeline and start drawing.
Pixel Brushes#
Most ToonSquid brushes are pixel brushes, which means that they draw rasterized brush strokes into pixel layers. They can therefore only draw within the region defined by the resolution of the pixel layer. The allowed painting region is automatically visualized with a rectangle if necessary.
Pixel brushes can be used to achieve various beautiful brush stroke effects, for example using the wet mixing settings and by choosing detailed brush textures. Their downside is that their brush strokes are rasterized at the fixed resolution of the pixel layer, so you cannot later scale up the layer without the drawing looking pixelated or blurry.
All ToonSquid brushes can be switched into Vector Shape or Vector Stroke mode to draw vector shapes instead, which have no fixed resolution and are sharp at all scales. Learn more about vector brushes on the next page.
Tool Options#

Size and Strength Sliders#
Use these two sliders to change the size and strength of the currently selected brush. A preview of the new size or strength is shown while you drag the slider.
The meaning of "strength" depends on the context. Most commonly, it just controls the overall opacity of the brush stroke. In the smudge tool, it controls the strength of the smudging.
Your most recent size and strength settings are remembered for each brush and are automatically applied when you switch brushes.
Tip#
Tap the slider handle and then tap the number in the preview popup to enter a precise value using the keyboard.
Brush Library#
Tap the brush tool button again to see the brush library, where you can select a brush by tapping it once.

Brushes are organized into brush collections. You see the list of collections in your library on the left. ToonSquid comes with various default brush collections for different types of painting.
The brushes in the selected collection are shown in the list on the right. The brushes inside a collection (and also the collections themselves) can be reordered using drag and drop. Drag and drop can also be used to move brushes into another collection.
Add Brushes#
You can add a new brush or a new collection with the + button at the top. This is also where you can import existing ToonSquid brush files and collections into the app.
Customization#
ToonSquid brushes have many customizable settings which empower you to create a large collection of custom brushes that perfectly fit your needs. Select a brush and tap the Edit Brush button at the bottom of the brush library to start editing its settings in the brush editor.
#
Brushes
Vector Brushes
While pixel brushes can create strokes with lots of intricate details and textures, the final drawing always exists at a fixed resolution. Scaling up brush strokes of pixel brushes makes them look blurry or pixelated.
Vector brushes, on the other hand, create filled or stroked vector shapes as their brush strokes, which remain sharp when viewed at any scale. These vector brush strokes are either stored in vector layers or in path layers within vector groups, depending on the Vector Workflow Preference setting.
ToonSquid comes with a default vector brush collection containing some dynamic and high-quality vector brushes.
Creating Vector Brushes#
Every brush can be turned into a vector brush by simply changing its brush mode to either Vector Shape or Vector Stroke.
Vector Shape Brushes#
Vector Shape brushes create filled path layers whose path outlines the edges of the brush strokes. They can create brush strokes with dynamically varying sizes throughout the stroke.
When creating vector shape brushes, remember that simple shape textures work best. Using brush textures that create lots of small details leads to a large number of vector control points in the resulting vector shape, which can result in lower performance compared to simpler shapes.
Furthermore, vector brush strokes all have well-defined borders and the same opacity everywhere, so they don't support brush textures with soft edges very well.
Vector Stroke Brushes#
Vector Stroke brushes create stroked path layers whose path is the center line of the brush strokes. Their width is always constant and defined by the stroke width property of the path layer. You can configure the line cap and line join properties of the stroke in the brush settings.
Vector stroke brushes do not use brush textures.
Eraser#
The eraser tool automatically puts the selected brush into the correct brush mode (Pixel or Vector Shape) based on the selected layer, so you can just pick a brush and start erasing immediately.
Vector Trimming#
All Vector Stroke brushes act as a vector trimming tool when they are selected in the eraser tool. Vector trimming can be used to clip away parts of vector strokes that overlap past the edge of another vector stroke.
Dragging the brush over a vector stroke first highlights the trim line in blue.
Once you lift off of the screen, all vector strokes that intersect with the trim line are trimmed away.
How much of each stroke is timmed away is determined as follows:
- If the vector stroke overlaps any other vector stroke in the same vector layer / vector group, the part of the stroke that is touched by the trim line is trimmed away until the edge of the overlapping other stroke is reached.
- If the vector stroke does not overlap any other vector stroke, it is removed completely.
Smudge#
You can use the smudge tool on vector layers, path layers and vector groups to move the vector control points of the path layers around. This allows you to easily deform vector shapes.
#
Brushes
Brush Editor
The brush editor is the interface for customizing brushes. All brush settings can be found and edited here.
Open the brush editor for the selected brush with the Edit Brush button in the brush library.
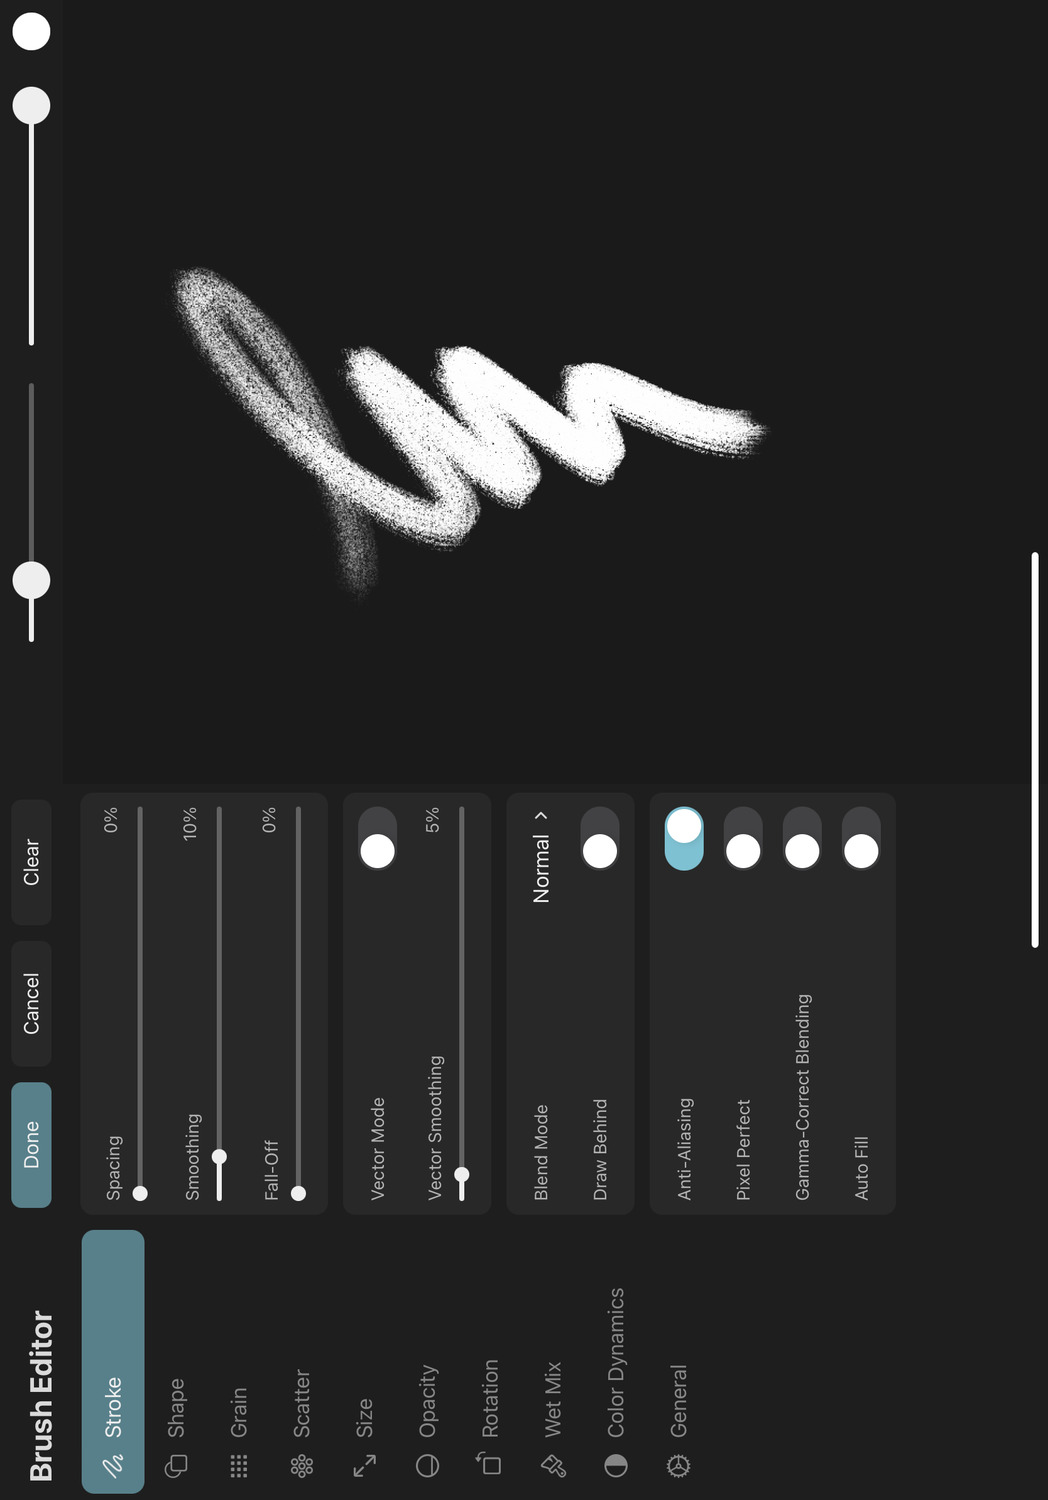
You can find all available brush settings explained in detail on the next page.
Settings Structure#
In the brush editor, the different brush settings categories can be found on the left. All settings of the selected category are shown in the inspector in the middle of the screen.
The settings categories each represent a general aspect of the brush that can be customized and all settings that can be used to control that aspect can be found in that category.
Sketchpad#
Use the sketchpad on the right for quick testing of the current brush configuration. Any stroke that you draw on the sketchpad uses the current brush settings. Changing the settings will update previously drawn strokes to reflect the new settings.
Just like in the regular editor, you can use the size and strength sliders to change the brush size and opacity. You can change the brush color by opening the color picker with the color button in the top right corner.
Clear the sketchpad using the Clear button at the top of the settings inspector.
Finish Editing#
When you are done editing, either select Done to save the settings changes you made or choose Cancel to dismiss all changes made since the brush editor was opened.
#
Brushes
Brush Settings
Stroke#
The following properties control the general behavior of the brush stroke.
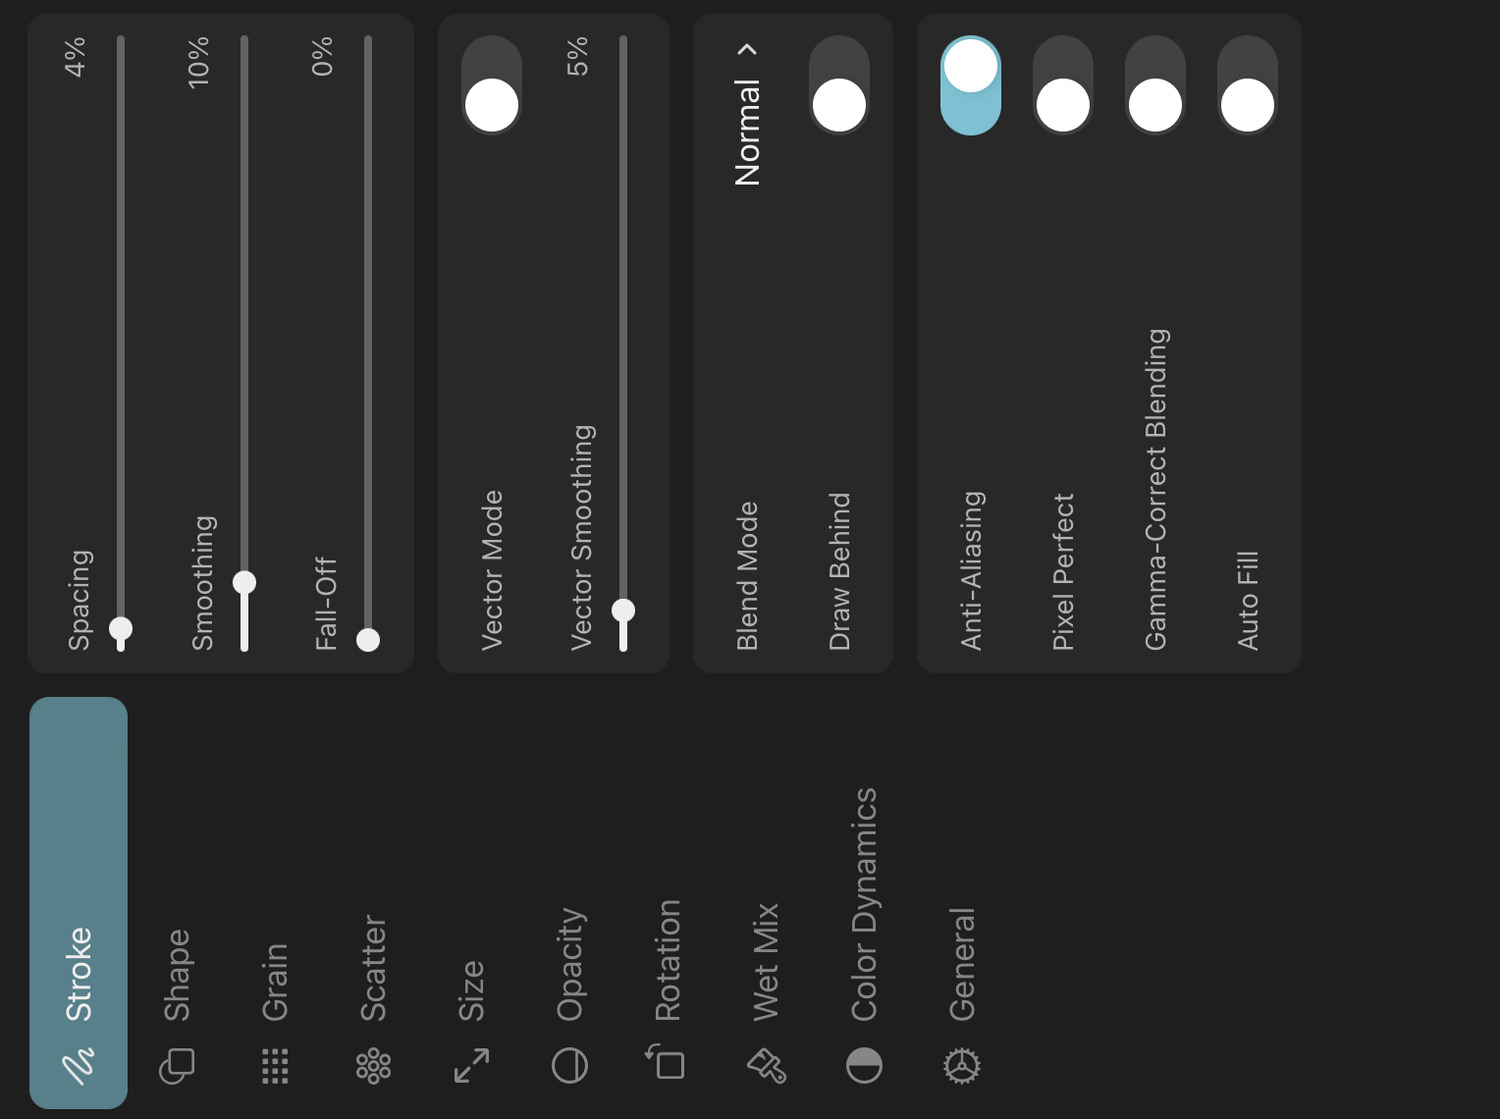
Brush Mode#
The brush mode determines whether the brush should draw pixel strokes into pixel layers or filled or stroked vector shapes into vector layers / vector groups.
The available brush settings depend on the selected brush mode.
Pixel#
The brush draws pixel strokes into pixel layers. This is the default mode for all new brushes.
ToonSquid's pixel brushes draw their strokes by combining their shape and grain textures and "stamping" these resulting brush marks onto the layer at various points along the path that you draw with Apple Pencil or your finger.
Vector Shape#
Vector Shape brushes create filled path layers whose path outlines the edges of the brush strokes. See here for more details.
Vector Stroke#
Vector Stroke brushes create stroked path layers whose path is the center line of the brush strokes. See here for more details.
Spacing#
The spacing between consecutive brush marks relative to the brush size. A spacing of 100% results in neighboring brush marks touching at their edges. A spacing of 0% will place all brush marks 1px apart.
Lower values make the brush stroke appear smoother but also create more brush marks which can slow down the performance of the brush.
Fall-Off#
Controls whether and how quickly the brush stroke should fade out. A value of 0% represents an infinite amount of paint that never decreases. Lower values will cause the brush to slowly run out of its selected brush color throughout the brush stroke. This property is only available for pixel brushes.
Smoothing#
Intensity#
Controls how much ToonSquid should attempt to remove wobbles due to shakiness in your brush strokes to create a smoother final stroke. ToonSquid will use a moving average of the most recent input positions to calculate the final inputs that will be used for the stroke.
Show Gap#
In order to smoothen your brush strokes, ToonSquid averages multiple of the most recent touch or Apple Pencil input positions. This naturally results in a delay between the brush stroke and your finger or Apple Pencil. By default, ToonSquid hides this gap by connecting the end of the stroke to the tip of the pen. If you prefer to see the gap, enable the Show Gap setting.
Catch Up When Stroke Ends#
Whether the end of the smoothed stroke should immediately "catch up" and connect to the last touch or Apple Pencil position when the stroke ends. When disabled, the smoothed stroke does not get modified any futher once you lift your finger or Apple Pencil.
Adjust With Speed#
Whether the effective amount of smoothing at each point should be affected by the speed at which you draw the stroke.
Vector Smoothing#
If this brush is a vector brush, the Vector Smoothing controls how much the final vector strokes are simplified and smoothened compared to the fully-detailed pixel brush stroke of the same brush. More smoothing results in vector strokes that are represented by fewer Bézier curves and are therefore more performant but are also not as accurate at approximating the original stroke.
Line Cap#
Defines the line cap style to be used for the stroke for vector stroke brushes.
Line Join#
Defines the line join style to be used for the stroke for vector stroke brushes.
Blend Mode#
The blend mode with which the brush stroke should be blended onto the existing contents of the layer. This setting is only relevant for pixel brushes.
Draw Behind#
If this option is enabled, the brush will add its new strokes on the selected layer behind existing strokes.
This setting is ignored and has no effect if the brush performs wet-mixing.
Anti-Aliasing#
Whether the edges of the stroke should be anti-aliased or not. Anti-aliasing will remove jagged edges from the brush strokes. Disable this if you are looking for that jagged appearance, for example when creating brushes for pixel art.
Pixel Perfect#
With this setting enabled, the brush attempts to prevent visually uneven stroke thicknesses when the brush size is 1 px. The image below shows an example with the setting disabled on the left and enabled on the right.
Gamma-Correct Blending#
Enables gamma-correct (linear) blending for the brush strokes, as opposed to the default sRGB blending.
Auto Fill#
If this option is enabled, the brush will close the drawn shape at the end of the stroke and fill the inside of this region with the primary selected color.
If the grain rendering mode of the brush is set to Per Stroke, then the grain texture will also be applied to the filled region.
This setting is ignored and has no effect if the brush performs wet-mixing.
Shape#
These settings control the shape of the brush marks.

Shape Texture#
The image that should be used as the shape texture of the brush. Learn more about selecting and importing brush textures here.
The shape texture is combined with the grain texture to form the final brush marks.
Inverted#
Inverts the shape texture. Areas of the shape that are currently transparent will then show up in the brush stroke and currently visible portions will be invisible.
Flip X#
Flips the shape texture horizontally.
Flip Y#
Flips the shape texture vertically.
Grain#
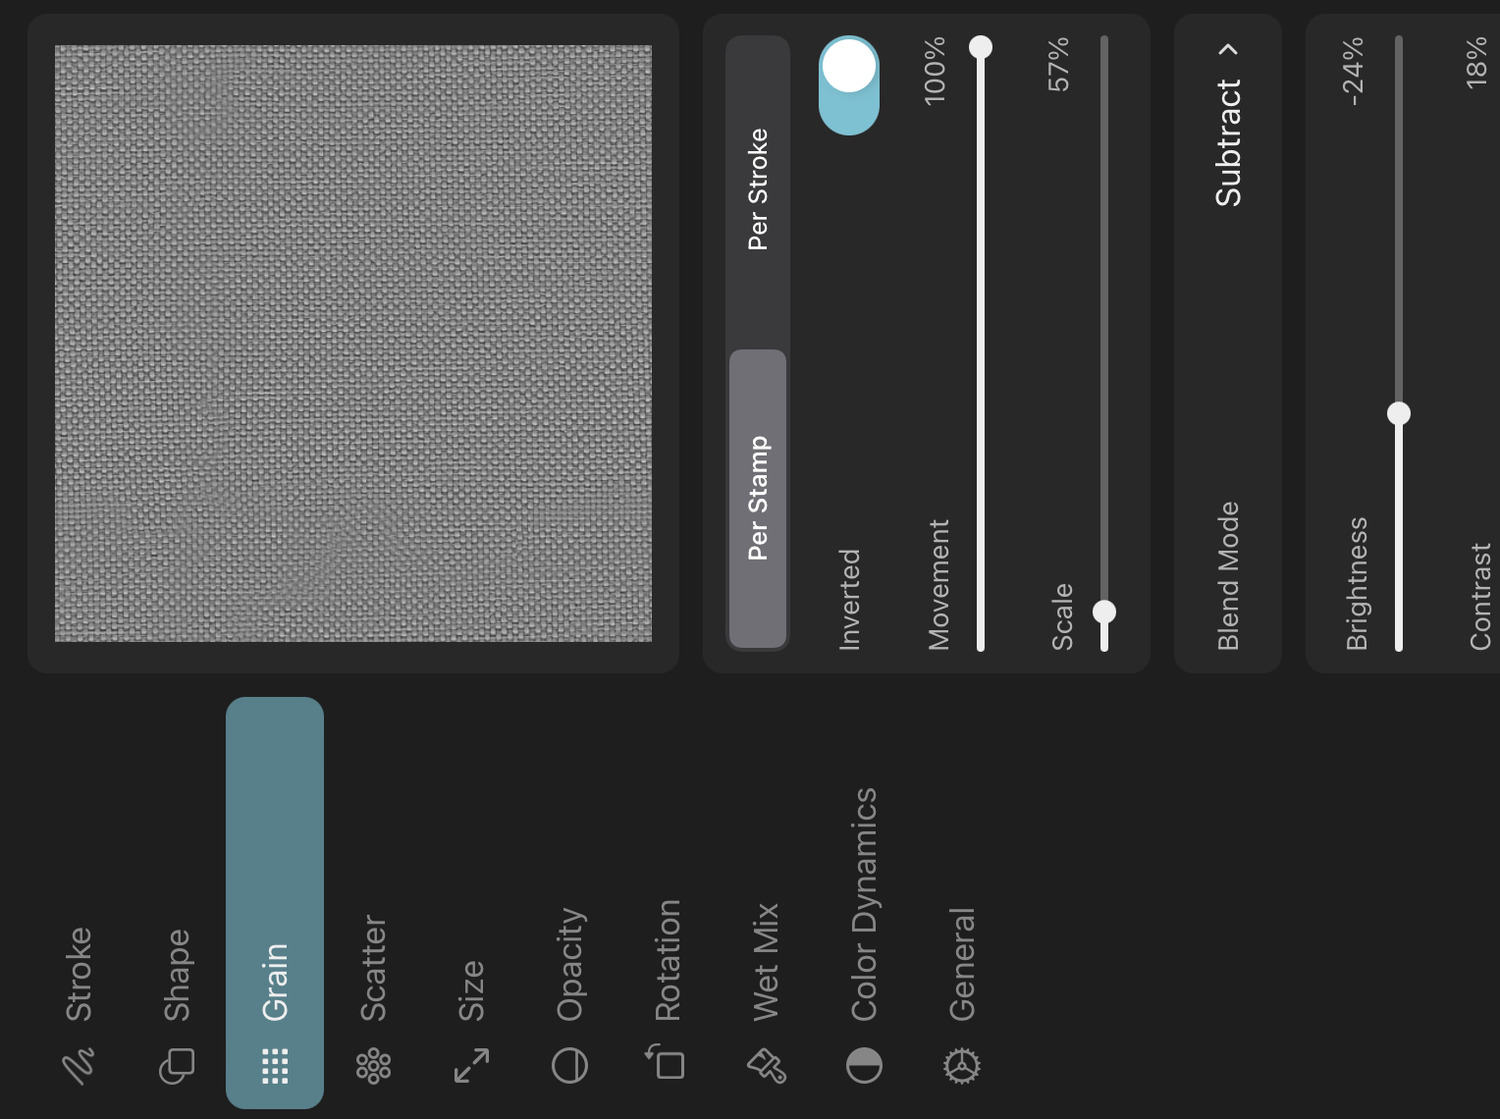
In addition to the shape texture, ToonSquid brushes use another texture - the so-called grain - to add more variety and detail to your brush strokes. The grain can also be used to create the effect of painting on a textured surface.
Grain Texture#
The image that should be used as the grain texture of the brush. Learn more about selecting and importing brush textures here.
The grain texture is combined with the shape texture to form the final brush marks.
Rendering Mode#
The grain supports two rendering modes, which define how it is combined with the shape texture to create the final brush stroke.
Per Stamp#
The grain texture is blended with the shape texture for each brush mark (stamp) before the new mark is then added to the current stroke.
Per Stroke#
The individual brush marks just consist of the shape texture. The grain texture is then blended with the entire brush stroke at once.
Inverted#
Inverts the grain texture. Areas of the Grain that are currently transparent will then show up in the brush stroke and currently visible portions will be invisible.
Movement#
The grain movement defines how the grain texture is positioned when it is blended with the brush marks. A movement value of 100% causes the grain texture to match the drawing surface. As you move your brush, it will therefore blend with different parts of the grain, as if the surface is textured.
A value of 0% causes the entire grain texture to be blended with each brush mark, no matter where you are drawing.
This setting is only available if the grain rendering mode is set to Per Stamp.
Scale#
Use this to change the scale of the grain texture.
Blend Mode#
Defines the blend mode to be used to blend the grain and shape textures together.
The Linear Height and Height blend modes are unique to the grain texture and cannot be selected for layers. Height multiplies the shape with the grain depth before then subtracting the grain. Linear Height uses the same result or that of multiplying the grain instead of subtracting it, depending on which result is brighter.
Tip#
The different grain blend modes are a very powerful tool to create significantly varying brush effects using the same shape and grain textures.
Brightness#
You can use this setting to adjust the brightness of the grain texture before it gets blended.
Contrast#
You can use this setting to adjust the contrast of the grain texture before it gets blended.
Depth#
The grain depth controls the intensity of the grain. If the rendering mode is set to Per Stamp, the grain depth can be further controlled by the following settings.
Jitter#
Use this to apply a random offset to the baseline grain depth for each brush mark.
Pressure Control#
Controls the grain depth based on the amount of pressure applied with Apple Pencil. Positive values increase the depth when there is more pressure, negative values decrease it with added pressure.
Tilt Control#
Controls the grain depth based on the tilt angle of Apple Pencil.
Speed Control#
Controls the grain depth based on the speed at which you draw your stroke. Positive values increase the depth at higher speeds, negative values decrease it.
Scatter#
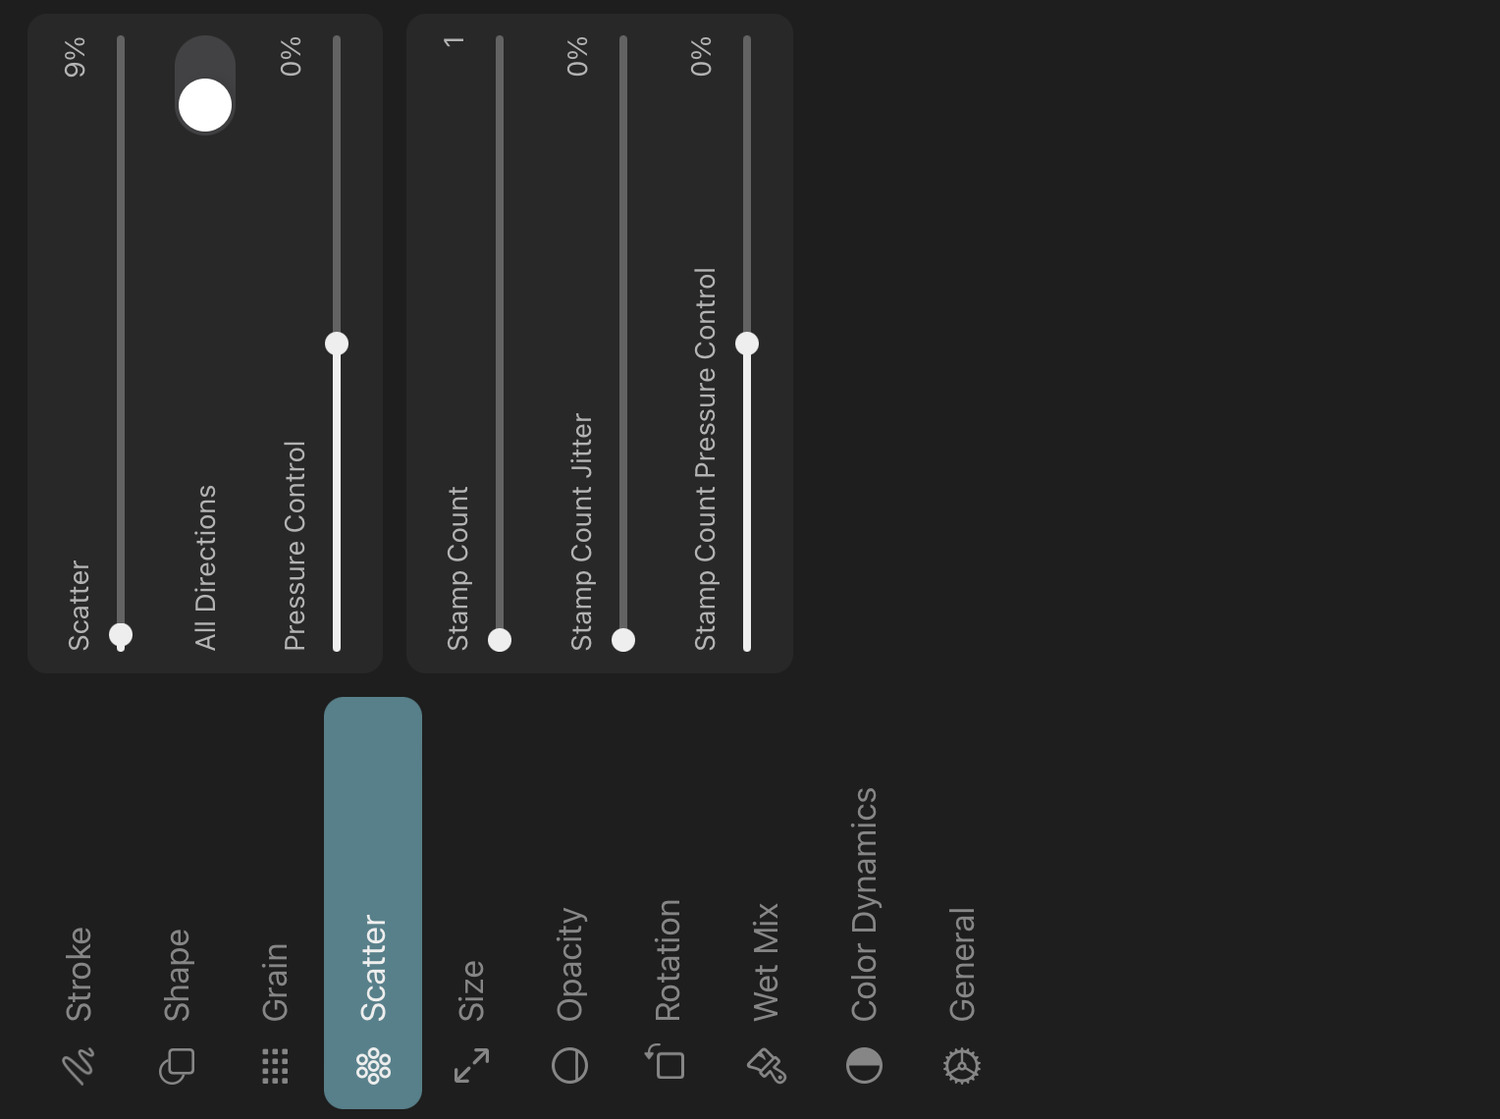
Use the settings in the scatter category to randomly shift the individual brush marks away from their regular position in the brush stroke.
Scatter#
Applies a random offset to the position of every brush mark, thereby scattering them away from their original points. The slider controls how far the marks can be moved away from their original positions as a percentage of the brush size.
All Directions#
If this is enabled, the brush marks are scattered in all directions. Disable this to only shift them perpendicularly to the brush stroke.
Pressure Control#
Controls the amount of scattering based on the pressure you apply with Apple Pencil during the stroke. Positive values increase the scattering with increased pressure, negative values decrease it.
Stamp Count#
Defines how many brush marks should be created at each spacing interval. This is set to 1 by default. Note that higher values for the stamp count will slow down the rendering of your brush strokes.
Stamp Count Jitter#
Randomly changes the stamp count at each spacing interval.
Stamp Count Pressure Control#
Controls the stamp count based on the pressure you apply with Apple Pencil during the stroke. Positive values increase the stamp count with increased pressure, negative values decrease it.
Size#
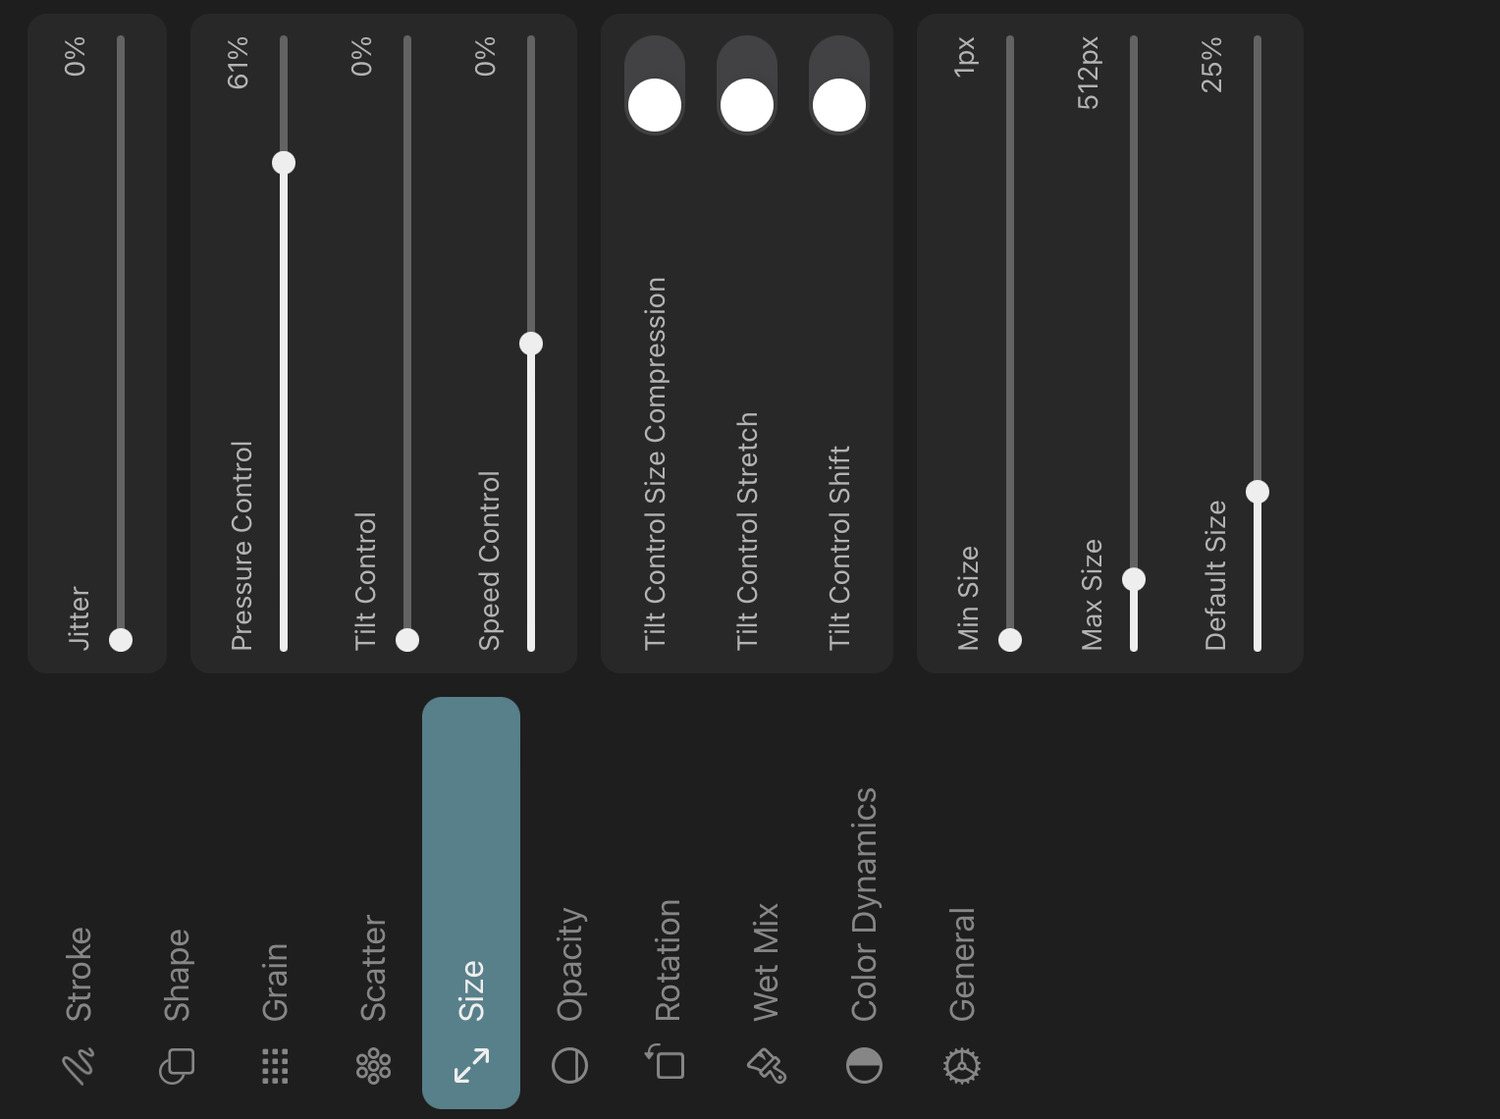
These settings control the size of each brush mark in the stroke.
Jitter#
Determines how much the size of each stamp can randomly deviate from the base size.
Pressure Control#
Controls the brush size based on the pressure you apply with Apple Pencil during the stroke. Positive values increase the size with increased pressure, negative values decrease it.
Tilt Control#
Controls the brush size based on the tilt angle of Apple Pencil. The more you tilt Apple Pencil, the larger the brush marks will get, the amount of which depends on this setting.
Speed Control#
Controls the brush size based on how fast you draw the stroke. Positive values decrease the brush size during slower movement, negative values decrease the brush size during faster movement.
Barrel Roll Control#
Controls the brush size based on the barrel roll angle of Apple Pencil Pro. When using an Apple Pencil model that does not support barrel roll, the brush size is controlled by the azimuth angle instead.
Tilt Control Size Compression#
When this option is enabled in combination with the tilt control slider, the magnitude of the size increase will be based on the direction of movement of the brush.
If the brush is being moved in the same or opposite direction as the azimuth angle of Apple Pencil, then there will be little to no size increase due to the tilt.
Moving orthogonally to the azimuth angle results in the largest size increase.
This can be used to approximate shading with the side of a pencil, especially if the brush uses a random rotation for each stamp.
Tilt Control Stretch#
When this option is enabled in combination with the tilt control slider, only the horizontal size of the brush stamps will increase with an increasing amount of tilt. This is the preferred way to approximate shading with the side of a pencil over the size compression setting if the brush has little to no rotation jitter and has its rotation behavior setting set to -100% to follow the azimuth tilt angle.
Tilt Control Shift#
When this option is enabled in combination with the tilt control slider, the brush marks will be shifted towards the tilted Apple Pencil to align the top edge of the stroke with the tip of the pencil.
Min Size#
The smallest allowed size for this brush. The range of the brush size slider is also limited by this.
Max Size#
The largest allowed size for this brush. The range of the brush size slider is also limited by this.
Default Size#
The default size of this brush when it is imported into a brush library. The value is specified as a percentage in the range between the minimum and maximum sizes.
Relative Secondary Brush Size#
The size of the secondary brush relative to the primary brush. This setting is only available for the secondary brush when dual brush settings are enabled.
Opacity#
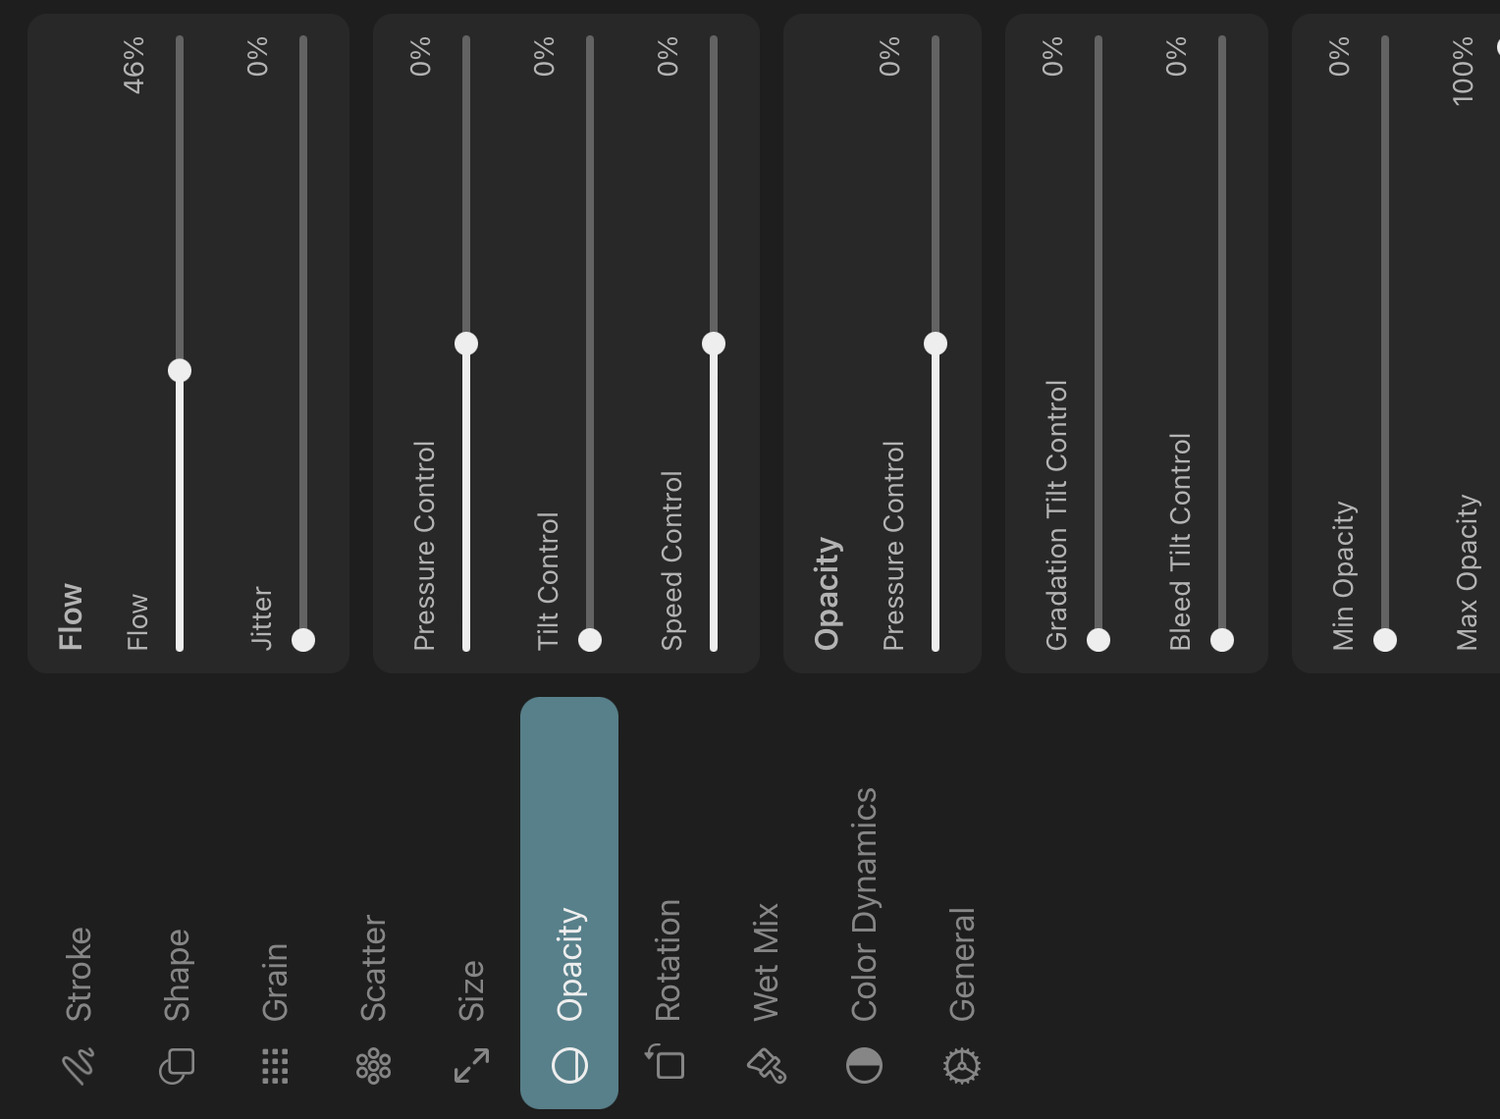
Flow#
The flow is an opacity multiplier for each individual brush mark, as opposed to the opacity of the entire stroke.
Jitter#
Determines how much the flow of each stamp can randomly deviate from the base flow value.
Pressure Control#
Controls the flow based on the pressure you apply with Apple Pencil during the stroke. Positive values decrease the flow with decreased pressure, negative values decrease it with increased pressure.
Tilt Control#
Controls the flow based on the tilt angle of Apple Pencil. The more you tilt Apple Pencil, the lower the flow will be, the amount of which depends on this setting.
Speed Control#
Controls the flow based on how fast you draw the stroke. Positive values decrease the flow during slower movement, negative values decrease the flow during faster movement.
Barrel Roll Control#
Controls the flow based on the barrel roll angle of Apple Pencil Pro. When using an Apple Pencil model that does not support barrel roll, the flow is controlled by the azimuth angle instead.
Opacity Pressure Control#
Controls the opacity of the brush stroke based on the pressure you apply with Apple Pencil during the stroke. Positive values decrease the opacity with decreased pressure, negative values decrease it with increased pressure.
The opacity controls the opacity of the stroke after the brush marks get blended as opposed to the flow which controls the opacity of the individual marks.
Gradation Tilt Control#
Whether tilting the brush should cause the opacity within each brush stamp to gradually decrease along the stamp's horizontal axis.
Bleed Tilt Control#
Whether tilting the brush should decrease the level of detail of each brush stamp.
Pixels within the brush mark that have an alpha value below a certain threshold will become fully transparent and pixels above an alpha threshold will become fully opaque. The distance between these two thresholds decreases with an increased amount of tilt.
Min Opacity#
The lowest allowed opacity of each brush mark.
Max Opacity#
The highest allowed opacity of each brush mark.
Rotation#
These settings control the rotation behavior of the brush shape.
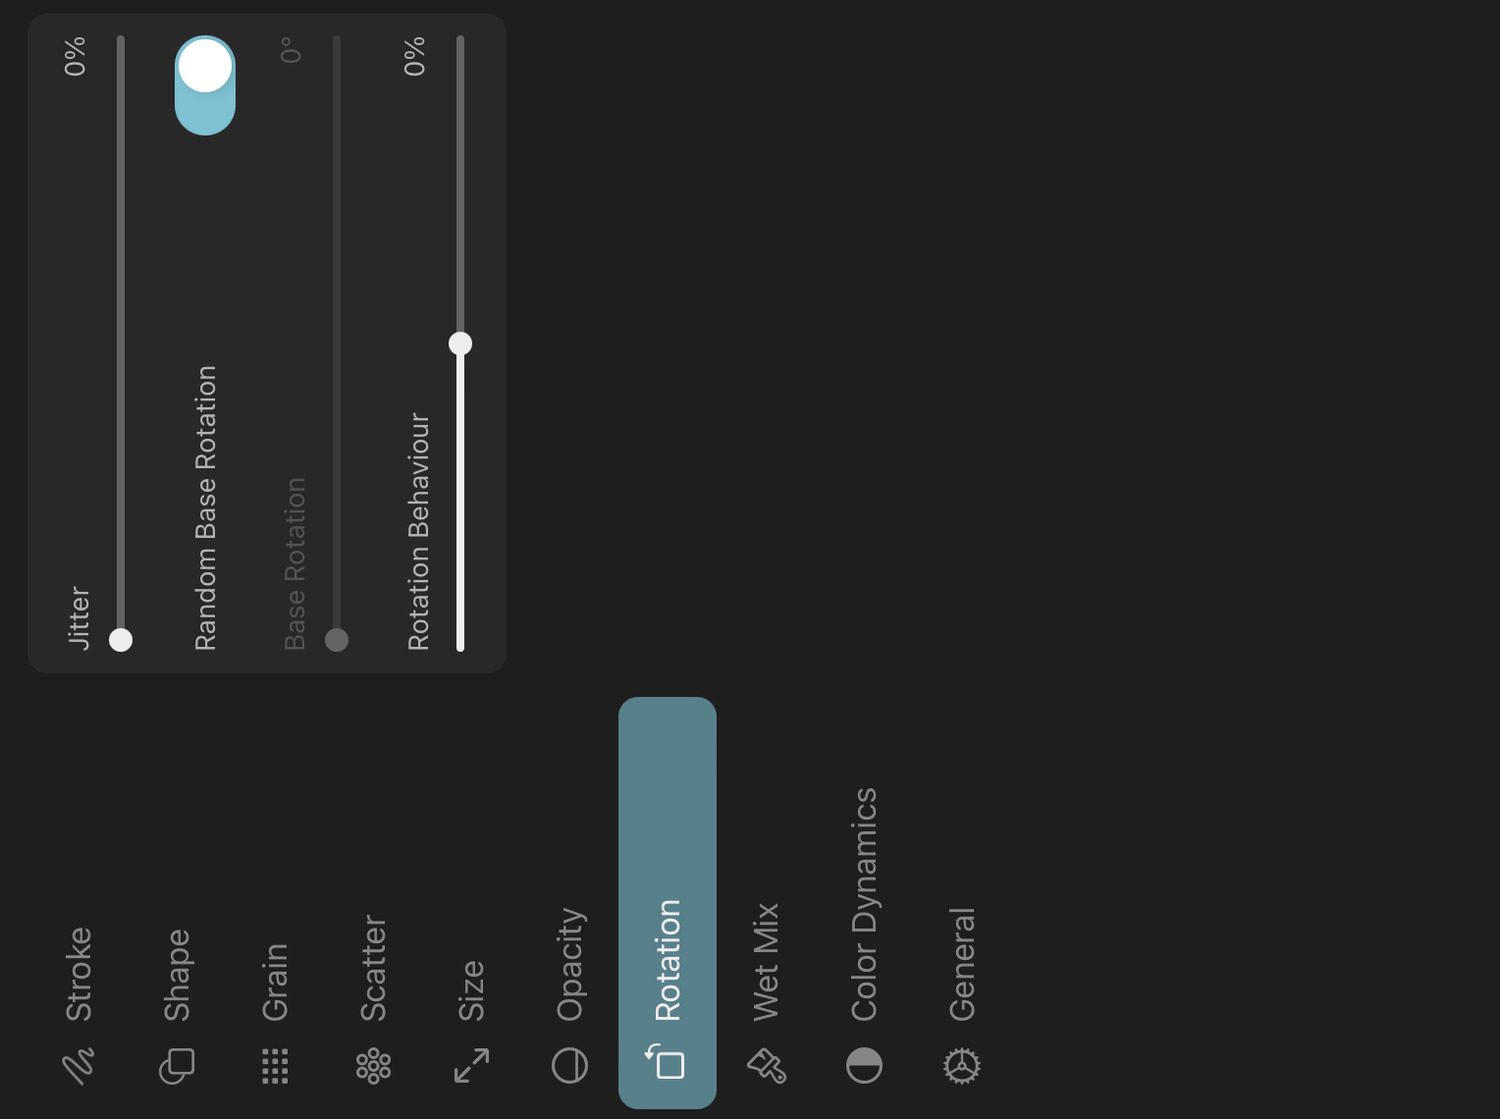
Jitter#
How much the rotation of each brush stamp should randomly deviate from the base rotation.
Random Base Rotation#
Whether the base rotation of the shape texture should be randomly chosen for every stroke.
Base Rotation#
The baseline rotation angle of the shape texture. If the rotation jitter is 0, then all brush marks will have this rotation.
This option is unused if Random Base Rotation is enabled.
Rotation Behavior#
Defines how the rotation of each brush mark should be controlled.
A value of 0 just uses the base rotation and the optional jitter specified above.
A value of 100% keeps the rotation perpendicular to the direction of the brush stroke.
A value of -100% keeps the rotation perpendicular to the azimuth tilt angle of Apple Pencil.
Barrel Roll Control#
How much the shape should rotate based on the barrel roll angle of Apple Pencil Pro. When using an Apple Pencil model that does not support barrel roll, the rotation is controlled by the azimuth angle instead.
Dual Brush#
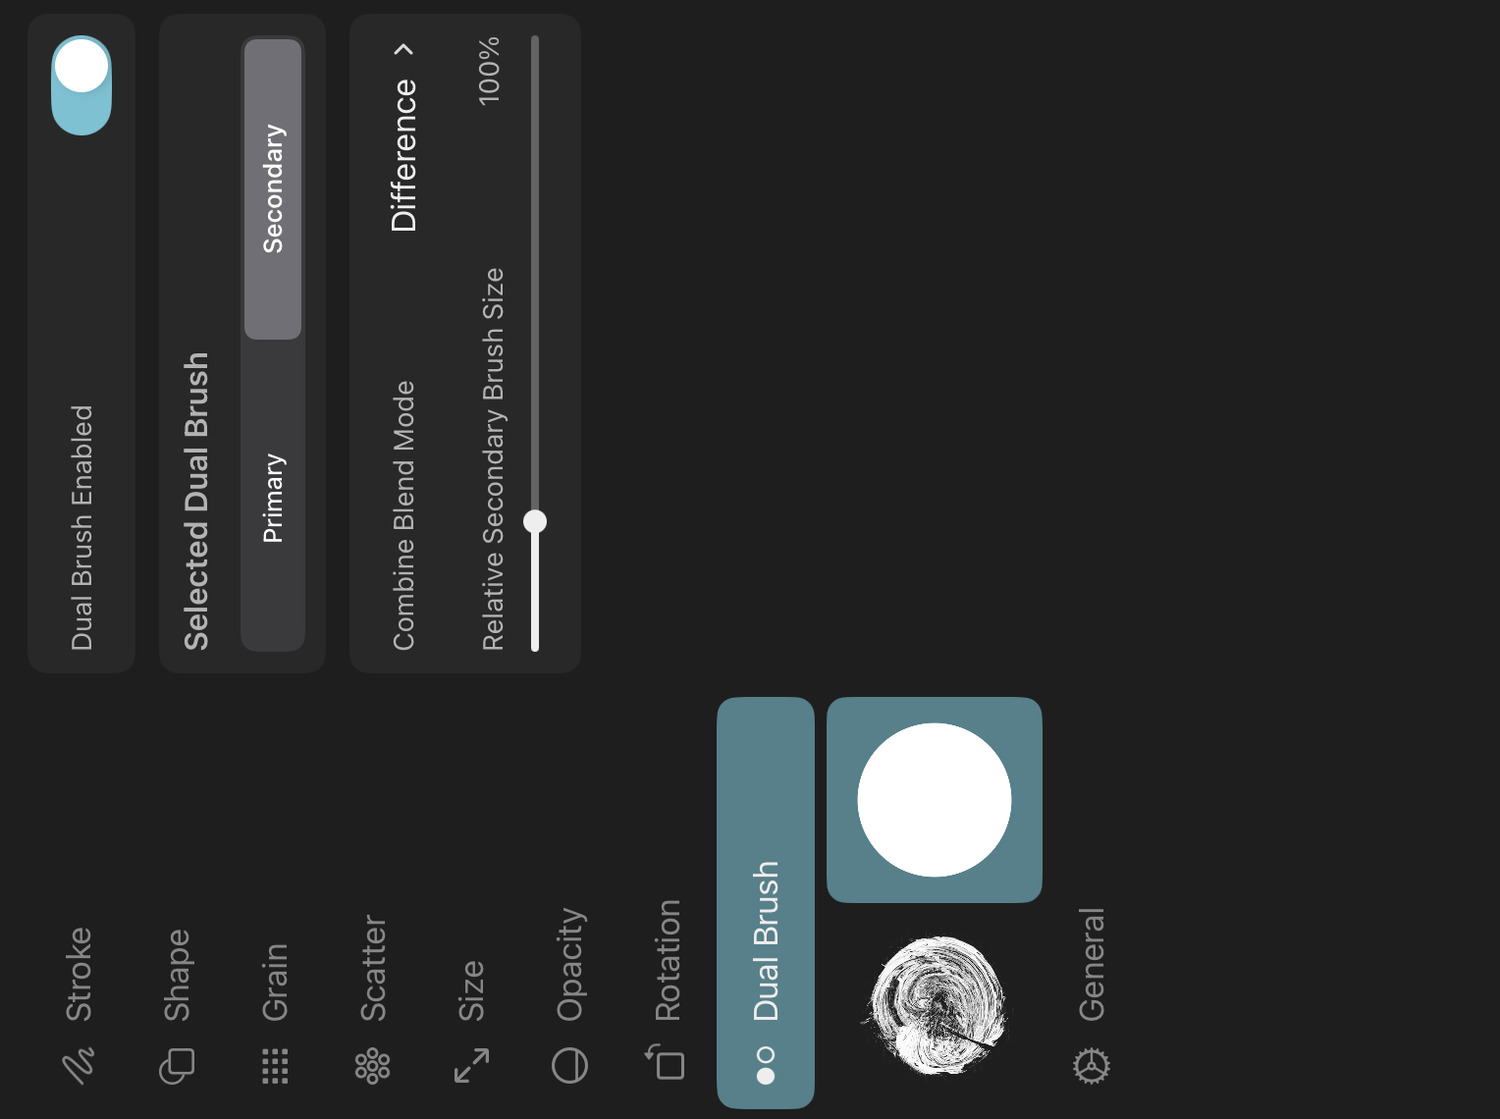
The dual brush feature allows you to combine two different brushes into a single brush stroke to create unique effects.
After enabling dual brush settings, you can separately edit the brush settings of a primary and a secondary brush. When drawing with the dual brush, both the primary and secondary brush settings create two overlapping brush strokes which are combined into a single stroke based on the Combine Blend Mode setting.
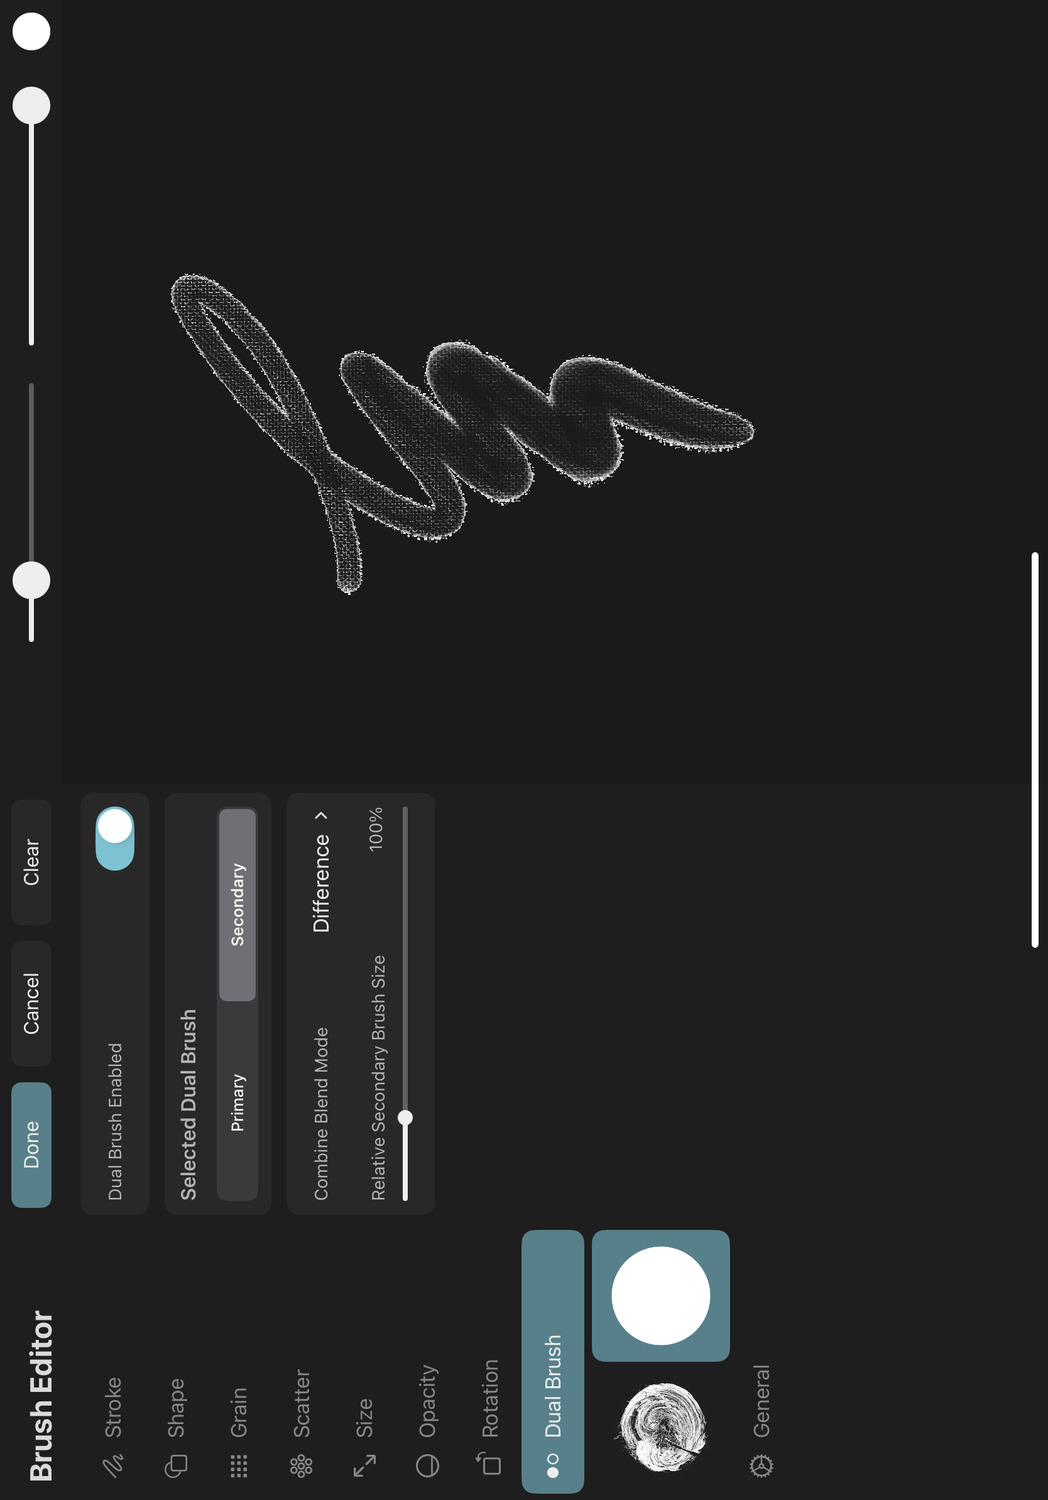
Dual Brush Enabled#
Whether the brush should act as a dual brush or not. Dual brush settings are only supported for pixel brushes.
Note#
Wet mix brush settings are not available for dual brushes.
Note#
The secondary brush of a dual brush is ignored by the smudge tool. Only the primary brush settings are used for smudging.
Selected Dual Brush#
Whether the primary or secondary brush settings of the dual brush should currently be edited in the brush editor. Not all settings are available for both brushes.
When dual brush settings are enabled, the brush editor will show the shape texture of both the primary and the secondary brush in the sidebar under the Dual Brush tab. You can tap on either one of these to quickly switch between editing the settings of the primary or secondary brush without having to switch to the Dual Brush tab first.
Combine Blend Mode#
The combine blend mode controls how the strokes of the primary and secondary brushes are combined into a single stroke. This combine blending is based on the opacity of each pixel and is not based on the colors.
Relative Secondary Brush Size#
The size of the secondary brush relative to the primary brush. This setting is only available for the secondary brush when dual brush settings are enabled.
Wet Mix#
Use the following settings to create beautiful wet paint effects which cause your brush to drag the existing paint on the layer around as you draw.
Note that wet mix settings are not available if dual brush settings are enabled.
Wetness#
Controls the overall strength of the wet mixing effect. Increase this value to drag and mix the paint on the layer for longer distances during each brush stroke.
When this is set to 0%, all following wet mix settings do not affect the stroke.
Wetness Pressure Control#
Controls the wetness based on the pressure you apply with Apple Pencil during the stroke. Positive values decrease the wetness with decreased pressure, negative values decrease it with increased pressure.
Wetness Jitter#
Determines how much the wetness of each stamp can randomly deviate from the base wetness value.
Attack#
The attack controls how much of the selected brush color should be added to the mix of the current surface color and color that the brush picked up from the surface throughout the stroke.
Attack Pressure Control#
Controls the attack based on the pressure you apply with Apple Pencil during the stroke. Positive values decrease the attack with decreased pressure, negative values decrease it with increased pressure.
Attack Tilt Control#
Controls the attack based on the tilt angle of Apple Pencil. The more you tilt Apple Pencil, the higher the attack will be, the amount of which depends on this setting.
Attack Barrel Roll Control#
Controls the attack based on the barrel roll angle of Apple Pencil Pro. When using an Apple Pencil model that does not support barrel roll, the attack is controlled by the azimuth angle instead.
Attack Jitter#
Determines how much the attack of each stamp can randomly deviate from the base attack value.
Load#
Describes how much paint is initially loaded on the brush.
Color Dynamics#
Use ToonSquid's color dynamics settings to apply color variations within your brush strokes.
Primary / Secondary Jitter#
Controls how far the brush color can randomly deviate from the primary color towards the secondary color at each brush mark.
Primary / Secondary Pressure Control#
Controls the primary / secondary jitter based on the pressure you apply with Apple Pencil during the stroke. Positive values decrease the jitter with decreased pressure, negative values decrease it with increased pressure.
Hue Jitter#
Controls how far the hue of the brush color can randomly deviate from the mix between the primary and secondary color at each brush mark.
Saturation Jitter#
Controls how far the saturation of the brush color can randomly deviate from the mix between the primary and secondary color at each brush mark.
Brightness Jitter#
Controls how far the brightness of the brush color can randomly deviate from the mix between the primary and secondary color at each brush mark.
General#
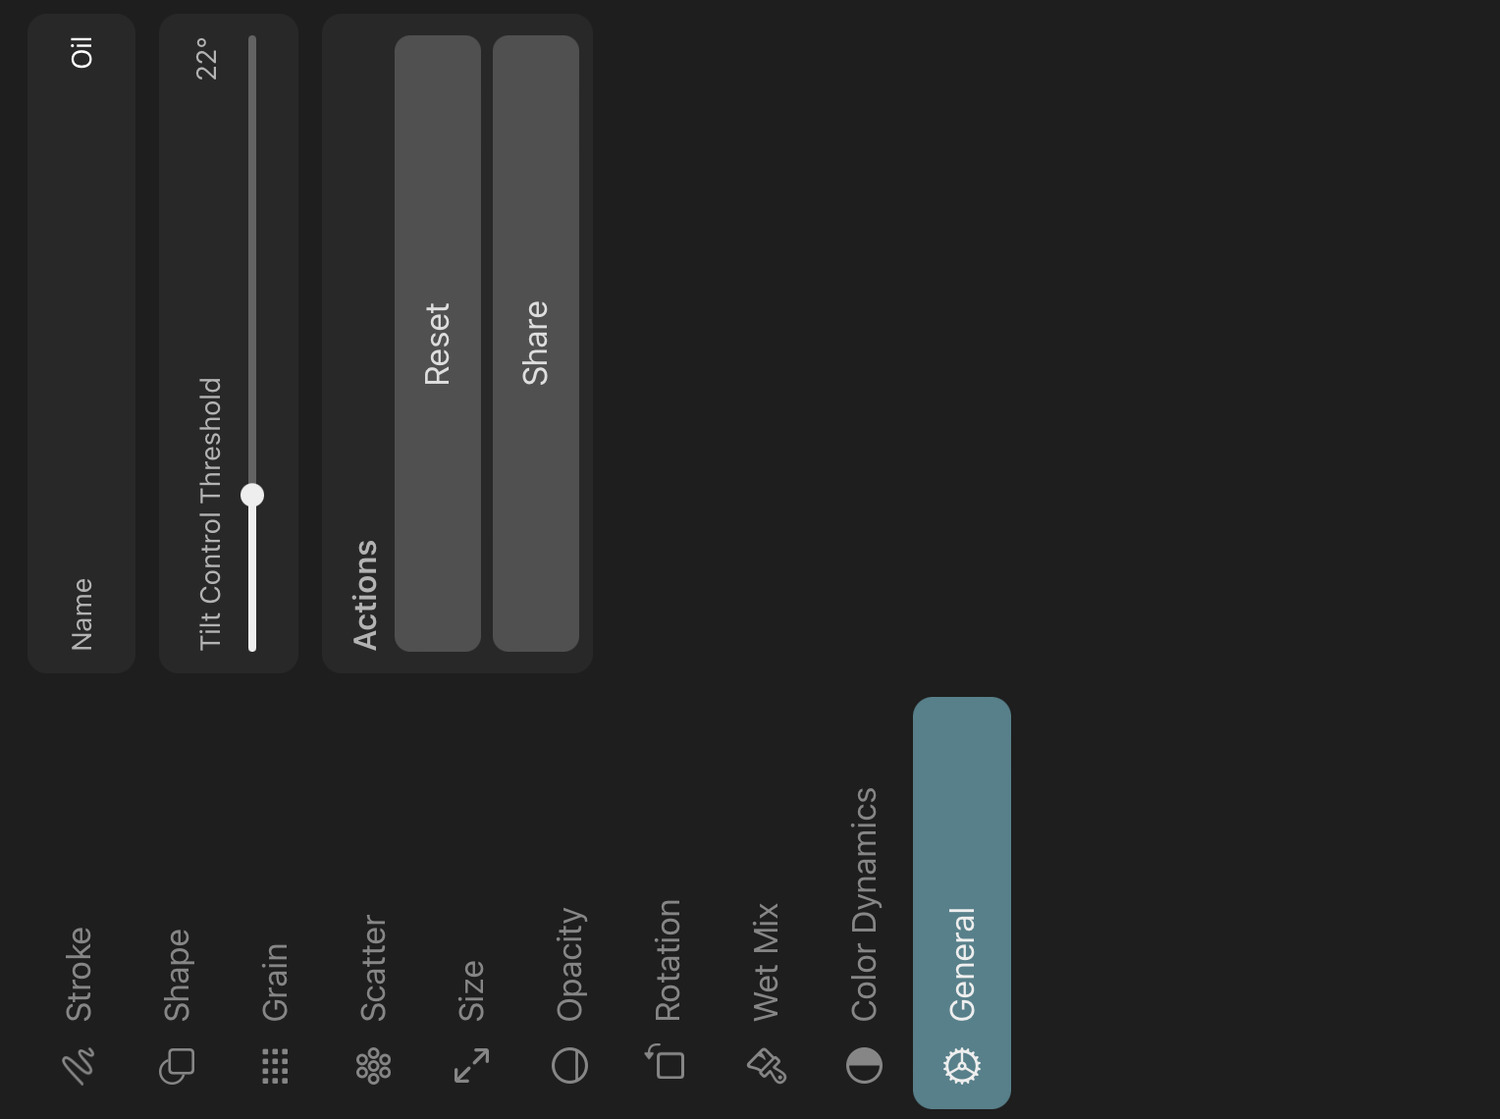
Name#
The name of the brush in the brush library. This name is also used when the brush is exported.
Tilt Control Threshold#
This value defines the tilt angle of Apple Pencil below which tilt control settings of the brush start to take effect. An angle of 0° represents Apple Pencil being tilted so that the flat edge of its tip is completely touching the screen.
Barrel Roll Relative To Start Of Stroke#
Whether the barrel roll angle of Apple Pencil should always be considered 0° at the start of each stroke, regardless of the physical roll angle of Apple Pencil at that moment. When enabled, all subsequent roll angles are then measured relative to this initial angle.
Reset#
Resets all brush settings to their values when this brush was first created.
Share#
Exports the brush as a .tsbrush file.
#
Brushes
Brush Textures
ToonSquid brushes with a Pixel or Vector Shape brush mode use a shape and a grain texture to generate the brush strokes while you draw. You can select the textures that you want your brush to use from the brush texture library via the brush editor.
Library#

The brush texture library interface has a tab for shape textures and a tab for grain textures, but you can choose from either of these tabs when selecting a texture for your brush shape and grain.
Shape textures typically contain shapes that don't extend to the edges of the image, since they form the basis of the shape of the brush stroke. Grain textures on the other hand are mostly used to add more variation and to simulate surface textures. Therefore, most of them fill the entire image and are seamlessly repeating.
Import#
ToonSquid already comes with numerous shape and grain textures that you can use to create hundreds of different brushes, but you can also add your own custom brush textures by importing more images into the brush texture library.
- Tap the
+button in the top right corner. - Choose
Import from PhotosorImport from Files. - Select the image you want to use as a brush texture in order to copy it into the currently selected tab of the texture library.
Grayscale#
All brush textures are grayscale images since they only control the shape of a brush stroke and not its colors. The amount of white at each pixel determines where the brush will apply paint onto the layer.
If you import a grayscale image, it is used as-is. If you import an RGB image, it is converted to grayscale based on the brightness of each pixel. Importing an image with transparencies will only use the alpha channel as the grayscale pixels of the new brush texture. The colors are completely ignored in this case.
#
Brushes
Import and Export
ToonSquid brushes and brush collections can be exported and shared outside of the app.
Export Brushes#
With the collection or brush to be exported selected, tap it again and select Share.
File Extensions#
Brush collections are exported as a file with the .tsbrushes extension. When you export a single brush, you get a file with a .tsbrush file extension.
The files contain all brush settings and textures needed for the brush or collection that was exported.
You can use this to easily backup all of your custom brushes outside of your iPad or to share your unique brushes with others.
Import Brushes#
To import a brush or brush collection into your ToonSquid brush library, tap the + button and choose Import. Then select the .tsbrush, .tsbrushes or .abr file that you want to import.
The new brushes are copied to the brush library and can then be used in all of your projects.
Adobe Photoshop® Brush Compatibility#
.abr files can be imported into ToonSquid. Most of the Photoshop brush settings are compatible with ToonSquid.
However, since the underlying brush engines are different, the brush behavior is not guaranteed to be exactly the same in both applications.
#
Brushes
Shape Assist
ToonSquid makes it easy to draw perfect shapes with your brushes.
Shape Types#
The shape assist feature supports the following shape types:
- Lines
- Curves
- Polylines
- Polygons (triangles, rectangles, squares, pentagons, hexagons etc.)
- Ellipses (and circles)
How To Draw Shapes#
- Draw a brush stroke and hold your Apple Pencil / finger at the end of the stroke.
- After a short delay, your brush stroke is automatically adjusted to draw the closest shape consisting of perfect straight lines or curves.
- Continue to move your Apple Pencil / finger in order to adjust the orientation and size of the shape.
This works in the brush, eraser and smudge tools.
Tip #
When drawing a polygon or an ellipse shape, you can tap the screen once to even out its proportions.
This turns an ellipse into a perfect circle, a rectangle into a square etc.
Editing Shapes#
You can continue to edit the shape that you just drew by tapping the "Edit shape" button which appears at the top next to the brush size slider.
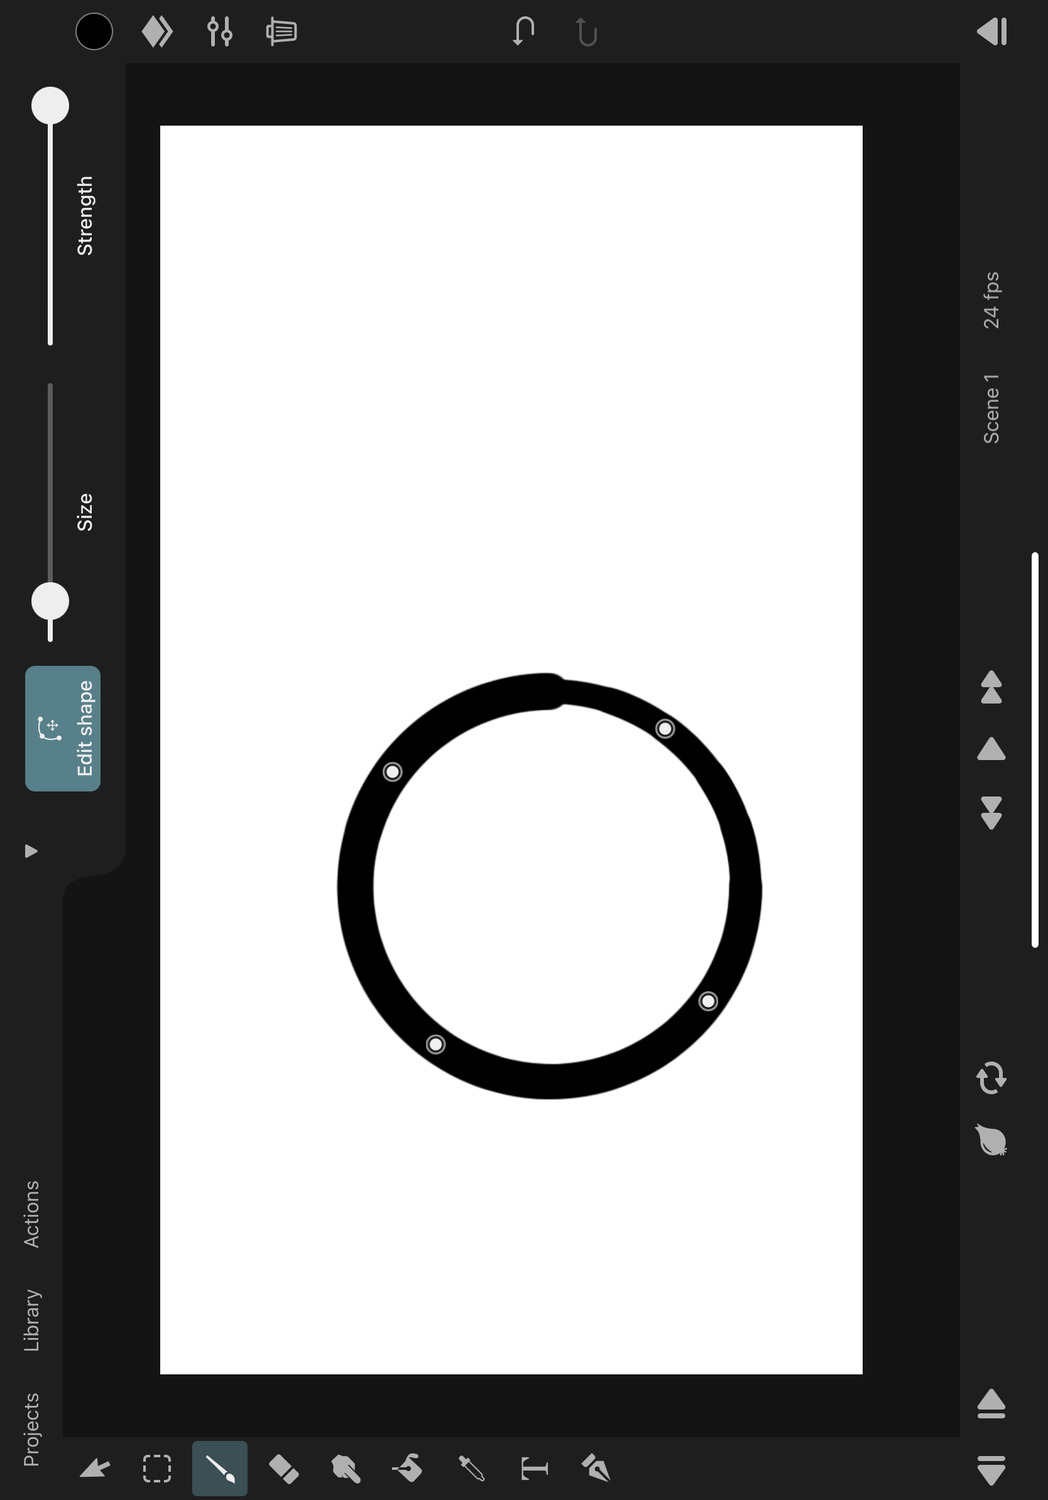
When shape editing is enabled, you will see control points on the canvas that you can drag to edit the shape. In this mode you can also drag anywhere on the canvas to move the shape. Additionally, changing the brush size and strength will update the shape's appearance.
When you are done editing the shape, either tap the screen once or tap the "Edit shape" button again. This will apply the brush stroke to the layer.
Note#
Shape assist also works with vector brushes.
When the shape editing mode is exited and the brush is inVector Shapemode, only the portion of the shape that is visible on screen will be added to the vector layer. This is the same behaviour as with regular vector brush shape strokes, which are also cut-off at the edges of the screen.
Settings#
You can disable the shape assist feature completely or adjust its delay in the Gestures settings tab.
#
Drawing Guides
Overview
ToonSquid's drawing guides and rulers help you create precise and accurate artwork by providing visual aids on the canvas such as grids or perspective lines, symmetry tools and assisted drawing features.
Grid
Use the 2D grid drawing guides to draw straight lines, subdivide your drawing space and maintain consistent proportions in your artwork.
Isometric
The isometric drawing guides help you create artwork with a consistent isometric perspective, perfect for game art and technical drawings.
Perspective
The perspective drawing guides allow you to set up one-point, two-point or three-point perspective grids to help you draw scenes with accurate depth and perspective proportions.
Ellipse
Learn how to use the ellipse drawing guide to create perfect circles and ellipses in your artwork.
Rectangle
The rectangle drawing guide helps you draw perfect squares and rectangles with ease.
Symmetry
The symmetry drawing guide allows you to draw mirrored artwork by reflecting your brush strokes across one or more symmetry axes.
Ruler
Rulers are a more traditional drawing aid in ToonSquid. Position them on the canvas and draw accurate lines along the edge of the ruler without affecting your brush strokes further away.
#
Drawing Guides
Grid
The grid drawing guide displays a 2D grid on the canvas to help you draw straight lines, subdivide your drawing space and maintain consistent proportions in your artwork.

Enable the Grid Drawing Guides#
In order to enable the grid drawing guides:
- Tap on
Actionsand then onEnable Guides. - If a different type of drawing guide was previously selected, tap on
Actionsfollowed byEdit Guidesto open the drawing guides settings in the inspector. - In the inspector under
Drawing Guides->Type, selectGrid. - Adjust the grid properties as desired.
- Press
Doneto finish editing the grid drawing guide properties.
Properties#
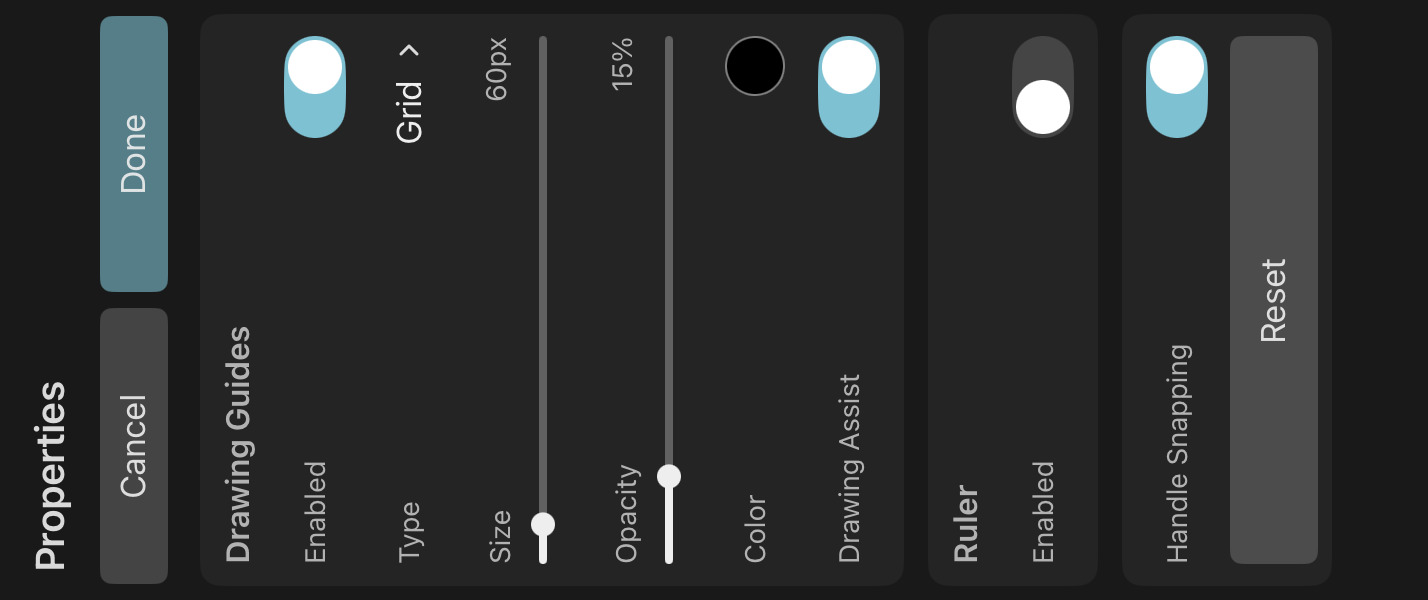
Size#
The size of the grid cells in pixels.
Opacity#
The opacity of the grid lines on the canvas.
Color#
The color of the grid lines on the canvas.
Drawing Assist#
If enabled, all of your brush strokes will automatically snap to be either horizontal or vertical lines. This allows you to easily draw straight lines along the grid axes. Note that this does not lock your brush strokes to the visible grid lines themselves, so the size of the grid has no effect on the drawing behaviour.
If you simply want to use the grid as a visual aid without affecting your brush strokes, disable this option.
Position and Rotation#
To move or rotate the grid, use the control handles that appear on the canvas while editing the grid drawing guide properties.
Handle Snapping#
Whether the grid control handles on the canvas should snap to relevant positions on the canvas when being moved.
Reset#
Reset the properties of the grid drawing guide to their default values.
Cancel#
Press this button to discard the most recent changes made to the drawing guide properties and to remove the control handles from the canvas.
Done#
Press this button to finish editing the drawing guide properties, remove the control handles from the canvas and to show the selected layer properties in the inspector again.
#
Drawing Guides
Isometric
The isometric drawing guide displays an isometric grid on the canvas to help you create artwork with a consistent isometric perspective, perfect for game art and technical drawings.
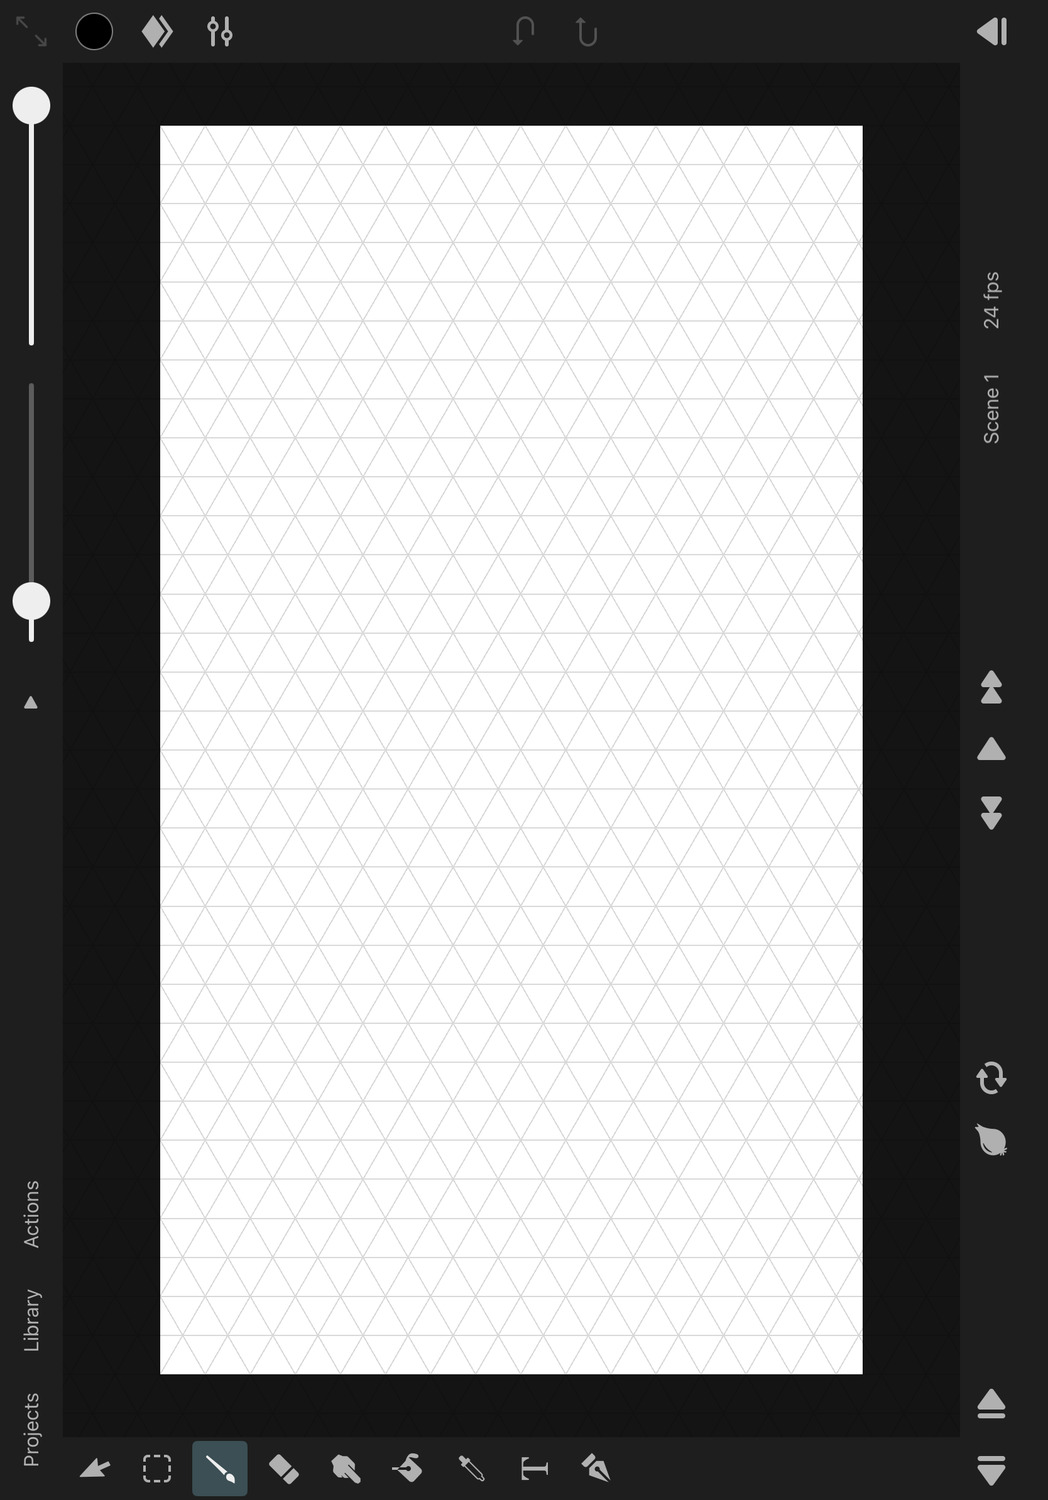
Enable the Isometric Drawing Guides#
In order to enable the isometric drawing guides:
- Tap on
Actionsand then onEnable Guides. - If a different type of drawing guide was previously selected, tap on
Actionsfollowed byEdit Guidesto open the drawing guides settings in the inspector. - In the inspector under
Drawing Guides->Type, selectIsometric. - Adjust the isometric grid properties as desired.
- Press
Doneto finish editing the isometric drawing guide properties.
Properties#

Size#
The distance between the grid lines in pixels.
Opacity#
The opacity of the grid lines on the canvas.
Color#
The color of the grid lines on the canvas.
Drawing Assist#
If enabled, all of your brush strokes will automatically snap to follow the direction of the isometric grid lines. This allows you to easily draw lines and shapes that conform to the isometric perspective. Note that this does not lock your brush strokes to the visible grid lines themselves, so the size of the grid has no effect on the drawing behaviour.
If you simply want to use the isometric grid as a visual aid without affecting your brush strokes, disable this option.
Position and Rotation#
To move or rotate the isometric grid, use the control handles that appear on the canvas while editing the isometric drawing guide properties.
Handle Snapping#
Whether the isometric grid control handles on the canvas should snap to relevant positions on the canvas when being moved.
Reset#
Reset the properties of the isometric drawing guide to their default values.
Cancel#
Press this button to discard the most recent changes made to the drawing guide properties and to remove the control handles from the canvas.
Done#
Press this button to finish editing the drawing guide properties, remove the control handles from the canvas and to show the selected layer properties in the inspector again.
#
Drawing Guides
Perspective
The perspective drawing guides allow you to set up one-point, two-point or three-point perspective grids to help you draw scenes with accurate depth and perspective proportions.
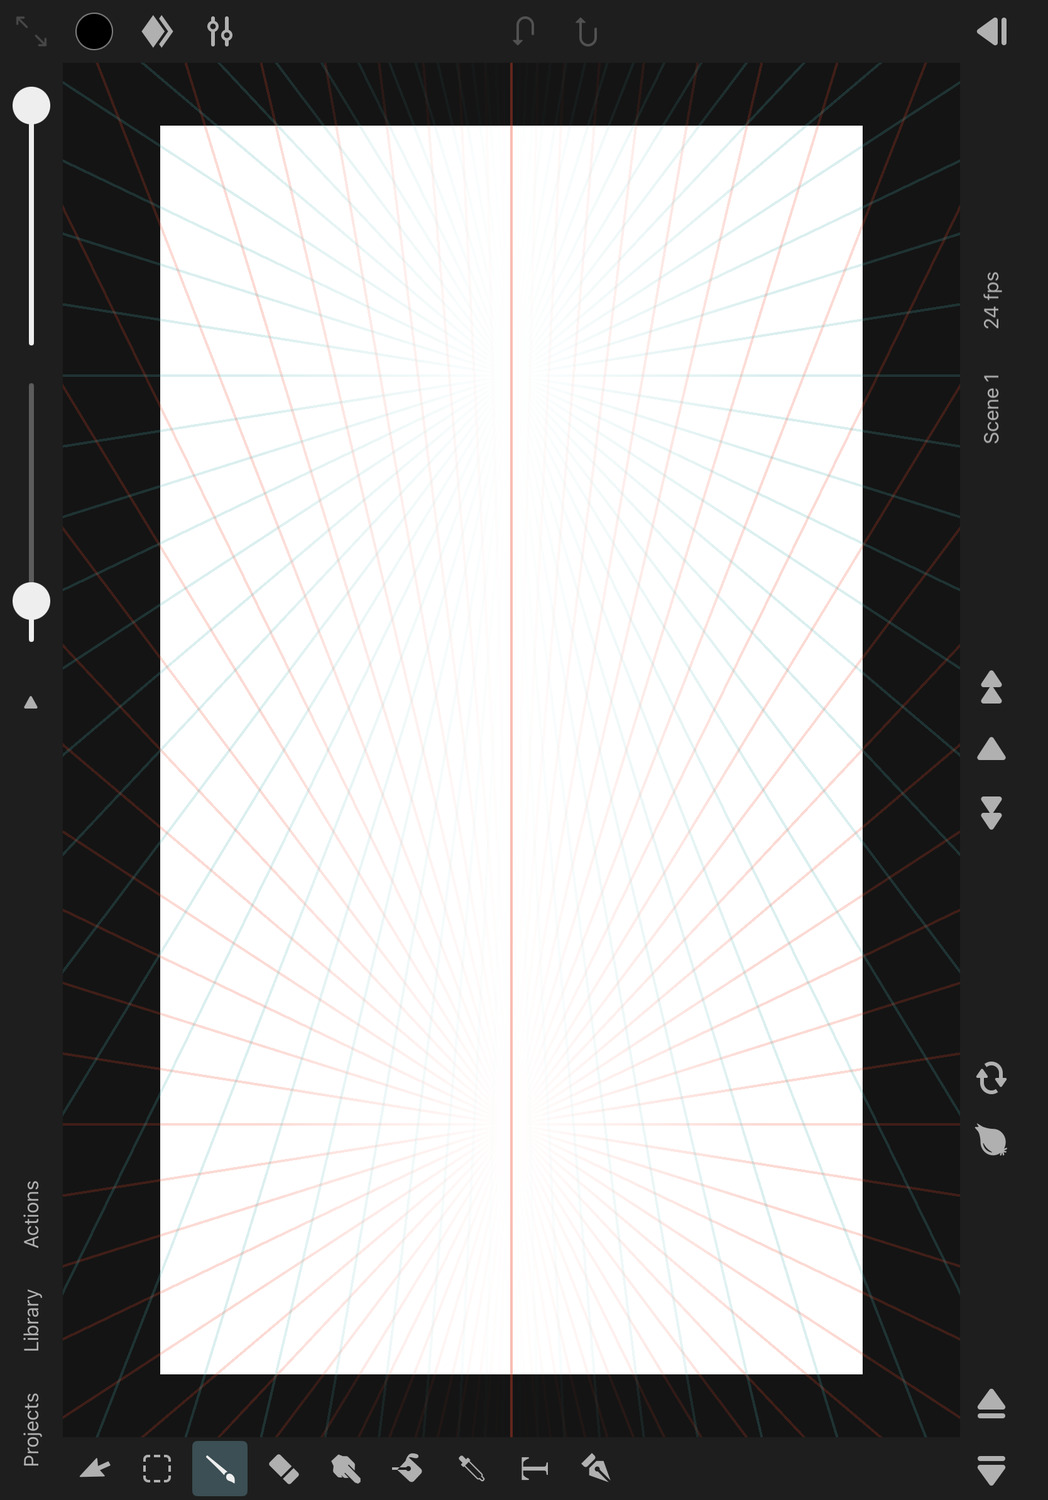
Enable the Perspective Drawing Guides#
In order to enable the perspective drawing guides:
- Tap on
Actionsand then onEnable Guides. - If a different type of drawing guide was previously selected, tap on
Actionsfollowed byEdit Guidesto open the drawing guides settings in the inspector. - In the inspector under
Drawing Guides->Type, selectPerspective.
Properties#

Perspective Mode#
The perspective mode determines how many vanishing points are used in the perspective grid. You can choose between one-point, two-point and three-point perspective.
Opacity#
The opacity of the perspective lines on the canvas.
Color#
Use the color properties to define the color of the perspective lines of each separate vanishing point.
Drawing Assist#
If enabled, all of your brush strokes will automatically snap to follow the closest perspective line to a vanishing point or snap to the closest vertical or horizontal line. This allows you to easily draw lines and shapes that conform to the selected perspective.
If you simply want to use the perspective grid as a visual aid without affecting your brush strokes, disable this option.
Vanishing Point Positions#
To move the vanishing points of the perspective grid, drag the control handles that appear on the canvas while editing the perspective drawing guide properties.
Handle Snapping#
Whether the vanishing point control handles on the canvas should snap to relevant positions on the canvas when being moved.
Reset#
Reset the properties of the perspective drawing guide to their default values.
Cancel#
Press this button to discard the most recent changes made to the drawing guide properties and to remove the control handles from the canvas.
Done#
Press this button to finish editing the drawing guide properties, remove the control handles from the canvas and to show the selected layer properties in the inspector again.
#
Drawing Guides
Ellipse
The ellipse drawing guide helps you create perfect circles and ellipses around a common center point in your artwork.
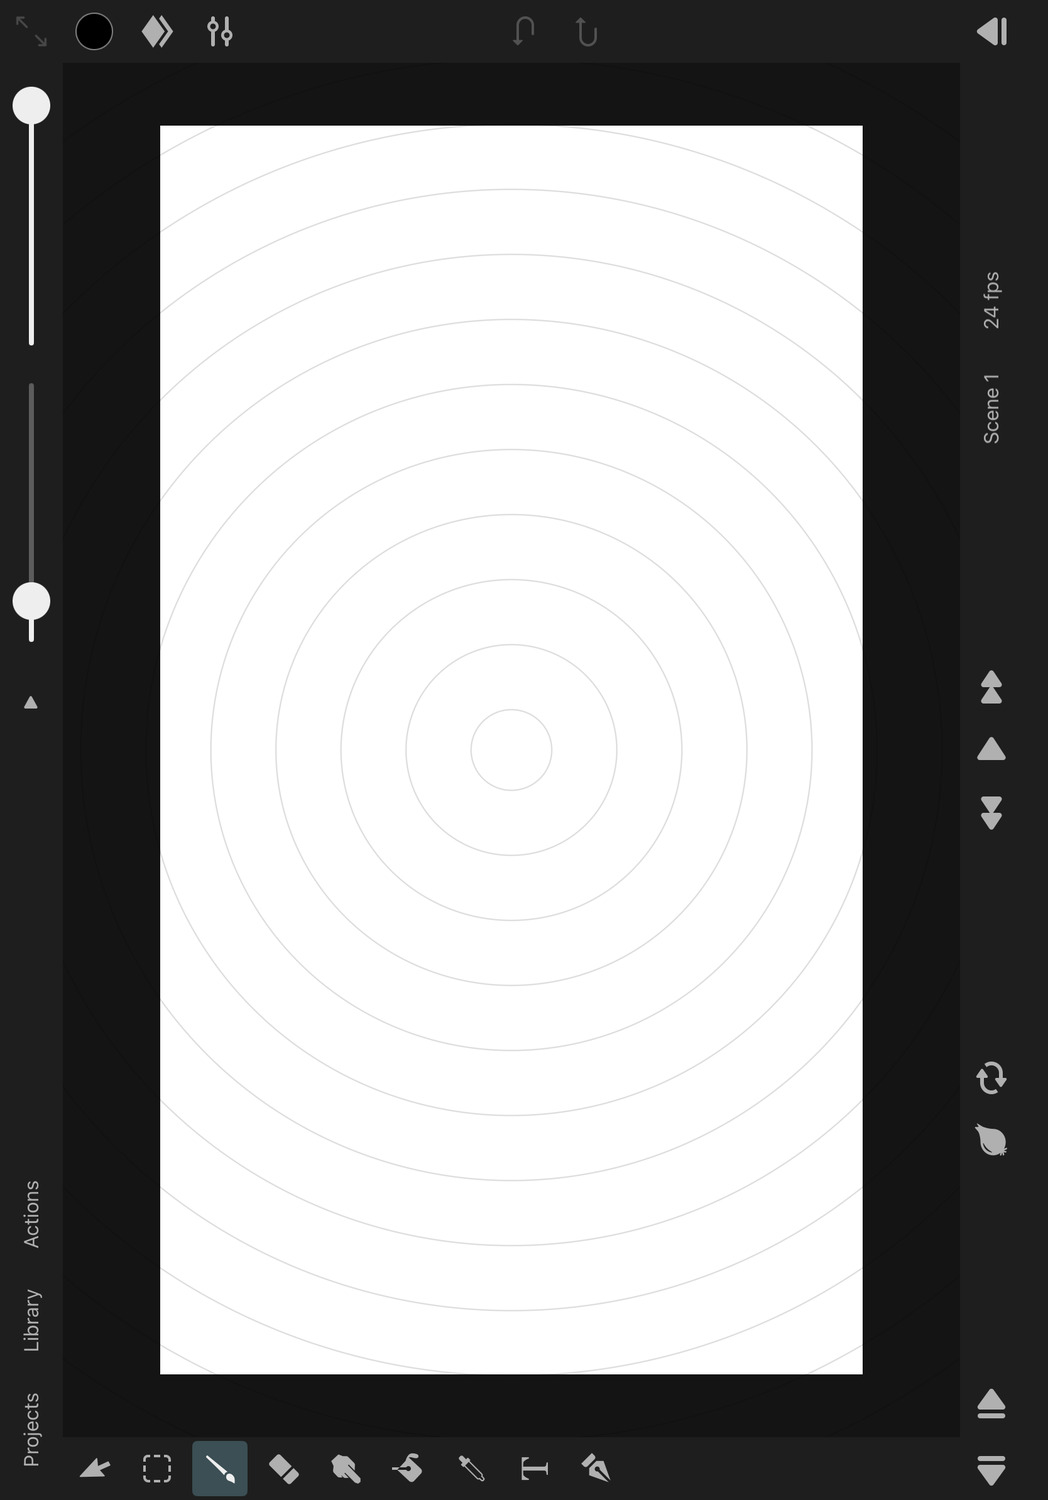
Enable the Ellipse Drawing Guides#
In order to enable the ellipse drawing guides:
- Tap on
Actionsand then onEnable Guides. - If a different type of drawing guide was previously selected, tap on
Actionsfollowed byEdit Guidesto open the drawing guides settings in the inspector. - In the inspector under
Drawing Guides->Type, selectEllipse. - Adjust the ellipse properties as desired.
- Press
Doneto finish editing the ellipse drawing guide properties.
Properties#
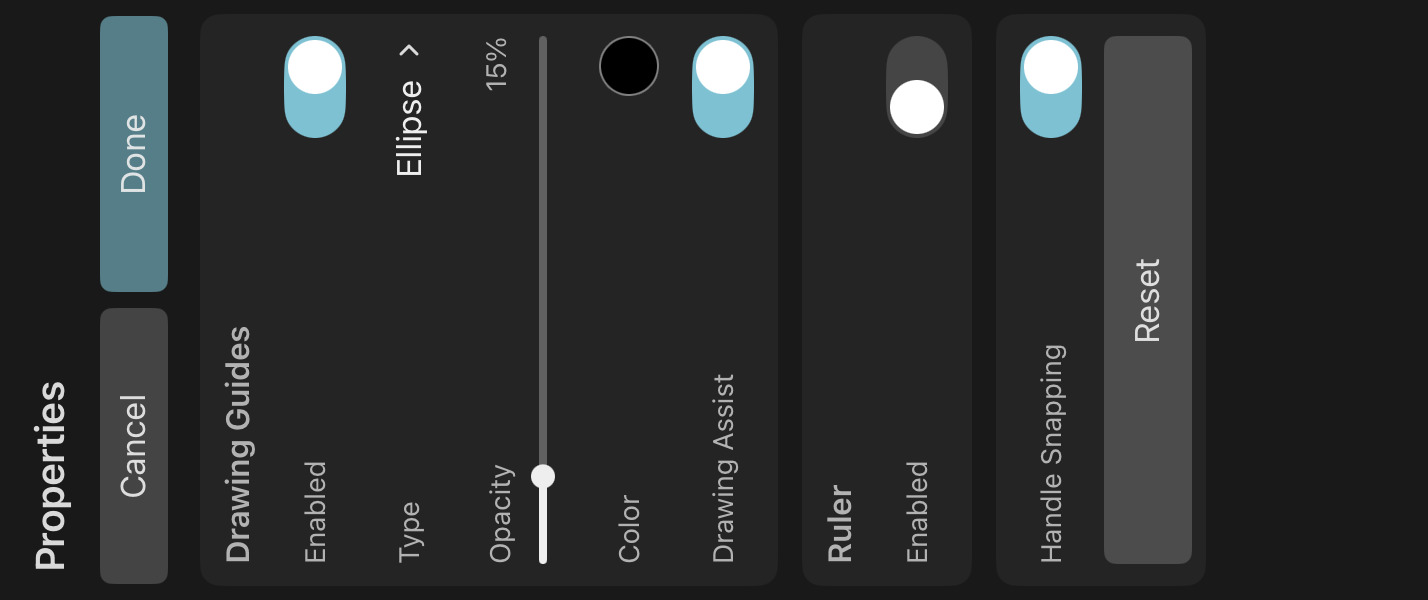
Opacity#
The opacity of the drawing guide lines on the canvas.
Color#
The color of the drawing guide lines on the canvas.
Drawing Assist#
If enabled, all of your brush strokes will automatically snap to follow the closest ellipse shape defined by the drawing guide. This allows you to easily draw perfect circles and ellipses around the center point of the drawing guide.
If you simply want to use the ellipse drawing guide as a visual aid without affecting your brush strokes, disable this option.
Position, Rotation and Size#
To move, rotate or resize the ellipse, use the control handles that appear on the canvas while editing the ellipse drawing guide properties.
Handle Snapping#
Whether the ellipse control handles on the canvas should snap to relevant positions on the canvas when being moved.
Reset#
Reset the properties of the ellipse drawing guide to their default values.
Cancel#
Press this button to discard the most recent changes made to the drawing guide properties and to remove the control handles from the canvas.
Done#
Press this button to finish editing the drawing guide properties, remove the control handles from the canvas and to show the selected layer properties in the inspector again.
#
Drawing Guides
Rectangle
The rectangle drawing guide helps you create perfect rectangles and squares in your artwork.

Enable the Rectangle Drawing Guides#
In order to enable the rectangle drawing guides:
- Tap on
Actionsand then onEnable Guides. - If a different type of drawing guide was previously selected, tap on
Actionsfollowed byEdit Guidesto open the drawing guides settings in the inspector. - In the inspector under
Drawing Guides->Type, selectRectangle. - Adjust the rectangle properties as desired.
- Press
Doneto finish editing the rectangle drawing guide properties.
Properties#

Opacity#
The opacity of the drawing guide lines on the canvas.
Color#
The color of the drawing guide lines on the canvas.
Drawing Assist#
If enabled, all of your brush strokes will automatically snap to follow the closest rectangle shape defined by the drawing guide. This allows you to easily draw perfect rectangles and squares.
If you simply want to use the rectangle drawing guide as a visual aid without affecting your brush strokes, disable this option.
Position, Rotation and Size#
To move, rotate or resize the rectangle, use the control handles that appear on the canvas while editing the rectangle drawing guide properties.
Handle Snapping#
Whether the rectangle control handles on the canvas should snap to relevant positions on the canvas when being moved.
Reset#
Reset the properties of the rectangle drawing guide to their default values.
Cancel#
Press this button to discard the most recent changes made to the drawing guide properties and to remove the control handles from the canvas.
Done#
Press this button to finish editing the drawing guide properties, remove the control handles from the canvas and to show the selected layer properties in the inspector again.
#
Drawing Guides
Symmetry
The symmetry drawing guide helps you create perfectly symmetrical artwork by mirroring your brush strokes across one or more axes.
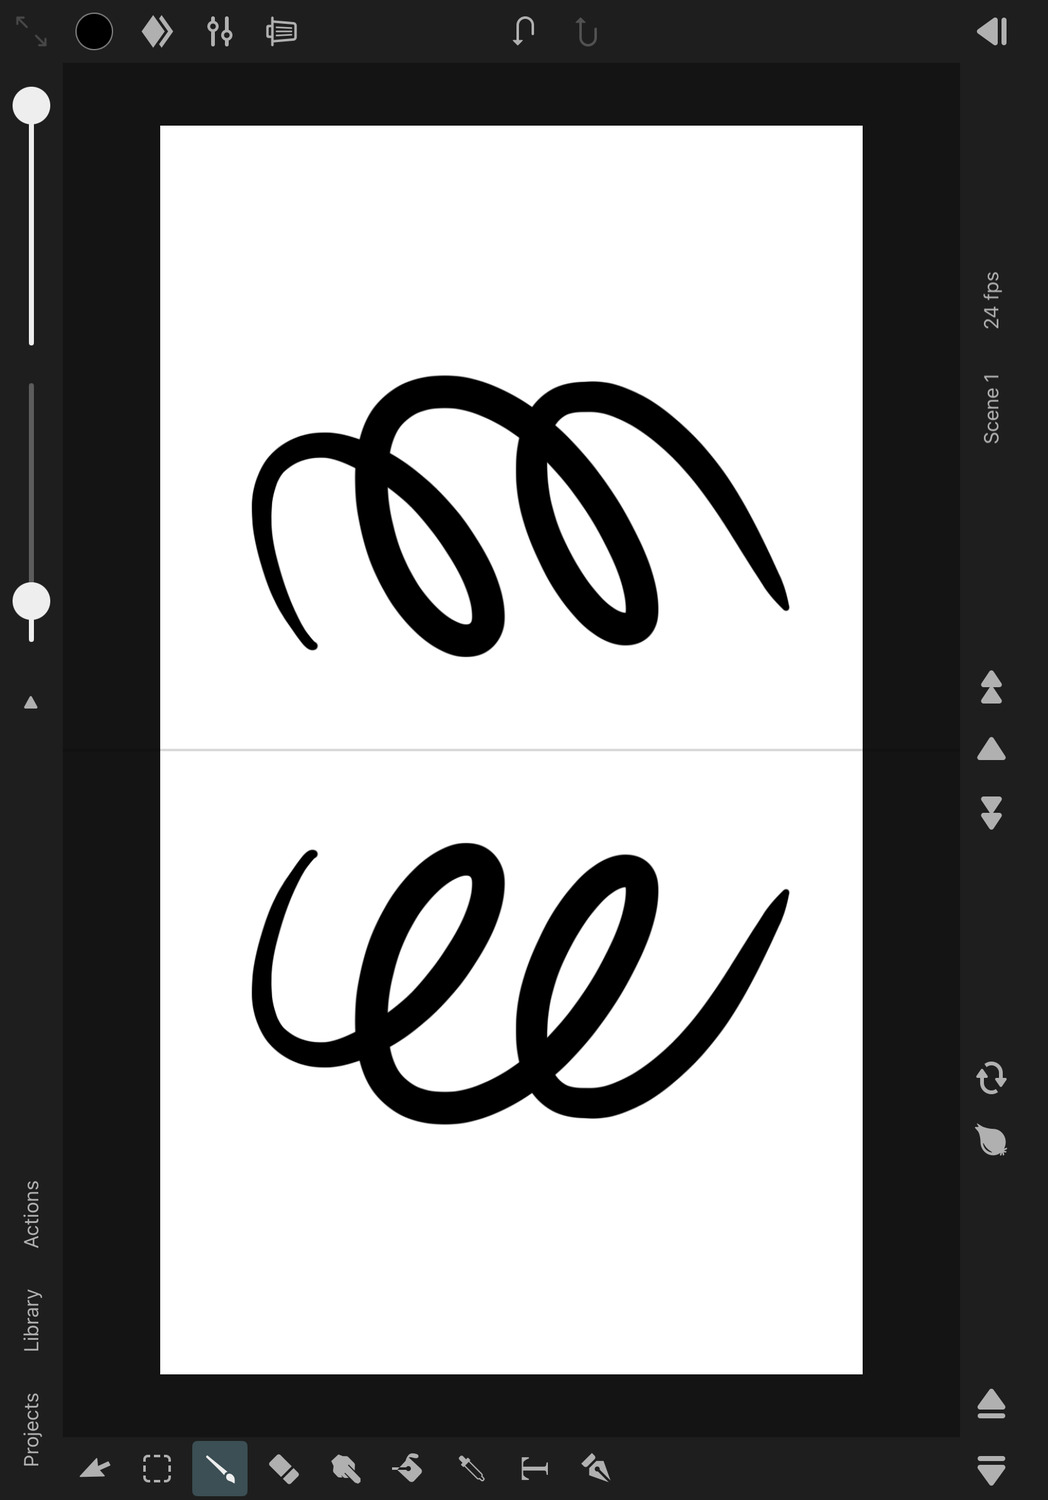
Enable the Symmetry Drawing Guides#
In order to enable the symmetry drawing guides:
- Tap on
Actionsand then onEnable Guides. - If a different type of drawing guide was previously selected, tap on
Actionsfollowed byEdit Guidesto open the drawing guides settings in the inspector. - In the inspector under
Drawing Guides->Type, selectSymmetry. - Adjust the symmetry properties as desired.
- Press
Doneto finish editing the symmetry drawing guide properties.
Properties#

Symmetry Mode#
The symmetry mode determines how many symmetry axes are used:
Mirror#
A single symmetry axis is used to mirror your brush strokes.
Quadrant#
Two symmetry axes are used, one vertical and one horizontal, creating four quadrants that mirror your brush strokes.
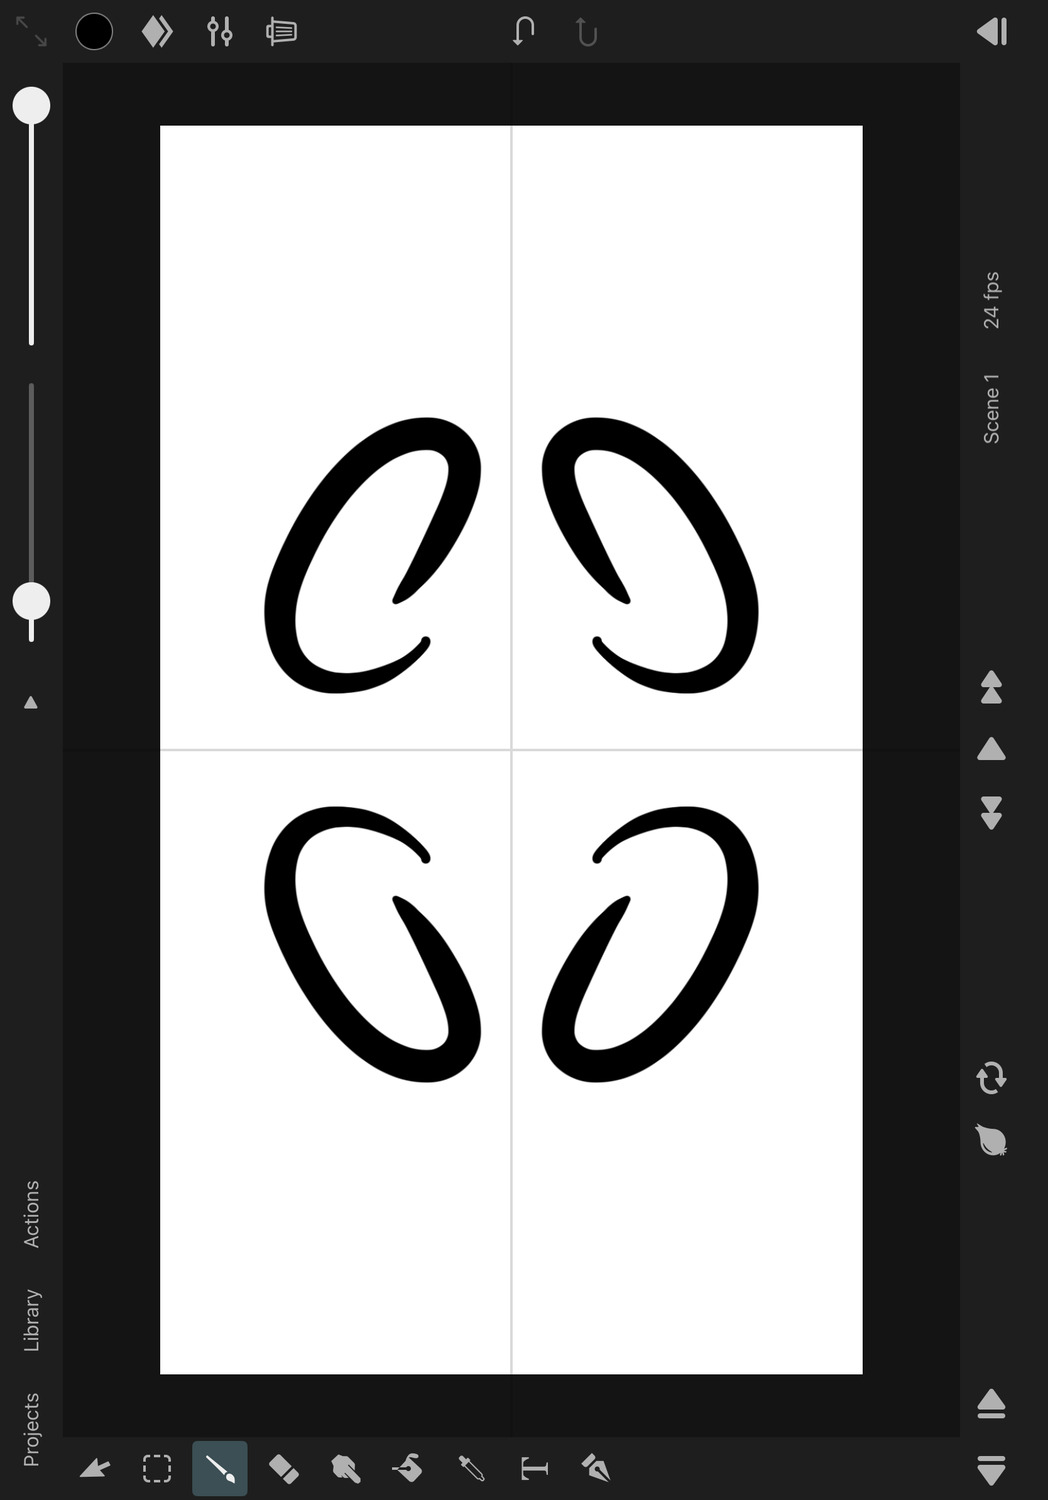
Octagon#
Four symmetry axes at 45° angles create eight sections that mirror your brush strokes.

Rotational Symmetry#
When this is enabled, your brush strokes will be rotated around the center point of the symmetry guide instead of being mirrored across the symmetry axes. This allows you to create artwork with rotational symmetry.
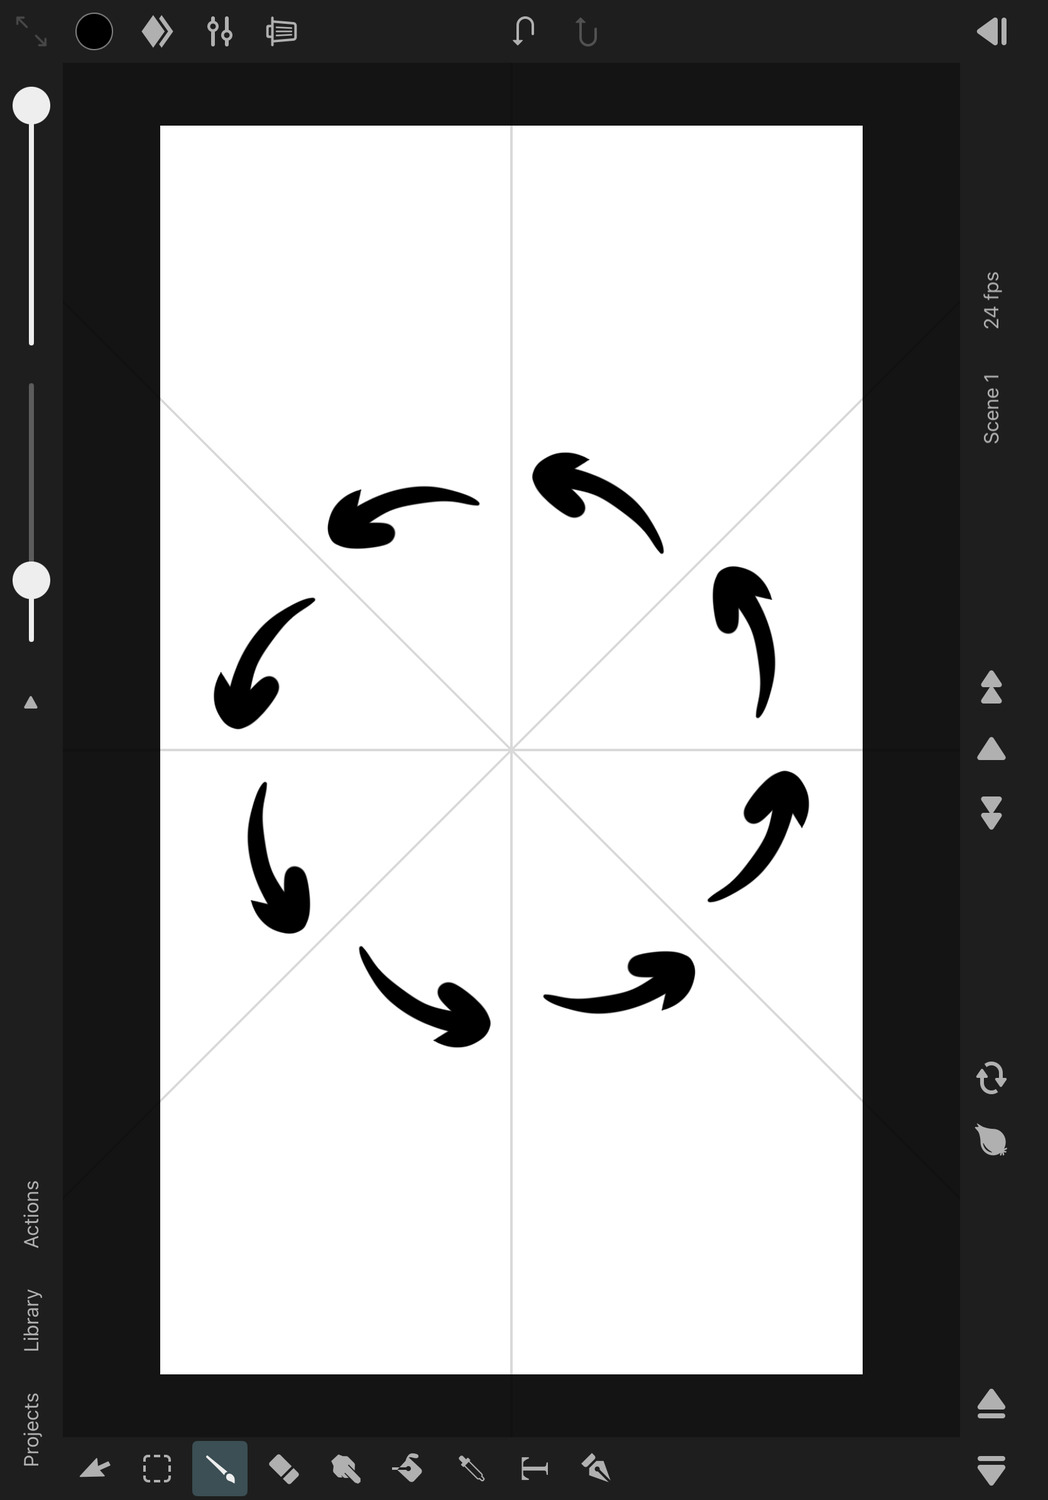
Opacity#
The opacity of the symmetry axes on the canvas.
Color#
The color of the symmetry axes on the canvas.
Position and Rotation#
To move or rotate the symmetry axes, use the control handles that appear on the canvas while editing the symmetry drawing guide properties.
Handle Snapping#
Whether the symmetry control handles on the canvas should snap to relevant positions on the canvas when being moved.
Reset#
Reset the properties of the symmetry drawing guide to their default values.
Cancel#
Press this button to discard the most recent changes made to the drawing guide properties and to remove the control handles from the canvas.
Done#
Press this button to finish editing the drawing guide properties, remove the control handles from the canvas and to show the selected layer properties in the inspector again.
#
Drawing Guides
Ruler
Rulers in ToonSquid help you draw accurate lines and shapes with the brush tool.
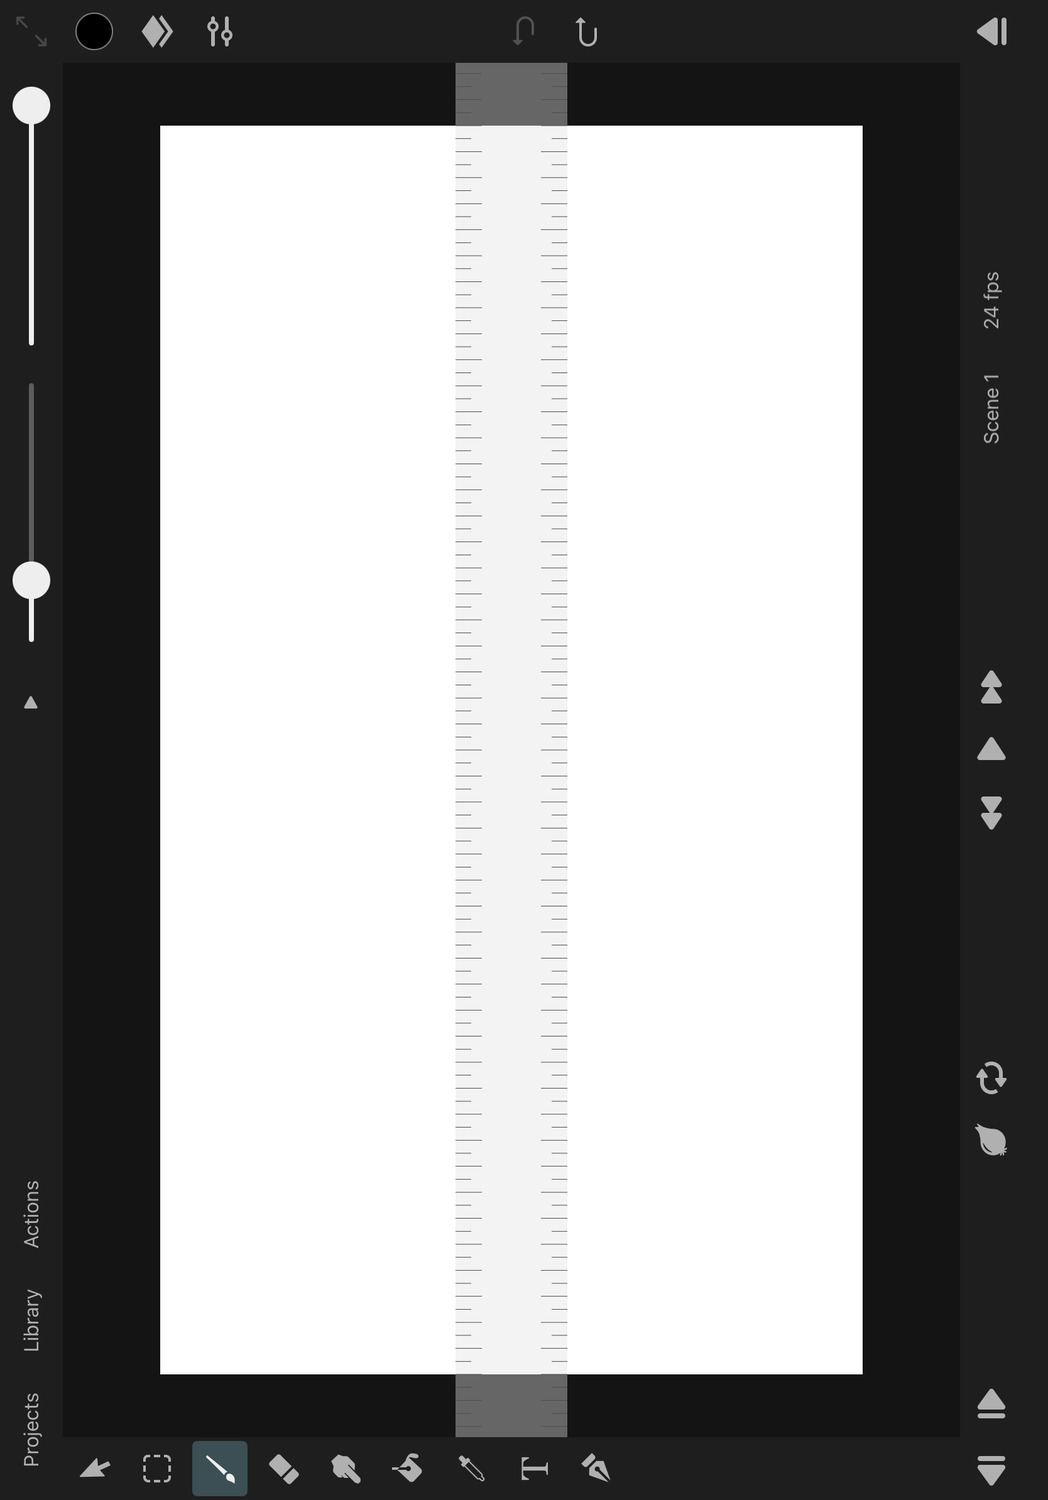
Enable the Ruler#
In order to enable the ruler, tap on Actions and then on Enable Ruler.
Differences between Rulers and Drawing Guides#
While rulers and drawing guides share some similarities, there are important differences between the two features:
- Rulers will only snap your brush strokes to their exact edge if you start drawing the stroke close enough to the edge of the ruler. Otherwise, the ruler will not have any effect on your brush strokes. With drawing assist enabled for drawing guides, your brush strokes will be limited to directions allowed by the respective drawing guide regardless of where you start drawing the stroke on the canvas.
- Rulers can always be moved on the canvas regardless of whether you are editing their properties in the inspector or not. Drawing guides can only be moved using the on-canvas handles while editing their properties.
- Any ruler type can be used at the same time as any drawing guide type. This is especially useful when you either want to just use the drawing guides as a visual aid without drawing assist enabled or when you want to use the ruler in combination with the symmetry guide.
Ruler Types#
To change the ruler type:
- Tap on
Actionsfollowed byEdit Guidesto open the guides and ruler settings in the inspector. - In the inspector under
Ruler->Typeselect your preferred ruler type.
Line#
This ruler type simulates a straight ruler with two edges along which you can draw straight lines.
The line marking along the edges of the ruler can also be used to measure distances on the canvas. When the canvas is zoomed in far enough so that all line markings are visible, the gap between neighboring markings represents 10 pixels on the canvas.
You can rotate the ruler on the canvas by placing and rotating two fingers on the ruler.
Ellipse#
This ruler type has an elliptical edge which allows you to draw perfect circles and ellipses with the brush tool.
Use the control handles on the canvas to adjust the position, rotation and size of the ellipse ruler.
Rectangle#

This ruler type has a rectangular edge which allows you to draw perfect rectangles and squares with the brush tool.
Use the control handles on the canvas to adjust the position, rotation and size of the rectangle ruler.
Properties#
Color#
The color and opacity of the ruler on the canvas.
Handle Snapping#
Whether the ruler control handles on the canvas should snap to relevant positions on the canvas when being moved.
Reset#
Reset the properties of the ruler to their default values.
Cancel#
Press this button to discard the most recent changes made to the ruler properties and to remove the control handles from the canvas.
Done#
Press this button to finish editing the ruler properties, remove the control handles from the canvas and to show the selected layer properties in the inspector again.
#
Transform
Overview
Movement lies at the core of all animation workflows. Whether you just want to move and resize a portion of a drawing during editing or you are looking to animate a layer's position, rotation and scale using keyframes, ToonSquid provides you with easy-to-use tools to achieve these goals.
Transform Properties
Every movable layer has position, rotation and scale properties that can be animated using keyframes. Dive into the basics of layer movement in ToonSquid.
Transform Tool
Use the transform tool to edit a layer's position, rotation and transform directly on the canvas. It also allows you to select layers with a simple tap.
Motion Path
When a layer has multiple position keyframes, you can see and edit the entire motion path of the layer directly on the canvas.
Hierarchy
Position layers relative to each other, create basic character rigs and simplify more complicated movement animations using the transform hierarchy.
Transform Layer
Use the transform layer to add an intermediate coordinate system to the hierarchy and to animate multiple layers in sync with the same movement.
#
Transform
Transform Properties
All movable layers have a transform, which consists of the following properties.
Transform#
The following three properties all support keyframes.
Position#
The position of a layer is the offset of its pivot from the origin of the layer's parent coordinate system on the x- and y-axis.
Rotation#
The rotation of the layer around its pivot. In ToonSquid, positive rotations are clockwise, and negative rotations are counterclockwise.
Additionally, rotations have an infinite range and are not restricted to the range 0° - 360°. This allows you to use keyframes to interpolate toward very large rotation values and therefore create an animation that rotates a layer multiple full revolutions.
Scale#
The scale of the layer around its pivot relative to the layer's original content size on the x- and y-axis. This is 1 (on both dimensions) by default.
For example, setting a scale of 2 on a layer will make the layer twice as big on the canvas.
Pivot#

The layer pivot is the origin of the layer's coordinate system. It is highlighted when the layer is selected in the transform tool via a cross-hair.
As mentioned above, the pivot is the reference point for the position, rotation and scale properties.
Editing the Pivot#
The position of the layer pivot can be manually edited. By default, the pivot is automatically placed in the center of the layer, even when the layer contents are edited.
Editing of the layer pivot is disabled by default since it is not needed very often. To edit the layer pivot, you need to
- Select the layer.
- Select the transform tool.
- Tap the layer on the canvas.
- Select
Enable Pivot Editing
Now the pivot can be dragged around. Place the pivot where you want it to be and tap Disable Pivot Editing to lock the pivot in place again and prevent it from being accidentally edited.
The layer pivot does not support keyframes.
Tip#
If position, rotation and scale already have keyframed animations, editing the pivot afterwards will (by definition) result in a change of the behavior of that animation. It is therefore recommended, that you first choose where you want the layer pivot to be and only afterwards animate the layer transform.
Editing the Transform#
The transform properties of a layer can be edited both in the inspector and on the canvas using the transform tool.
#
Transform
Transform Tool
The transform tool is used to edit both layer transforms and transform layer contents directly on the canvas. It also allows layers to be selected by simply tapping them on the canvas.
Transform Editing#
When a transformable layer is selected, the transform tool shows various handles on the canvas that can be used to edit the layer's transform.
Move#
Drag the layer to change its position.
Rotate#
Drag the rotation handle to rotate the layer. Rotate the layer multiple full revolutions to increase the rotation value beyond 360° and -360°.
The rotation handle is placed at the bottom of the layer if the pivot is in the center, but it might also be on a different corner if you have manually adjusted the pivot.
Scale#
Use the scale handles around the edges of the layer to edit the layer's scale.
Pivot#
The pivot is automatically placed in the center of your layers by default, but you can also change its position manually as described here
Tool Options#
The available options in the transform tool depend on the type of the selected layer.

Snapping#
Whether the layer should snap its position and its edges to other layers while being edited with the transform tool. This can help with centering and aligning layers to each other.
Scaling Mode#
How the layer should be scaled when one of the scale handles is dragged.
Uniform#
The layer will be scaled evenly in the horizontal and vertical directions and therefore keep its current aspect ratio.
Freeform#
The horizontal and vertical scale of the layer can be edited separately.
Perspective#
Drag the four corner points or edges in order to apply a perspective distortion to the layer.
Warp#
Drag the control points or anywhere within the layer in order to warp and reshape the layer's surface. This even allows you to fold parts of the layer over itself.

In order to define the overlap order, you can tap each control point and move it to the front, the middle or the back.
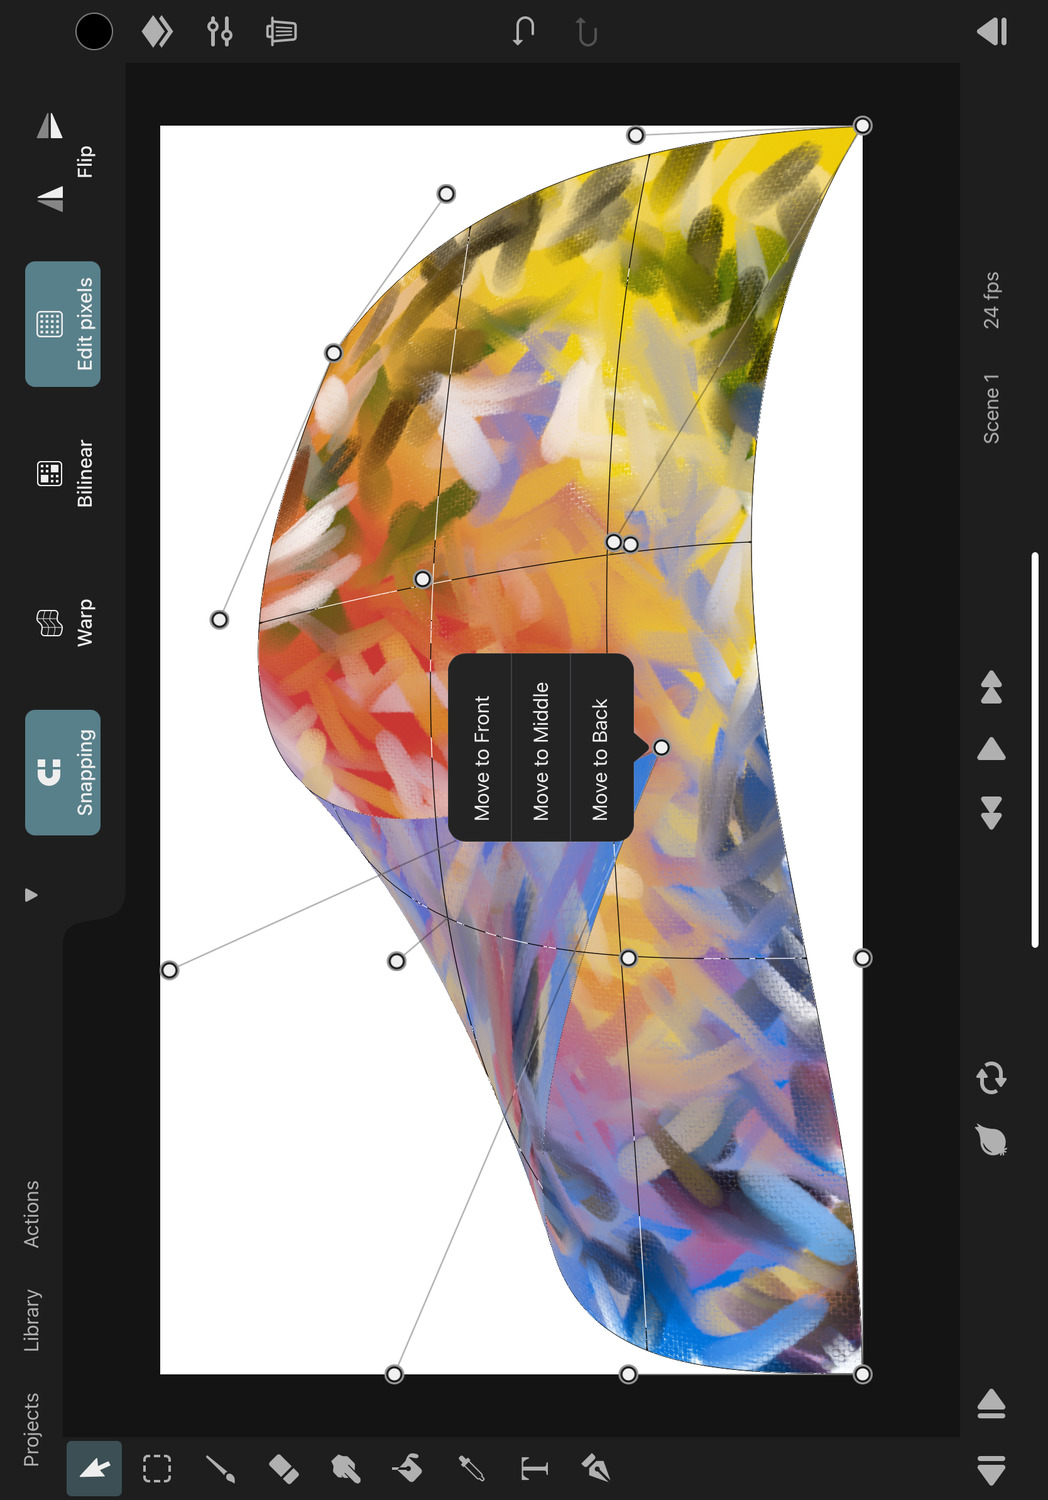
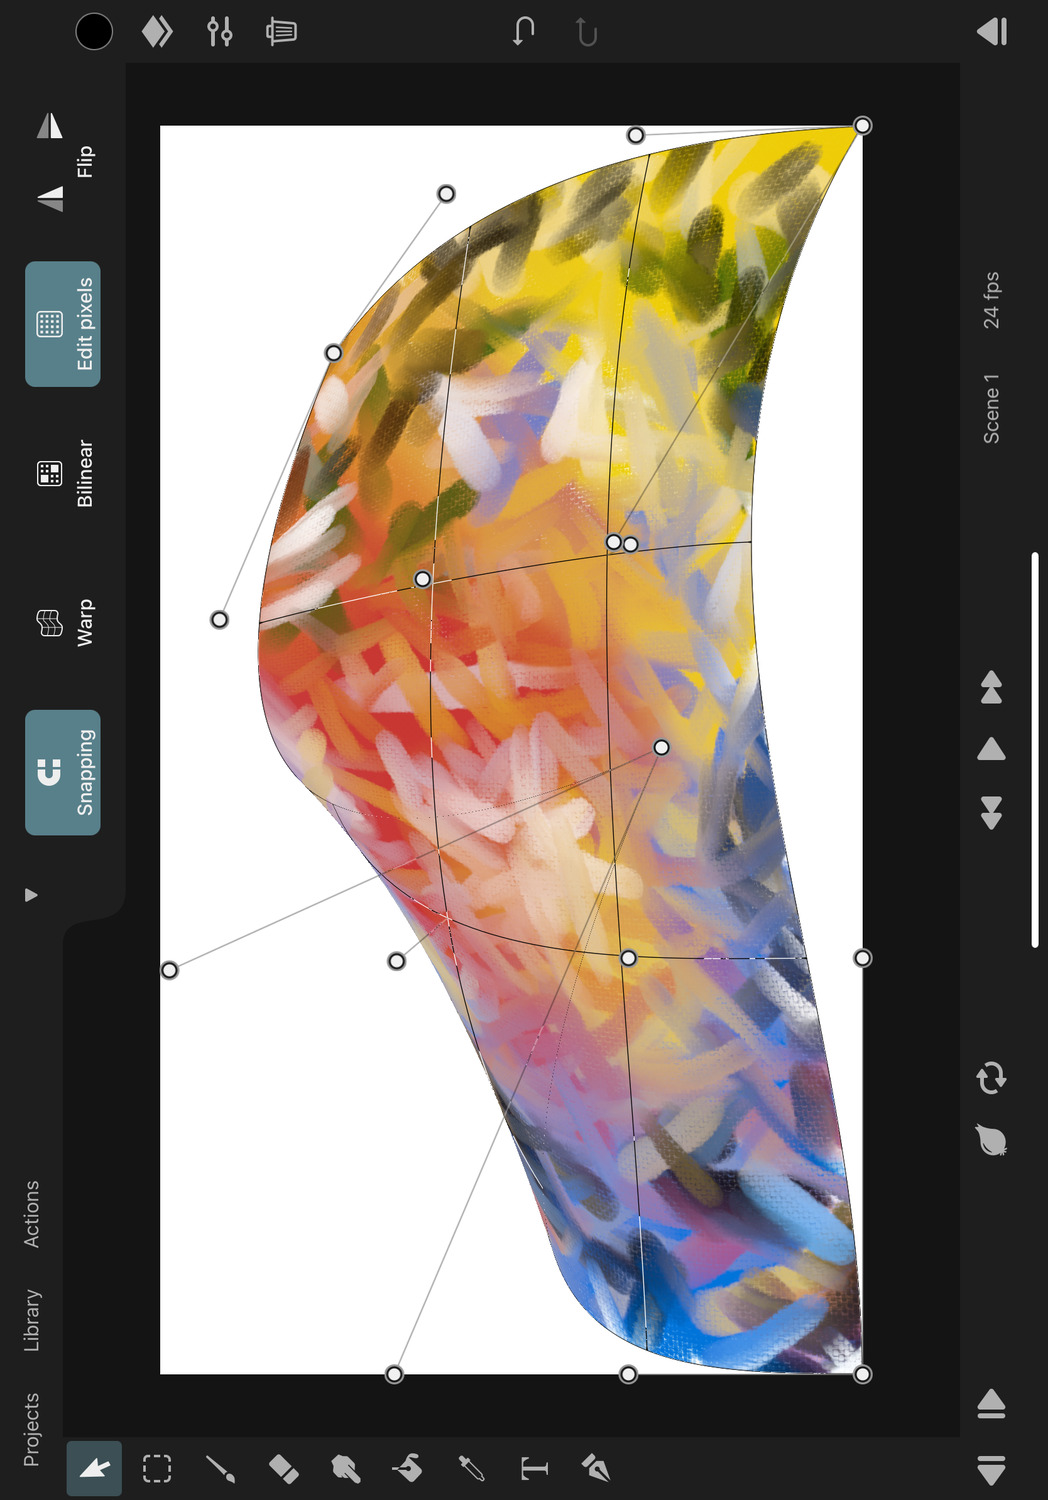
Note#
The scaling modes
PerspectiveandWarpcan be used to either edit the perspective effect or warp effect, or to edit the contents of pixel layers, vector layers or vector groups (i.e. the pixels or path control points) directly. Create a selection in order to edit the layer contents.
If neither a selection nor the corresponding effect exists on the selected layer, then ToonSquid will ask you which of the two editing options you want to use.
Flip#
Use the flip horizontally button (on the left) and the flip vertically button (on the right) to flip the layer around its pivot.
Resizing Filter (Pixel Layer)#
Defines how to filter (resample) the pixels of a pixel layer when they are scaled, rotated or moved. This option is only available if the tool is editing the pixels within the layer instead of the layer's transform, e.g. when there is an active selection area.
Nearest#
Uses nearest neighbor interpolation. This filter keeps hard pixel edges, so the layer contents appear "pixelated" when upscaled.
Bilinear#
Uses bilinear interpolation. This causes previously sharp edges to be blurry when they are upscaled.
Transforming Selections#
When a selection area is active, using the transform tool on pixel layers, vector layers, path layers or vector groups will transform the pixels, path control points or path segments within the selection area instead of the transform properties of the layer.
Tip#
If you tap the transform tool button again while the transform tool is already active, ToonSquid will create a selection area that covers the entire contents of the selected layer. This lets you quickly switch between editing the layer's transform and its contents. Tap again to deselect everything.
When editing the pixels within a pixel layer, moving the layer contents outside the limits of the layer region (as defined by the resolution) will cause them to be clipped when the tool is exited.
Even without a selection area, the pixels within a pixel layer can be edited if the Automatic Pixel Edit Mode Switching setting is enabled. Please refer to the linked handbook page for more details.
Tip#
If you have unintentionally shifted a pixel layer away from its original position, you can quickly reset its position by tapping the layer in the transform tool and then selecting the
Reset Transformoption. This option is only available when editing the layer's transform properties with the transform tool, so make sure that you do not have an active selection area and enable keyframing mode in the timeline.
Entering Groups on the Canvas#
There are two ways to select a layer inside of a group directly on the canvas with the transform tool without opening the layer list:
- Tap on the selected group layer and select the
Enter Groupoption. - Double tap the group on the layer inside that you want to select.
Selecting Groups on the Canvas#
When you tap a group on the canvas and the currently selected layer is not inside of the group, the group layer will be selected, even if you tapped on one of the layers in the group.
If the currently selected layer is inside the group and you tap on another layer in the group, that tapped layer will be selected - not the group. In order to select the group again, tap on the group in an empty region without a visible layer.
#
Transform
Motion Path
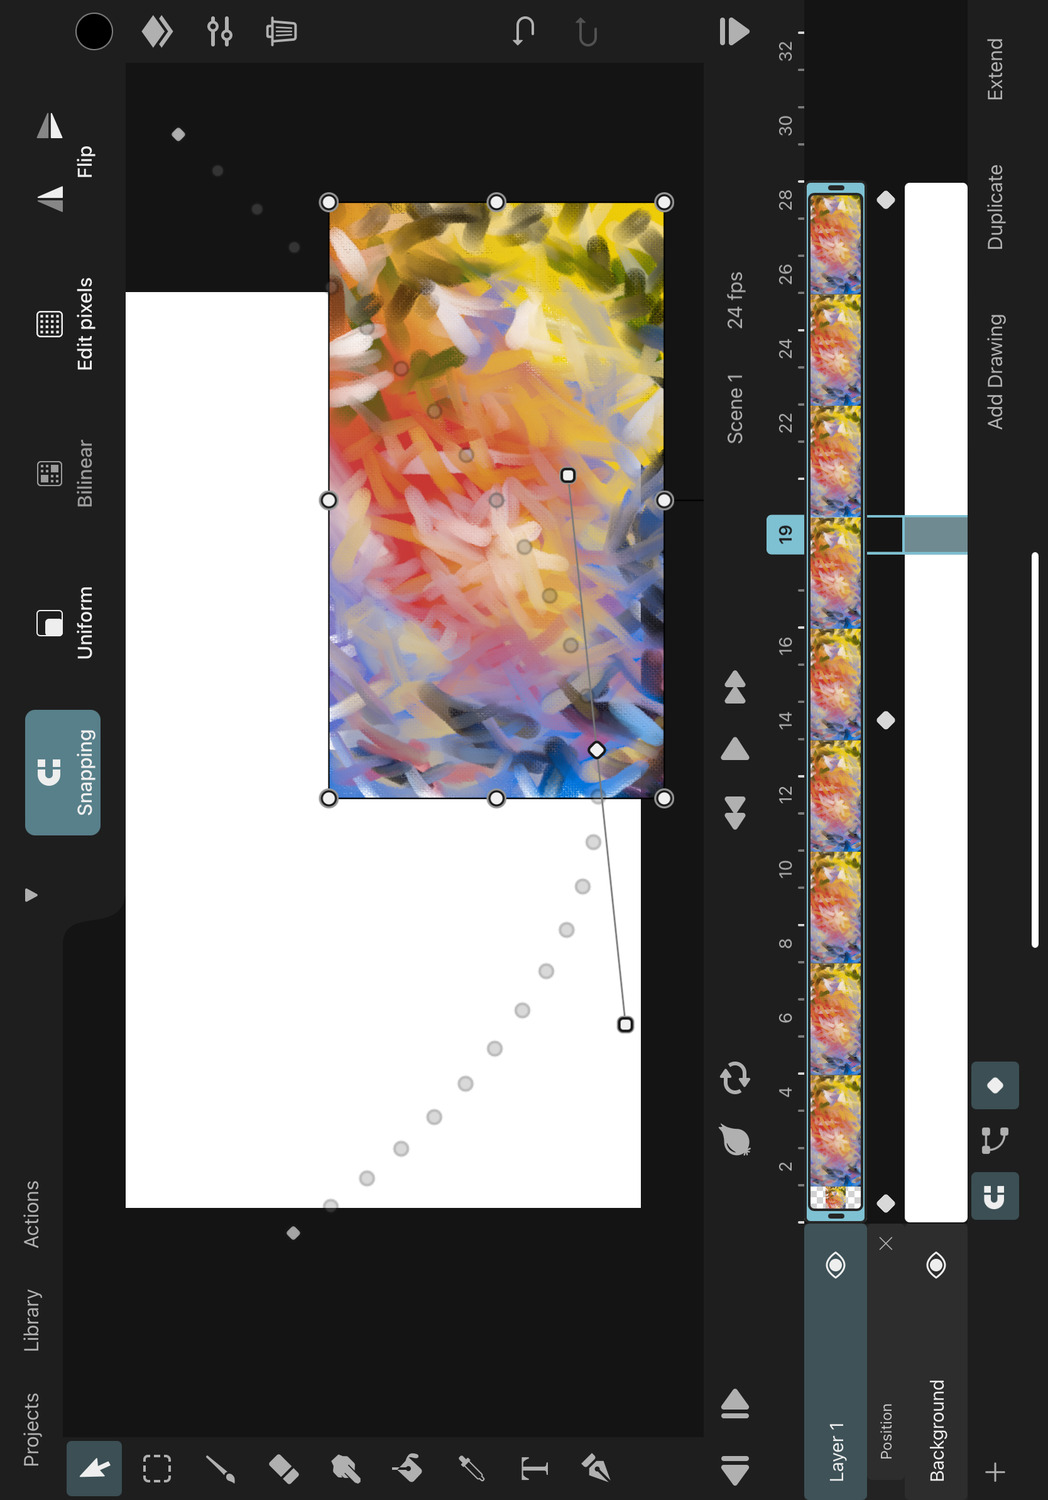
The motion path of a layer is shown in the transform tool if the position property of the layer has more than one keyframe.
The motion path shows all intermediate positions of the layer's pivot between all of the layer's position keyframes.
You can use it to edit the position keyframes and therefore the path of the layer directly on the canvas using Bézier curves, similar to how you can edit the path outline of a path layer in the path tool. Refer to those pages for all available options.
Use the Show Motion Path setting to control whether or not the motion path should be shown in the transform tool.
#
Transform
Hierarchy
Coordinate Systems in ToonSquid#
ToonSquid uses a right-handed coordinate system with the origin in the top left corner, the x-axis pointing to the right and the y-axis pointing downwards. Positive rotations are therefore clockwise.
Every layer has its own local coordinate system. The origin of the local coordinate system of a layer is the layer's pivot.
By default, all layers outside of groups are placed in the global coordinate system of the scene and layers inside of groups are placed in the group's local coordinate system (making that their "parent coordinate system").
Transform Hierarchy#
Layers in the timeline can also be manually placed in each other's local coordinate system to chain movement animations together. When this is the case, scaling, rotating and moving the parent layer will automatically do the same for the child.
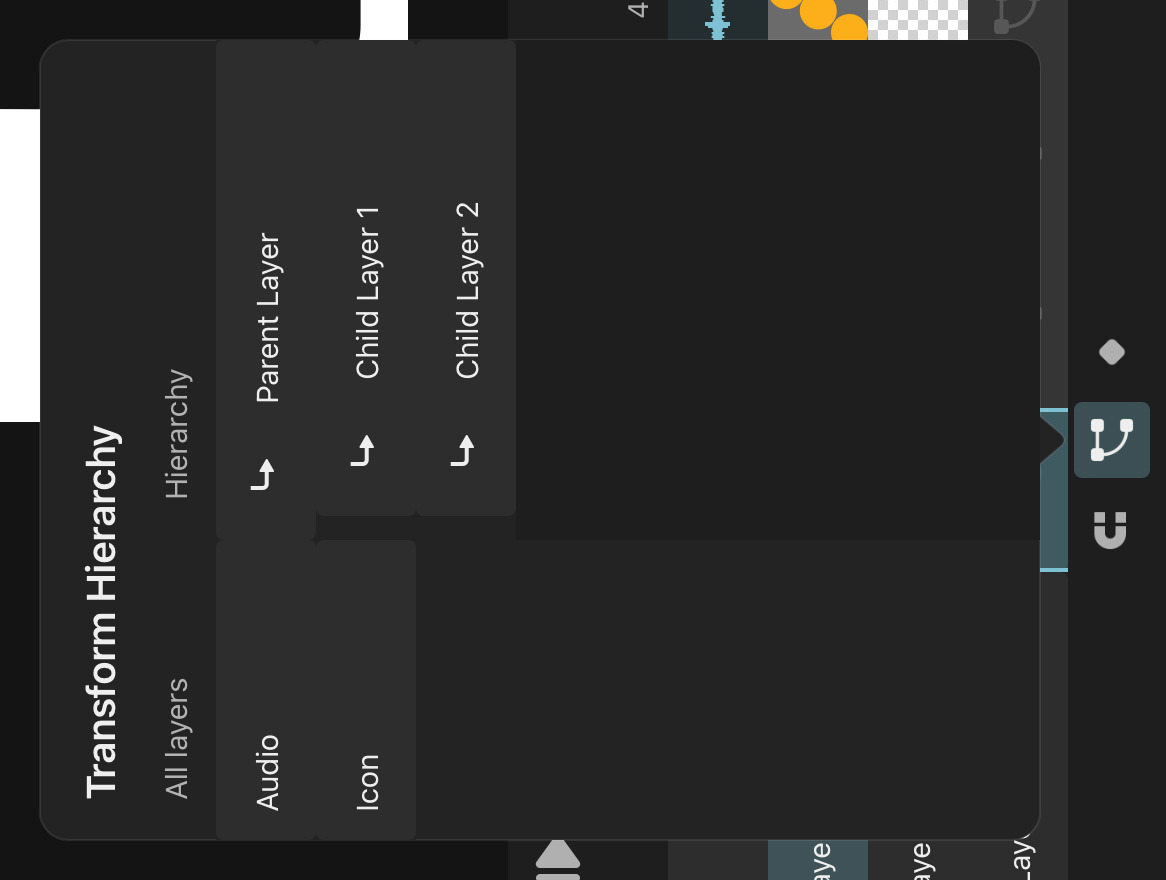
How to create a Hierarchy#
- Tap the transform hierarchy button in the timeline.
- All layers that are currently not part of the hierarchy are listed on the left.
- All layers that are part of the hierarchy are listed on the right.
- Drag layers from the list on the left to the right to create the hierarchy.
- Drop a layer
Aon top of another layerBin the hierarchy list to parentAtoB.Awill now be positioned inB's local coordinate system.
The order of the layers in the hierarchy section does not matter. The visual order is still defined by the regular layer list in the timeline.
Remove Layers from the Hierarchy#
Drag layers from the hierarchy section to the list of all layers to remove them from the hierarchy.
Groups#
Layers inside of groups are automatically in an implicit transform hierarchy with the group as their parent. Transformations of group layers therefore automatically apply to all of layers in the group.
These implicit hierarchies between groups and their contents are not shown in the transform hierarchy list. That is only for manually defined hierarchies.
Any layer that has been manually placed in a transform hierarchy as shown above is only part of that manually defined hierarchy. This means that placing a layer that is inside of a group in a manual hierarchy automatically removes the group as the layer’s implicit transform parent (no matter if the layer in the manual hierarchy has a new parent or not). If you want to create a manual hierarchy within a group layer in the timeline, also add the group layer to the manual transform hierarchy and explicitly construct the entire hierarchy.
#
Transform
Transform Layer
The transform layer has no visual content but has a transform property. It is used to add another coordinate system into a transform hierarchy.

Animate the movement of multiple layers at once#
The common way to animate multiple layers at once is using groups layers.
You can also use transform layers to animate the movement of multiple timeline layers together. They can be particularly useful for this when the layers to be moved in sync are visually interleaved with other layers that should not be moved. In that case, it can be cumbersome to animate the movement using group layers.
In order to animate the movement of multiple layers at once using transform layers:
- Add a transform layer via the layer list.
- Open the transform hierarchy screen.
- Drag the transform layer into the hierarchy section.
- Parent all layers that you want to be animated to the transform layer.
- Select and animate the transform layer using keyframes and the transform tool.
#
Text
Overview
ToonSquid has all the tools you need to add text to your animations.
Text Editing
Edit your text directly on the canvas, without the need for separate input fields. ToonSquid also supports right-to-left text input and IMEs for non-Latin-based languages.
Text Layer
Text layers let you customize and animate many text properties. Use the trim property to make your text appear letter by letter.
Fonts
Choose any font that is installed on your iPad or import your own fonts to be used with the text layers.
#
Text
Text Editing
Use the text tool to add and edit text layers on the canvas.
Add Text Layers#
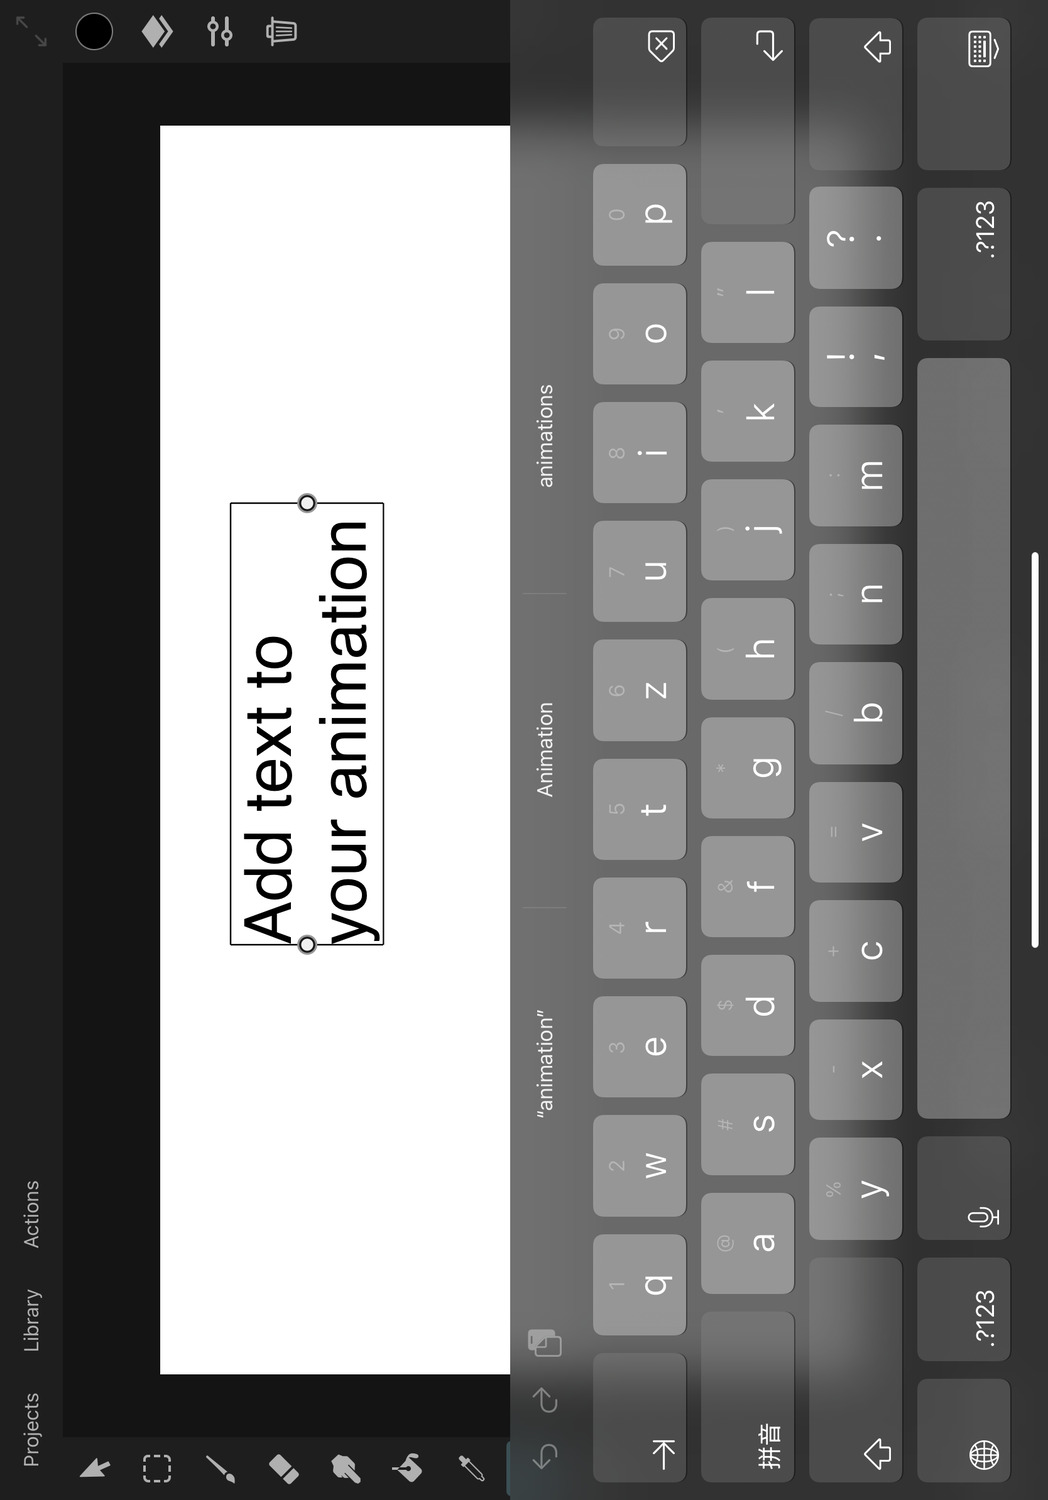
Select the text tool and tap anywhere on the canvas to add a new text layer and immediately start typing to fill it with text.
Alternatively, tap an existing text layer in the text tool to start editing the text inside.
Text Wrapping#
By default, the text in a text layer will only wrap to a new line when the enter key is pressed.
You can use the handles on the left and right of the text to increase the width of the text box. Once the width is manually defined, the text wraps when it reaches this width.
Selection#
Double-tap on a word to select it and triple-tap to select the entire text. You can then use the handles at the start and end of the selection to change the range of the selected text.
By default, you can move the text layer in the text tool by dragging it on the canvas. You can also change this behavior so that a drag results in a text selection instead.
Text Actions#
Tap the cursor or a selected region to bring up the text actions.
Copy#
Copies the selected text to the clipboard so that it can be pasted somewhere else.
Paste#
Allows pasting text from the clipboard at the current text cursor location. If a range of text is selected, that selection is replaced with the pasted text.
Cut#
Copies the selected text to the clipboard and removes it from the layer.
Deselect#
Removes the selection and shows the single text cursor again.
Select All#
Selects the entire text in the layer
Features#
Move the Cursor with the Space Bar#
Just like elsewhere in iOS, ToonSquid also allows you to hold the space bar and then drag your finger on the keyboard to move the text cursor.
Emojis#
You are not limited to just typing Latin characters in ToonSquid, but you can also use emojis and other Unicode symbols.
Right to Left Text#
ToonSquid also supports right-to-left and bidirectional text input.
If you place the cursor in an ambiguous location within bidirectional text, two text cursors will be shown to indicate both potential continuation positions of the text, depending on the next character that you type.
Additionally, the cursors are tilted to indicate where the next character will appear, depending on whether it uses a left-to-right (LTR) or right-to-left (RTL) writing direction.
The cursor that is tilted clockwise (with its top towards the right and the bottom towards the left) indicates the location for RTL text to appear.
The cursor that is tilted counter-clockwise (with its top towards the left and the bottom towards the right) indicates the location for LTR text to appear.
IMEs#
ToonSquid's text tool supports input method editors for languages such as Chinese, Japanese and Korean.
#
Text
Text Layer
Text layers are used to add text to an animation. Refer to the text editing page to learn how you can add a text layer and edit it on the canvas using the text tool.
The text layer provides many properties that you can use to customize the appearance of your text.
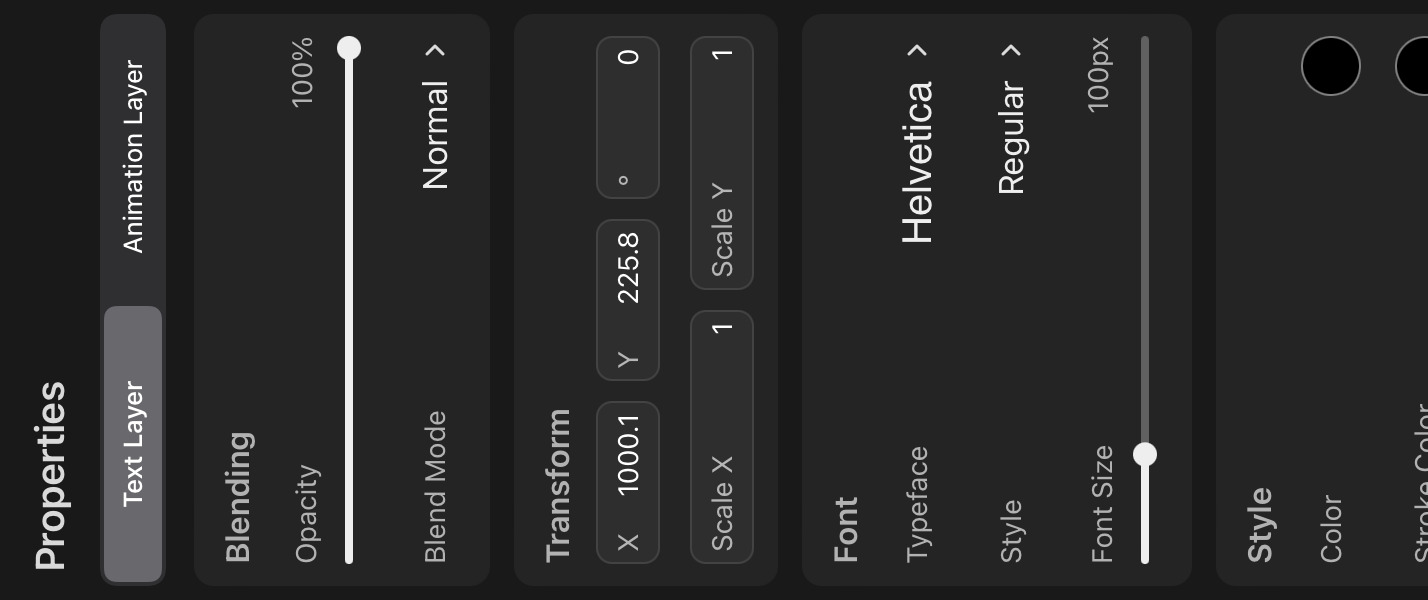
Font#
Typeface#
The typeface (or design family) of the font to be used by the layer. This is commonly loosely referred to as the "font", even though not technically correct.
You can choose the typeface from any font that is installed on the iPad or imported into ToonSquid.
Style#
The specific style variation of the typeface that should be used. A typeface can offer multiple fonts with different weights and styles such as Regular, Bold, Italic, Condensed, many more and combinations thereof.
The available options depend on which fonts are installed for the selected typeface.
Font Size#
The font size in pixels (in the local coordinate system of the text).
Style#
Color#
The text color. This property only supports solid colors and no gradients.
Stroke Color#
The color of the stroke along the edges of each glyph. This is only relevant if Stroke Width is greater than 0 so that a stroke is shown at all.
Stroke Width#
The width of the stroke as a percentage of the font size.
Layout#
Text Alignment#
The horizontal alignment of the text within the layer. Available options are
- Left
- Center
- Right
Line Spacing#
The distance of the baselines of each line of text from each other as a percentage of the default line-height for the chosen font.
Letter Spacing#
The additional amount of spacing between the glyphs as a percentage of the font size.
Trim#
The percentage of the characters in the text that should be shown.
The trim can be animated. You can use this, for example, to make text appear or disappear letter by letter over time very easily.
Note that text can only be edited on keyframes where this value is 100% (i.e. where all the text is visible).
#
Text
Fonts
All fonts installed on the iPad or imported into ToonSquid can be used for any text layer. You can also import additional fonts to be available in ToonSquid.
Import#
Custom fonts can be imported in one of the following three ways:
Via the Inspector#
- Select a text layer.
- Open the inspector.
- Open the
Typefacedropdown. - Tap the
Import Fontbutton.
Via the Library#
- Open the asset library.
- Tap the
+button. - Select
Import from Files.
Via the Files App#
- Copy your font files into the Files app under
On My iPad > ToonSquid > Fonts. - Quit and restart ToonSquid.
Fonts and the Project#
The font files themselves are not stored as part of a project and are not included when a project is exported. This means that they don't increase the size of a project and can be used in every project after being imported once.
This also means that importing a project that uses custom fonts on a different iPad will use fallback fonts instead until the fonts used by the project are installed on the iPad.
Supported File Formats#
ToonSquid supports font files with the following formats to be imported:
- TTC
- TTF
- OTF
#
Path
Overview
Add fully-customizable shapes to your animation. They are vector-based, so they will remain sharp at every scale.
Path Tool
With the path tool you can create vector shapes from scratch and edit all of the curve control points of existing shapes right on the canvas.
Path Layer
Path layers define vector shapes. Control their fill color or gradient, stroke and corner radius and animate their trim to a certain percentage.
Shape Library
Double tap the path tool to open up the shape library and choose from a variety of shape presets so that you don't have to waste any time creating basic shapes by hand.
Morphing
Animate the position of all path control points over time using keyframes to smoothly morph one shape into another.
SVG
Import SVG files to edit and animate them as vector groups in ToonSquid.
#
Path
Path Tool
Use the path tool to create vector shapes. Vector shapes are made up of control points with piecewise Bézier curves in-between.
Editing#
Tap on the canvas to add control points to the path. A new path layer is created automatically if necessary. If the Tools > Path > Create Vector Groups setting is enabled, a new vector group is created if there isn't one already and the path layer is placed inside.
Tap and immediately drag to add a control point and pull out Bézier control handles at that control point. Tap any control point once to see its control handles. You can drag the control points or Bézier handles to edit the path.
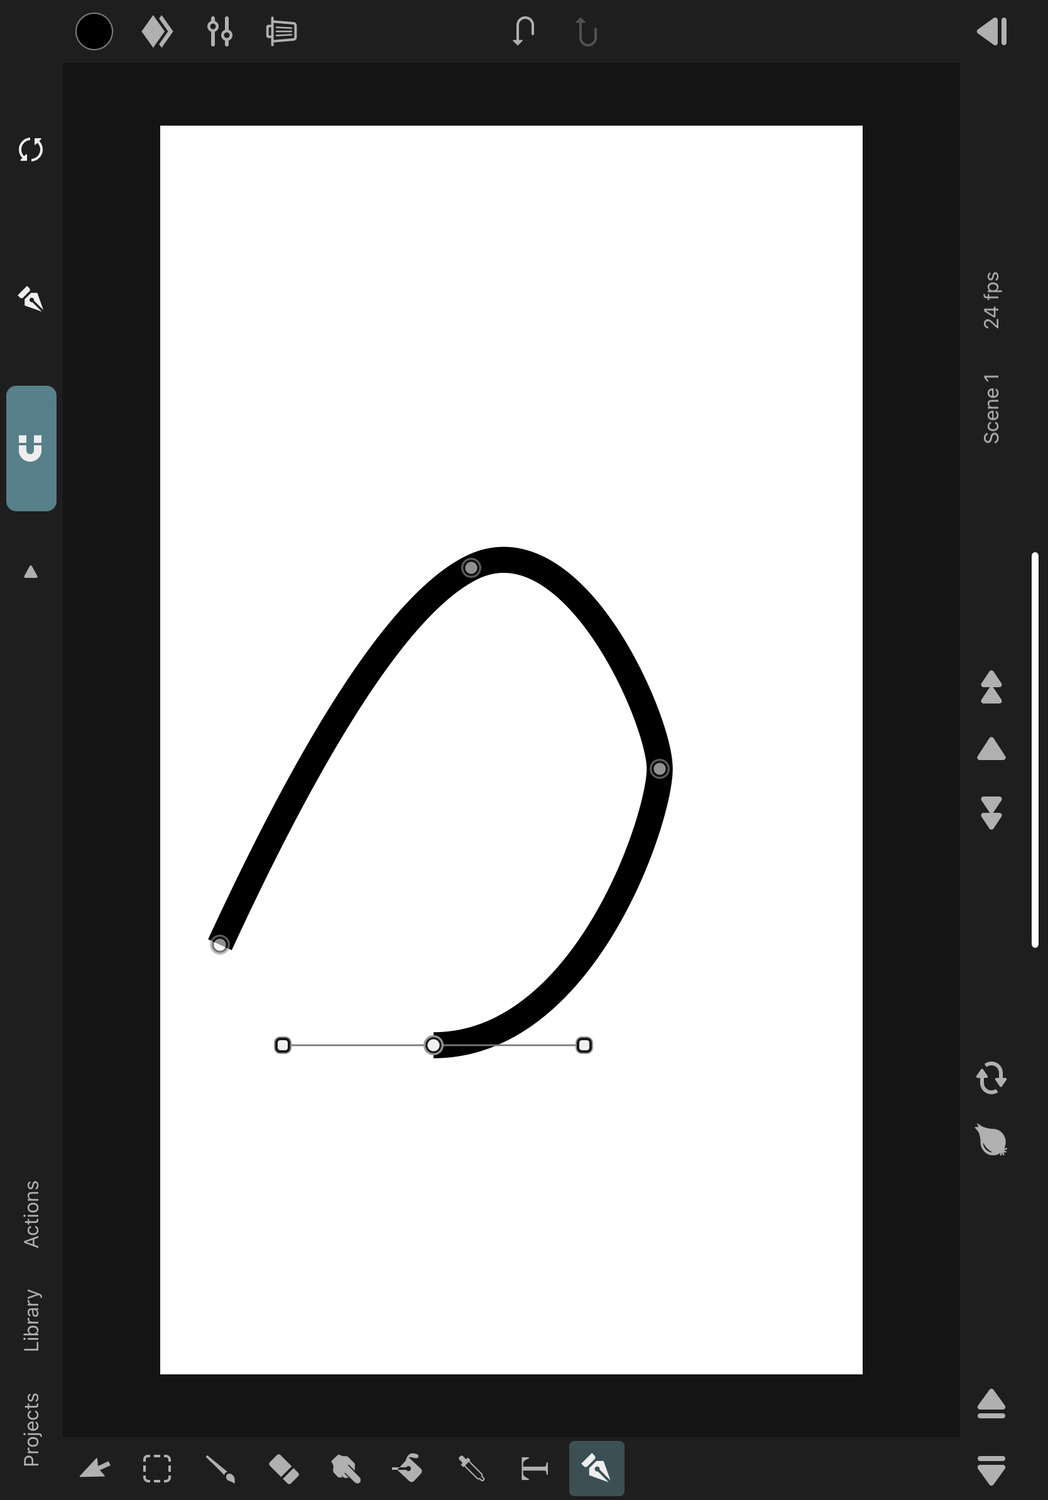
Tap the selected control point again and select Delete to remove that point from the path entirely.
Close the Path#
When the last control point is selected, tap the first control point to close the path. Tap a control point of a closed path twice and select the Open Path action to open the path at that control point.
Multiple Subpaths#
By default, when the path of the selected path layer is closed and you try to add a new control point, the path tool creates a new path layer for the new control point. You can also change the Add Subpaths in Freehand Mode setting to instead create new subpaths in the existing layer.
Editing Multiple Control Points#
When a path layer is selected and you use the selection tool to create a selection area, all path control points within the selection area become selected. You can then either use the quick delete button or switch to the transform tool to move, rotate or scale the selected control points together.
Control Point Mode#
Each control point has a mode, which defines how the Bézier control handles behave at that point.
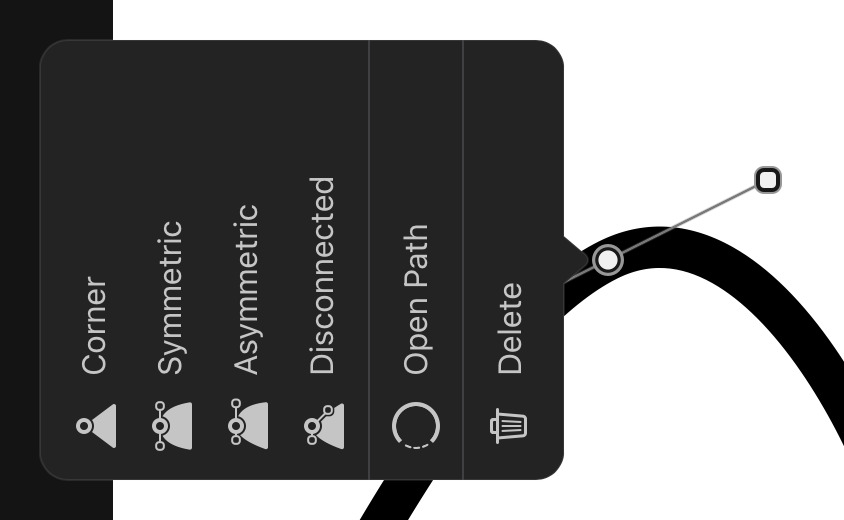
Corner#
The control point acts as a sharp corner and no Bézier control handles are shown. Only control points with the Corner mode are affected by the corner radius property of the path layer.
Symmetric#
The Bézier control handles maintain the same distance and opposite direction to the control point. This creates a perfectly smooth curve at the control point.
Asymmetric#
This is the same as the Symmetric mode, except that the control handles can have different distances to the control point.
Disconnected#
There are no limitations on the Bézier control handles. Both can be moved independently of each other.
Tip#
Touch the screen with a second finger while dragging one of the control handles if you want the control point mode to immediately switch its mode to Disconnected.
Tool Options#

Snapping#
If enabled, control points and Bézier handles will snap to other control points and the centers and edges of other layers when they are being dragged.
Path Mode#
The path mode defines how new paths are created with the path tool.
Freehand#
This is the default mode. It lets you add one control point at a time per tap on the canvas.
Ellipse / Rectangle / Rounded#
Touch and drag to create a new shape between the first touch and the current drag location.
Tip#
Touch the screen with a second finger while creating a new ellipse or rectangle shape in order to keep the height and width of the shape perfectly equal.
Tip#
With a path layer selected in the transform tool, double-tap the layer to switch to the path tool.
Tip#
The editor color picker automatically connects to selected path layer in the transform and path tools, so you can use that to change the layer fill and stroke colors.
#
Path
Path Layer
The path layer stores a single vector shape. It has the following properties, which can be edited in the inspector.
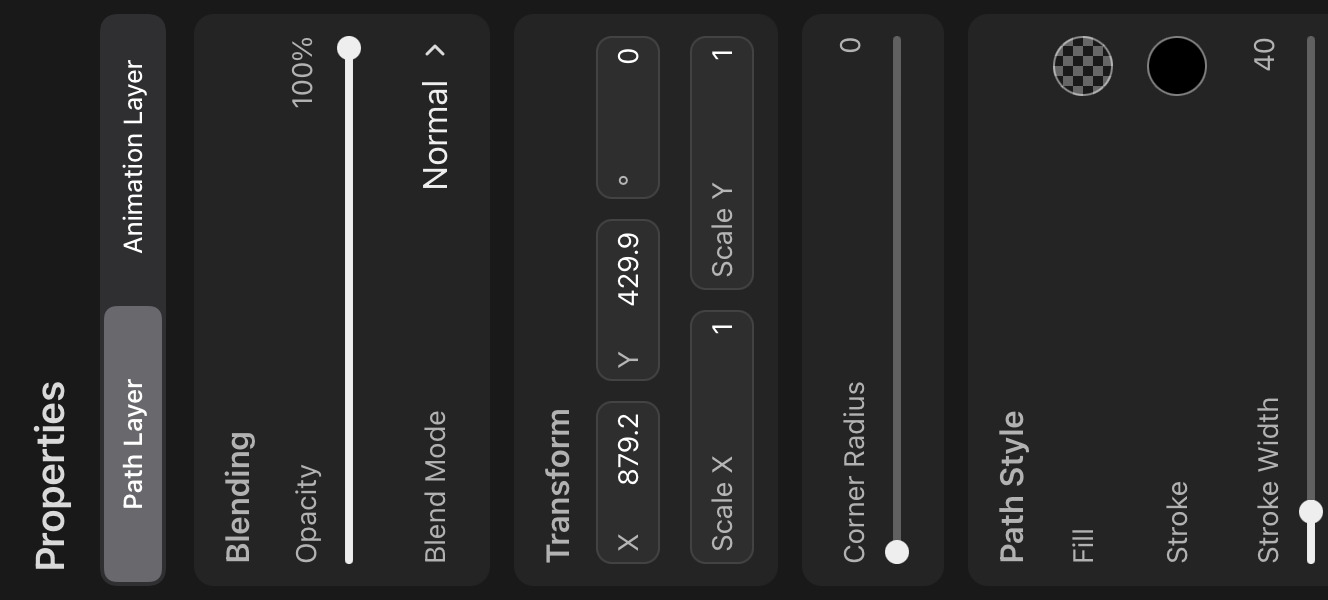
Corner Radius#
You can use this slider to control the corner radius of every control point that has the Corner mode. If a specific control point is selected, only the radius of that one is edited.
Path Style#
Fill#
The color or gradient with which the shape should be filled.
Stroke#
The color or gradient of the stroke around the edge of the shape. This is only relevant if the stroke width is greater than 0.
Stroke Width#
The width of the stroke in pixels (in the local coordinate system of the layer).
Stroke Alignment#
Whether the stroke should be fully inside the shape, fully outside or centered along the edge.
Cap style#
The shape of the two open ends of the stroke. This has no effect on closed paths.
Butt#
The ends are cut off straight and do not extend beyond the first and last control points.
Round#
The ends are rounded and extend past the first and last control points.
Square#
The ends are cut off straight and extend past the first and last control points.
Join Style#
The shape of the connection of two curve segments of the stroke at a corner control point.
Miter#
The outer edges of the stroke are extended past the corner until they come together at a point.
Round#
The connection is rounded.
Bevel#
A bevel is used at the outer edge of the stroke at the control point.
Trim#
The trim property can be used to only show a certain percentage of the entire path.
This can be animated with keyframes to let the path grow or shrink over time.
Start trim#
Trims the beginning of the path.
End trim#
Trims the end of the path.
Note#
In older versions of ToonSquid (before 2.0) it was possible for path layers to have control points keyframes with different numbers of control points. In newer versions this is no longer supported.
In new path layers, control point keyframes can also be added for each individual path control point and the corner radius of each control point can be keyframed separately.
Legacy path keyframes from older versions that contain different numbers of control points are still loaded and editable, but it is not possible to edit the keyframes for only some of the control points. In order to migrate these keyframes to the latest format, tap on theControl Pointsproperty in the timeline and then selectMigrate Legacy Keyframes.
Due to the change in behaviour, this migration will cause the appearance of the path animation to change. You can undo this migration while the editor is still open but it is not possible to otherwise revert to the legacy behaviour.
#
Path
Shape Library
After selecting the path tool, tap the path tool icon again to open the shape library.

Here, you can choose a shape preset to add a new layer with that shape to the current drawing.
Adding a shape from the shape library automatically switches to the transform tool so that you can immediately being to move it to its correct location.
#
Path
Morphing
The control points of a path layer are keyframeable. You can use this to create an animation that morphs one shape into another.
Since vector brushes create path layers, you can also use keyframes to animate vector brush strokes after they have been drawn.
Both the control point position and its Bézier control handles are interpolated.
By default, the Control Points and Corner Radius property groups of path layers are collapsed in the timeline, but you can also expand them to see each control point as its own property. Regardless of whether the property group is collapsed in the timeline, when you animate a single control point on the canvas (e.g. using the path tool), keyframes are only added for that specific control point.
If you want to add keyframes for all control points on a certain frame, select the control points property group in the timeline and use the Add Keyframe button.
#
Path
SVG
Scalable Vector Graphics (SVG) is a popular file format for describing two-dimensional vector graphics. You can import SVG files into ToonSquid to edit and animate them.
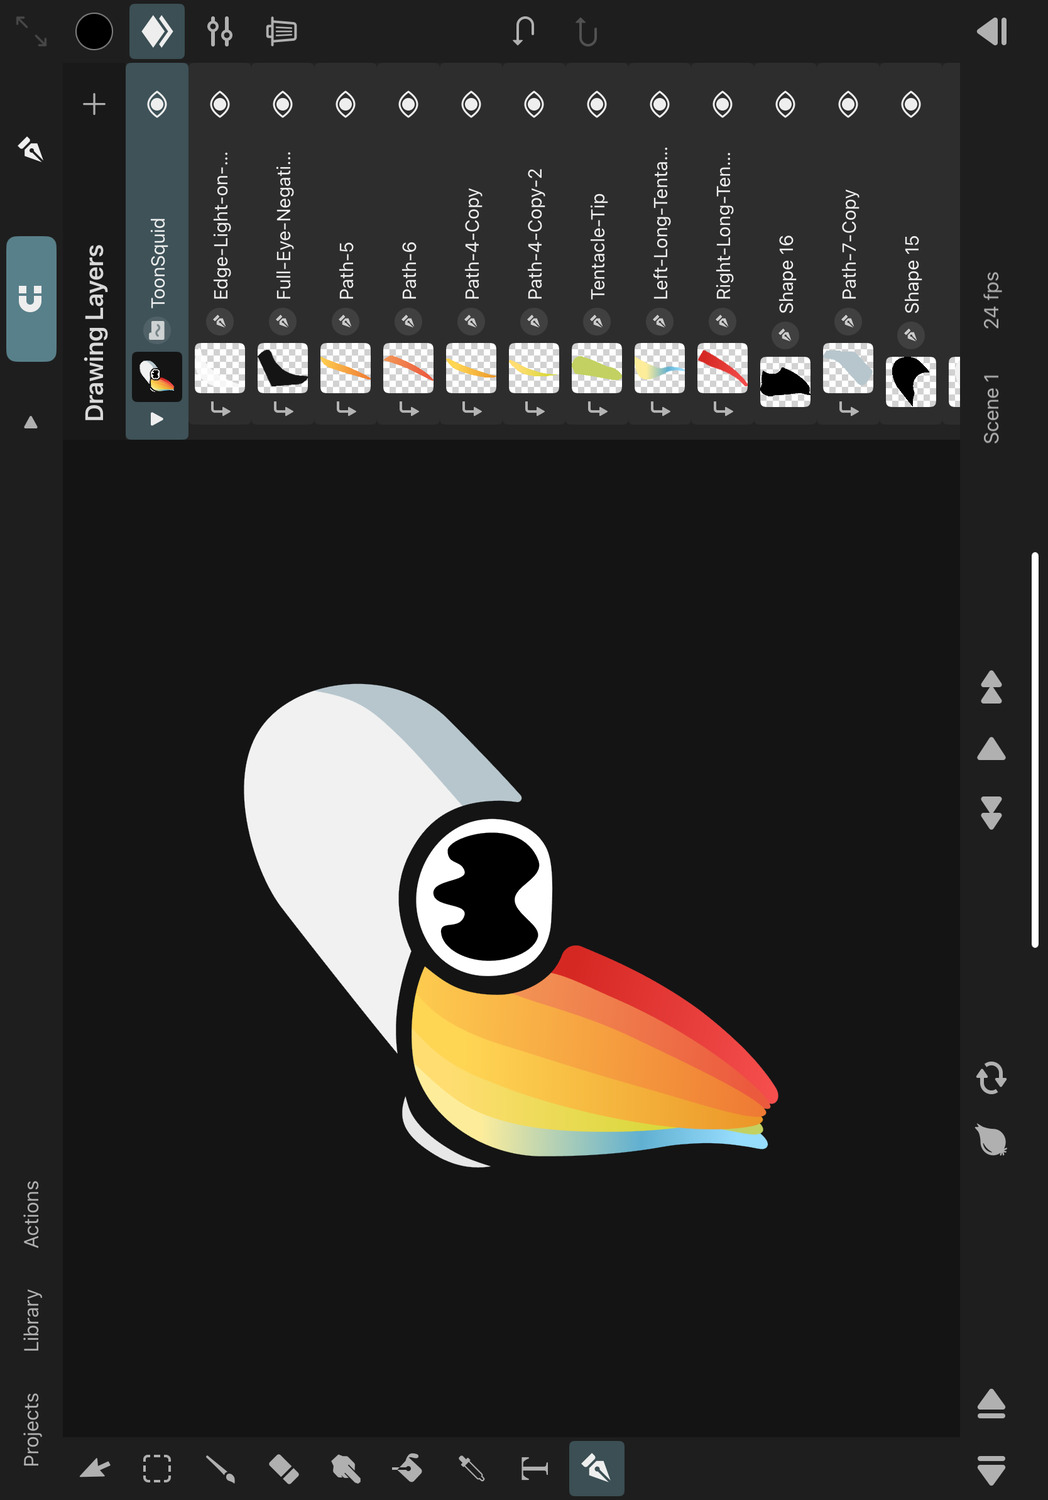
Importing SVG Files#
When you import an SVG file, ToonSquid creates a new vector group in the current drawing and places each vector shape from the SVG into a separate path layer in the vector group.
You can import SVGs into your animation by tapping the + button in the timeline, selecting Image and then Import from Files. Choose the SVG file you want to import.
Alternatively, you can also drag and drop SVG files from other applications into ToonSquid.
Limitations#
It is important to note that not all of the vast number of SVG file format features are supported in ToonSquid. Since the vector shapes of the SVG are converted into path layers, the current capabilities of path layers limit the accuracy of the import.
Here are some of the most important limitations to keep in mind:
- Dashed strokes are not supported. The dashing will be ignored and the strokes will appear solid.
- Embedded text is not supported. Convert text in your SVG into outline shapes before importing the SVG file into ToonSquid.
- Embedded raster images are not supported.
- Interactive or animated SVGs are not supported.
- Path layers in ToonSquid always use the even-odd fill rule. ToonSquid automatically tries to convert shapes in SVG files that use the nonzero fill rule into the visually equivalent shape using the even-odd fill rule. This can lead to the insertion of additional control points and the addition or removal of subpaths. The accuracy of the conversion depends on the complexity of the shapes.
- Internal structural details of the SVG file - e.g. nested groups or "use” nodes - are not retained in the layer structure within ToonSquid after the import. ToonSquid aims to replicate the visual appearance of the SVG, not the internal file structure.
Some of these limitations may be addressed in future versions of ToonSquid. If you have a specific SVG file that is not being imported correctly into ToonSquid, feel free to send a copy of the file to contact@toonsquid.com for further investigation.
#
Symbols
Overview
Explore the concept of symbols and animation clips in ToonSquid and learn how you can use frame markers to significantly speed up your animation workflow.
Animation Clips
Animation clips form the basis of all animation in ToonSquid. Creating separate clips for different parts of your animation allows you to reuse those in other parts of the animation using symbols.
Symbol Layer
Symbol layers reference other animation clips that should be displayed as the content of the symbol layer. You can animate them around like any other layer but also control how they should loop and at which speed they should play back in your current timeline.
Create Symbols
Learn about the different ways in which you can create symbols in ToonSquid.
#
Symbols
Animation Clips
Animation clips are used to add and reuse separate parts of your animation in a ToonSquid project.
They provide a timeline, in which you create your animation using layers. Every animation clip has a resolution and a frame rate and is part of a project.
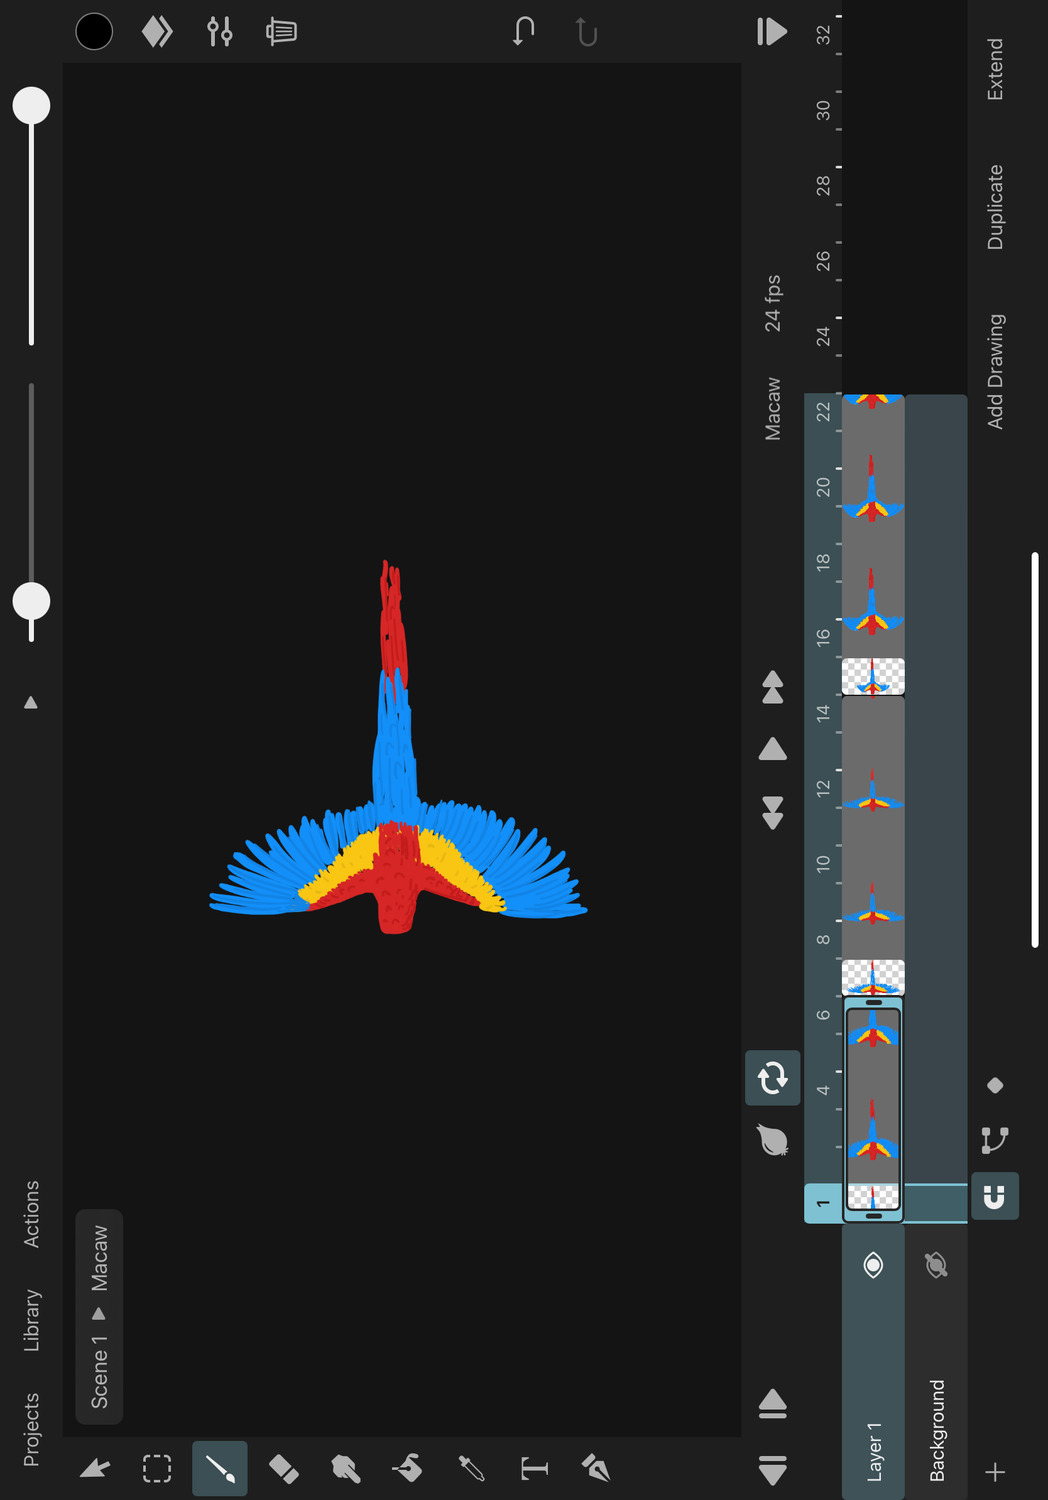
Symbol#
Animation clips in your project's asset library can be inserted into other animation clips and scenes using symbol layers. This allows you to reuse entire animations and therefore organize your projects more efficiently.
For example, you can animate a tree once in a separate animation clip and insert it multiple times in your main scene at different positions and scales to create a forest quickly without having to draw and animate every tree in the forest separately.

You can create animation clips in the library.
Scenes#
At this point, you are probably already familiar with scenes since this is where the majority of your animation takes place.
Scenes generally behave in the same way as animation clips as far as their timeline is concerned but are more limited in some aspects.
They are not shown in the asset library, they all have the same resolution and fps settings as the project, and they cannot be used as symbols.
#
Symbols
Symbol Layer
A symbol layer references an animation clip in the project asset library and shows the contents of that clip as its own content. The referenced clip will also play back over time inside the symbol layer.
Symbol layers have a transform that can be used to position, rotate and scale the referenced clip just like any other layer.
Symbol layers use the Pass Through blend mode by default, which results in the same appearance as if the layers of the referenced were directly in the timeline instead of the symbol layer.
Properties#
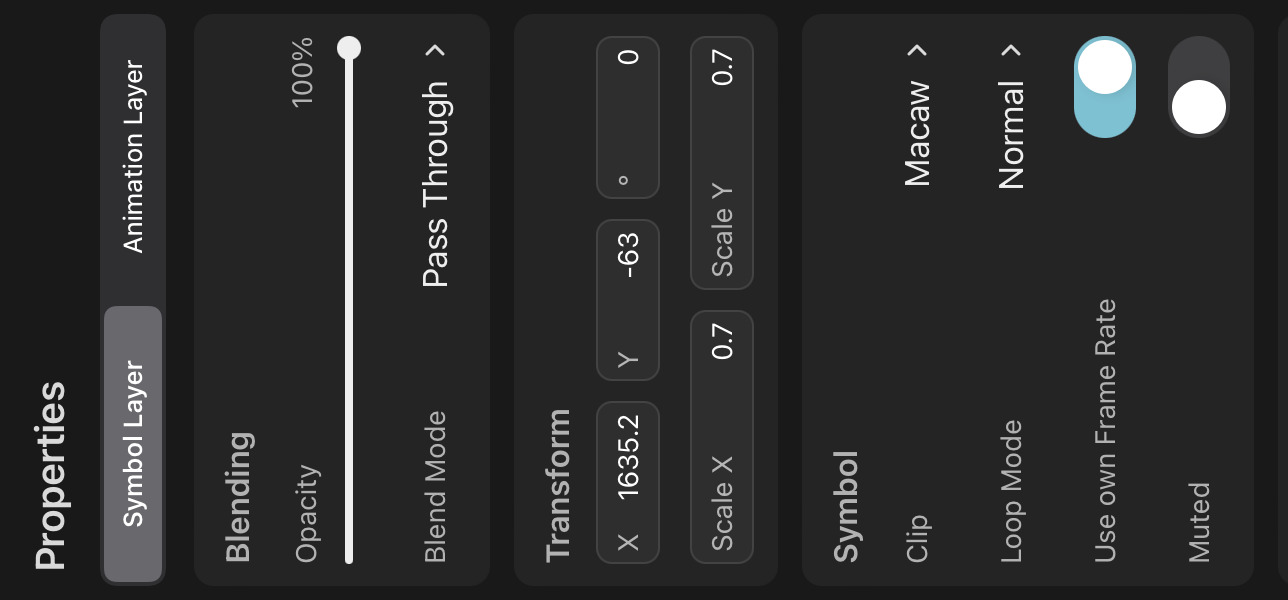
Clip#
The animation clip whose contents should be played back in the symbol layer. You can select any animation clip from the library.
Loop Mode#
The loop mode controls the playback of the animation clip if the symbol layer is longer than the referenced animation.
Don't Loop#
No looping takes place. Once the animation clip runs out of content, the symbol layer will appear empty.
Normal#
The referenced animation clip will play again from the beginning once it reaches its last frame. This is the default loop mode.
Boomerang#
The clip is first played forwards until its last frame is reached. It is then played in reverse until the first frame and then the loop starts again.
Use own Frame Rate#
This setting is only relevant if the clip that the symbol layer is in and the referenced symbol animation clip have different frame rates.
It defines whether the symbol should play back at the frame rate of its own referenced clip or the timeline that it's currently in.
Note that audio is automatically muted if it's coming through a symbol that is not playing back at its own frame rate.
Example: Importing a 60fps video into a 30fps timeline via a symbol
If Use own Frame Rate is enabled, the video plays back in real-time (every second frame is skipped to maintain its natural speed).
If Use own Frame Rate is disabled, the video plays back at half-speed (no frames are skipped - one frame in the timeline equals one frame in the symbol clip (i.e. video)).
Time#
The frame of the referenced clip at which the playback in the symbol should begin. This works similarly to the Offset property of an audio clip.
If the referenced clip uses frame markers, you can also tap on Select From Markers in order to quickly pick the time from the list of markers. Learn more about that workflow here.
Muted#
Whether audio layers should play through this symbol.
Camera Behavior#
If the referenced clip has a camera layer, the resolution of that camera defines the resolution in which the clip is displayed in its symbols.
Tip#
When a symbol layer is selected in the transform tool, double tap it to open the referenced clip in the editor.
Effects#
If a symbol references a clip that uses effects on any of its layers, the symbol will always display the clip with all of its effects enabled, no matter whether the FX button is enabled or not.
Note that this does not refer to effects attached to the symbol layer itself. Since such effects are directly part of the current scene, they are controlled by the FX button.
Editing Symbol Clips#
There are multiple ways to edit the clip of a symbol:
- Open the drawing layer list, tap on the symbol layer and select
Edit Clip. - With the symbol layer and the transform tool selected, tap the layer and select
Edit Clip. - In the library, select the animation clip and choose
Edit.
#
Symbols
Create Symbols
There are multiple ways in which you can create symbols in ToonSquid.
Create in the Library#
- Open the library.
- Tap the
+button. - Select
Create Animation Clip. - Configure the clip.
- Tap
Create. - Edit the contents of the new clip.
- Switch to the scene or clip in which you want to insert the symbol. You can do this either via the breadcrumbs, the scene selection, or the library.
- Insert a symbol from that clip by tapping the clip to be inserted in the asset library.
Create from a Drawing#
- Select the drawing in the timeline.
- Tap the drawing again to show drawing actions.
- Select
Create Symbol. - A new animation clip is created with the contents of this drawing. The contents of the drawing are replaced with a symbol referencing the new clip.
Create from Timeline Layers#
- Select one or more layers in the timeline.
- Tap the selected layer again to show the layer actions.
- Select
Create Symbol. - A new animation clip is created containing the selected layers. The layers are replaced in their old clip with a new animation layer containing a drawing with a symbol layer that references the new clip.
#
Selection
Overview
Selection
Create selection areas in the editor to define which parts of your animation the brush tool, fill tool and transform tool are allowed to edit.
Selection Tool
You use the selection tool to add, modify and remove selection areas on the canvas.
Tip#
This tool is not used to select or move layers. Use the transform tool for that.
#
Selection
Selection
You can use the selection tool to define a selection area on the canvas. Certain tools work differently when there is an active selection area.
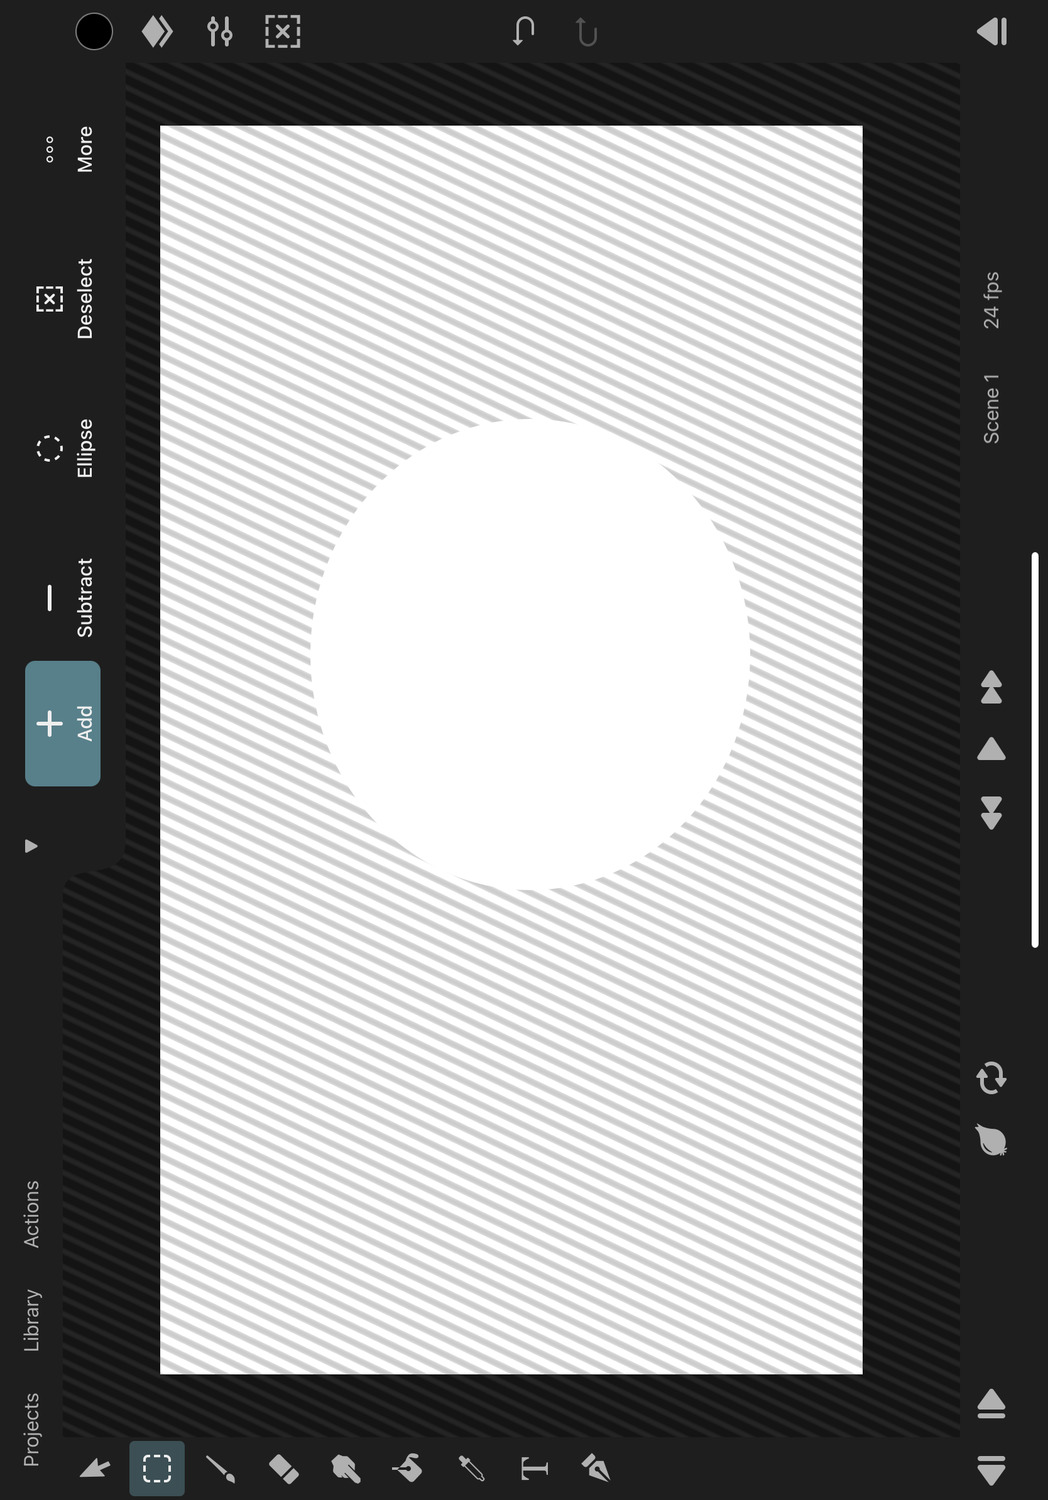
Brush Tool#
The brush tool only draws, erases and smudges within the selection area.
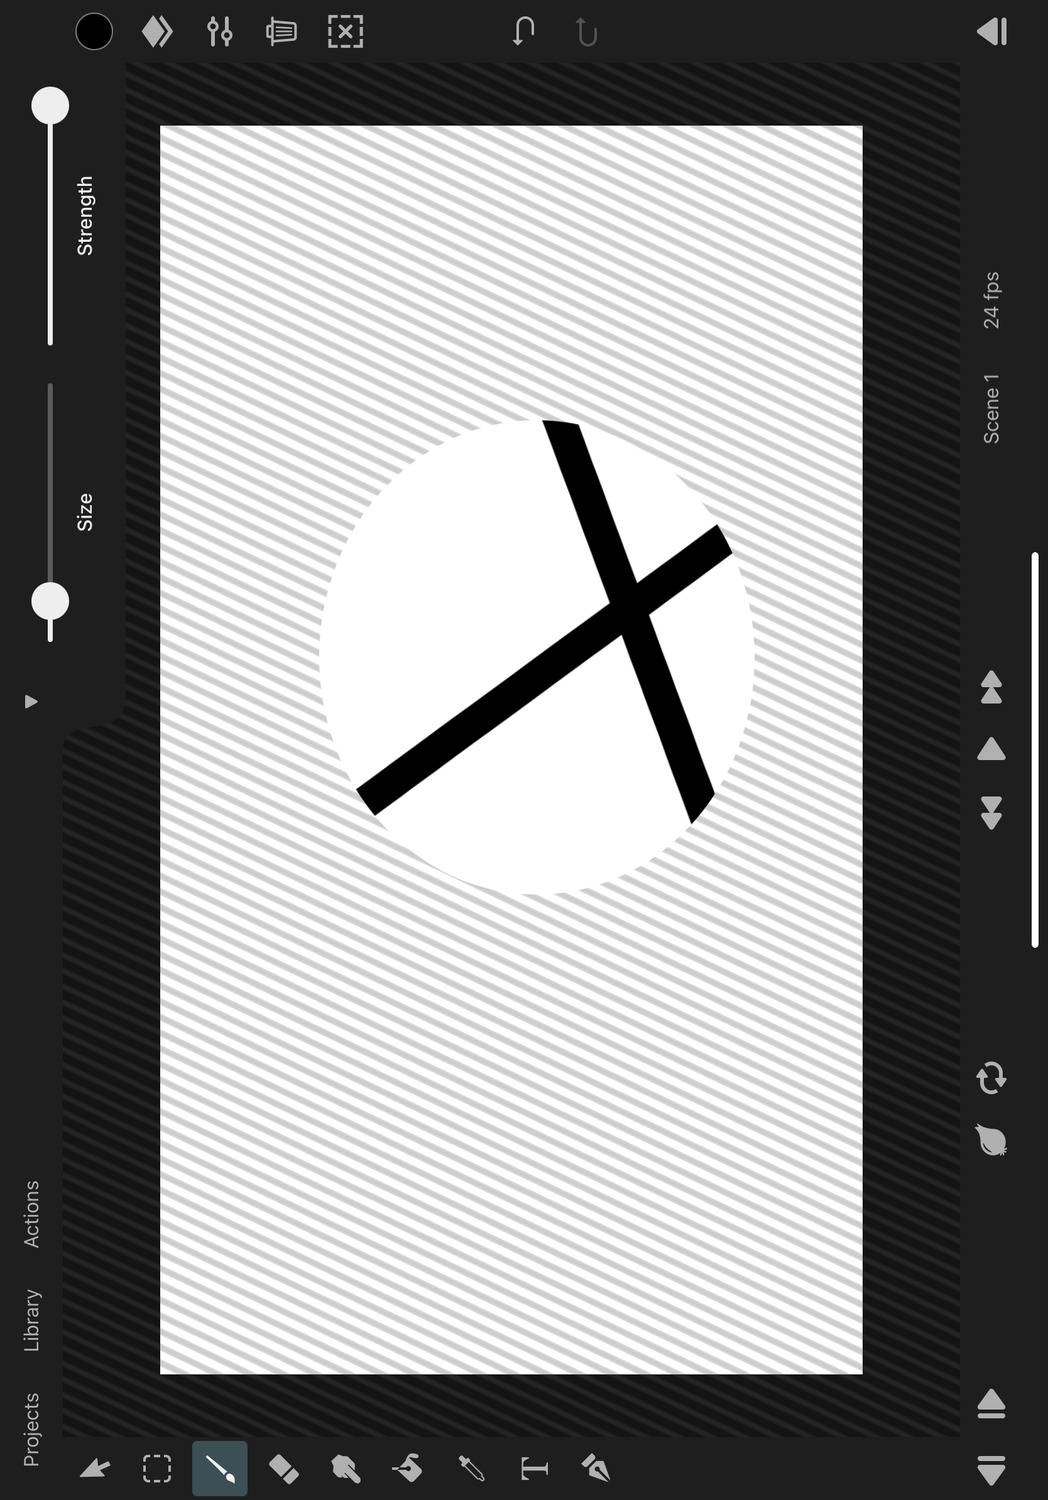
Transform Tool#
Pixel Layer#
When there is an active selection area and a pixel layer is selected, the transform tool makes destructive edits to the pixel contents of the layer within the selection area instead of editing the transform properties of the layer.
Note that such pixel edits cannot be animated with keyframes.
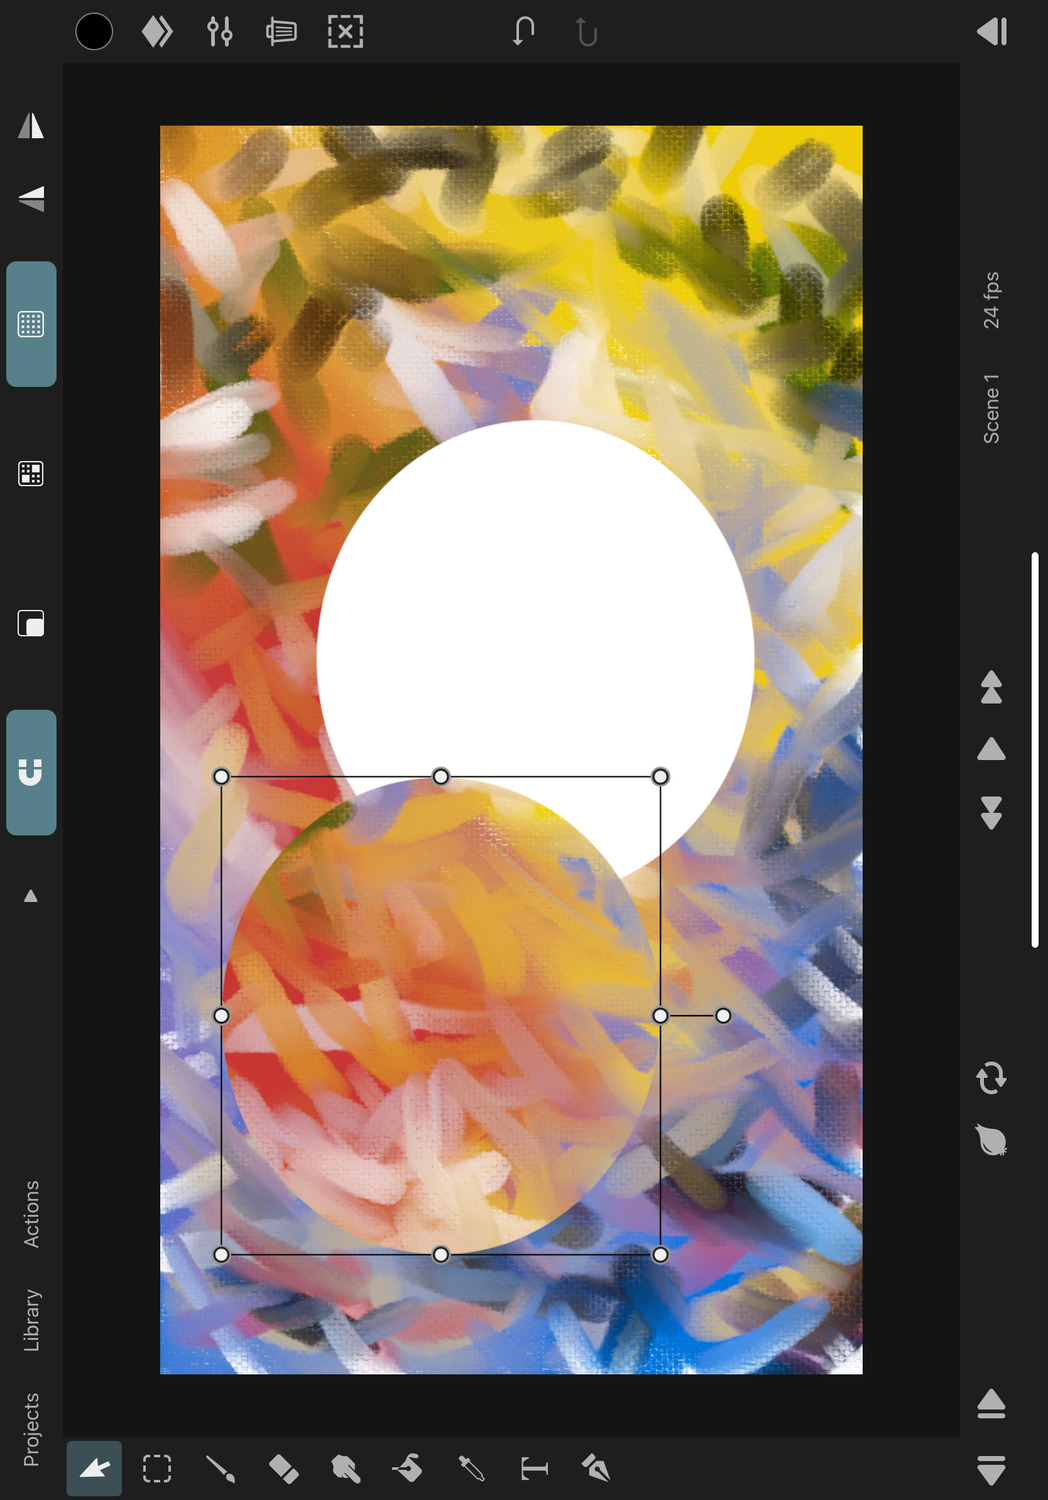
Path Layer#
When there is an active selection area and a path layer is selected, the transform tool edits the path control points within the selection. This can for example be useful to resize a vector shape without scaling the entire layer. Scaling the layer also affects the stroke width but transforming the control points keeps the stroke width unmodified, which is often desired.
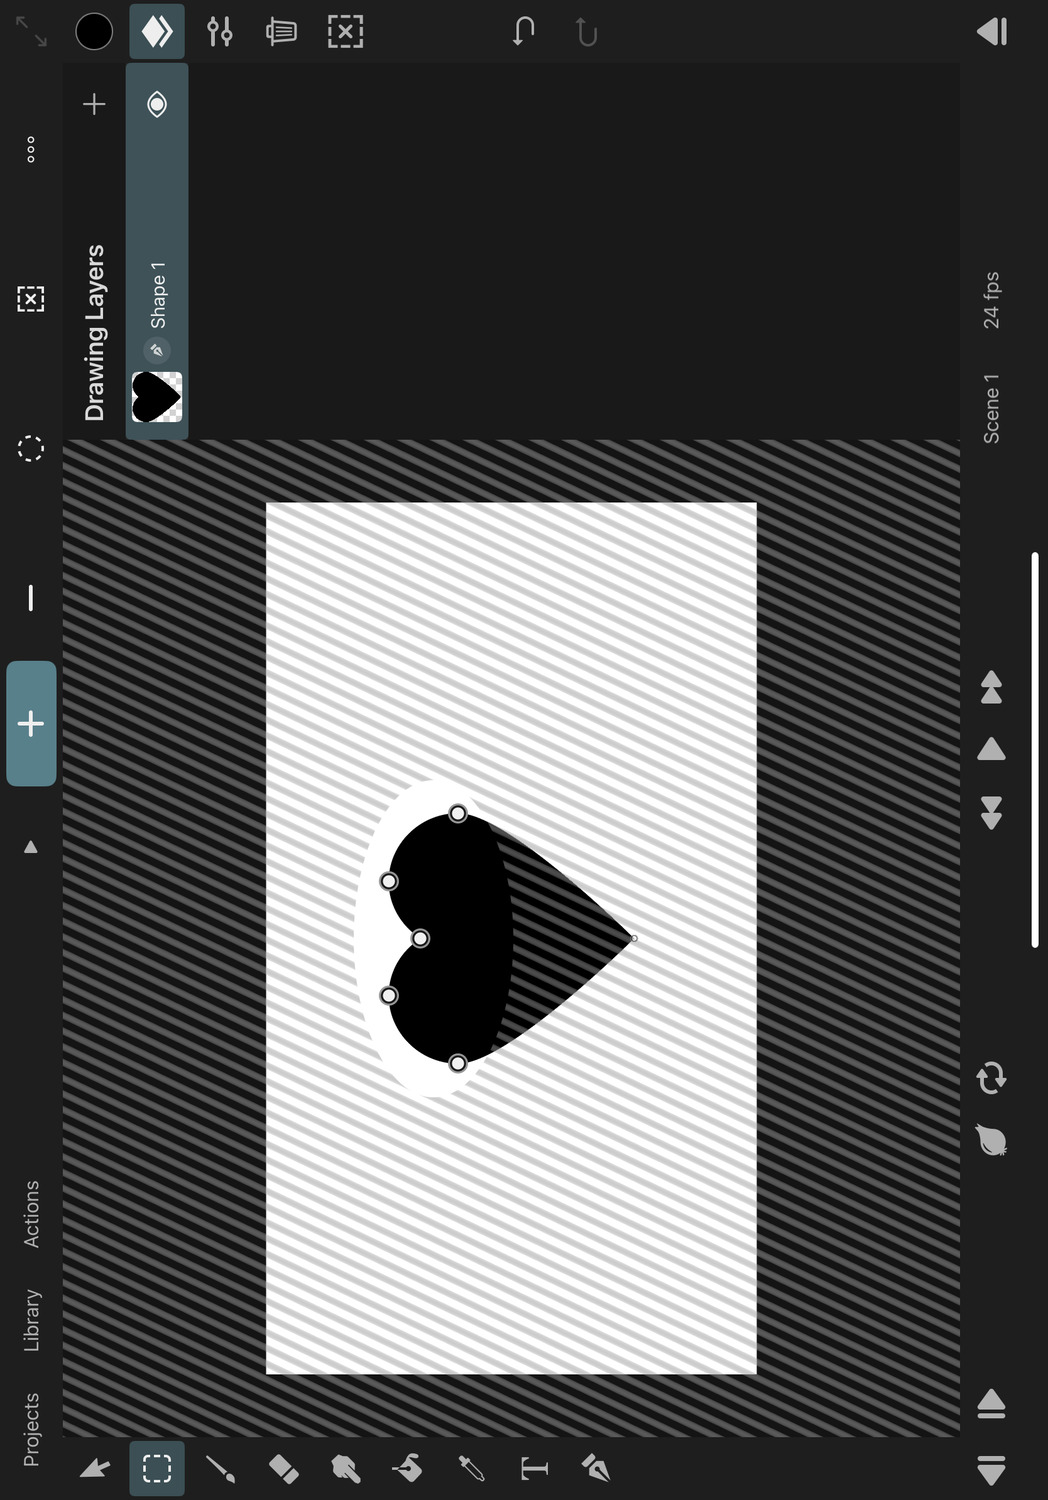

Vector Group and Vector Layers#
When there is an active selection area and a vector group is selected, the transform tool will edit the path control points in the selection area of all path layers in the group, but it will also cut the shapes along the edges of the selection area and move them around, similar to the behaviour when editing a selection region of a pixel layer. New path layers are automatically created if necessary when path layers with a visible fill are split into multiple pieces. Note that path control point keyframes of animated path layers can get lost by such a cutting operation.
Similarly, the selected region of vector shapes will be transformed when a vector layer is selected.
Fill Tool#
The fill tool only fills the selected canvas region.
Quick Select#
When the transform tool is selected and you tap the tool button in the sidebar again, this will automaticaly create a selection area that covers all contents of the selected layer. This lets you quickly switch between editing the layer's transform and its contents.
This behaviour can be turned off in the tool settings.
Quick Deselect#
You can use the deselect button in the right sidebar in order to quickly deselect the current selection no matter which tool you are currently in.
#
Selection
Selection Tool
The selection tool allows modifying the selection area by touching and dragging on the canvas. All changes that you make to the selection area are undoable.
If a selection area exists, regions outside the area are highlighted with diagonal lines on the canvas.
Tool options#
The options under the More button are only available if an active selection area exists.
Combine Mode#
The combine mode defines how the next selection area that you draw is combined with the current selection.
Add#
New regions that are drawn are added to the current selection.
Subtract#
New regions that are drawn are removed from the current selection.
Path Mode#
The path mode defines what shapes are added to or subtracted from the current selection when you draw on the canvas.
Freehand#
The edges of the new selection region are manually drawn by hand.
By default, when you create a new freehand selection you have to tap the highlighted starting point again in order to close the new selection area.
You can also change this in the settings so that the new selection region is closed automatically as soon as you stop touching the screen.
Tapping the screen with an open freehand selection will add a straight edge from the last selection point to the tapped location.
Rectangle#
New rectangular selection regions can be created by touching and dragging. The rectangles are added between the first and last touch positions.
Ellipse#
Similar to the Rectangle mode but this mode adds an ellipse shape instead of a rectangle.
Deselect#
Removes the current selection.
Copy#
Copies the selected region of the selected drawing layer.
If there is no active selection region, then the entire layer is copied.
Cut#
Copies the selected region of the layer and cuts it out of its original layer if it is a pixel layer, vector layer or a vector group.
If there is no active selection region, then the entire layer is copied and then deleted.
Paste#
Pastes the copied layer or selection region into a new layer on the current drawing. If a region of a vector layer / vector group was copied, the pasted layer remains a vector layer / vector group. If the copied region belonged to a different layer type (e.g. a non-vector group or a symbol layer), then the pasted layer will be a pixel layer containing the rasterized contents of the copied layer.
Tip#
If you want to quickly merge the new pasted layer with the one below it, you can simply tap it once on the canvas in the transform tool and select "Merge Down" from the list of options.
If this should always happen automatically, you can enable the Merge Down Pixel Layers and Vector Groups After Pasting setting.
Invert#
Inverts the selection areas. Areas that were previously selected become deselected and ones that were not selected become selected.
Soft Edge#
Presents a slider that can be used to blur the edge of the current selection. The slider controls the blur radius in pixels.
Create Mask#
Tap this button to use the current selection area as a mask for the selected drawing layer. The selection is rasterized into a new pixel layer which then acts as the mask layer of the selected layer.
#
Colors
Overview
Learn how to select colors with the color picker and pipette, save them into palettes, fill entire regions with them quickly and create beautiful gradients.
Color Picker
The color picker is your central hub for selecting colors for the brush and for text and path layers. Explore the different color picker interfaces that let you quickly choose the next color you are looking for.
Pipette
The pipette tool allows you to easily pick a color straight from the canvas.
Fill Tool
Fill connected regions of a pixel layer quickly with the same color using the fill tool.
Color Palettes
Store colors that you use most often in a color palette to have them right at your disposal in the color picker. ToonSquid comes with a selection of beautiful palettes, but you can also create your own and even share them with others.
Gradients
Instead of solid colors, you can also choose gradients for the fill and stroke of a path layer. Edit gradient control points in the color picker and right on the canvas.
Color Spaces
Learn about the color spaces that are supported by ToonSquid.
#
Colors
Color Picker
The color picker allows you to select colors to be used with the brush tool or by the selected layer.
Color Button#
You open the color picker either with the color button in the sidebar or via a layer property in the inspector.
The behavior of the color picker that is opened via the sidebar depends on the selected layer and tool.
This color picker generally selects the color for the brush tool, however, when a text or path layer is selected and the transform, text or path tools are selected, the color picker controls the fill and stroke colors of the selected layer instead.
Primary and Secondary Color#
You can see the currently selected primary and secondary colors in the top left corner. Refer to the color dynamics settings to learn about how the brush tool uses the primary and secondary colors.
If the layer color and stroke are being controlled by the color picker, then the stroke is shown in the primary color slot and the fill is shown in the secondary slot below.
You can swipe the primary color cell to the right to quickly swap the primary and secondary colors.
Color Types#
If the color picker is opened in a context in which gradients can be selected, the different color type options are shown in the top right corner.
You can then either choose a single solid color, a linear gradient or a radial gradient.
Tabs#
You can choose different tabs of the color picker at the bottom to switch between different interfaces, depending on how you prefer to select colors.
Classic#
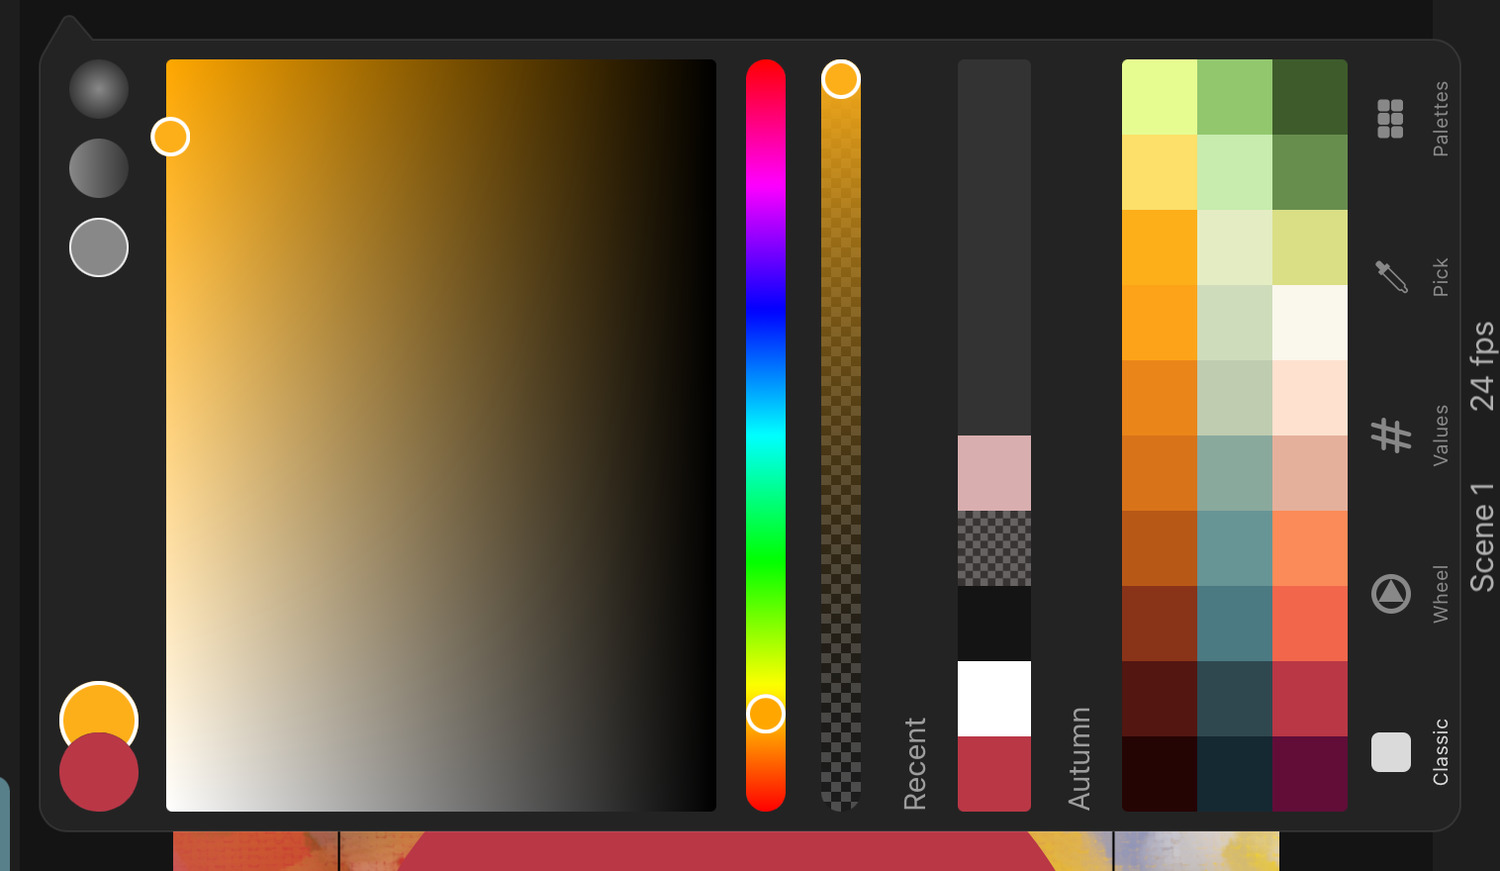
The classic color picker interface shows a rectangular saturation-brightness picking area, where the saturation increases horizontally from left to right and the brightness increases from bottom to top. Below this, you will find a simple hue slider.
Wheel#
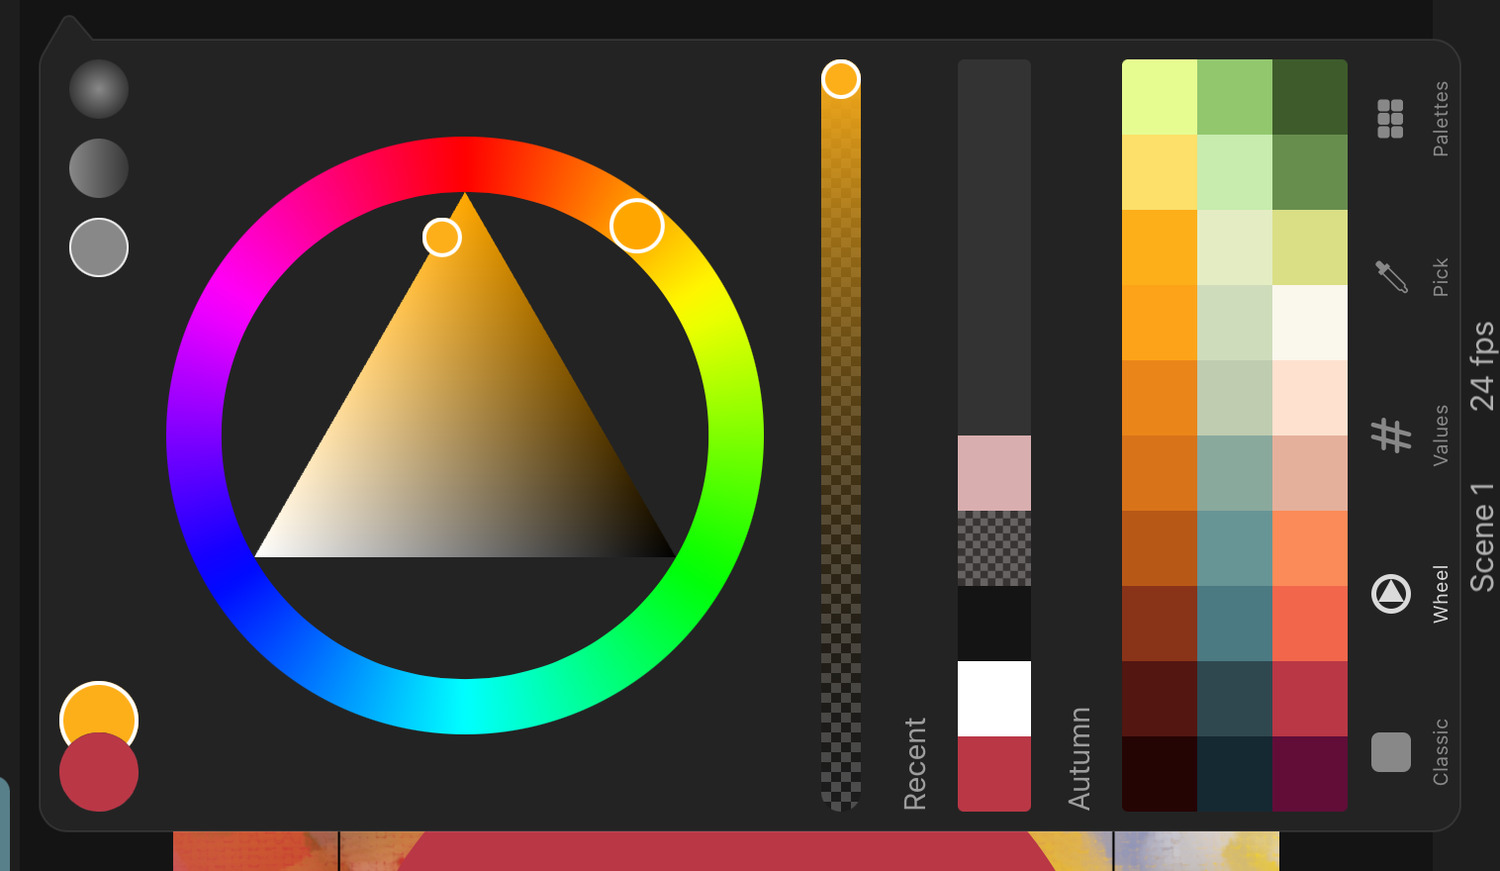
The wheel color picker shows a triangular saturation-brightness picking area. The minimum saturation is at the left edge and the maximum saturation is at the bottom-right edge. The saturation increases with the angle between the two edges.
The lowest brightness (i.e. black) is found at the bottom corner and the highest brightness (i.e. white) at the opposite edge.
This saturation-brightness area is surrounded by a circular hue slider, which makes picking the hue a little easier than it is in the classic color picker.
Values#

The values tab shows three sliders to input the red, green and blue components, three alternative sliders to select the hue, saturation and brightness of the color and an input field where you can enter the color value in hexadecimal format.
Pick#
This is the only tab button that does not change the color picker interface but instead switches to the pipette tool to pick the color for the color picker from the canvas.
Palettes#

This tab shows the color palette library, where you can add, select and manage your color palettes.
Opacity#

If the color to be selected can have a transparency component, an opacity slider is shown in addition to the controls mentioned above.
Quick Palettes#
The Classic and Wheel tabs show a list of the 10 most recently selected colors and the selected color palette. The current palette is also shown in the Values tab. You can change which color palette is shown here in the color palette library.
Floating Color Picker#
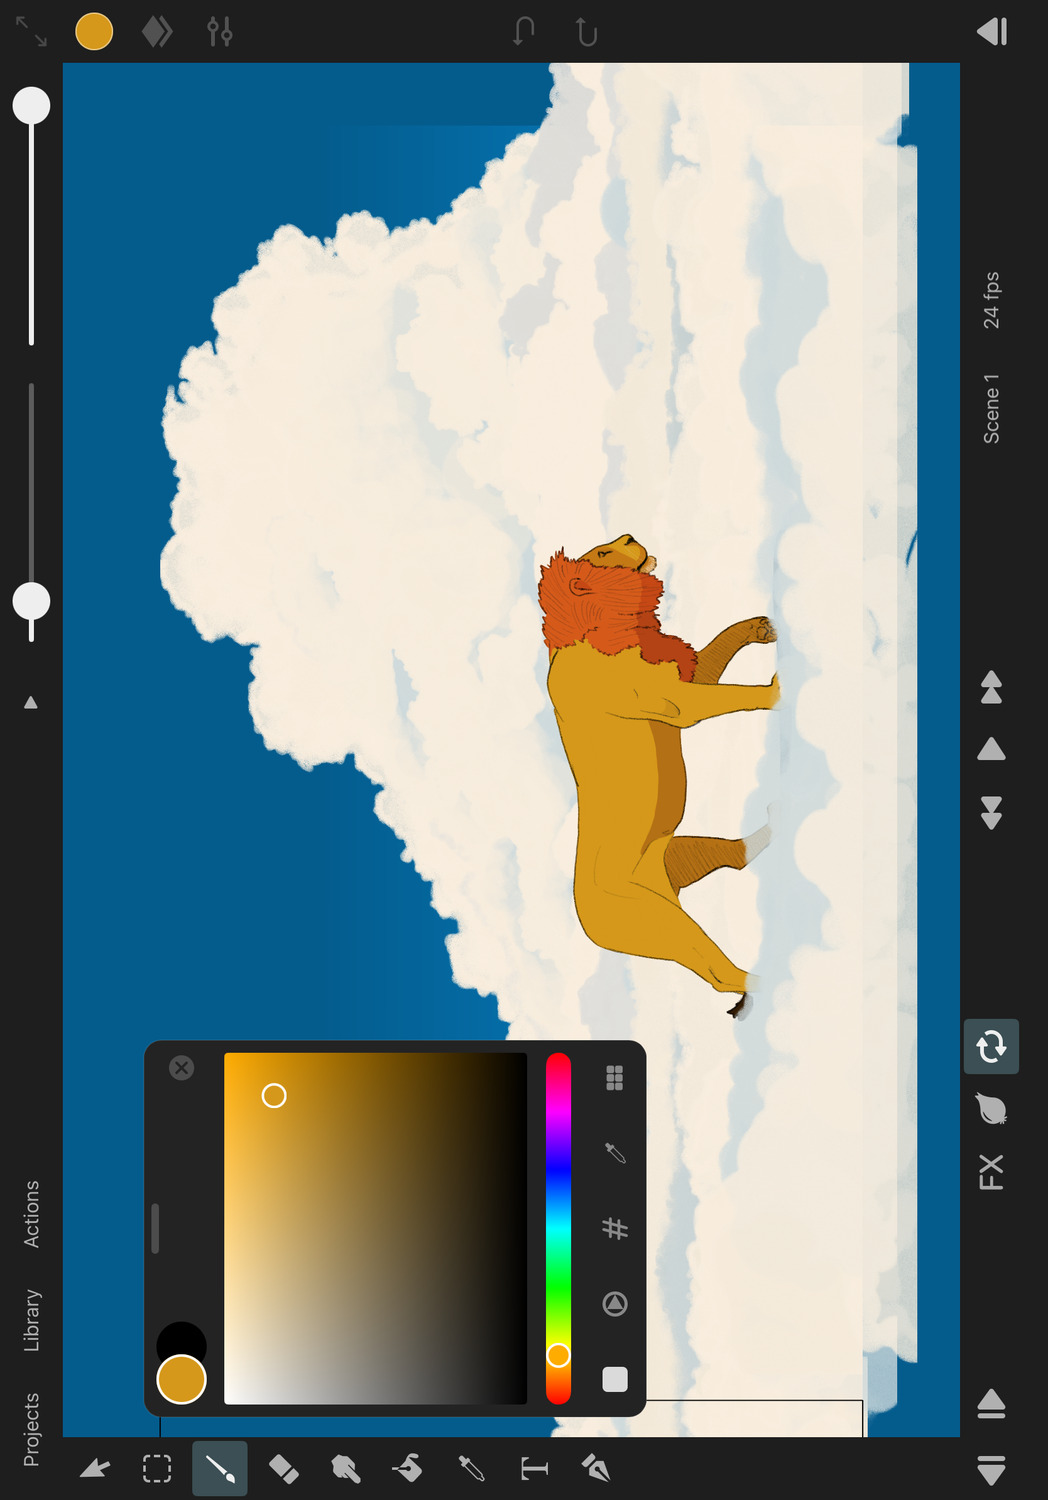
If you drag the handle at the top of the editor's color picker, you can detach it from the sidebar and position a compact version of the color picker anywhere you like on the canvas. This allows you to keep the color picker open while working with the brush tool.
Tap the x button in the top right corner to close the floating color picker.
#
Colors
Pipette
The pipette tool allows you to select a color directly from the canvas.
If the pipette tool is selected via the color picker, the selected color feeds into the color picker and therefore to the color property that is currently being controlled by the picker. The pipette disappears from the canvas when the color picker is closed.
If the pipette tool is instead selected via the toolbar in the editor, it is used to select a new brush color. In this case, the pipette stays on the canvas until a different tool is selected.
Gestures#
You can drag the pipette on the canvas to change which pixel it reads its color from.
You can also temporarily switch to the pipette tool by touching and holding on the canvas. By default, this is only possible with your finger, not with Apple Pencil. However, this can be changed in the settings.
When you enter the pipette tool using a long press, the editor exits the pipette tool and automatically switches back to the previous tool once you lift your finger from the screen.
Anatomy#
The pipette shows a reticle in the middle, which points to the pixel whose color is being read by the pipette.
The reticle is surrounded by a ring, which shows the previously selected color in its bottom half and the new color currently being picked by the pipette in its top half.
#
Colors
Fill Tool
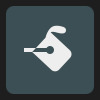
The fill tool is used to fill a closed region in a pixel layer, vector layer or vector group with the selected solid color.
If the fill tool is used on an empty layer, it creates a completely filled pixel layer.
If a selection exists, only the regions within the selection area are filled.
Note#
When filling vector regions that are fully or partially made up of stroked paths, note that only the actual path - i.e. the centerline of the strokes - contributes to the fill boundaries. The stroke width does not affect whether a region is closed or not.
If you try to fill a region that is not fully closed, ToonSquid will temporarily highlight the path lines to make it easier for you to see the gaps so you can close them before filling again.
Fill Reference Layers#
It is common to keep linework separate from coloring layers. In order to use the fill tool on one layer based on the contents of another, you can mark the layer containing your linework as the fill reference using the Set as Fill Reference layer action.

You can set this for both animation layers and drawing layers. There can at most be one reference layer in each drawing and at most one reference animation layer.
When an animation layer is defined to be a fill reference layer, the combined contents of all of its drawing layers on the current frame form the limits of the fill region.
Tool Options#

Threshold#
The fill tool re-paints all neighboring pixels that have the same or a similar color to the pixel that was tapped. The threshold slider limits how similar the pixels have to be to still be filled with the new color. The lower the threshold value, the fewer differing pixels get filled.
Tip#
Touch and hold your finger on the screen before dragging it left or right in order to dynamically adjust the threshold of the region you are currently filling. This makes it easy to find the exact threshold that you need.
More#
Use this button to quickly access the advanced fill tool settings.
Tip#
If the fill tool leaves a thin gap around the filled area, try increasing the fill Expand value in the fill tool settings.
#
Colors
Color Palettes
A color palette stores up to 30 colors so you can then quickly select them whenever needed. Color palettes are available globally, meaning that you can use all of them in every project.
The palettes tab in the color picker shows the color palette library. The currently selected palette has a blue border around it. This is the palette that is shown in the Classic, Wheel and Values tabs of the color picker for quick access.
In addition to simple RGB colors, palettes can also store gradients and colors with transparency. If a gradient is selected from a palette when only solid colors are supported, the first gradient color is used instead. The alpha channel of a selected color is ignored if transparency is not supported by the context, for example when choosing a brush color.
Custom Palettes#
ToonSquid comes with multiple beautiful default color palettes, which you can use immediately or modify if you want. You can also create as many fully-custom color palettes as you like.
- Open the color palette library in the color picker.
- Tap the
+button. This will add a new empty palette to your library. - Tap one of the empty slots in the palette to save the currently selected primary color to that slot.
- Tap and hold a slot in a palette to show the option to delete the color from that slot.
- Tap and hold, then drag to reorder the colors in a color palette.
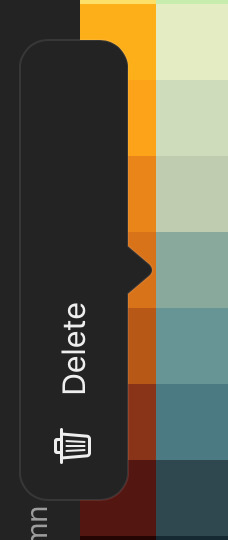
Palette Actions#
Tap the three dots to the right of a color palette to view the available actions for that palette.

Set as Current#
Selects the palette. You can also select a palette just by tapping its name in the library.
Rename#
Allows you to change the name of the color palette.
Share#
Exports the palette in a file with the .palette extension that can be shared and saved outside of the app.
Import#
Prompts for a .palette file to be imported into the color palette library. Every palette that you add to your library can immediately be used in all of your projects.
Delete#
Deletes the selected palette. This option is only available for custom color palettes and cannot be undone! You can use the Share button to create a backup of the palette before deleting it, in case you change your mind later.
#
Colors
Gradients
Gradients allow you to show transitions between multiple colors at different positions in a layer.
The fill and stroke properties of a path layer can be set to gradients.
In order to use a gradient instead of a solid color, use the color type selector in the color picker. You can choose between linear and radial gradients.
Linear Gradient#
Linear gradients create a color transition between two or more points in a straight line.
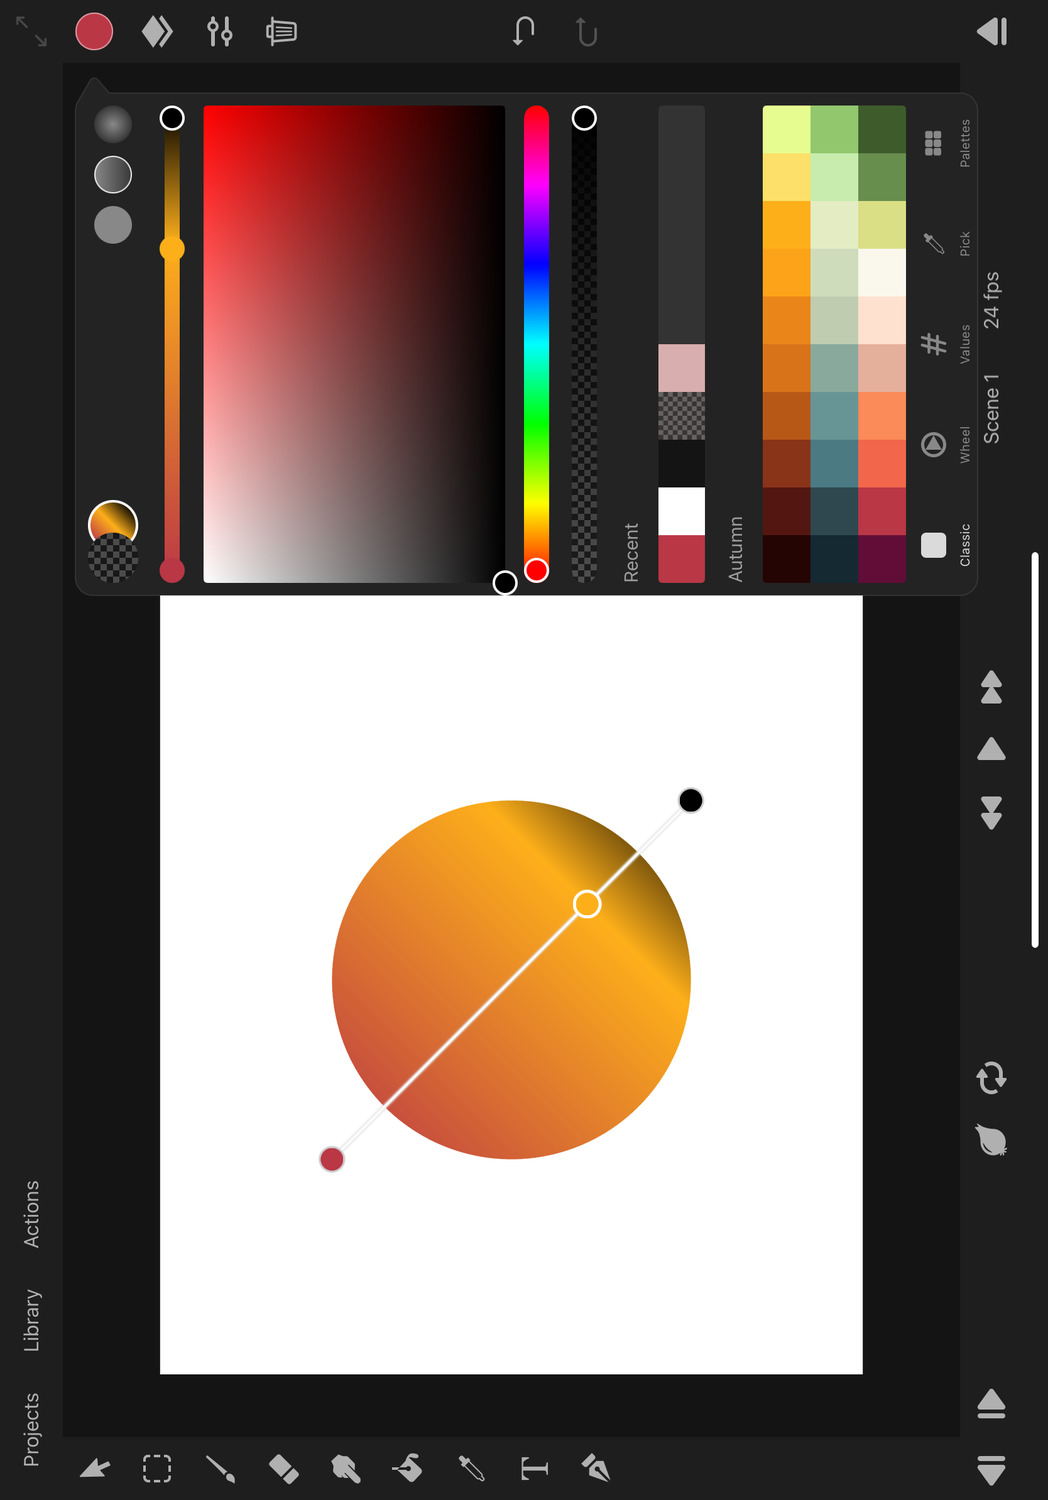
Radial Gradient#
Radial gradients transition between the gradient colors outwards from a center point until a specified radius is reached.

Editing#
When a gradient type is selected, the color picker shows a gradient slider at the top. You can use this slider to select, add or remove color stops or to change their relative position within the gradient.

The color picker also shows gradient handles on the canvas, which you can use to move the start and end points of the gradient within the layer in addition to the edits that you can make with the gradient slider.
Color Stops#
Every gradient consists of two or more color stops. A color stop defines the color and relative position of a color in the gradient.
The gradient then interpolates between neighboring color stops.
You use the gradient handles on the canvas to define the position of the gradient in a layer. The gradient is positioned in the local coordinate system of the layer. This means that any transform edits to the layer will automatically apply to the gradient as well but moving the individual path control points will not move the gradient.
Editing Color Stops#
You can add new color stops by tapping in the region between two existing stops either on the canvas or in the gradient slider of the color picker.
Drag the color stops to change their relative positions within the gradient.
Select gradient stops by tapping them on the canvas or the gradient slider. The selected gradient stop has a white outline. The color picker always selects the color of this selected color stop.
Delete Color Stops#
Tap the selected color stop again to show an option to delete it. The color stops at the very beginning and the end of the gradient cannot be deleted.
#
Colors
Color Spaces
A color space defines how digital colors are represented and stored.
ToonSquid currently uses 8-bit sRGB colors for pixel layers.
Brushes#
ToonSquid brushes blend colors in the sRGB space by default. This prevents heavy banding artifacts for dark colors.
Linear blending can be optionally enabled in the brush settings.
#
Effects
Overview
Modify and animate the appearance of your layers using ToonSquid's powerful effects.
Effects
Learn all about working with effects in ToonSquid.
Gaussian Blur
Blur the contents of a layer using a Gaussian blur effect.
Adjustments
Adjust the hue, saturation, brightness and contrast of a layer.
Pixelate
Pixelate the contents of a layer.
Chroma Key
Remove a specific color from a layer for a green screen effect.
Sharpness
Change the sharpness of a layer.
Halftone
Create a halftone effect on a layer.
Bones
Create a bone rig for a character and use inverse kinematics.
Mesh
Create a custom mesh for a layer and animate it using bones or by hand.
Perspective
Apply an animatable perspective distortion to a layer.
Warp
Apply an animatable warp distortion to a layer.
Stroke
Add a stroke to the contents of a layer.
Drop Shadow
Add a drop shadow to a layer.
Noise
Combine a noise signal with a property of a layer.
Orient Along Motion Path
Automatically rotate a layer to point in the direction of its motion path.
Spin
Spin a layer around its center and control its speed.
Parallax
Create a parallax effect and the illusion of depth when you move the camera.
#
Effects
Effects
Effects are a powerful tool in ToonSquid that allow you to modify the visual appearance of your layers. They can be used to create simple adjustments like changing the brightness of a layer or more complex effects like creating a bone rig for a character.
Effects in ToonSquid are nondestructive by default, meaning that you can always go back and change the settings of an effect, temporarily disable it or remove it entirely without losing any of your original layer content.
Add Effects#
Effects can be added to every layer in ToonSquid. To add an effect:
- Open the inspector.
- Tap the
+button in the effects section.
- Select the effect you want to add.
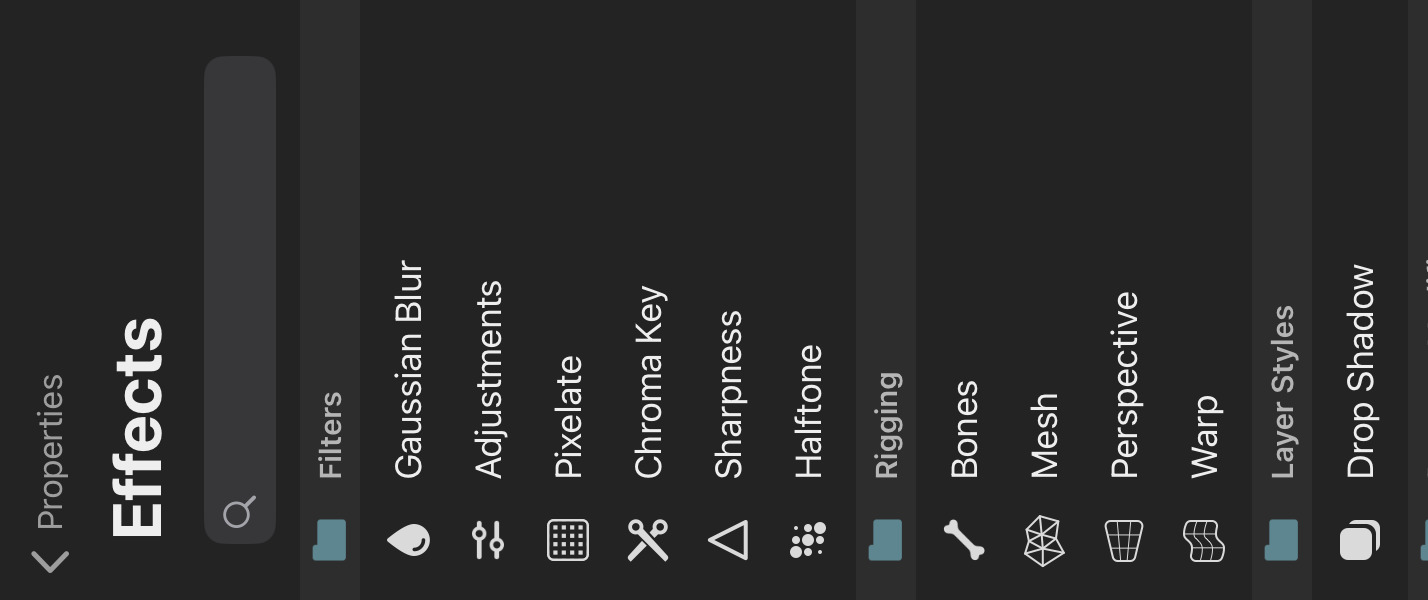
After you have added effects to your layer, they appear in the effects list in the inspector. With a few exceptions such as bones, most effects can be added multiple times to the same layer.
Search#
You can search for effects by typing into the search field at the top of the effects list.
Effects Order#
In general, the order of effects in the effects list matters. Most of the effects are applied to the layer from top to bottom, meaning that the effect at the top of the list is applied first and the effect at the bottom is applied last.
This gives you a lot of flexibility and control over the final appearance of your layer. Here is an example of a pixel layer with a Gaussian Blur followed by a Pixelate effect:
Here is the same layer with the Pixelate effect first and the Gaussian Blur effect second:
However, there are also exceptions to this common effect order behaviour.
Exceptions
- The order of the Bones effect in the effects list does not matter.
- The order of the Parallax effect in the effects list does not matter.
- All other effects in the
Property Modifierscategory are applied before the effects in other effect categories. Relative to one another, these property modifier effects are still applied in the order they appear in the effects list.
Visibility#
You can toggle the visibility of individual effects by tapping the eye icon next to the effect name in the effects list. Disabling the visiblity of an effect using this button also hides the effect in the export.
FX Button#
If the current scene contains any effects, you can use the FX button to view your animation with or without effects in the editor. This does not affect the export of your animation. All effects that haven't had their individual visibility manually turned off are visible in the export.
Many tools (e.g. the brush tool or the selection tool) automatically disable effects when you switch to them, since they edit the state of the layer contents before effects are applied to them.
Certain tools such as the transform bones tool or the transform mesh tool behave differently depending on whether effects are enabled or not. You can find more details about this on the corresponding handbook pages.
Note#
If a symbol layer references a clip that uses effects on any of its layers, the symbol will always display the clip with all of its effects enabled, no matter whether the
FXbutton is enabled or not.
Selecting and Deselecting Effects#
Effects can be selected by tapping on their name in the effects list, in the same way that you would select a layer in the layer list.
In order to deselect an effect, you can either:
- Tap the selected effect and and choose the
Deselectaction, or - Swipe the selected effect to the right and let go.
Similarly to layers, you can add more effects to the selection by swiping each one to the right and letting go.
Effect Properties#
When an effect is selected, its properties are shown in the inspector instead of the layer properties.
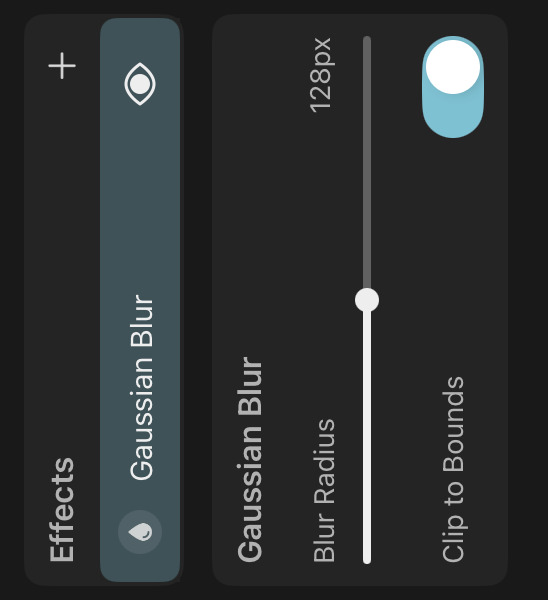
Keyframes#
Just like with layers, effect properties can be animated using keyframes.

When a layer has effects, the names of the layer and effects are also shown in the timeline above their respective properties. You can tap this name of the layer or effect to quickly select all of its properties.
Effect Actions#
Tap the selected effect again to see a list of actions that you can perform on this effect.
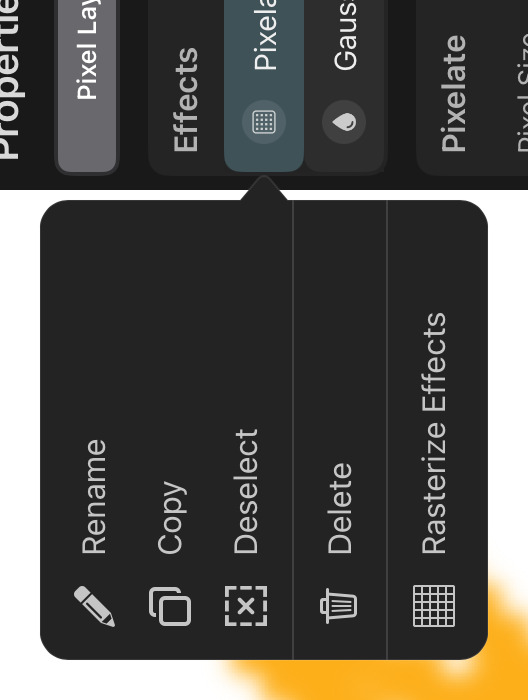
Rename#
Use this option to change the name of the effect.
Copy and Paste#
Use these options to copy and paste effects from one layer to another.
Deselect#
Deselects the effect.
Delete#
Deletes the effect and removes it from the layer.
Tip#
You can also delete the selected effect using the
Quick Deletebutton in the sidebar. Alternatively, swipe the effect to the left and chooseDelete.
Rasterize Effects#
Rasterizes the layer with all of its effects applied - turning it into a pixel layer.
Rasterizing effects is a destructive operation, meaning that you can't go back and change the settings of the effects after you have rasterized them. All keyframes of the effect are lost during rasterization.
Render Quality#
The quality with which effects are rendered both in the editor and in the export can be adjusted in the settings. Consider temporarily switching to a lower quality setting if you run into performance issues in the editor when working with many effects.
Vector Contents#
Layers with resolution-independent vector contents such as vector layers and path layers need to be implicitly rasterized when certain effects are applied to them. This kind of implicit rasterization is automatically performed by ToonSquid when the layer with the effect is displayed. It is not a destructive operation and the original vector contents are still editable, however, when you zoom into the layer, you will notice individual pixels around the edges of the vector shapes. The resolution of this kind of implicit rasterization is also affected by the render quality setting.
#
Effects
Gaussian Blur
The gaussian blur effect blurs the contents of its layer.
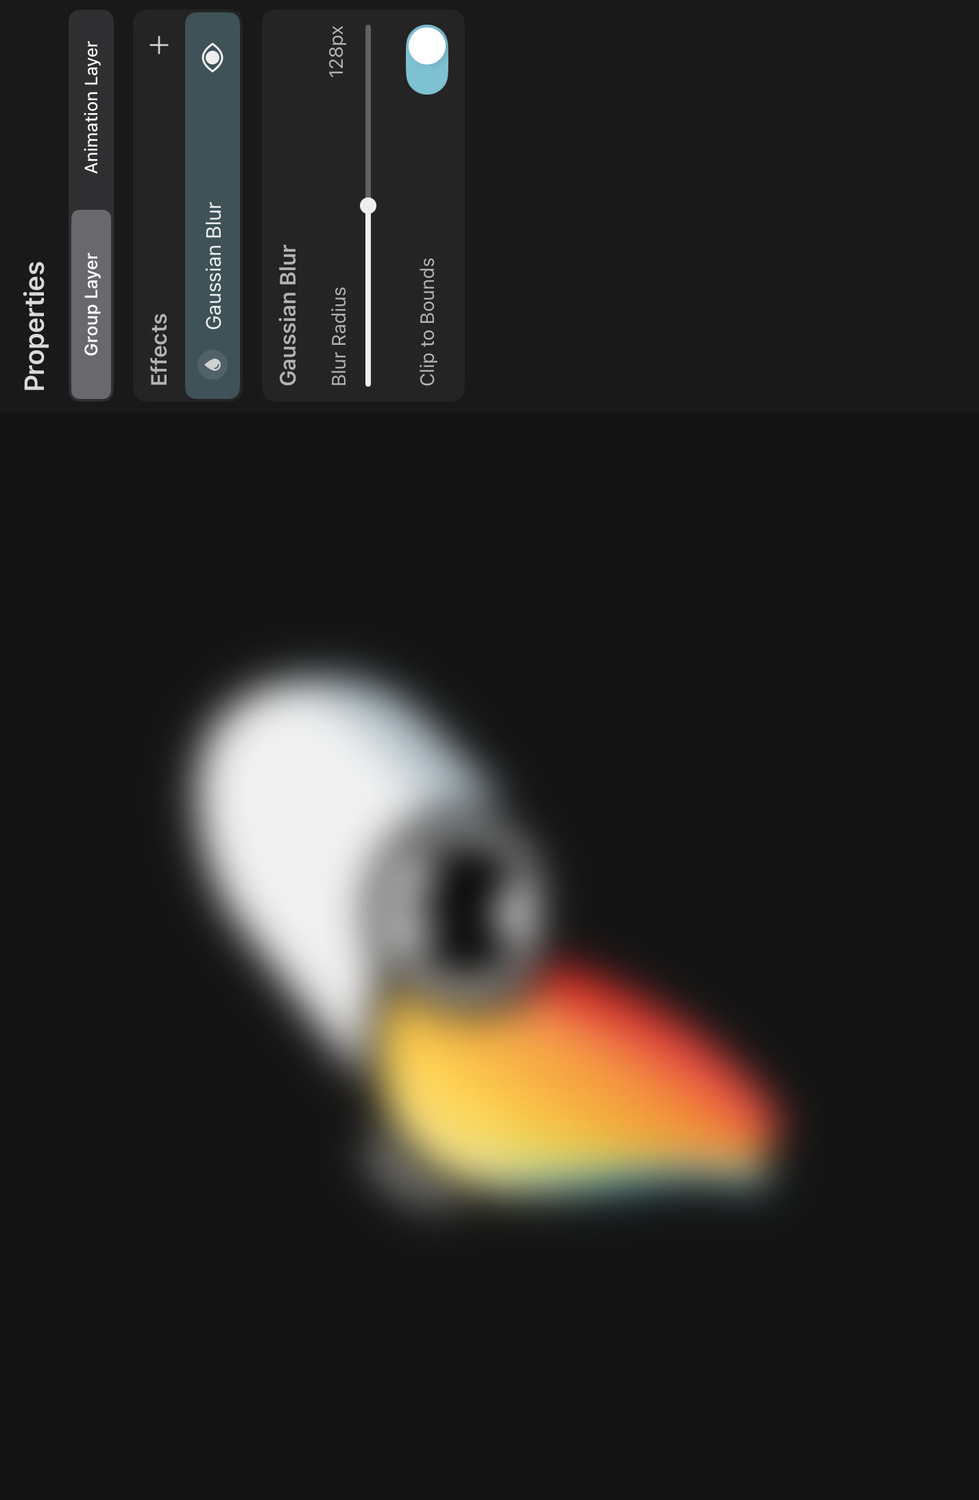
Properties#
Blur Radius#
The radius of the blur effect in pixels. Higher values result in a more intense blur.
Clip to Bounds#
If enabled, the blur effect is clipped to the bounds of the layer. If disabled, the soft edge of the blurred contents can extend beyond the layer bounds.
#
Effects
Adjustments
The adjustments effect can change the hue, saturation, brightness and contrast of a layer.

Properties#
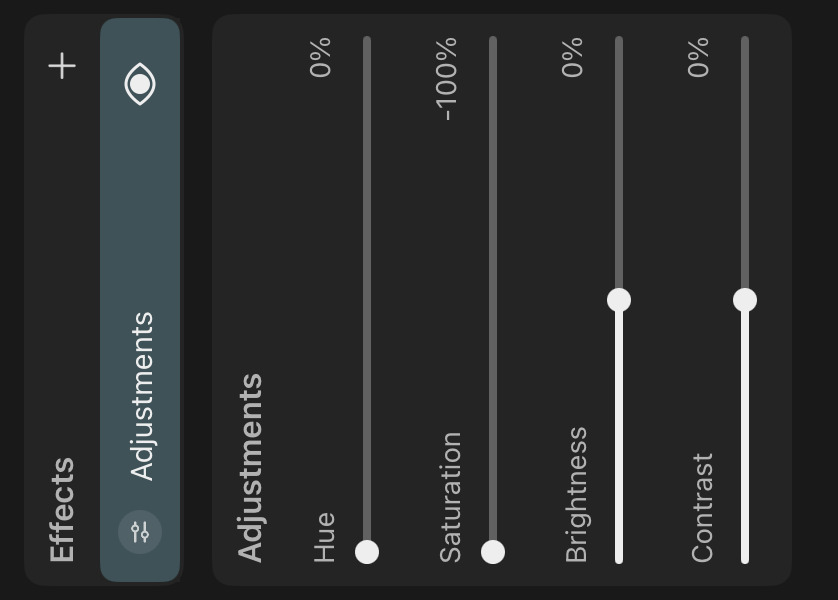
Hue#
How much the hue of the layer contents should be shifted.
Saturation#
How much the saturation of the layer contents should be increased or decreased. Lowering this to -100 will result in a grayscale image.
Brightness#
How much the brightness of the layer contents should be increased or decreased.
Contrast#
How much the contrast of the layer contents should be increased or decreased.
#
Effects
Pixelate
The pixelate effect pixelates the contents of its layer.
Properties#
Pixel Size#
The size of the pixels in the pixelated image. Higher values result in larger pixels.
Pivot X and Y#
The relative point in the bounds of the layer around which the pixelation effect is centered. By default, it is set to the center of the layer bounds.
The impact of the pivot is especially noticeable when the pixel size is animated.
#
Effects
Chroma Key
The chroma key effect removes a specific color from the layer contents, making it transparent. This is useful for creating a "green screen" effect.
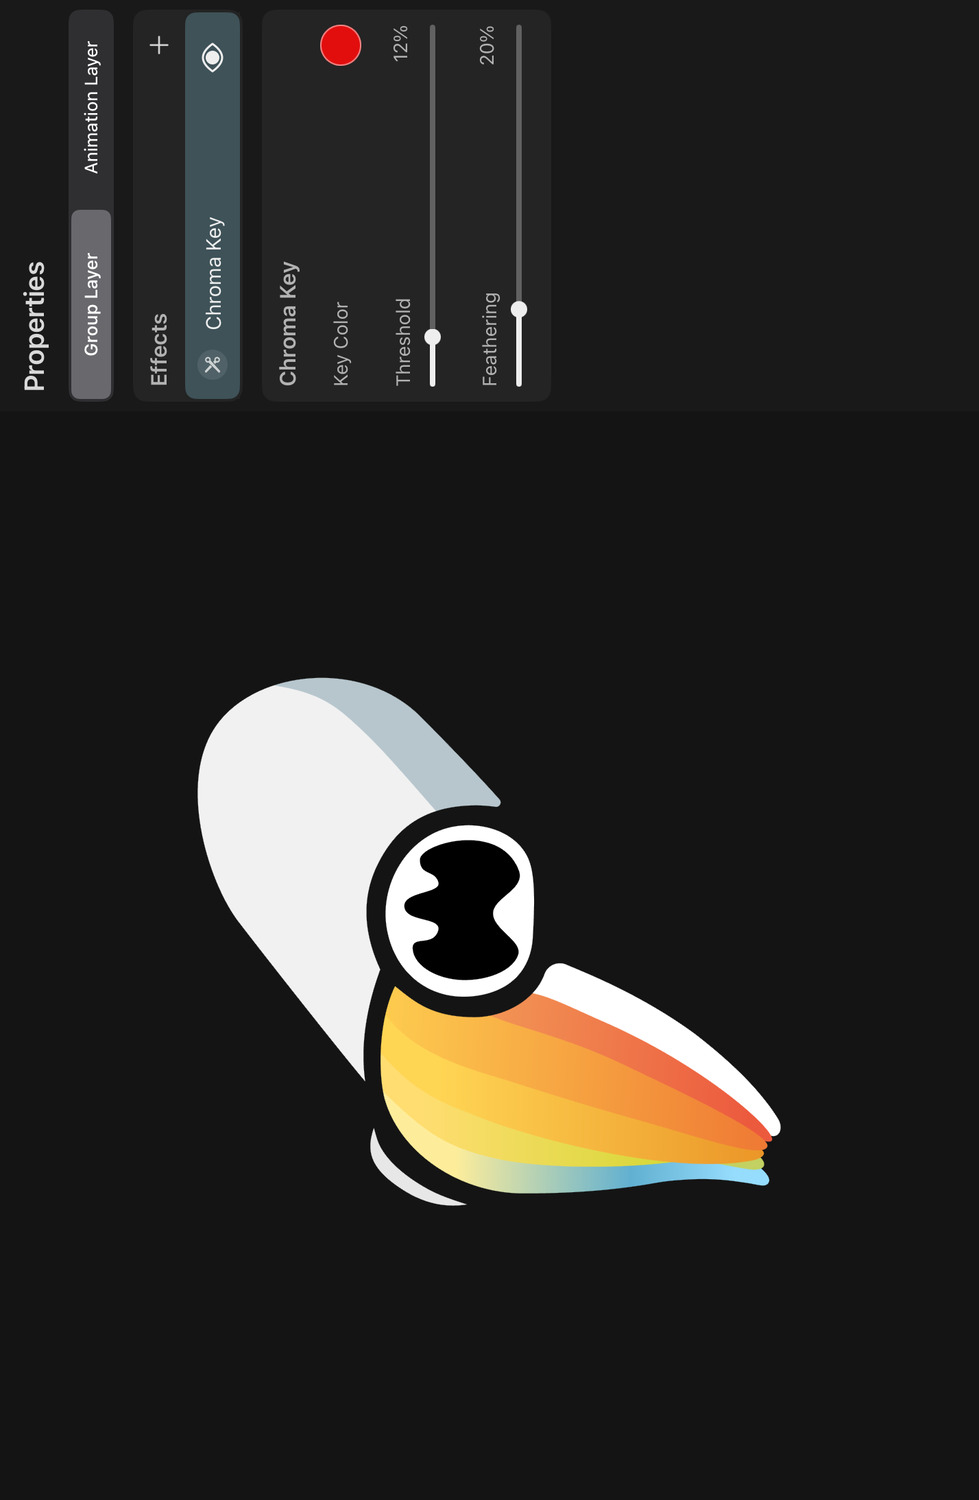
Properties#
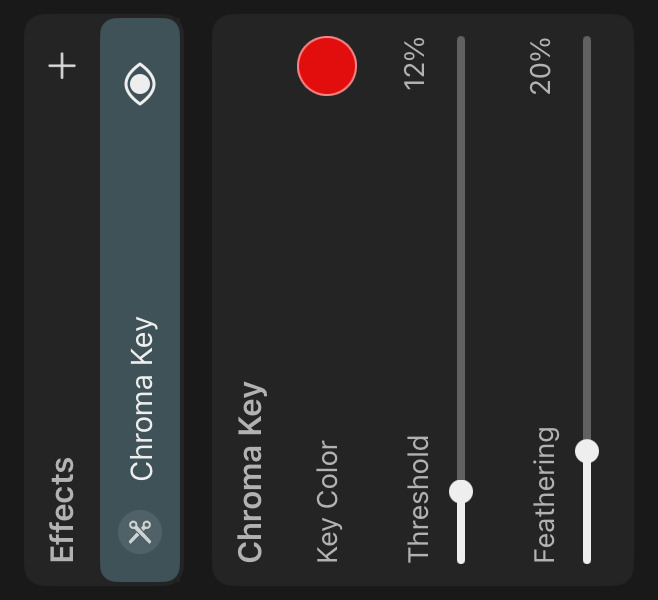
Key Color#
The color that should be removed from the layer contents. You can use the color picker to select a color from the layer contents.
Tip#
When picking the key color with the pipette, temporarily disable effects with the FX button to see the original colors of the layer and avoid flickering.
Threshold#
The threshold controls how similar the color of each pixel must be to the key color to be removed. Higher values result in more colors being removed. With a threshold of 0%, only the exact key color is removed.
Feathering#
Controls how smoothly the edges of the removed color blend into the rest of the layer contents. Higher values result in a smoother transition.
Tip#
If you want to use the chroma key effect on a video to achieve a green screen effect, consider adding it to the video layer within the animation clip of the imported video, instead of the symbol layer that references the clip. This way, the effect will always be applied to the video, even when effects are temporarily disabled in the scene with the symbol layer.
Note#
Note that the chroma key effect works based on the chromaticity of the selected key color, regardless of its luminance. This means that choosing e.g. black, white or any grey as the key color will result in the same output.
#
Effects
Sharpness
The sharpness effect can be used to emphasize the details and edges of the layer contents.
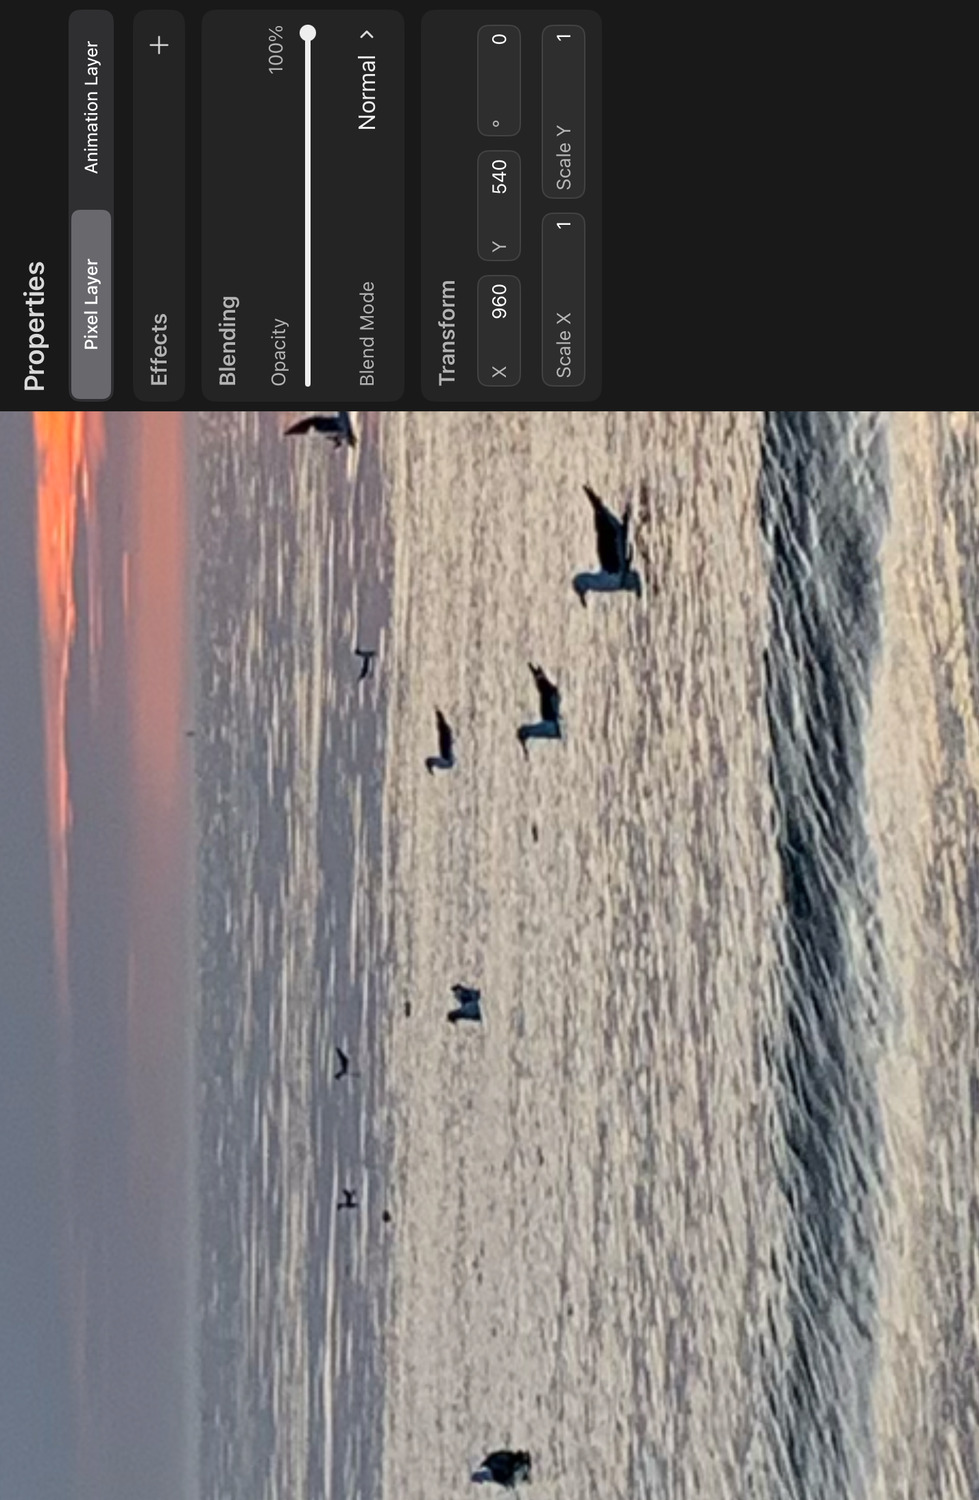
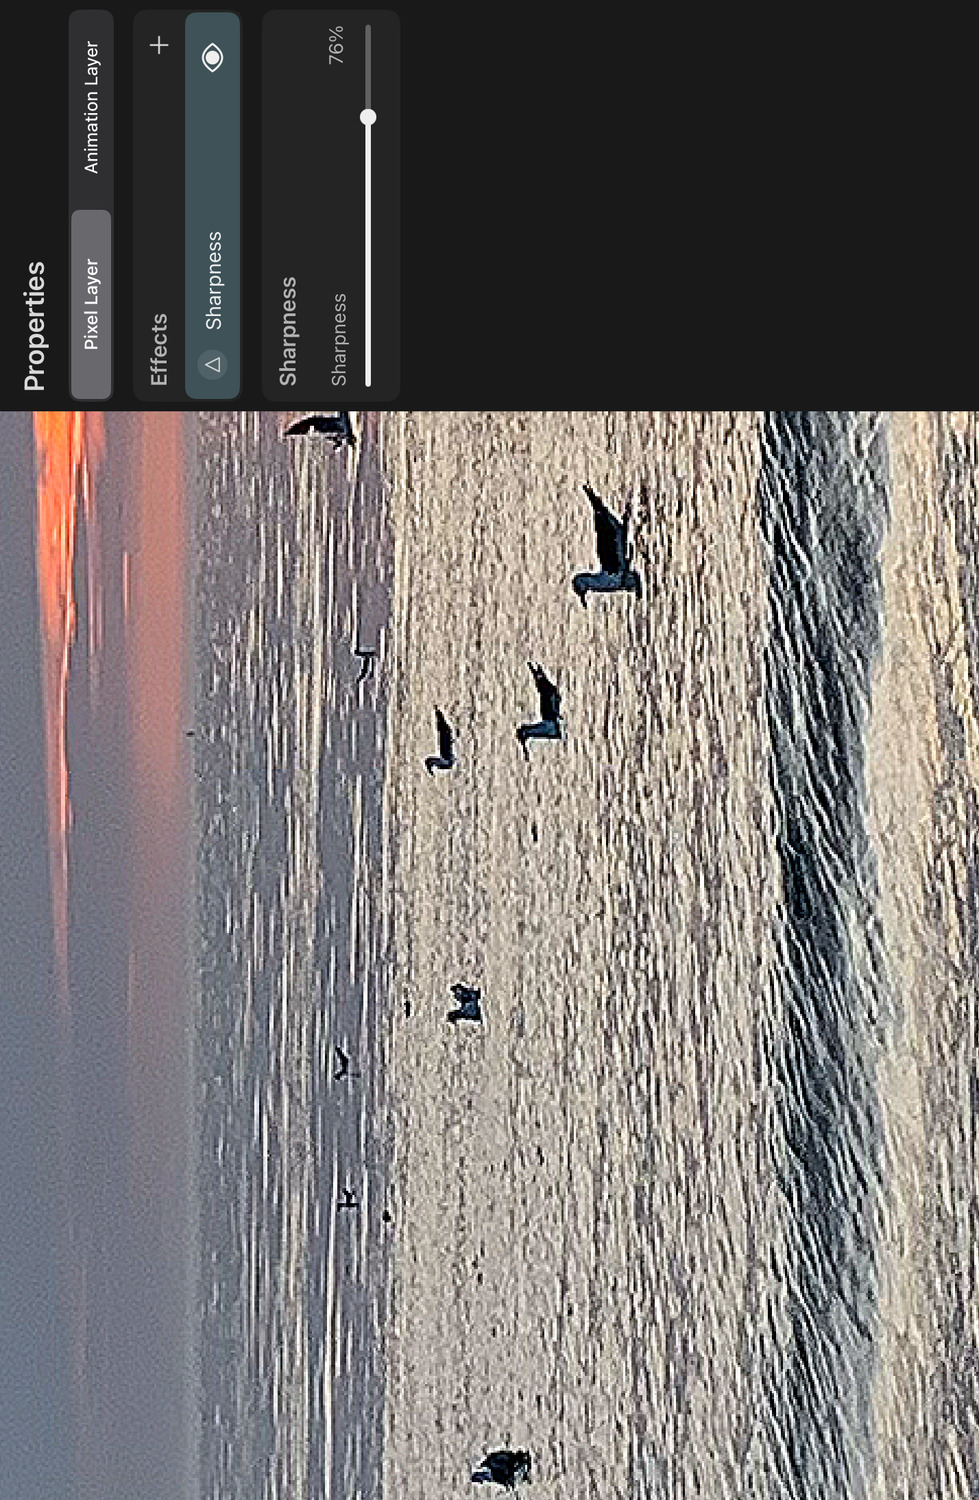
Properties#
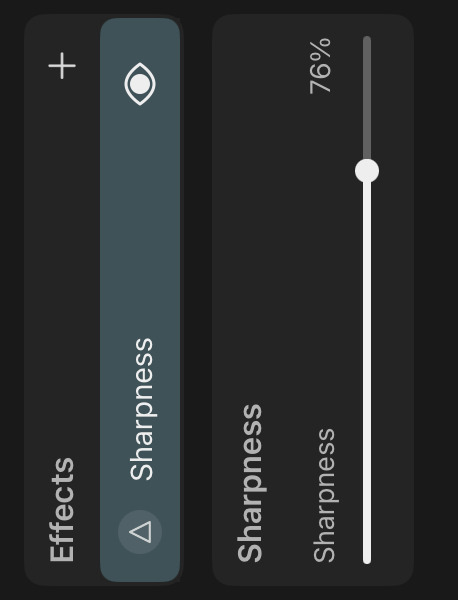
Sharpness#
How much the layer contents should be sharpened.
#
Effects
Halftone
The halftone effect simulates the look of a printed image by converting the layer contents into a pattern of black dots.
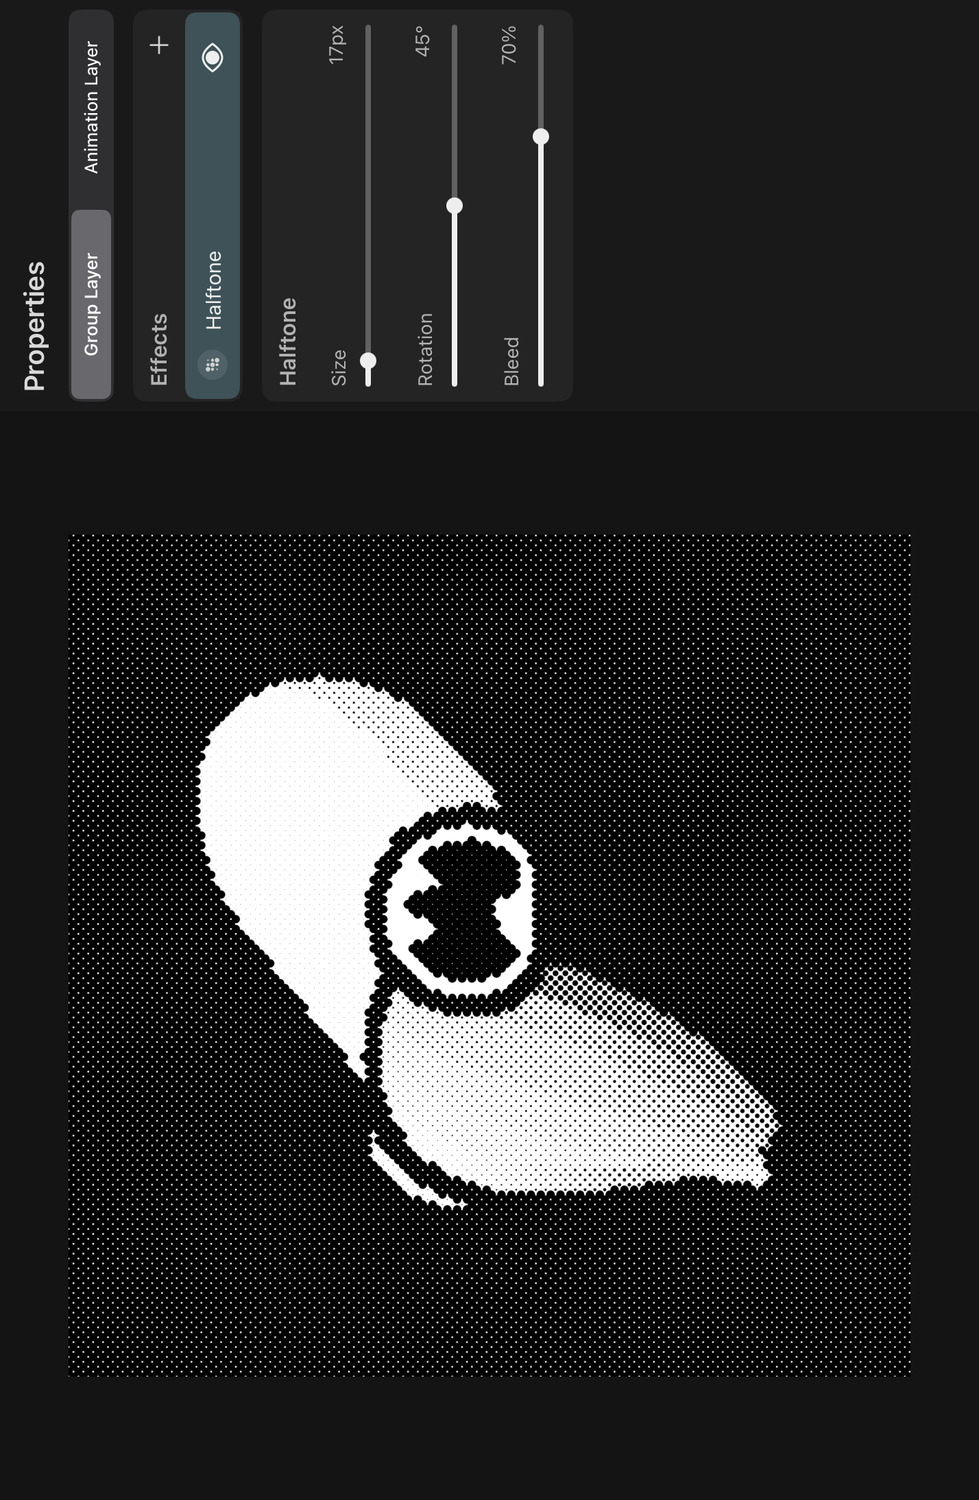
Properties#
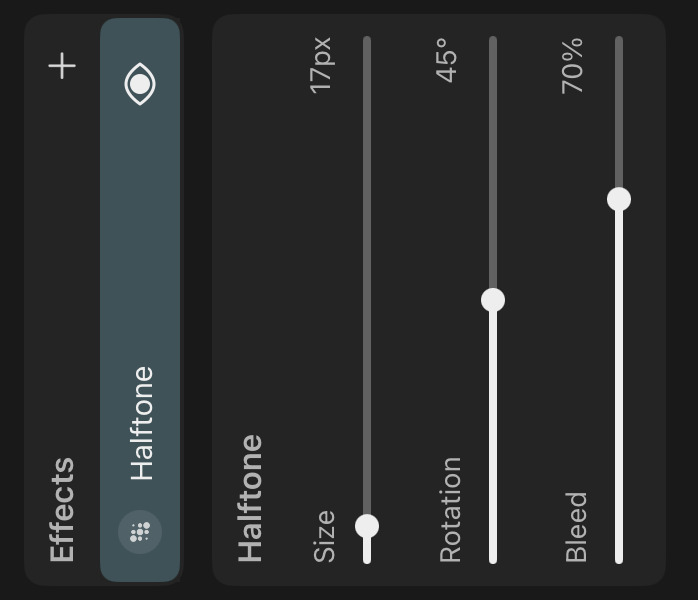
Size#
The maximum size of the dots in the halftone pattern. Darker regions of the layer will result in larger dots.
Rotation#
The rotation of the halftone pattern in degrees.
Bleed#
Controls how much large dots are allowed to overlap into the grid cells of the neighboring dots. Higher bleed values will result in dark regions of the halftone pattern leaving fewer empty gaps between the dots and therefore appearing darker.
#
Effects
Bones
The bones effect allows you to create a skeleton rig for a layer or a group of layers. This is a powerful tool for character animation, as it makes it possible to animate the layers by moving the bones of the rig.
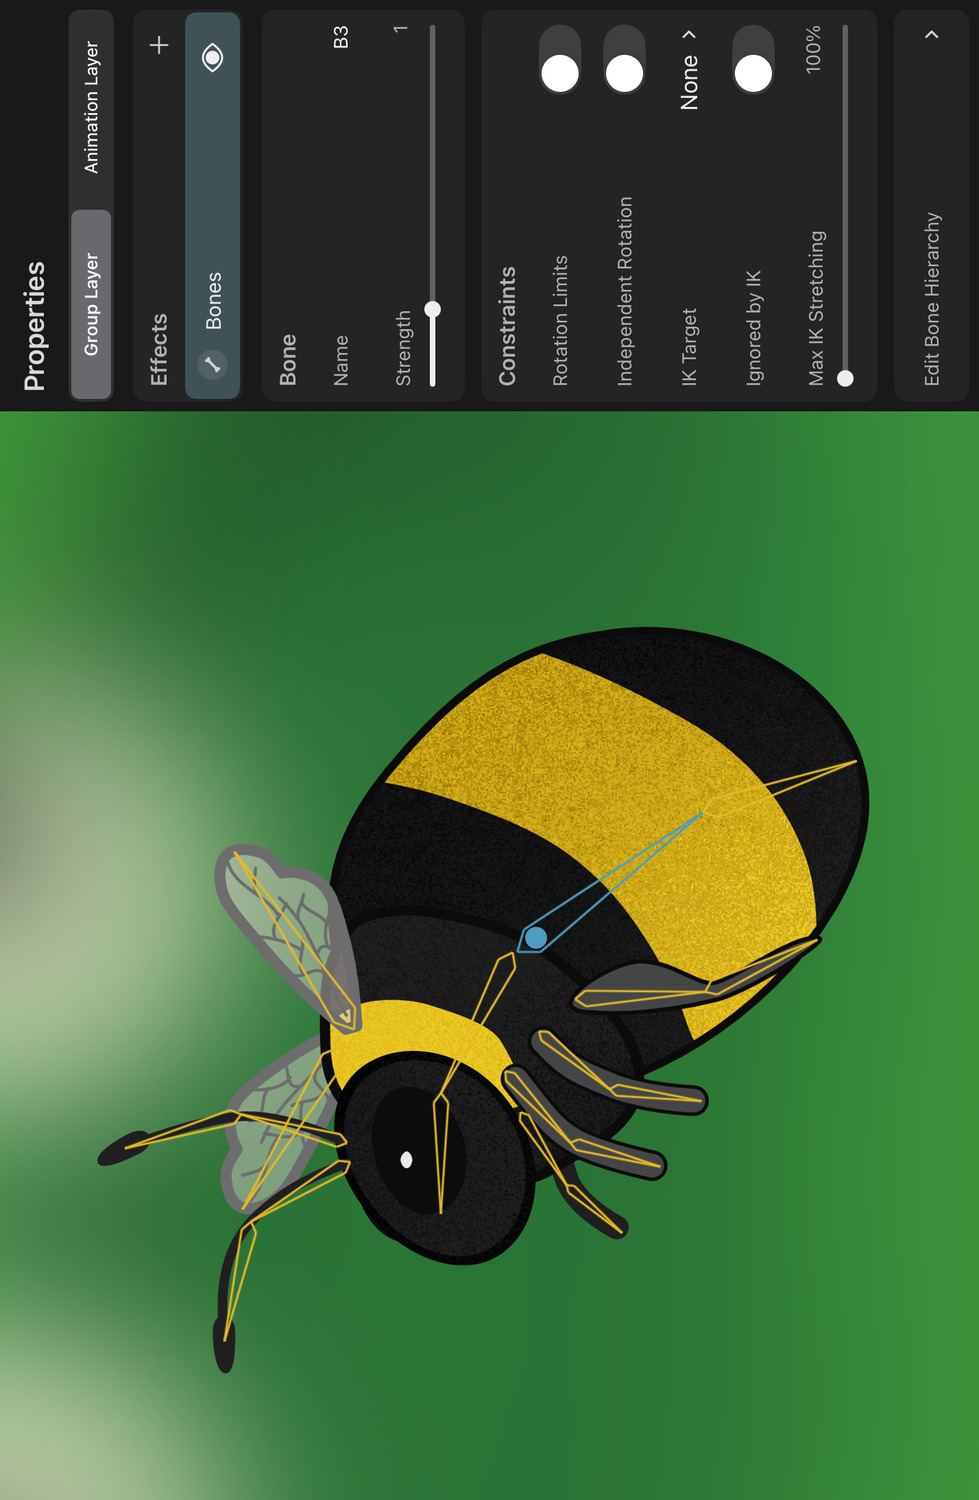
Bone Binding#
The connection between bones and the layers they control is called binding. If you add a bones effect to a layer, all bones in the effect are automatically bound to the layer. If the layer is a group, all layers in the group are bound to the bones.
With path layers and vector layers, the bones bind to the individual path control points. This allows you to animate the shape of the path by moving the bones. Path layers and vector layers retain their vector qualities when animated with bones.
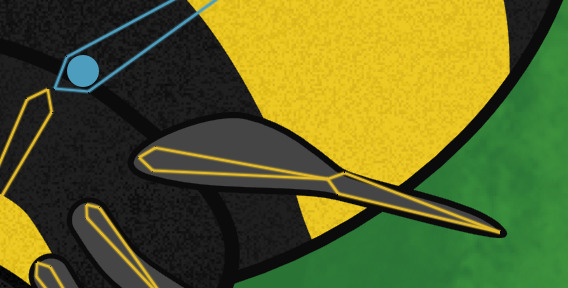
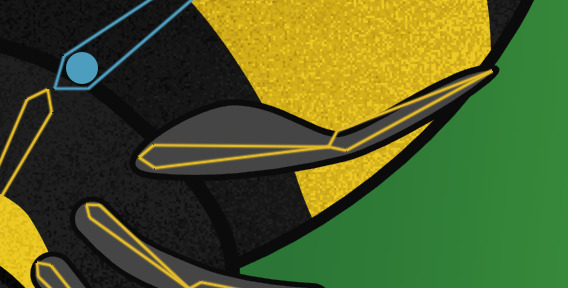
If a bound layer has a mesh effect or a warp effect, then the bones bind to the control points of the mesh or warp effect. That effect then controls the deformation of the layer instead of the bones directly.
Pixel layers that are bound to bones are automatically warped as if they had a warp effect attached to them. For more control over how exactly the pixel layer should be deformed, use a mesh effect.
The closer a bound layer or control point is to the bone that it is bound to, the more it is affected by movements of the bone.
When bones are bound to any other layer that has transform properties (e.g. symbol layers or text layers), the bones will control the position, rotation and scale of the entire layer. If you want such layers to be deformed by bones, add a mesh effect to them.
Bind Pose#
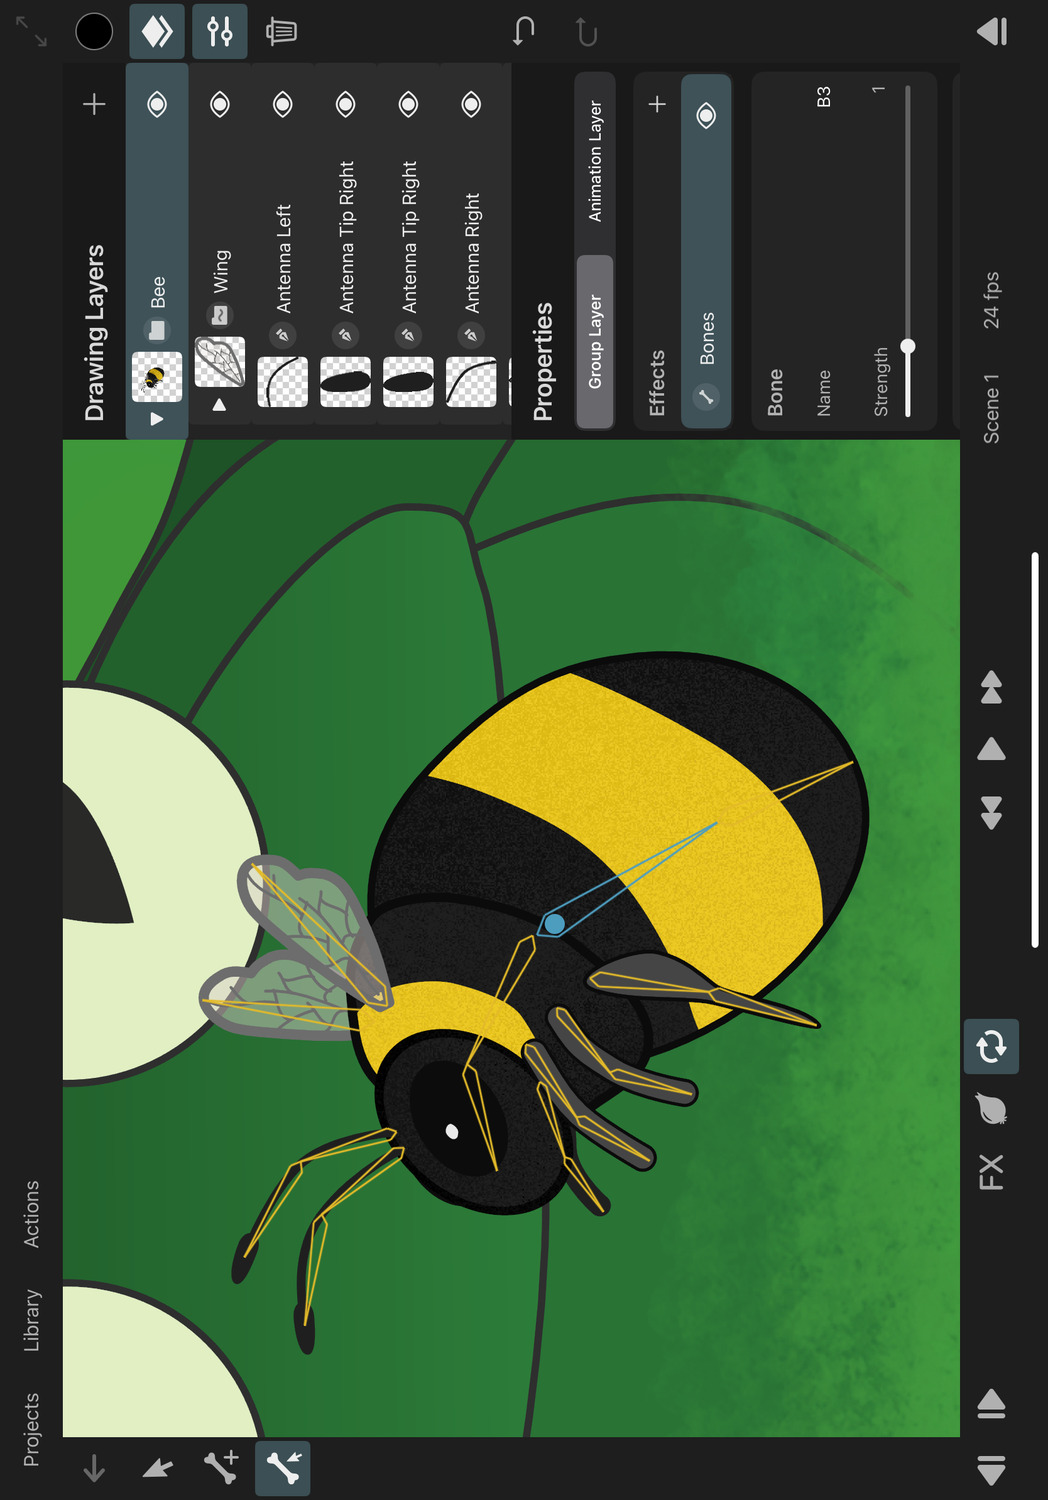
When working with bones, there are two different states that the editor can be in, which allows you to edit the skeleton in two distinct ways:
- Editing the bind pose of the skeleton.
- Animating the skeleton using keyframes.
The bind pose defines the position, rotation and size of the bones with which they should bind to the individual layers. This configuration is how the bones effect later knows how to move the bound layers when you animate the bones.
Therefore, creating the bind pose is the first step when creating a bone rig. For example, if you have already drawn a character that you want to animate with bones, you would create the bind pose by placing and aligning the bones to the character's body parts.
In order to see and edit the bind pose, disable effects in the editor using the FX button. All bone edits you make when effects are disabled are applied to the bind pose of your rig.
On the other hand, when effects are enabled, edits that you make to the bones will insert keyframes and animate the bones. Note that keyframe insertion for bones when effects are enabled happens regardless of whether the keyframing mode in the timeline is active or not.
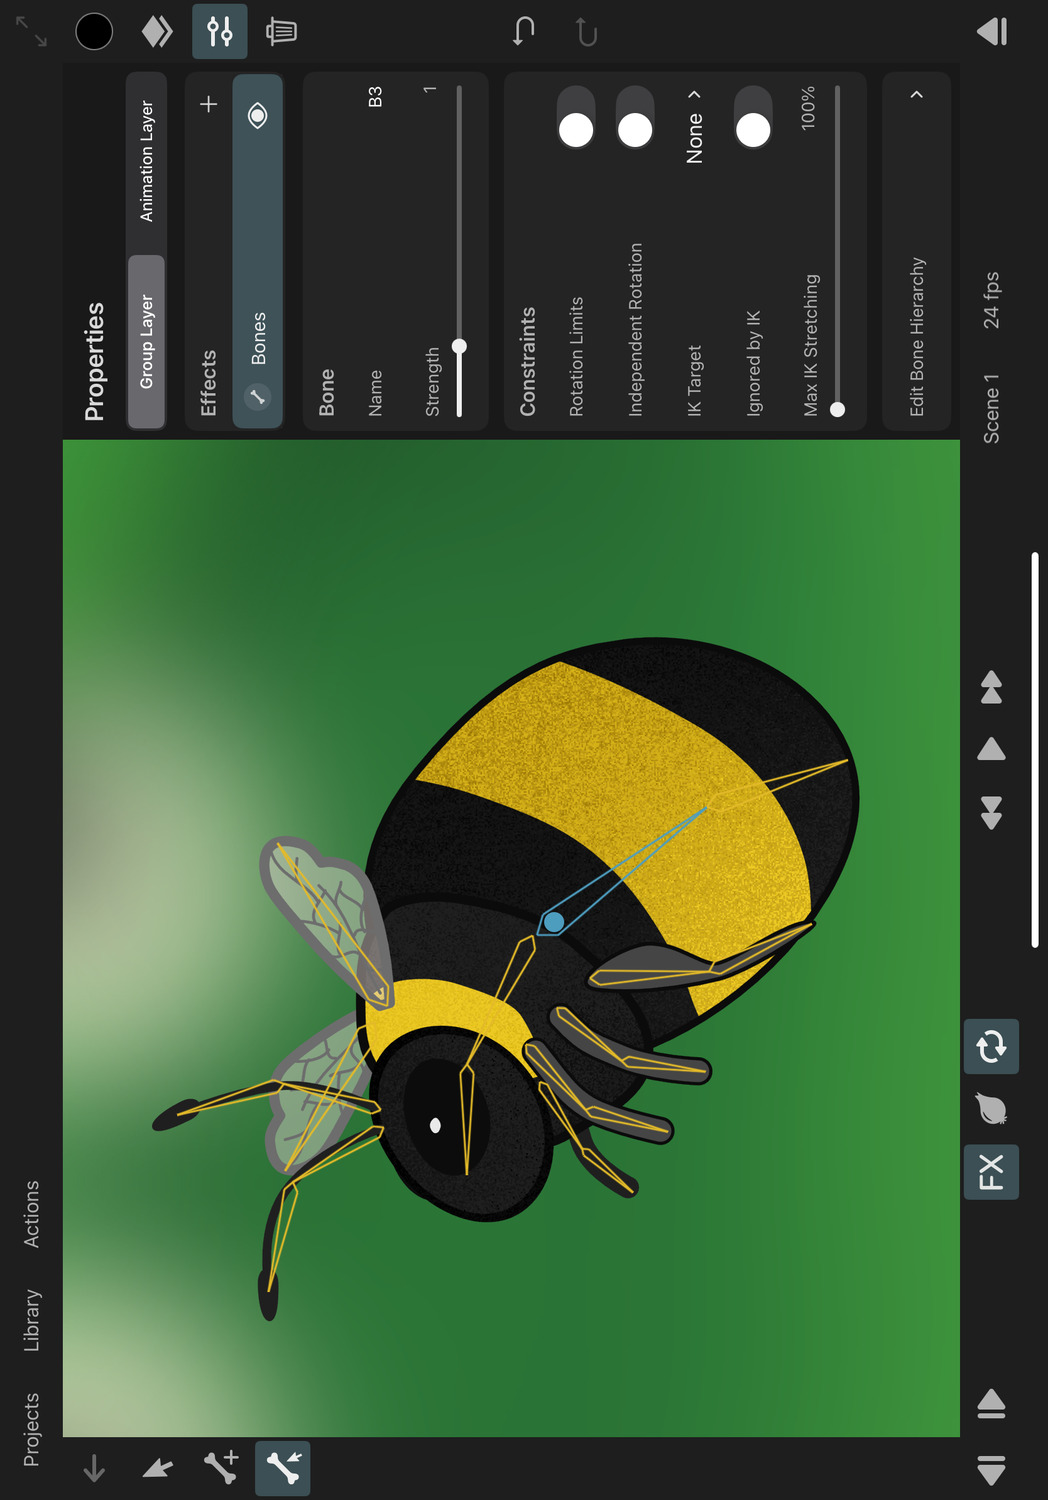
To sum up:
- FX disabled -> edit the bind pose
- FX enabled -> animate the bones
Adding Bones#
In order to add bones to a layer, you need to first add a bones effect to the layer. You can only have one bones effect per layer.
With the bones effect selected:
- Select the
Add Bones Toolin the sidebar. Its icon shows a bone with a plus sign. - Touch and drag on the canvas where you want your bone to appear. This creates a new bone.
The point where you first touch the canvas becomes the base of the new bone. The bone is then drawn from that point to the tip of your finger. Bones always rotate around their base point.
It is important to note that the currently selected bone automatically becomes the parent of any new bone that you add. This way you can create the bone hierarchy immediately while creating the skeleton. If you don't want the new bone to be a child of any other bone, first deselect the currently selected bone.
Selecting and Deselecting Bones#
Tap a bone on the canvas in order to select it. Tap anywhere else on the canvas to deselect the selected bone.
When a bone is selected, its properties are shown in the inspector.
The selected bone is highlighted in a different color than other bones. You can customize both the default bone color and the selected bone color in the settings.
Keyframes#
When a bone is selected, only the keyframeable properties of this selected bone are shown in the timeline. Edits to each bone automatically insert keyframes for only that single bone and not for all bones.

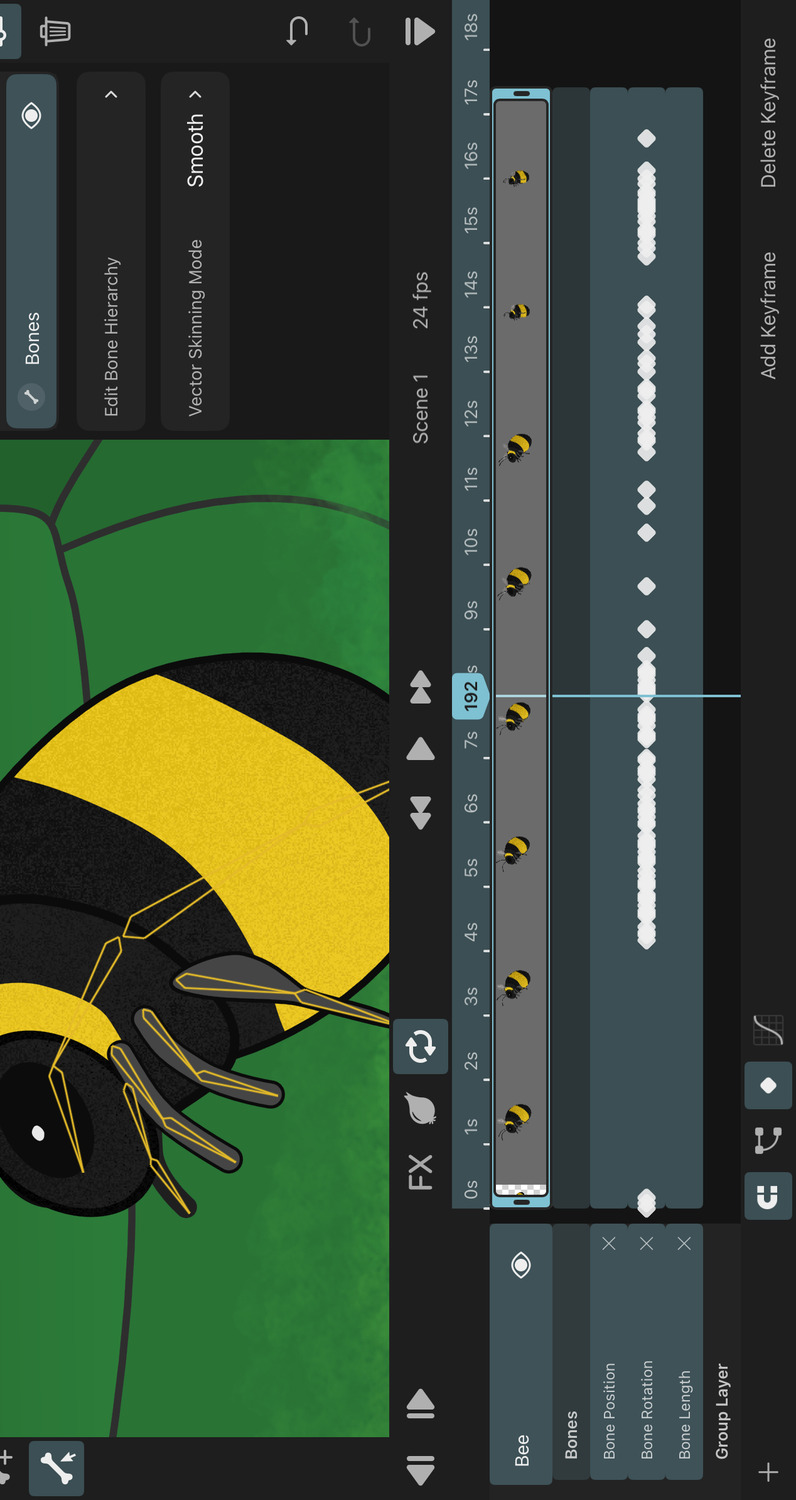
To add or delete keyframes of all bones manually, deselect any potentially selected bone on the canvas and tap the Bones property in the timeline. Then either use the Add Keyframe button in the timeline or tap Bones again and choose Delete Keyframes.
Deleting Bones#
- Select the bone you want to delete.
- Tap the selected bone again and choose
Delete.
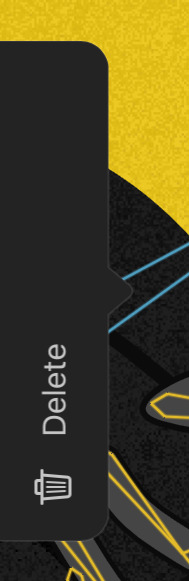
Transform Bones Tool#
To transform bones, select the Transform Bones Tool in the sidebar. Its icon shows a bone with a pointer. With this tool selected, you can
- drag near the base of a bone to move it
- drag near the tip of a bone to scale it
- drag anywhere else to rotate the bone
By default, scale editing is disabled. You can enable it by tapping on the selected bone and choosing Enable Scale Editing. In the same way, you can disable position editing using the Disable Position Editing option. These settings apply to all bones. Disabling position or scale edits can be useful for avoiding unwanted edits.
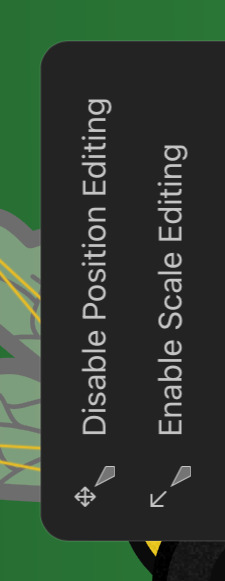
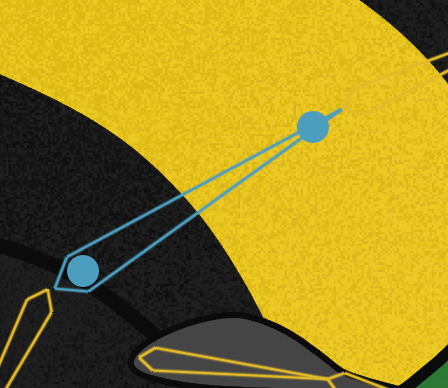
Bones get automatically selected when you start dragging them, if they weren't already selected.
As mentioned above, the behavior of the transform bones tool changes depending on whether effects are enabled or not. When effects are disabled, the tool edits the bind pose of the bones. When effects are enabled, the tool animates the rig.
Tip#
It is possible to switch from normal layer editing to bone editing via the canvas without having to open the inspector just to select the bones effect. If the transform tool is active and the layer with the bones effect is selected, you can tap the layer and select
Edit Bones. This will automatically select the bones effect and switch to the bones tool.
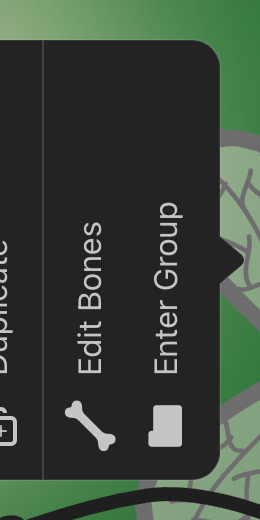
Custom Bone Binding#
By default, when you add a bones effect to a group, all bones of the effect are bound to all layers in the group. However, you can also customize this binding and manually choose which exact layers should be bound to which bones.
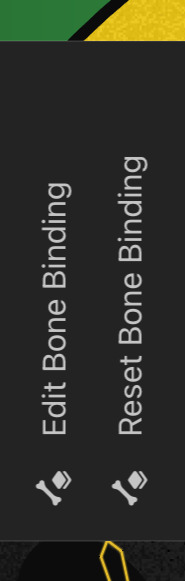
- Tap the selected bone whose binding you want to edit.
- Choose
Edit Bone Binding. - Tap the layer that you want to bind to the bone on the canvas. The selected layer gets highlighted.
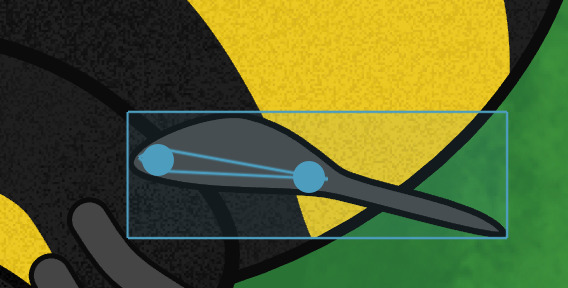
- If the correct layer is highlighted, tap it again and select
Bind to Bone. The bone is now bound to the layer.
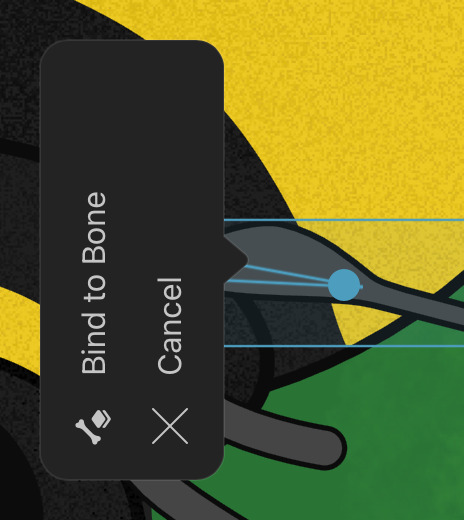
- Repeat these steps if you want to bind more layers to the same bone.
If you want to exit the binding editing mode, tap on the highlighted layer and select Cancel.
In step 4, if the group is a timeline layer, you have the choice of binding the bone to the highlighted drawing layer (Bind Drawing Layer to Bone) or to the entire animation layer (Bind Animation Layer to Bone), which in turn automatically binds the bone to all drawing layers in all drawings of the animation layer.
Alternatively in step 4, select Unbind from Bone to remove the binding of the bone to the layer.
Instead of editing the custom binding of bones and layers on the canvas, you can also do this in the inspector by tapping on Edit Bone Bindings. See Bone Bindings for more information.
Behaviour#
- Any bone can be manually bound to one or more layers.
- Any layer can be manually bound to one or more bones.
- Bones and layers that are part of such a manually defined binding are only bound to the layers / bones that are part of this binding. They are not automatically bound to any other layer / bone any more.
- All other bones and layers that are not part of a manually defined binding are automatically bound to each other.
Reset the Custom Bone Binding#
In order to reset the custom binding of a bone, tap the bone and choose Reset Bone Binding.
Bone Properties#
The following are the properties of individual bones, which can be edited in the inspector when a bone is selected.
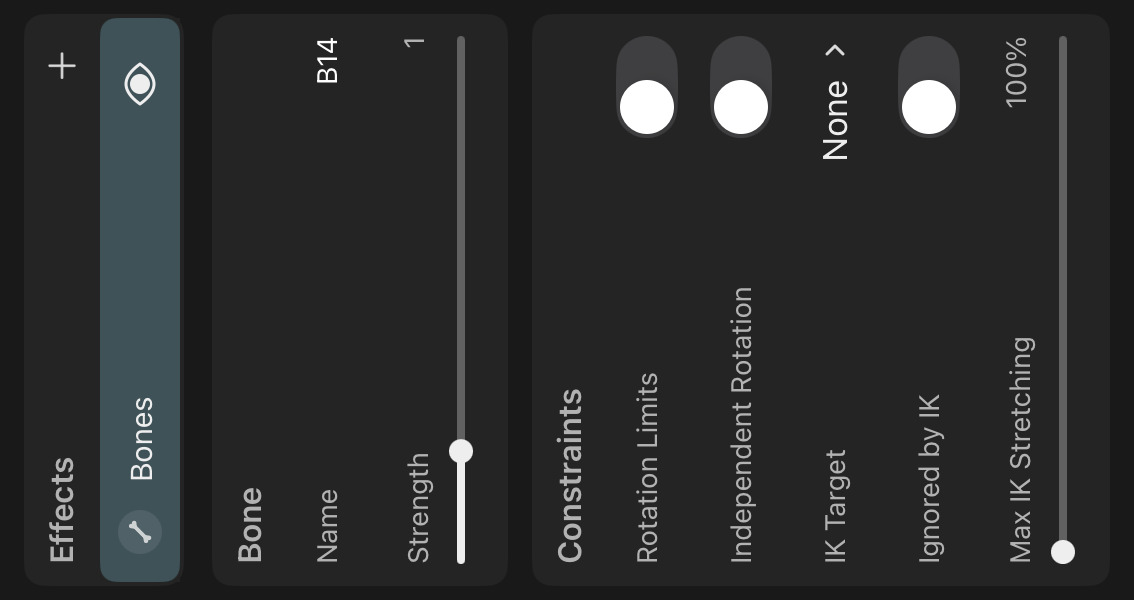
Name#
The name of the bone. This is useful for identifying bones in the timeline, the bone hierarchy and when choosing IK targets.
Strength#
Defines how much the bone affects its bound layers. A strength of 0 means that the bone has no effect on any layer.
The movement of each layer or control point that is bound to a bone is determined by the following factors:
- The distance of the control point / layer from the bone
- The length of the bone in the bind pose
- The strength of the bone
Constraints#
Rotation Limits#
How far the bone is allowed to be rotated relative to is rotation in the bind pose. You can define separate limits for the positive and negative rotation directions. By default, bones have no rotation limits.
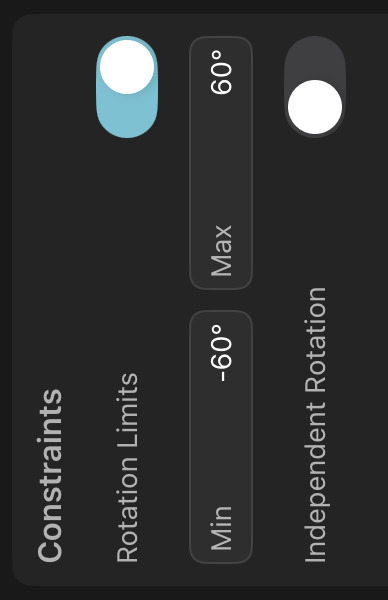
If rotation limits are enabled for a bone, they are visualized as two lines that extend from the base of the bone when the bone is selected.
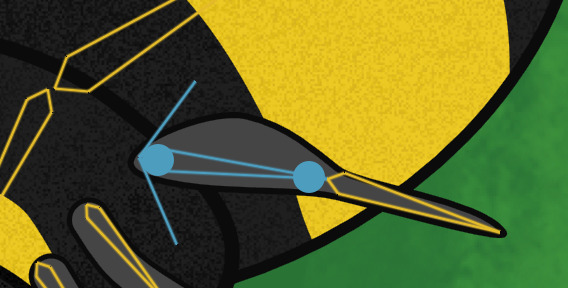
Independent Rotation#
Whether the rotation of the bone should be independent of the rotation of its parent bones or not.
By default, bones in a hierarchy are positioned and rotated relative to their parent bones, meaning that if you rotate a parent bone, the child bones automatically rotate as well.
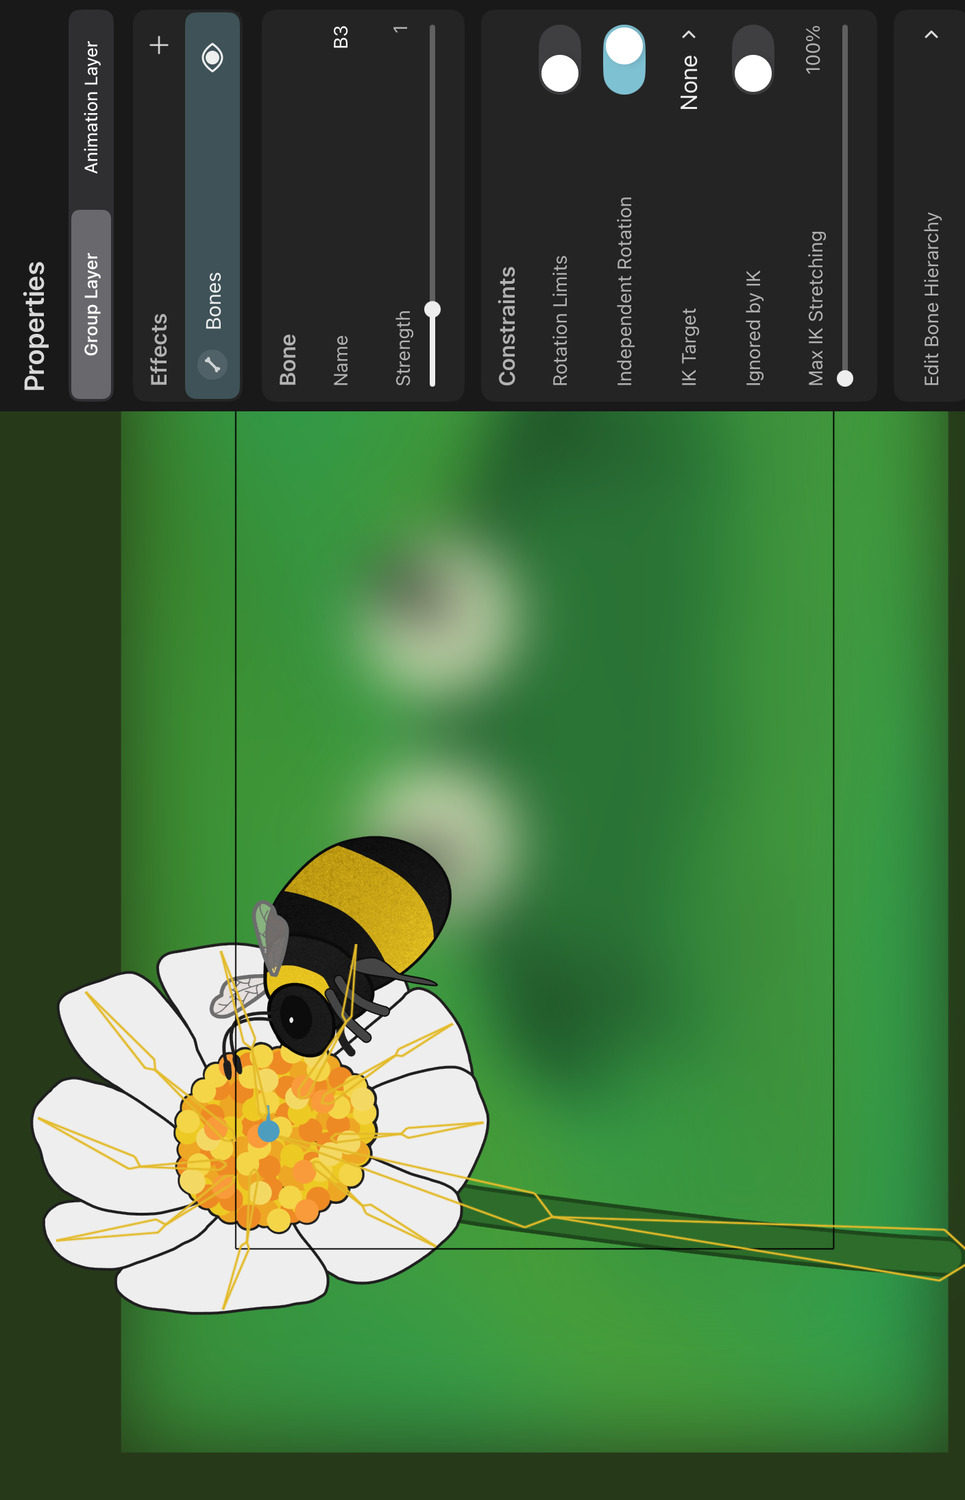
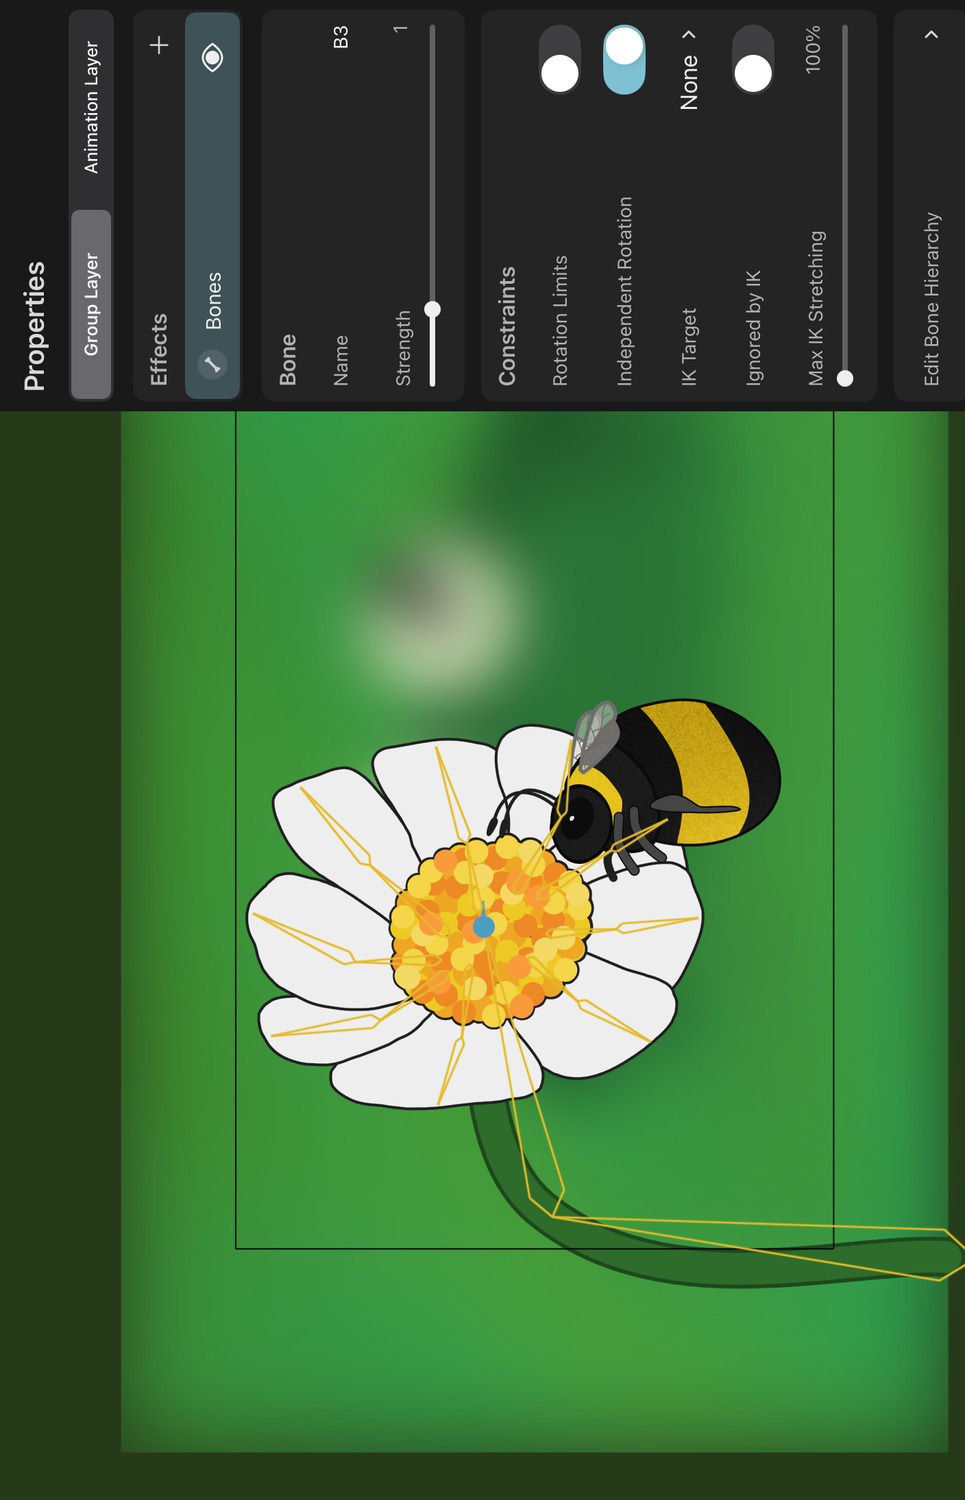
IK Target#
Which bone should act as the inverse kinematics target bone of this bone. By default, bones don't have an IK target. You can choose an IK target from the list of all bones in the same bones effect.
Ignored by IK#
Whether the bone should be ignored when determining IK chains. Enabling this can therefore have two effects:
- The bone will not be part of any IK chain.
- Sometimes you might want to add additional child bones for visual purposes to a bone that is part of an IK chain, but without breaking the chain itself, which is what happens by default when a bone has multiple children. In this case, you can enable
Ignored by IKfor these additional bones and they will not count towards the single-child rule.
Max IK Stretching#
How much the length of the bone is allowed to increase if it is part of an IK chain in order for the chain to reach the IK target.
Bone Hierarchy#
Bones in a skeleton rig are commonly arranged in a hierarchy, so that the movement of parent bones automatically affects the movement of their child bones. This is useful for creating complex animations with a minimal amount of keyframes.
For example, if you are rigging an arm, you might have a bone hierarchy consisting of three bones. The upper arm bone at the root, the lower arm as the child of the upper arm and the hand as the child of the lower arm. When you rotate the upper arm, the lower arm and the hand will automatically rotate as well.
When you add a new bone, it automatically becomes a child of the currently selected bone. If you want to later edit the bone hierarchy, open the inspector and tap on Edit Bone Hierarchy. This will show a list of all bones and their hierarchical relationships.
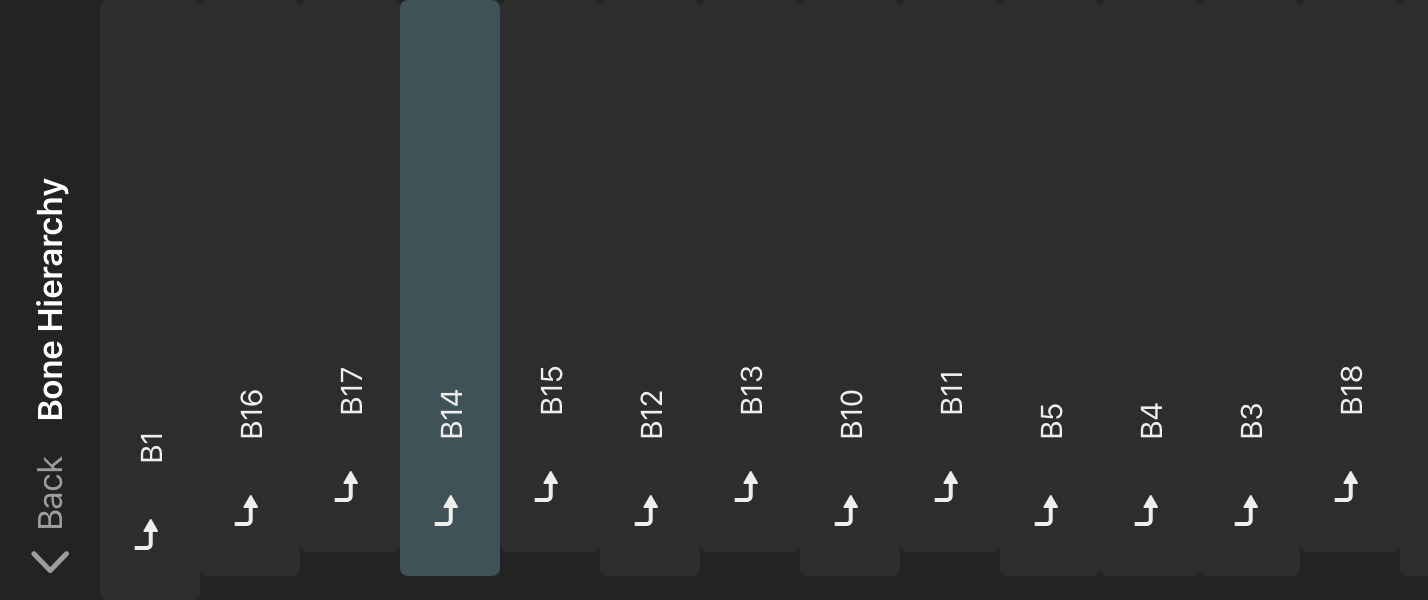
Bones without a parent are not indented in this list. They each form the root of a separate bone hierarchy. Bones with parents are shown below their parent bone and are indented. The order of multiple bones with the same parent bone in this list is arbitrary and has no impact on the hierarchy.
Drag and drop the bones in this list to different positions to edit the hierarchy. If you drop a bone on top of another bone, it becomes a child of the bone you dropped it on. If you drop a bone on the empty space above the list, it gets removed from the hierarchy it is in and becomes a root bone.
Bone Bindings#
In addition to editing the custom binding of bones and layers on the canvas, you can also do this in the inspector by tapping on Edit Bone Bindings. Here you can see a list of all layers that the selected bone can be manually bound to. Tap on a layer to bind or unbind it from the selected bone.
Layers that are bound to the selected bone are highlighted in the list. Manually bound layers have a stronger highlight. Automatically bound layers have a more faint highlight.
Use the reset button at the top to reset the manual bindings of the selected bone.
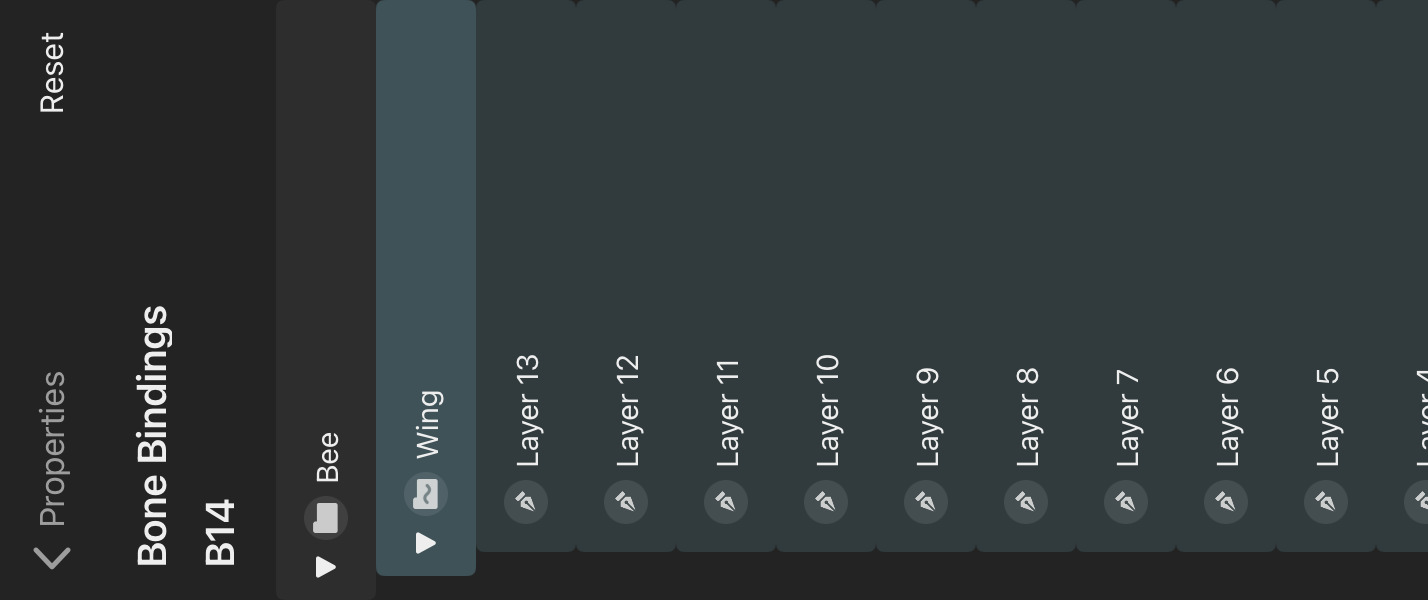
Vector Skinning Mode#
The vector skinning mode of a bones effect determines how path control points are influenced by bones. There are different modes:
Smooth#
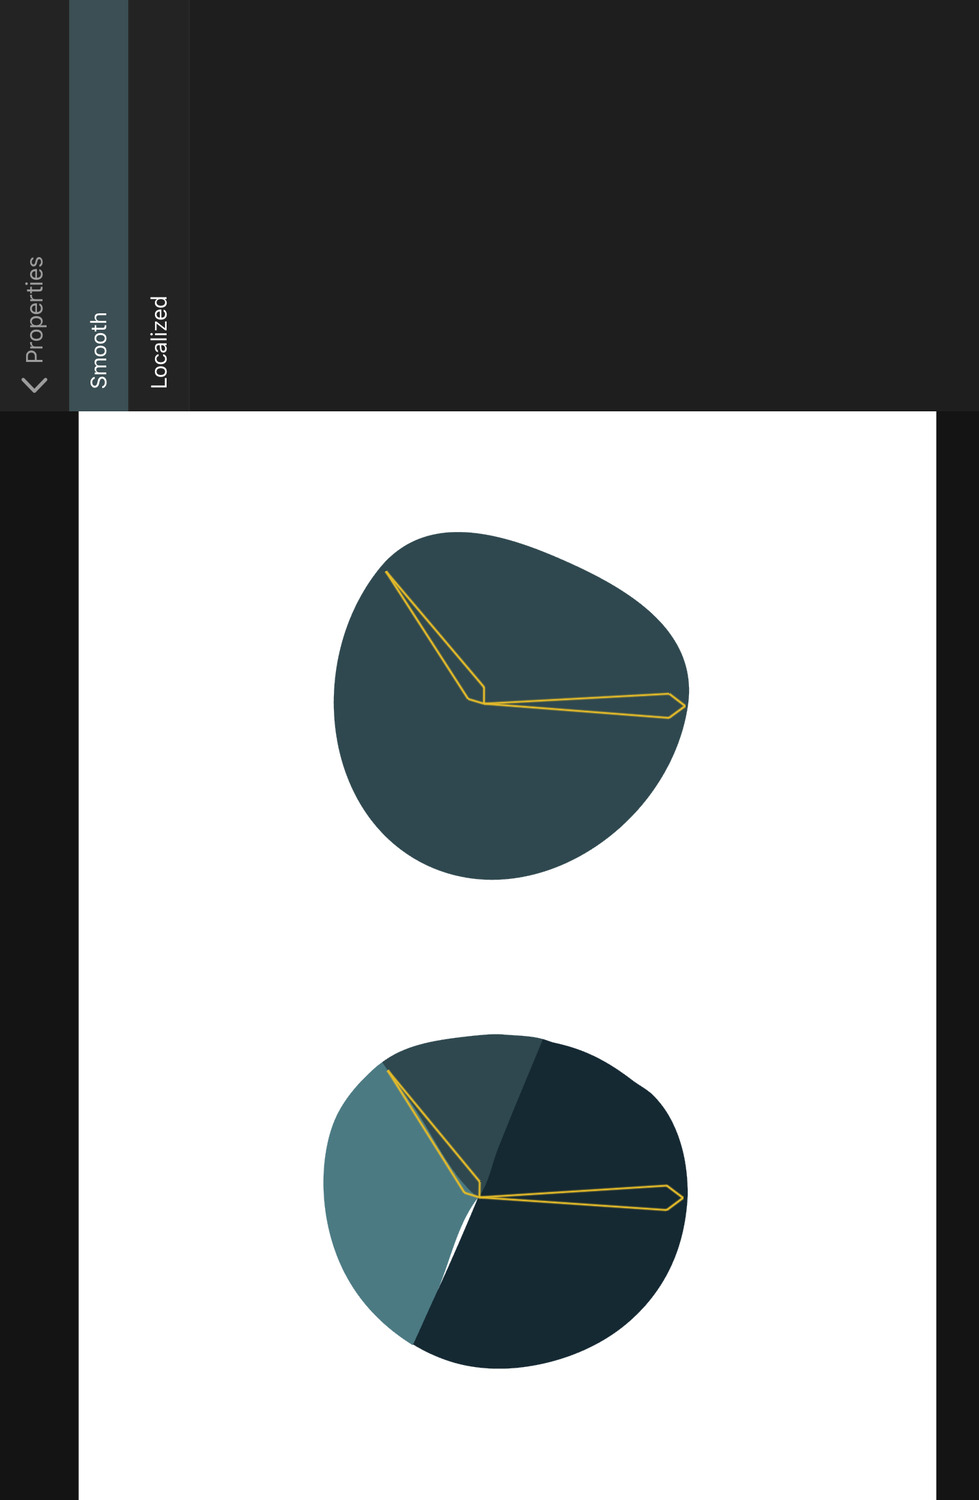
The Smooth skinning mode maintains the angle of the in and out handles of each control point. If the control point mode is Symmetric or Asymmetric and is therefore a smooth transition between two path segments, this transition point will remain smooth when the path is deformed by bones.
This is the default behaviour.
Localized#

The position of the in and out handles of each control point are updated in the same way that the control points themselves are updated by the bones. This can avoid gaps potentially opening up between adjacent path segments of different shapes when their control points and in and out handles overlap, but at the cost of symmetric or asymmetric control points losing their smoothness.
Smooth (Legacy)#
This is an older variant of the Smooth skinning mode and was the default skinning mode for bones effects that were created in ToonSquid versions before version 2.0.15. It is similar to the new Smooth mode, but can cause some unwanted distortions in certain situations, which is why it is only kept for backwards compatibility reasons. It is recommended to switch older rigs to the new Smooth mode, unless your animation relies on the specific behaviour of this legacy mode.
Inverse Kinematics (IK)#
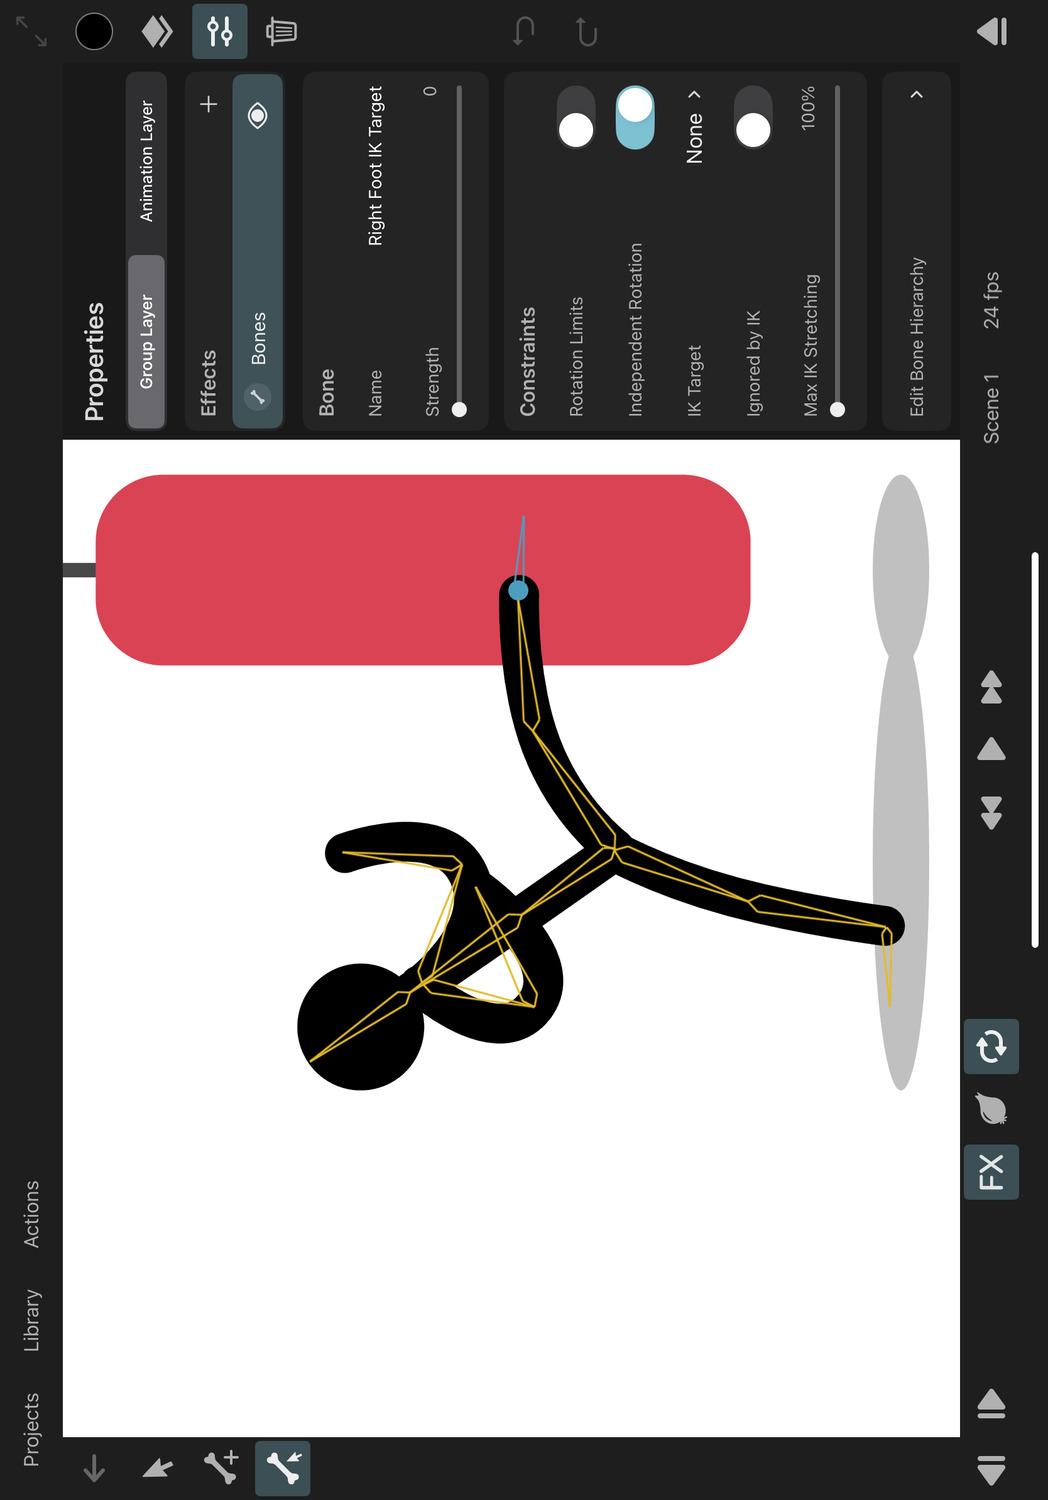
By default, bone hierarchies and layer hierarchies are based on forward kinematics, where the position, rotation and scale of a child depends on the position, rotation and scale of all of its parents in the hierarchy. For example, in a leg hierarchy of upper leg -> lower leg -> foot, moving the upper leg moves the lower leg and the foot and moving the lower leg moves the foot. Moving the foot does not move any of the bones further up the chain.
With forward kinematics, in order for the tip of the last bone in a hierarchy chain to end up at a specific position, you have to manually orient all of the bones in the chain.
With inverse kinematics (IK) on the other hand, you can use a single bone - the IK target - to define where you want the tip of the last bone in a chain to be. The positions and rotations of all of the bones in the chain are then automatically calculated to try to get the tip of the last bone as close as possible to the IK target position. This calculation is also referred to as "solving" the IK chain.
This can be particularly useful for character animation where you can control an entire rig by only animating a few IK target bones.
If the Max IK Stretching property of a bone in an IK chain is above 100%, then this bone is allowed to scale up if necessary to get the end of the bone chain closer to the target.
IK Chains#
An IK chain is a chain of bones that are controlled by inverse kinematics. The last bone in the chain is the bone that has its IK target property set to the IK target bone. The parent bones of this bone are also part of the IK chain if all of the following conditions are true:
- Their direct child is part of the IK chain.
- They only have one child bone whose Ignored by IK property is disabled.
- Their own Ignored by IK property is disabled.
Therefore, by default, bones with multiple children are not part of IK chains. For example, if a torso bone has two leg bone hierarchies with IK targets attached to them, only the leg bones are controlled by their respective IK targets. Since the torso has multiple child bones, it is not part of either IK chain.
Creating IK Chains#
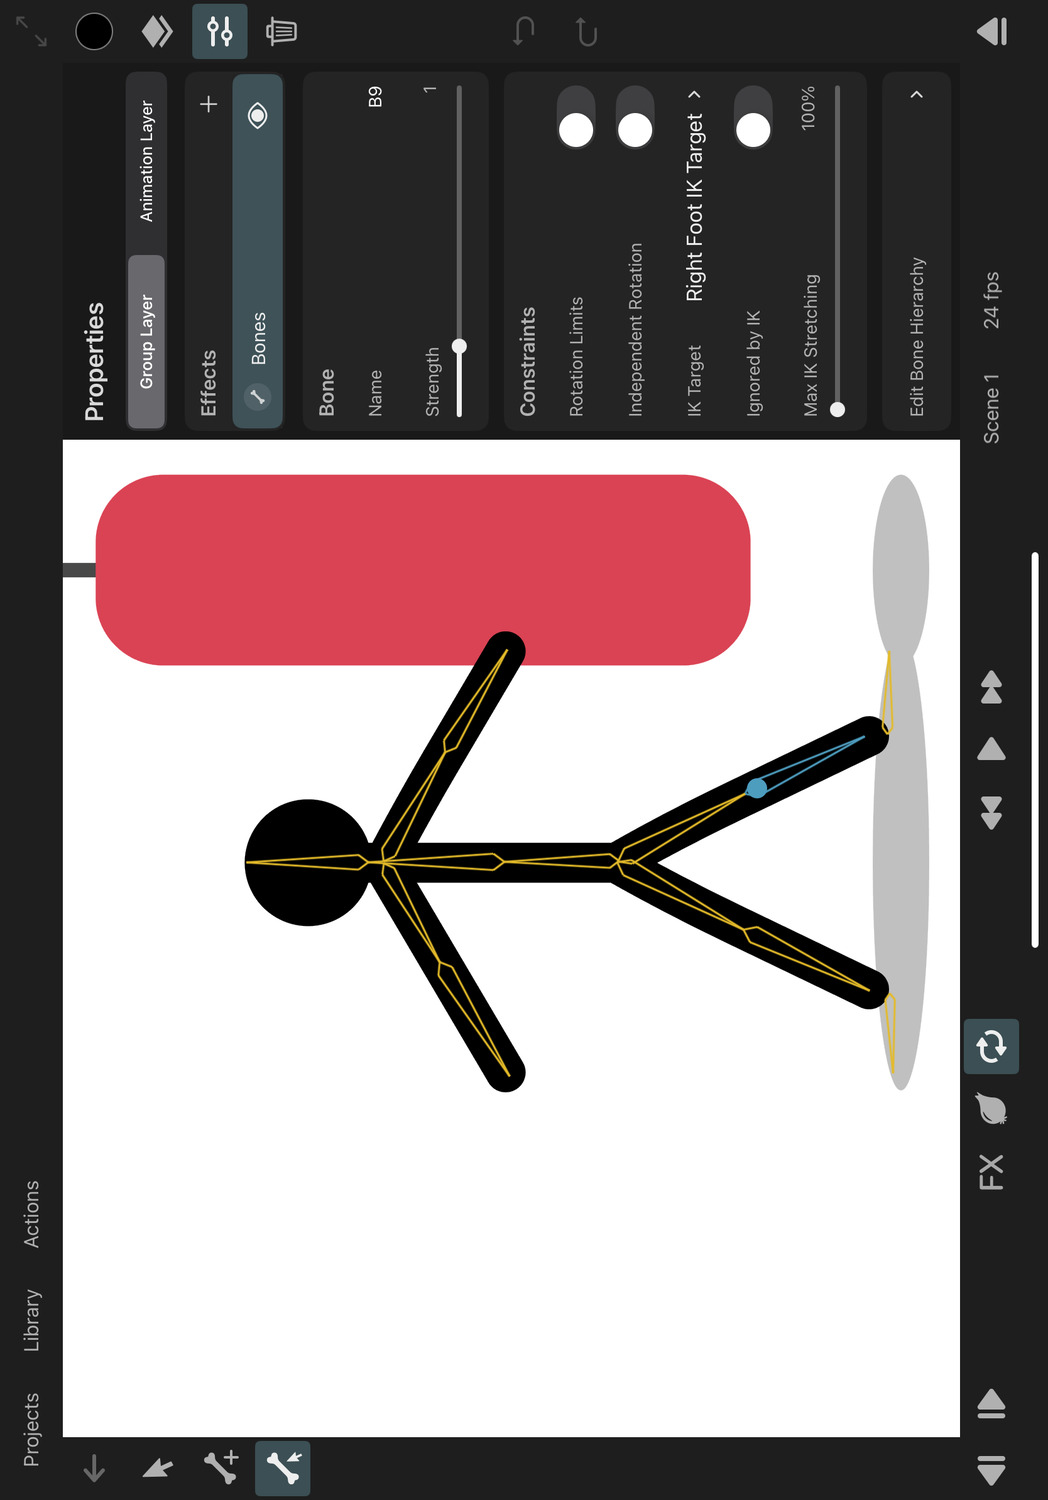
In order to create an IK chain, set the IK Target property of the last bone in the chain to the bone that should act as the IK target.
However, there are some additional rules and recommendations to keep in mind in order to avoid unwanted behaviour and get the best possible results:
- Make sure that the IK target bone is not part of the bone transform hierarchy that is being controlled by the IK target itself. This will otherwise lead to a feedback loop and cause jittering when you try to move the IK target bone. If you have such feedback loops in your rig, ToonSquid will show a warning in the inspector.
- Generally, you don't want the IK target bones to have any direct influence on the layer contents, so they effectively only act as control handles for the other bones in the rig. Those bones then deform the layer contents. Therefore, you'll usually want to set the Strength property of the IK target bones to 0.
- It is important to understand that the solutions of IK chains on any given frame of your animation don't depend on the IK solution on other frames. Given that there can often be multiple valid solutions for the bones in an IK chain, this can lead to bones jumping from one valid solution to a rather different solution between different frames. This can happen particularly frequently when the bones in a chain are all placed in a straight line in the bind pose. If you manually rotate the bones in the chain, either in the bind pose or using keyframes, you can nudge the IK chain towards a specific solution and get more consistent animations.
- Rotation limits are taken into account when IK chains are solved, however, they can also negatively impact the quality of the solution. Consider reducing the number of rotation limits in a chain if you are having trouble getting the desired results.
#
Effects
Mesh
The mesh effect allows you to map the contents of a layer to a custom mesh of triangles and then animate and deform the mesh with bones or by hand.
A common use case for the mesh effect is for building deformable character rigs out of imported images.
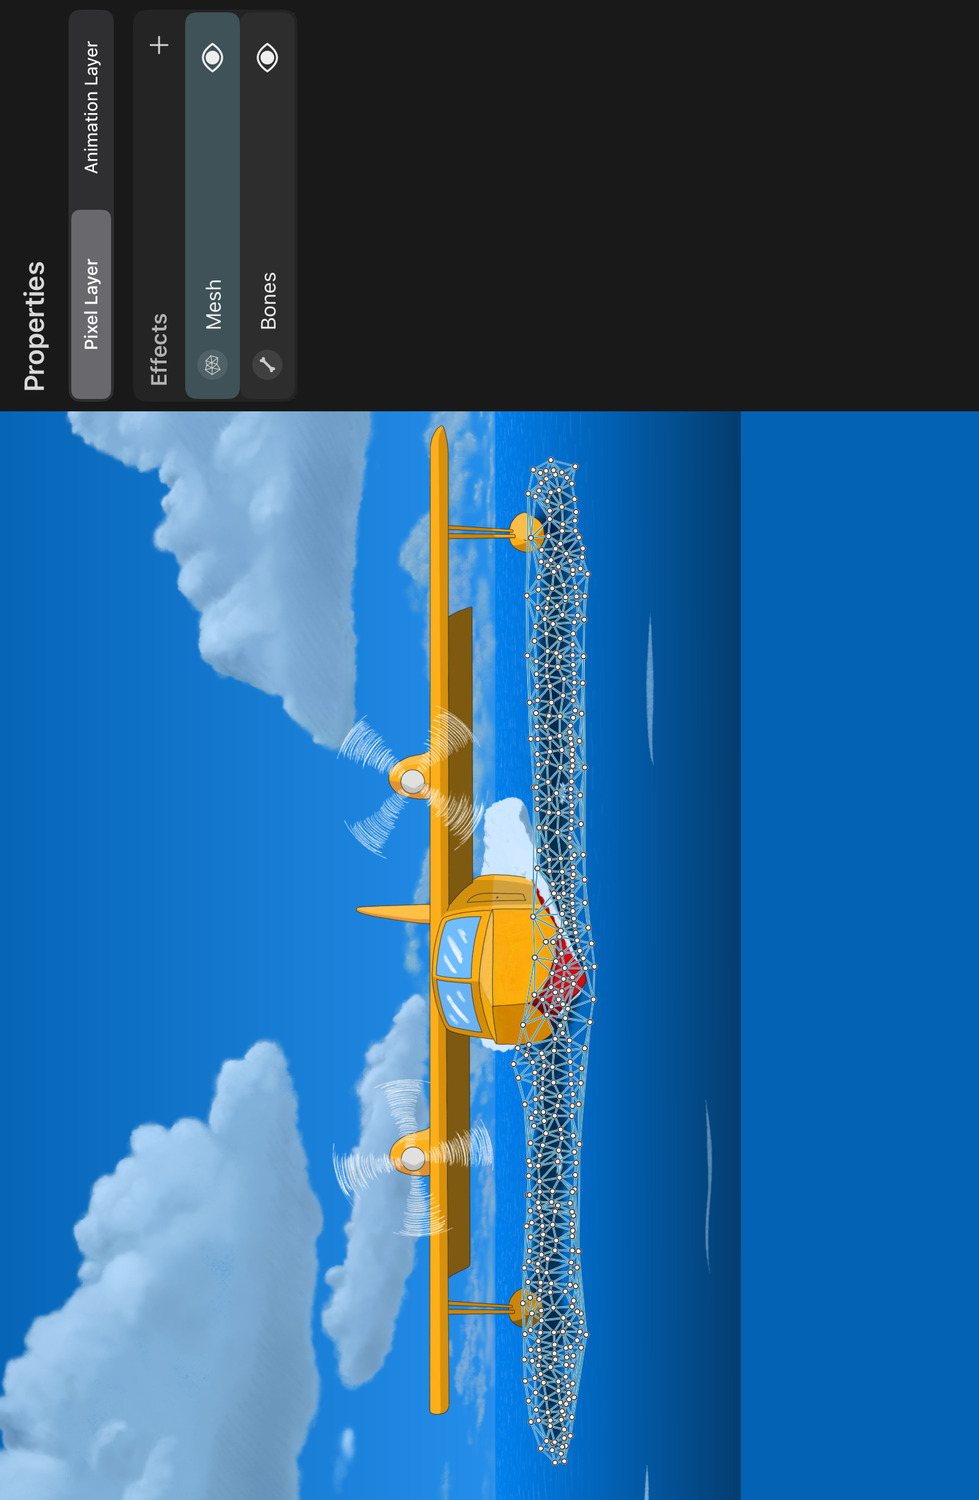
Note#
Layers with vector contents are implicitly rasterized when a mesh effect is applied to them.
Add Mesh Tool#
To add control points to the mesh
- Select the
Add Mesh Toolin the sidebar. Its icon shows a mesh with a plus sign. - Tap on the canvas to add new control points to the mesh.
Every time you add a new control point to the mesh, the triangles of the mesh are automatically updated to include the new control point.
Only the layer regions where the mesh has triangles remain visible when effects are enabled. You therefore need at least three control points in the effect to see any part of your layer through the mesh.
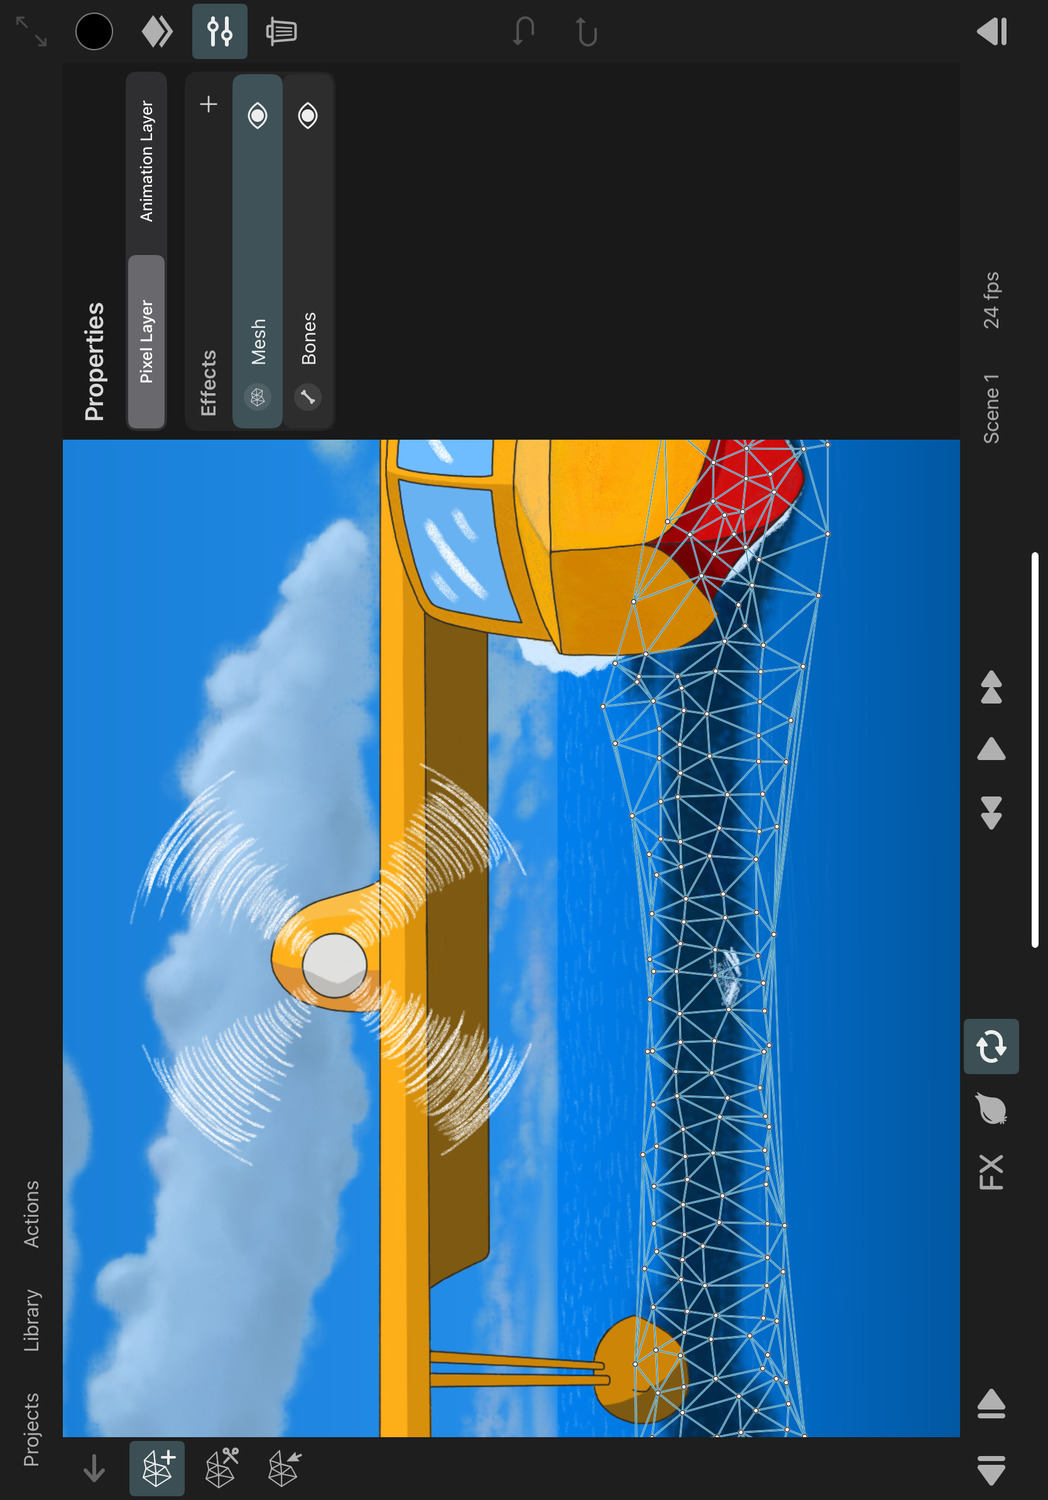
Cut Mesh Tool#
In order to delete triangles and control points from the mesh
- Select the
Cut Mesh Toolin the sidebar. Its icon shows a mesh with a scissors. - Drag across all triangles that you want to delete. Control points that would end up not being connected to any other points are automatically deleted as well.
Transform Mesh Tool#
To move the control points of the mesh
- Select the
Transform Mesh Toolin the sidebar. Its icon shows a mesh with a cursor. - Drag the control points to move them around.
If effects are disabled in the editor when you use the transform mesh tool, the control points are repositioned relative to the layer contents. This is the equivalent of editing the bind pose of a bone rig. The "bind" position of the control points defines how the layer contents should map onto the mesh.
When effects are enabled in the editor, the tool will create keyframes for the control points that you move in order to animate the mesh.
#
Effects
Perspective
The perspective effect distorts the contents of its layer using for corner control points to simulate a perspective transformation.
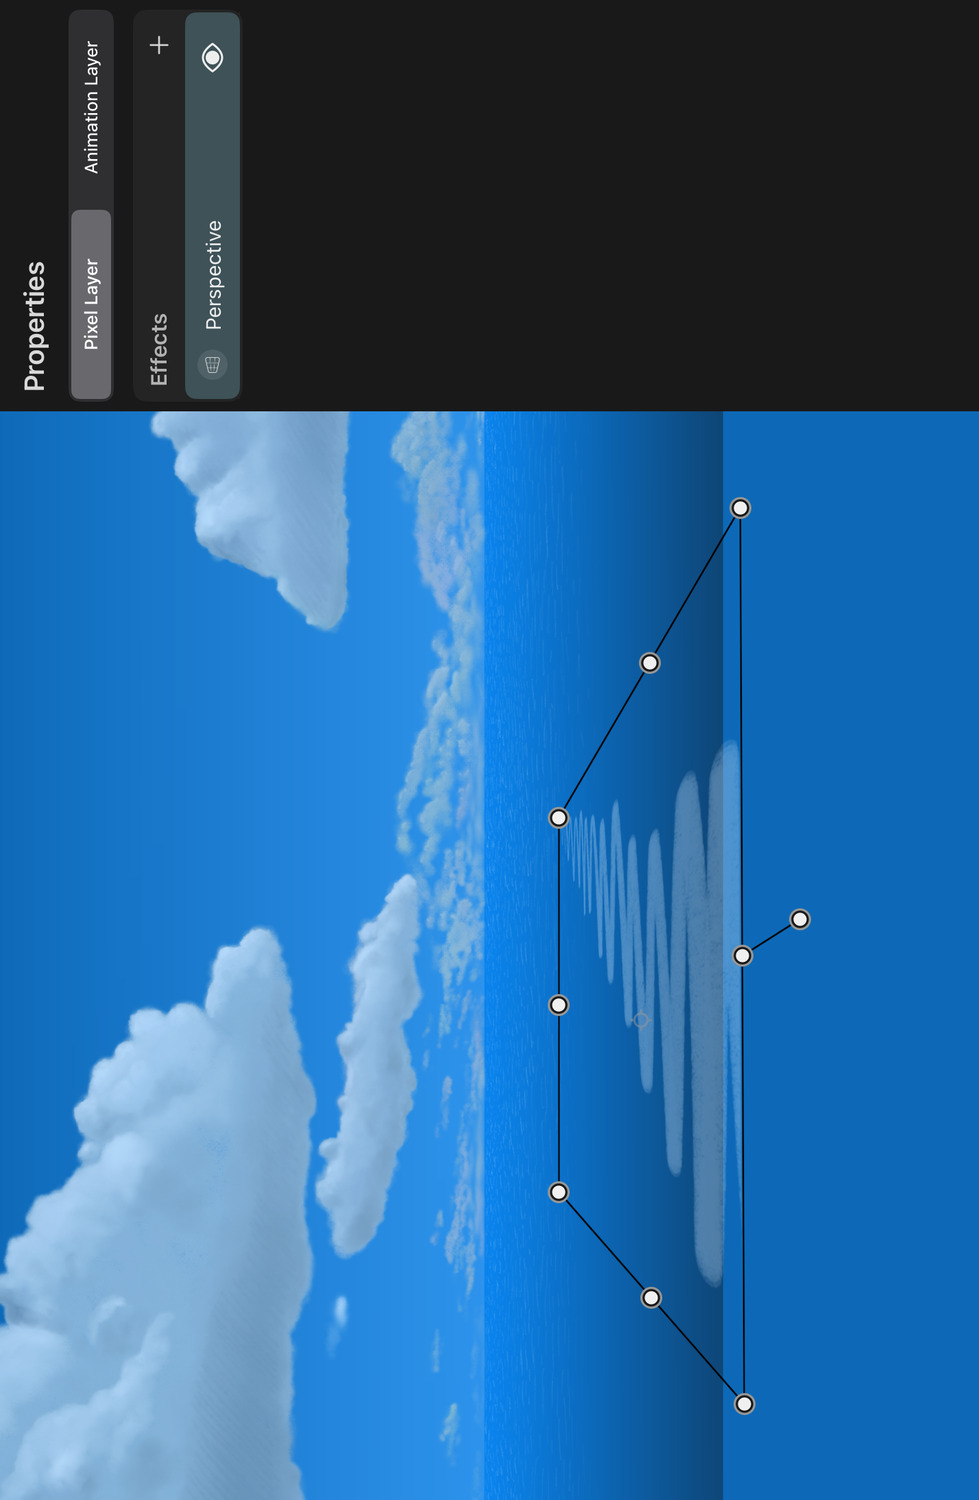
The corner control points can be animated using keyframes
Editing#
When you select the perspective effect, the editor will automatically switch to the perspective scaling mode of the transform tool. This allows you to drag the four corner points or edges of the layer to edit the perspective distortion.
Similarly, if you select the transform tool manually and switch to the perspective scaling mode and the selected layer already has a perspective effect applied, the transform tool will edit this effect.
#
Effects
Warp
The warp effect distorts the contents of its layer using a grid of 16 control points.
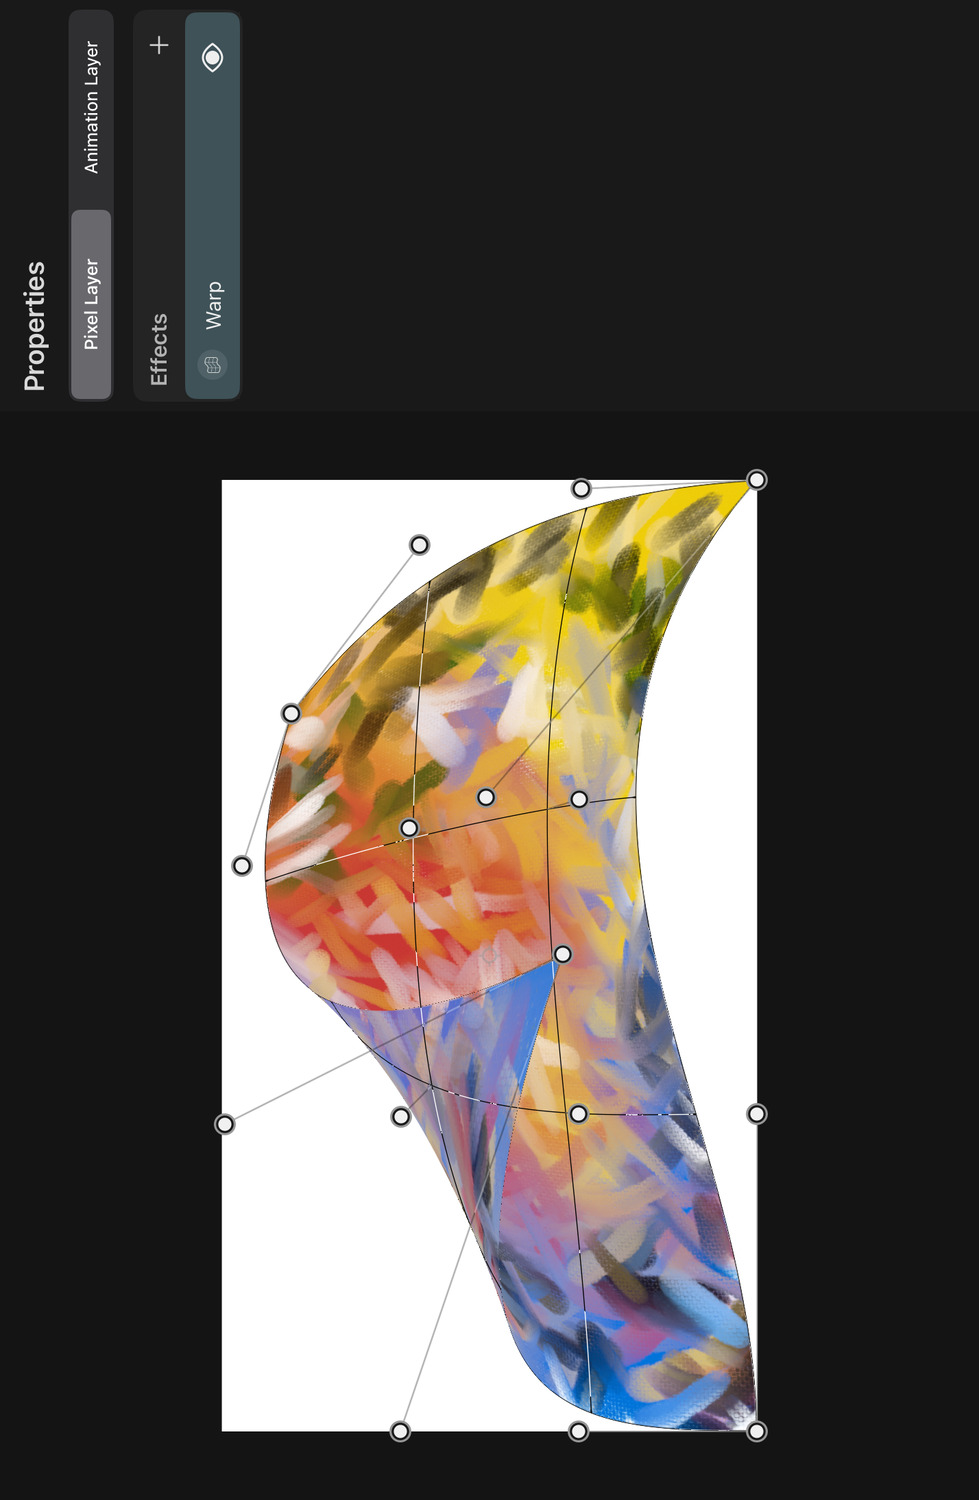
The control points of the warp effect can be animated using keyframes
Editing#
When you select the warp effect, the editor will automatically switch to the warp scaling mode of the transform tool. This allows you to drag the control points to edit the warp distortion.
Similarly, if you select the transform tool manually and switch to the warp scaling mode and the selected layer already has a warp effect applied, the transform tool will edit this effect.
#
Effects
Stroke
The stroke effect adds a stroke to the edges of its layer's contents.

Properties#
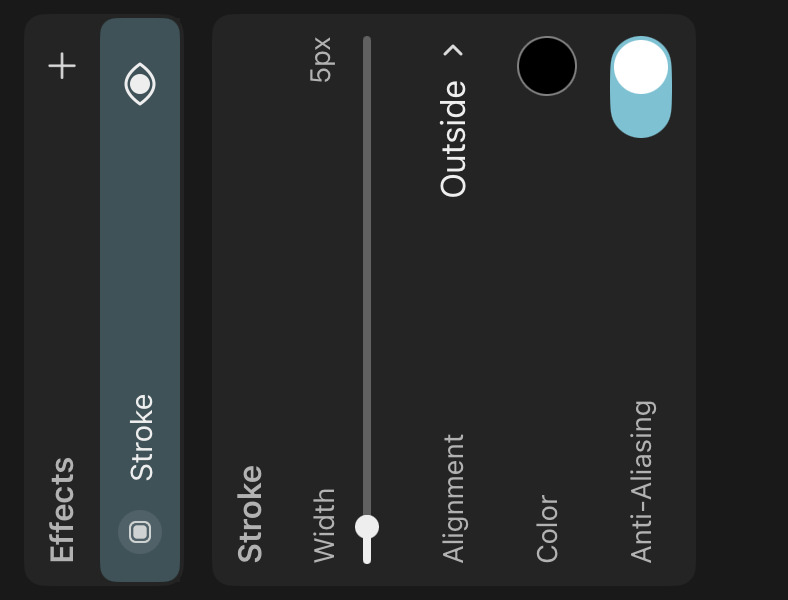
Width#
The width of the stroke.
Note#
The stroke effect can have a large performance impact, which increases with the stroke width. If you do not need the stroke to be dynamically updated or nondestructive, consider rasterizing the stroke effect into the layer contents for better editing performance.
Alignment#
Determines whether the stroke should be drawn outside of, inside of or centered on the edge of the layer contents.
Color#
The color and opacity of the stroke.
Anti-Aliasing#
When enabled, the stroke edges will be smoothed to reduce jagged edges. Disable this option for a sharper, pixelated stroke appearance.
#
Effects
Drop Shadow
The drop shadow effect adds a shadow behind the contents of its layer.
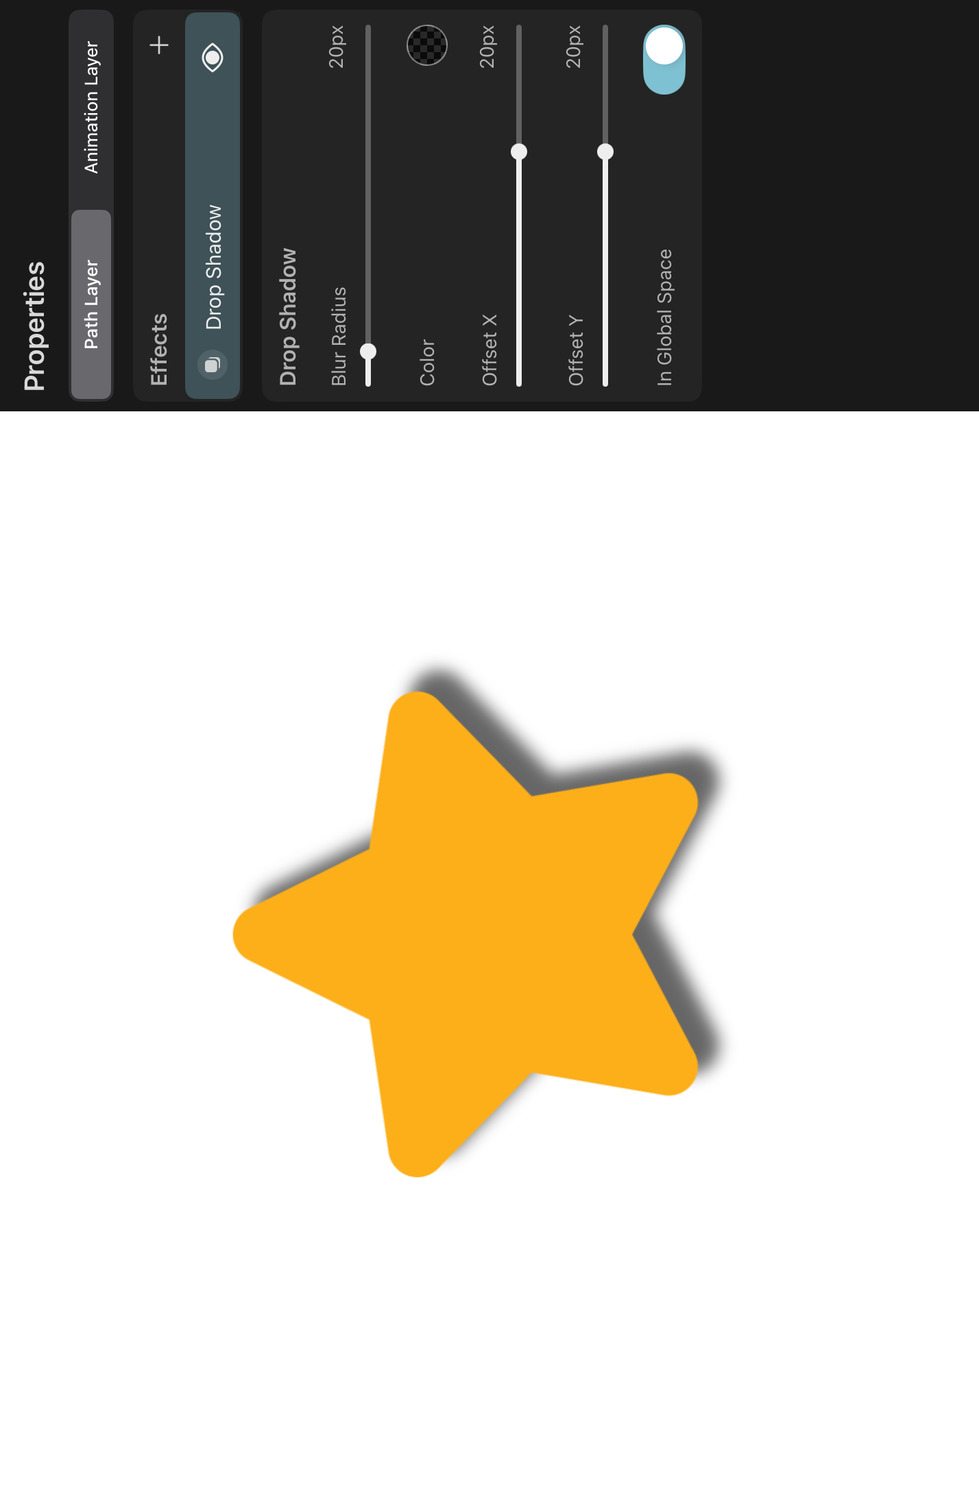
Properties#
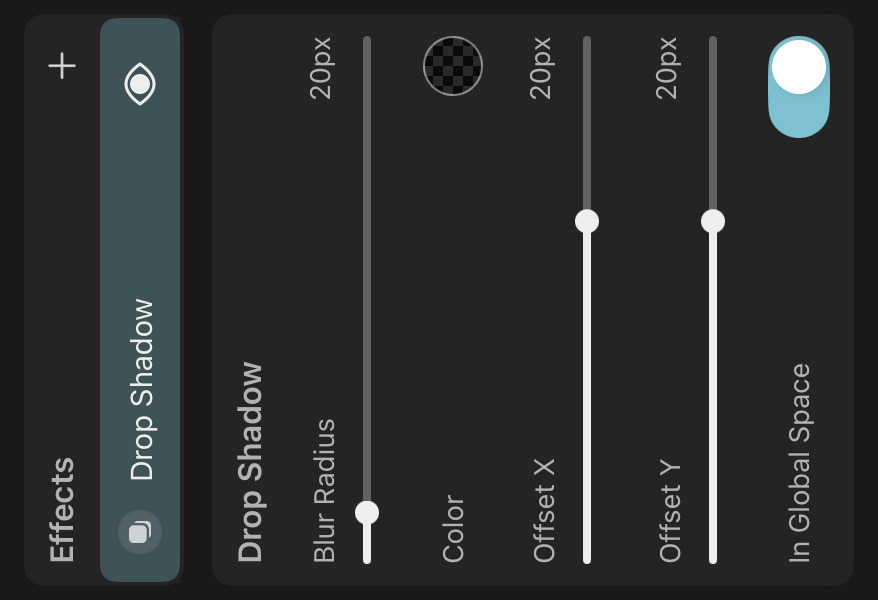
Blur Radius#
How much the shadow should be blurred. Higher values result in a softer shadow.
Color#
The color of the drop shadow.
Offset X and Y#
The horizontal and vertical distance between the layer contents and the shadow.
In Global Space#
When enabled, the shadow's offset direction is relative to the global coordinate system of the scene. This means that the shadow will not rotate or scale when you rotate or scale the layer.
If disabled, the shadow's offset direction is relative to the layer's local coordinate system, meaning that the shadow size and offset will rotate and scale when the layer is rotated or scaled.
#
Effects
Noise
The noise effect combines a random noise signal with one of the layer's properties. This can be used to achieve a variety of effects, such as adding a random jitter to the position or a layer, or adding a flicker to its opacity.
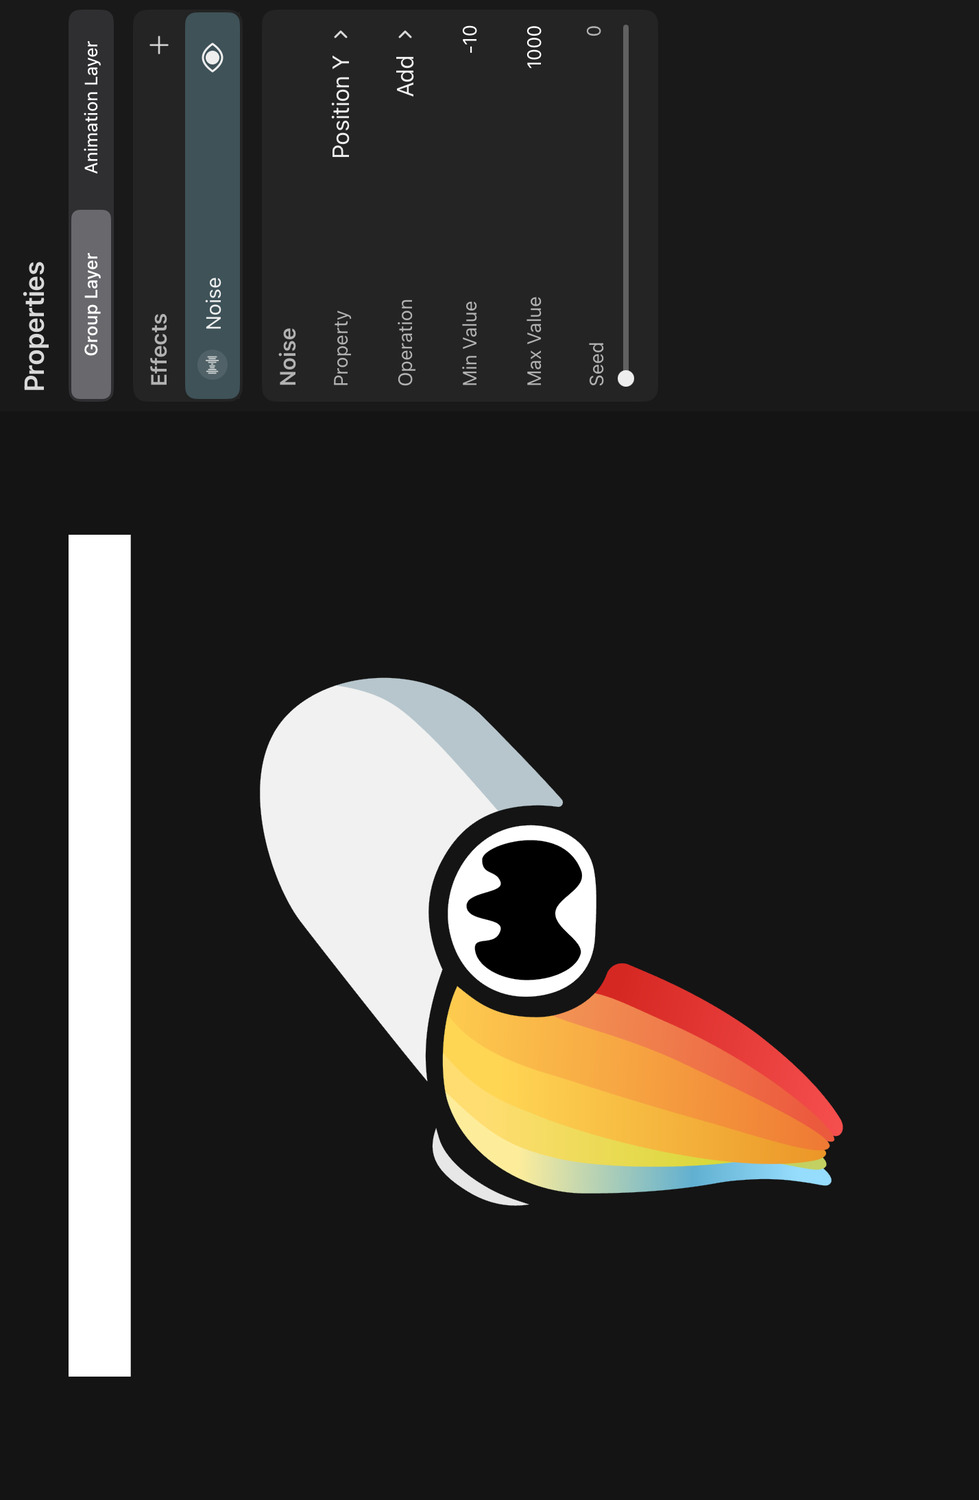
Properties#
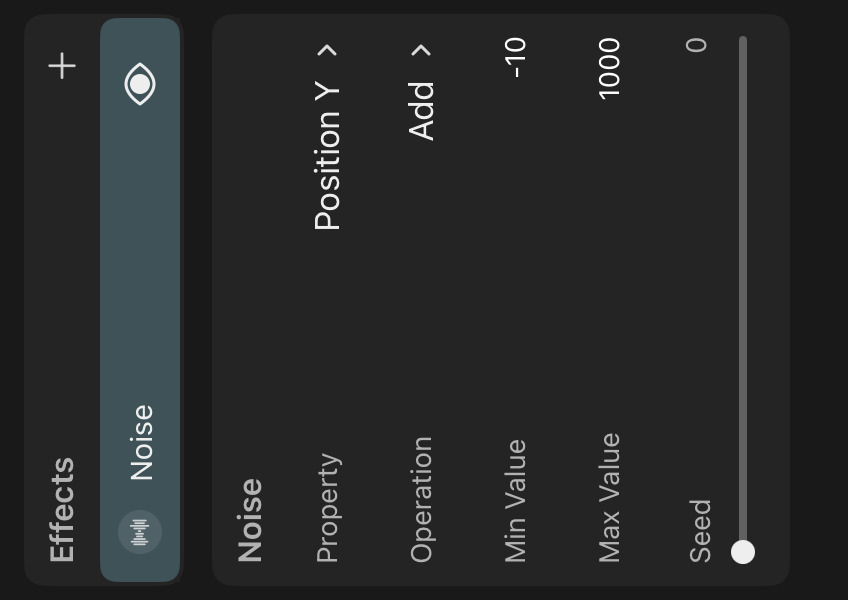
Property#
The layer property that should be combined with the noise signal.
Operation#
How the noise signal should be combined with the property.
Replace#
The noise signal replaces the property value.
Add#
The noise signal is added to the property value.
Multiply#
The noise signal is multiplied with the property value.
Min Value#
The minimum value of the noise signal.
Max Value#
The maximum value of the noise signal.
Seed#
The seed value for random noise generation. Changing the seed changes the noise values on each frame. Two noise effects with the same seed and min and max values will produce the same noise signal.
#
Effects
Orient Along Motion Path
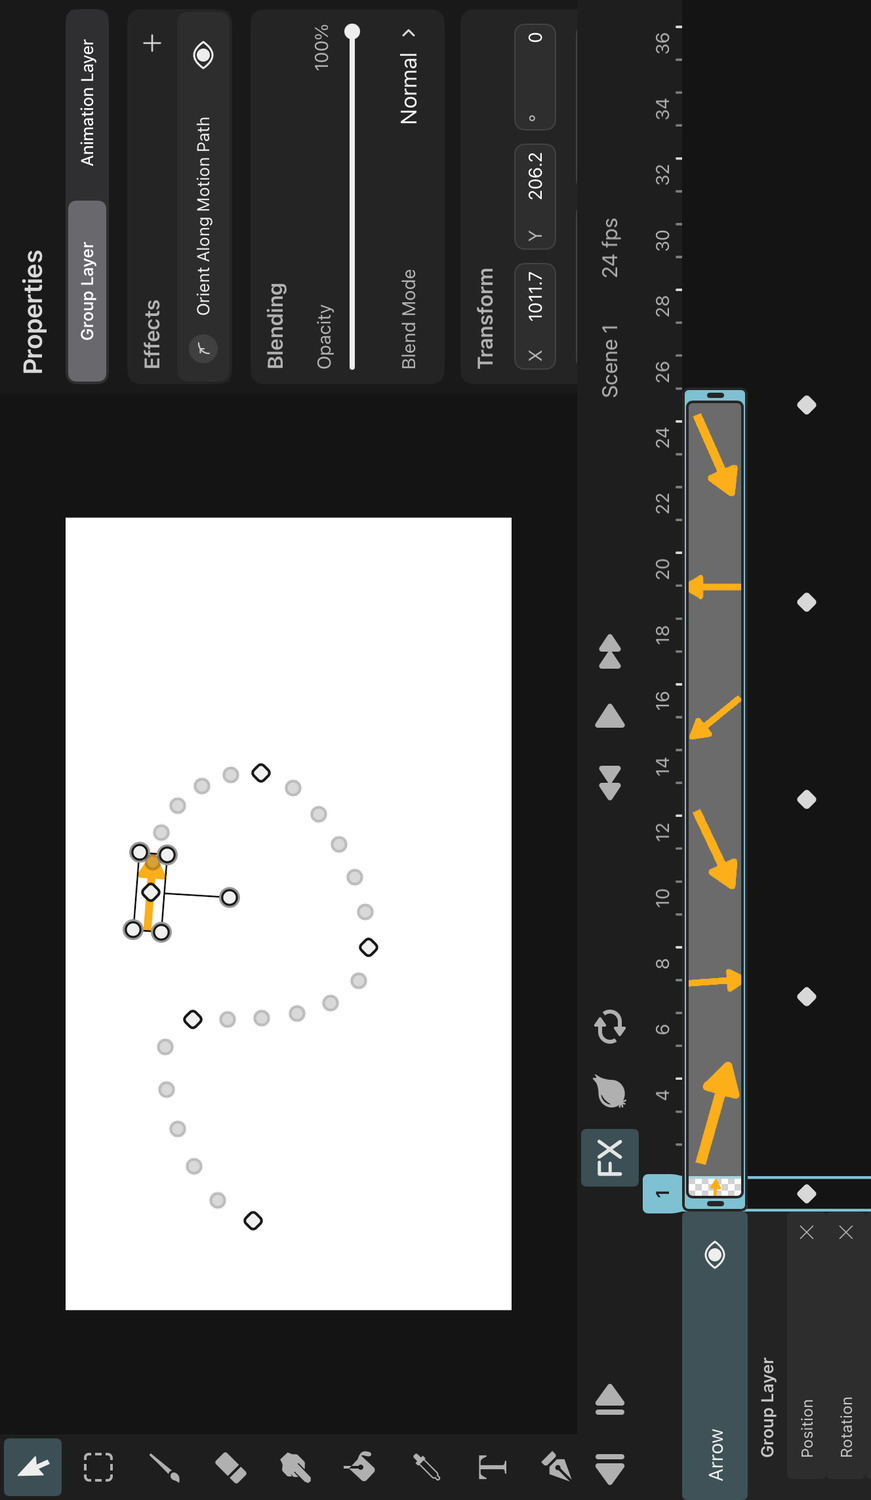
The "Orient Along Motion Path" effect automatically rotates the layer to follow the direction of the layer's motion path.
The layer's manually defined rotation (e.g. via keyframes) is added to the rotation calculated by the effect, so you can still fine-tune the orientation of the layer at any point in time.
The layer has to have at least two Position keyframes for this effect to have any impact.
#
Effects
Spin
The spin effect rotates its layer around the layer's pivot point at an adjustable speed.
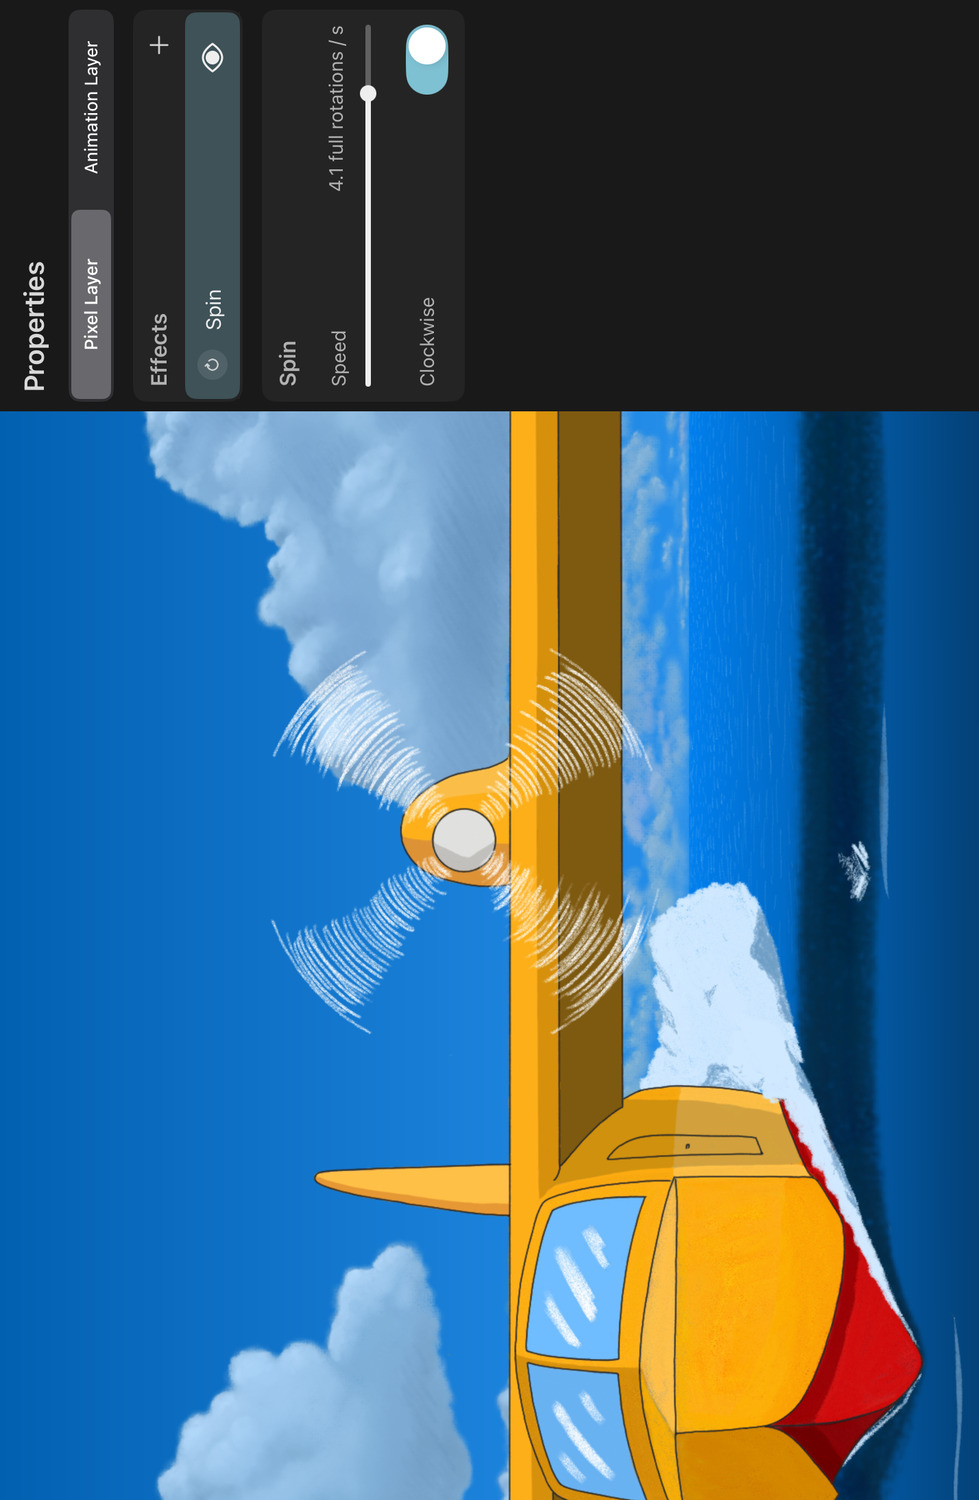
Properties#
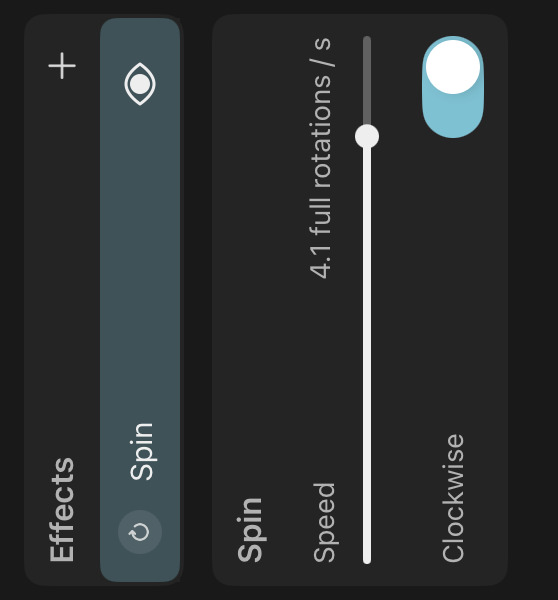
Speed#
The speed at which the layer contents should rotate, specified in full rotations per second. The speed can be animated using keyframes, making it easy to create a ramp-up or ramp-down of the spinning effect.
Clockwise#
Whether the rotation should be clockwise or counter-clockwise.
#
Effects
Parallax
In ToonSquid everything is 2D, so there is no real depth in the scene. The parallax effect can create the illusion of depth by moving its layer in the same direction as the movement of the camera. From the camera's point of view, the layer therefore appears to move slower than other layers without the parallax effect, which makes it appear further away.
Since the parallax effect requires a camera, a new camera layer is automatically added to the scene if necessary when you add the parallax effect to a layer.
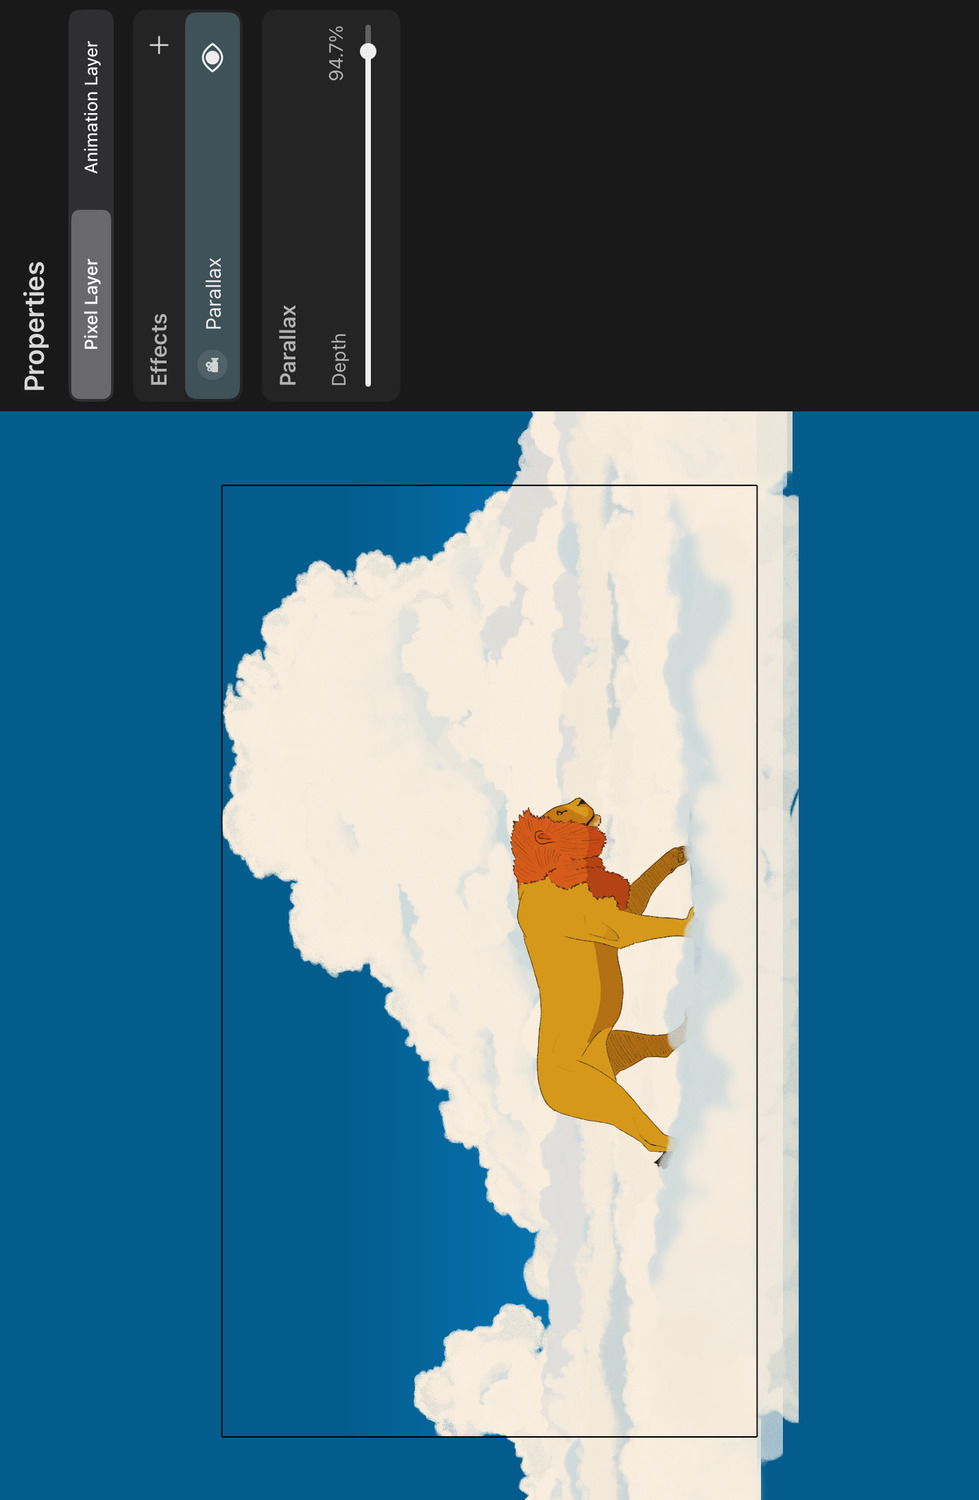
Properties#
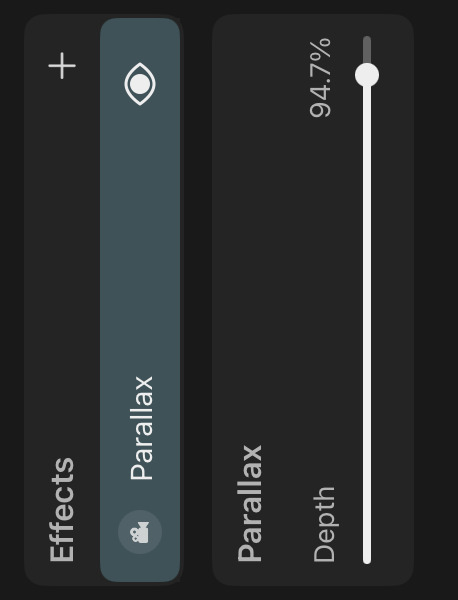
Depth#
How far away the layer should appear to be from the camera. Higher values make the layer move more slowly from the perspective of the camera.
A depth value of 0% is equivalent to a layer without the parallax effect. Layers with a depth value of 100% always appear to be at the same position from the perspective of the camera.
Note that the parallax effect does not change a layer's scale, regardless of the depth value.
Reset the Parallax Origin#
Since the parallax effect applies a position offset to its layer based on the movement of the camera, there is some point in the scene at which the camera is interpreted to not have moved yet. This parallax origin can be reset in the inspector when the camera is selected.
- Select the camera layer in the timeline.
- Move it to the position where no layer with the parallax effect should be shifted.
- Tap the
Reset Parallax Originbutton in the inspector.
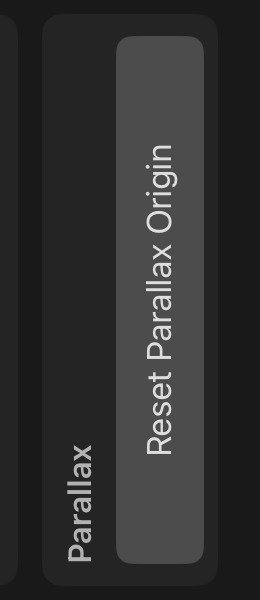
#
Export
Overview
Choose from a variety of widely-supported file formats to export your art and animations and share it outside of ToonSquid.
Video
Exporting your animation as a video is the most natural export option for you to share your work for others to see.
GIF
Export shorter animations as GIFs with a custom quality for easy sharing on the internet.
Image
Export individual frames of your animation as still images in formats such as PNG, JPEG and more.
Image Sequence
You can also export each frame of the animation as a sequence of images.
PSD
Export your ToonSquid animation as a layered PSD file, which can be opened in Adobe® Photoshop® or other compatible software.
Project
Use the export interface to share your ToonSquid project as a file that you can then import on another iPad or keep as a backup.
#
Export
Video
Video formats are the most natural export option for your animations. They are also the only options that allow you to include audio in your export.
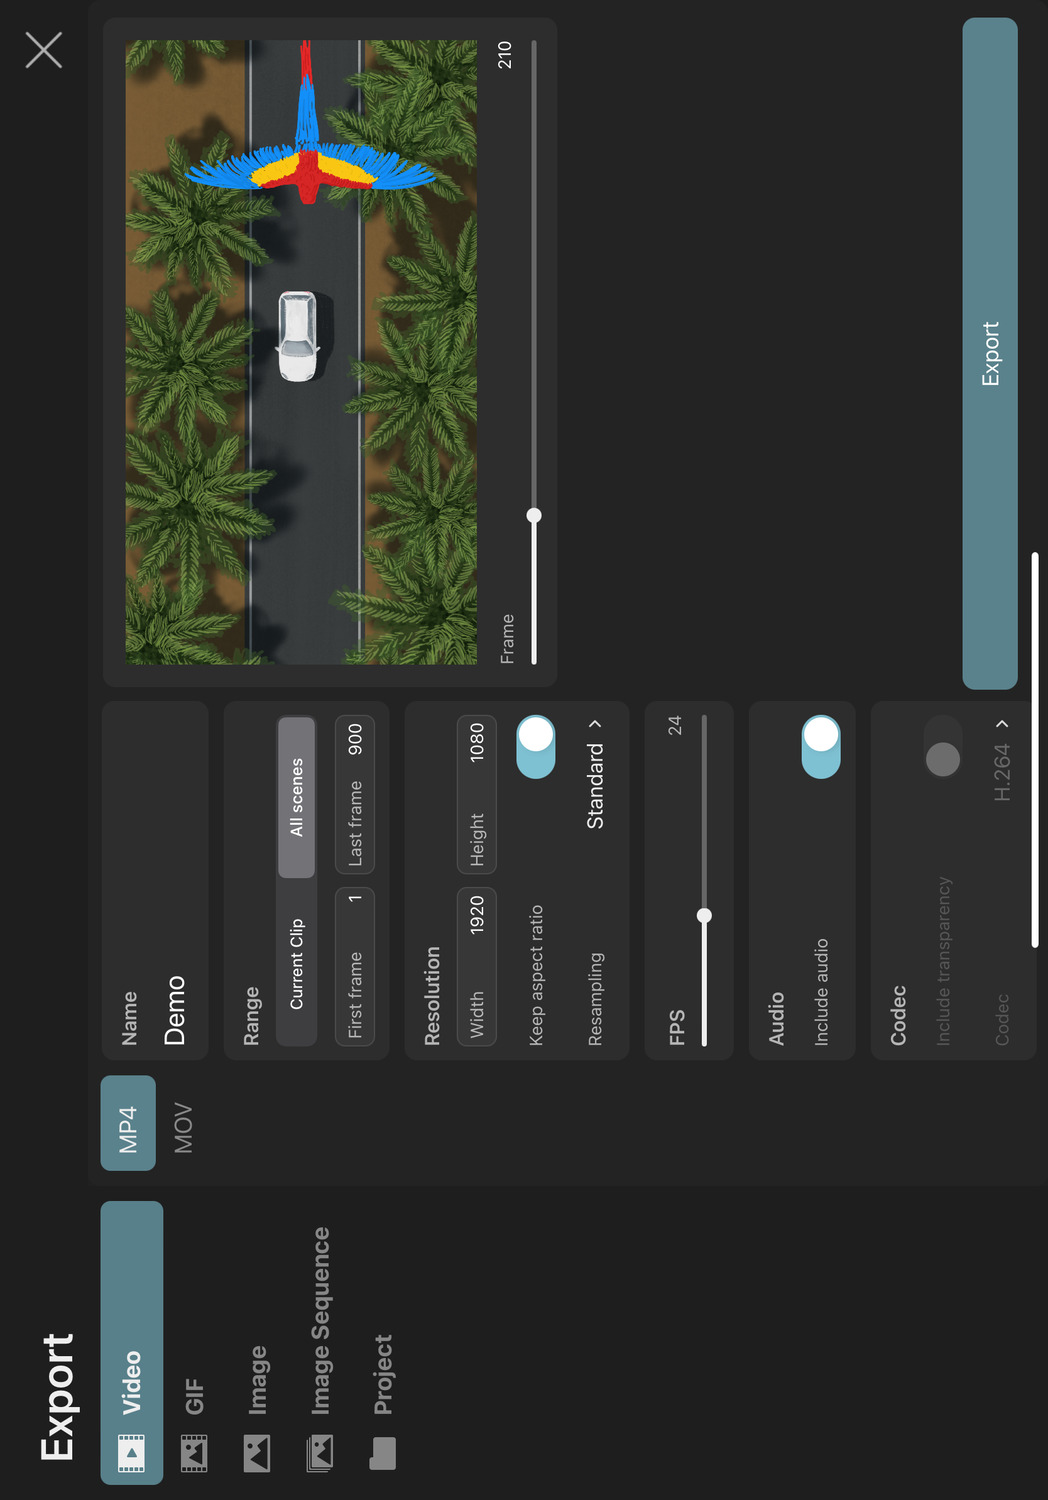
Available File Formats#
You can export your ToonSquid animations as videos in the following formats
- MP4
- MOV
Settings#
Name#
This will be the name of the exported video file.
Range#
Controls which part of your timeline should be exported.
Current Clip#
Only frames from the clip or scene currently selected in the editor should be exported.
All Scenes#
Every scene of the current project should be exported as one video.
First Frame / Last Frame#
The range of frames to be exported.
Resolution#
The resolution of the exported video. Choosing a different value here will simply scale the export and not crop anything. Changing the resolution disproportionately will therefore stretch the animation in the final export.
Keep Aspect Ratio#
Whether changing the resolution's width or height should also update the other value proportionally to keep the current resolution's aspect ratio.
Resampling#
How the animation contents should be rendered and resampled at the export resolution.
Standard#
Vector contents are rasterized at the export resolution, which keeps their edges perfectly sharp and prevents upscaling artifacts.
Pixel contents are scaled using either bilinear interpolation or nearest neighbor interpolation, depending on the magnitude of the scaling factor.
Nearest Neighbor#
The animation is first rendered at the project resolution and then resampled to the export resolution using nearest neighbor interpolation.
The nearest neighbor interpolation is also applied when sampling pixel layer contents during the initial render at the project resolution, which prevents blurring if they are animated with keyframes.
Vector contents other than text are rendered without antialiasing.
Nearest With Sharp Vectors#
Nearest neighbor interpolation is applied when sampling pixel layer contents at the export resolution.
Vector contents - including text - are rasterized at the export resolution as opposed to the project resolution.
Vector contents other than text are rendered without antialiasing.
The Nearest Neighbor and Nearest With Sharp Vectors options are recommended when exporting pixel art.
Fps#
The frame rate of the exported video.
Choosing a different frame rate here will not cause the animation to be slowed down or sped up in the export. The animation will be resampled to match the desired output frame rate.
Include Audio#
Whether any audio should be included in the exported video. This option is only shown if there is an audio layer in the animation.
Include Transparency#
Whether the exported video should include transparency information for each pixel using the H.265 (HEVC) or ProRes 4444 codecs. See the Codec section below for more detailed information about the different codecs.
Codec#
The codec of the exported video. Not all codecs are supported on all devices and this codec selection option is only displayed if your iPad supports both HEVC and ProRes 4444.
H.264is the only codec supported by theMP4file format. It results in small file sizes but does not support transparency.HEVC/H.265requires theMOVfile type, supports transparency and results in relatively small file sizes. Encoding videos with the HEVC codec is only supported on devices with an A10 chip or above. Transparent videos with this codec are sometimes not supported in other applications.ProRes 4444is a high-quality codec that supports transparency but results in rather large file sizes. It is often better supported by other applications than HEVC. Encoding videos with this codec requires at least iOS 15 and hardware encoding support by your iPad.
Premultiplied Alpha#
Videos with transparency are exported with premultiplied alpha. If you import these videos into other video processing software and see dark edges around the visible elements in the video, this is caused by that application not recognizing premultiplied alpha correctly. If the software lets you configure how the imported video should be interpreted with regards to its alpha channel, you need to change the interpretation mode from straight alpha to premultiplied alpha.
Anti-Aliasing Quality#
The quality of the anti-aliasing that should be applied to the rendered export output to avoid jagged edges and other aliasing artefacts. Higher quality settings result in smoother edges but also significantly increase the export time.
Note that anti-aliasing is only applied to a frame if necessary, e.g. when it contains vector contents or certain effects, so this setting has no impact on scenes without such contents.
Reset#
Use this button to reset all settings back to their defaults.
Preview#
You can use the frame slider under the preview on the right to preview the range of the animation that will be exported.
#
Export
GIF
The GIF image format is commonly encountered on the internet and is supported by web browsers. It can be a good choice for exporting short animations without sound.
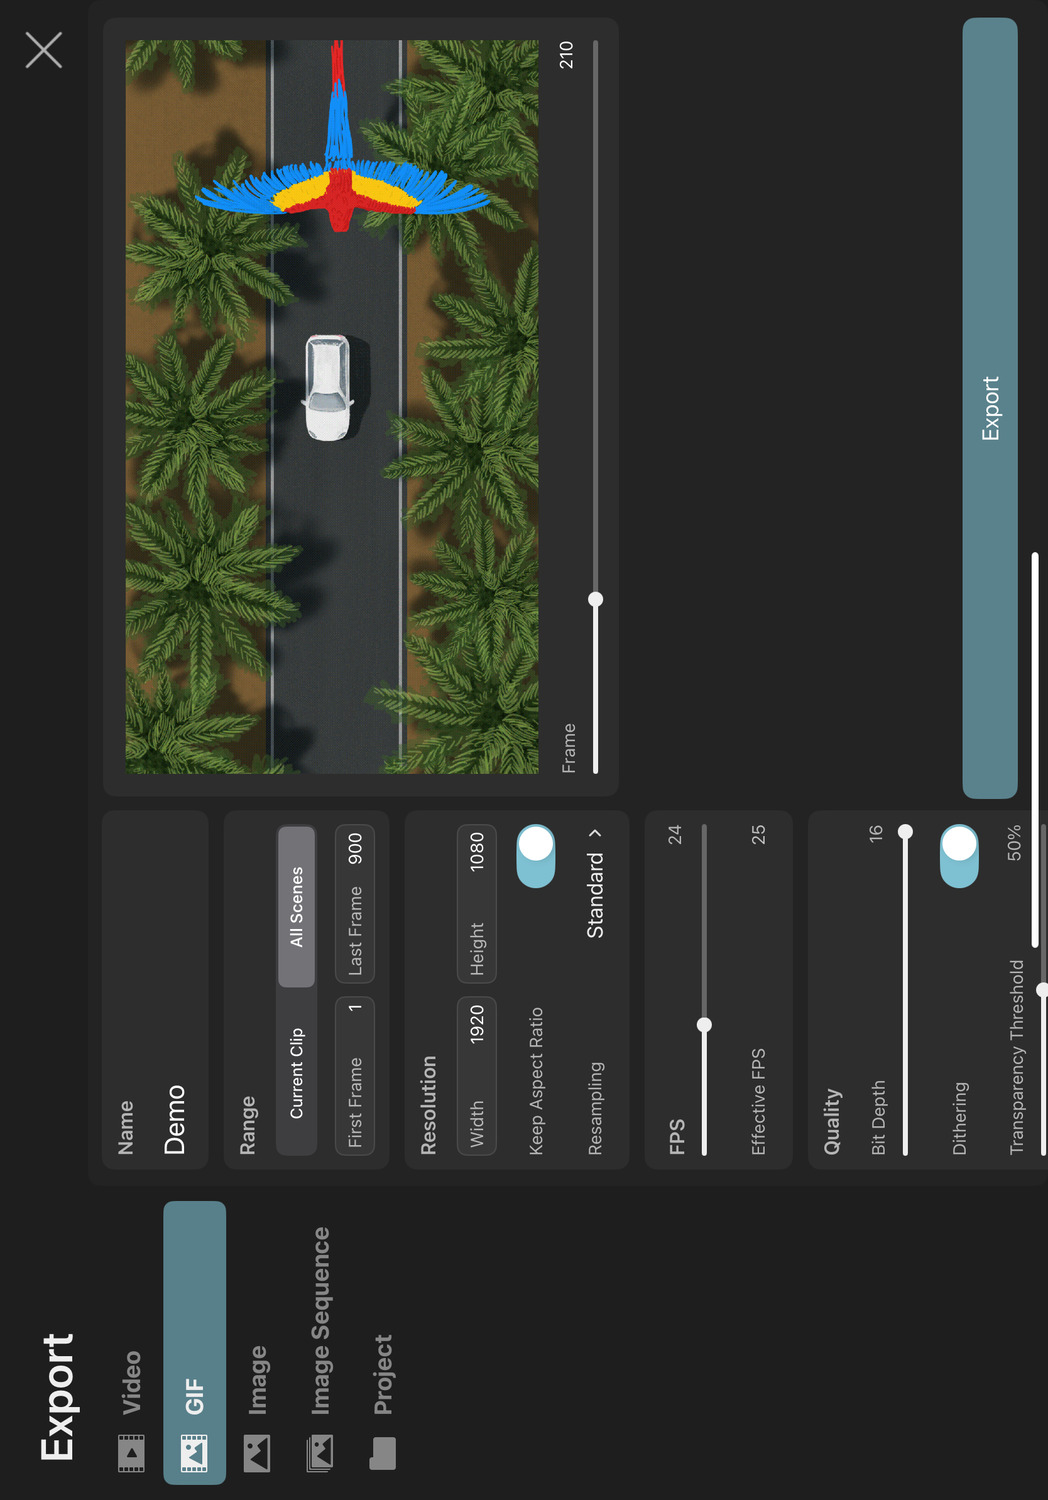
Limitations#
This format does not support semi-transparent pixels (i.e. pixels are either fully opaque or fully transparent) and it does not support audio.
Long and high-resolution animations can lead to very large files, so it is not recommended in this case.
Settings#
Name#
This will be the name of the exported GIF file.
Range#
Controls which part of your timeline should be exported.
Current Clip#
Only frames from the clip or scene currently selected in the editor should be exported.
All Scenes#
Every scene of the current project should be exported as one GIF.
First Frame / Last Frame#
The range of frames to be exported.
Resolution#
The resolution of the exported GIF. Choosing a different value here will simply scale the export and not crop anything. Changing the resolution disproportionately will therefore stretch the animation in the final export.
Tip#
Choose a low resolution if you are trying to reduce the size of the exported GIF.
Keep Aspect Ratio#
Whether changing the resolution's width or height should also update the other value proportionally to keep the current resolution's aspect ratio.
Resampling#
How the animation contents should be rendered and resampled at the export resolution.
Standard#
Vector contents are rasterized at the export resolution, which keeps their edges perfectly sharp and prevents upscaling artifacts.
Pixel contents are scaled using either bilinear interpolation or nearest neighbor interpolation, depending on the magnitude of the scaling factor.
Nearest Neighbor#
The animation is first rendered at the project resolution and then resampled to the export resolution using nearest neighbor interpolation.
The nearest neighbor interpolation is also applied when sampling pixel layer contents during the initial render at the project resolution, which prevents blurring if they are animated with keyframes.
Vector contents other than text are rendered without antialiasing.
Nearest With Sharp Vectors#
Nearest neighbor interpolation is applied when sampling pixel layer contents at the export resolution.
Vector contents - including text - are rasterized at the export resolution as opposed to the project resolution.
Vector contents other than text are rendered without antialiasing.
The Nearest Neighbor and Nearest With Sharp Vectors options are recommended when exporting pixel art.
FPS#
The frame rate of the exported GIF.
Choosing a different frame rate here will not cause the animation to be slowed down or sped up in the export. The animation will be resampled to match the desired output frame rate.
Effective FPS#
The GIF format does not support arbitrary frame rates, so the user-chosen value is rounded to the closest supported frame rate. This label shows the actual frame rate that the exported GIF will have.
Tip#
Choose a low frame rate if you are trying to reduce the size of the exported GIF.
Quality#
The quality settings that can be used to reduce the visual quality of the GIF in favor of reducing the file size or reducing export times.
Bit Depth#
The bit depth to use for each pixel. Choosing higher values results in a better quality GIF and larger file size, whereas lower values will result in lower quality but also smaller files.
Dithering#
Dithering refers to the use of dot patterns to emulate more colors and gradients with fewer distinct colors stored in the GIF.
If this option is enabled, the visual output quality is significantly improved, but the export takes slightly more time to complete.
Transparency Threshold#
Each pixel in a GIF can only be either fully transparent or fully opaque. Every pixel of your animation whose original transparency is above this limit will be fully opaque in the exported GIF and all other pixels will be invisible.
Setting this to 0% will cause all fully-transparent pixels of your animation to be black in the export.
Anti-Aliasing Quality#
The quality of the anti-aliasing that should be applied to the rendered export output to avoid jagged edges and other aliasing artefacts. Higher quality settings result in smoother edges but also significantly increase the export time.
Note that anti-aliasing is only applied to a frame if necessary, e.g. when it contains vector contents or certain effects, so this setting has no impact on scenes without such contents.
Reset#
Use this button to reset all settings back to their defaults.
Preview#
You can use the frame slider under the preview on the right to preview the range of the animation that will be exported.
#
Export
Image
You can export individual frames of your animation as still images.
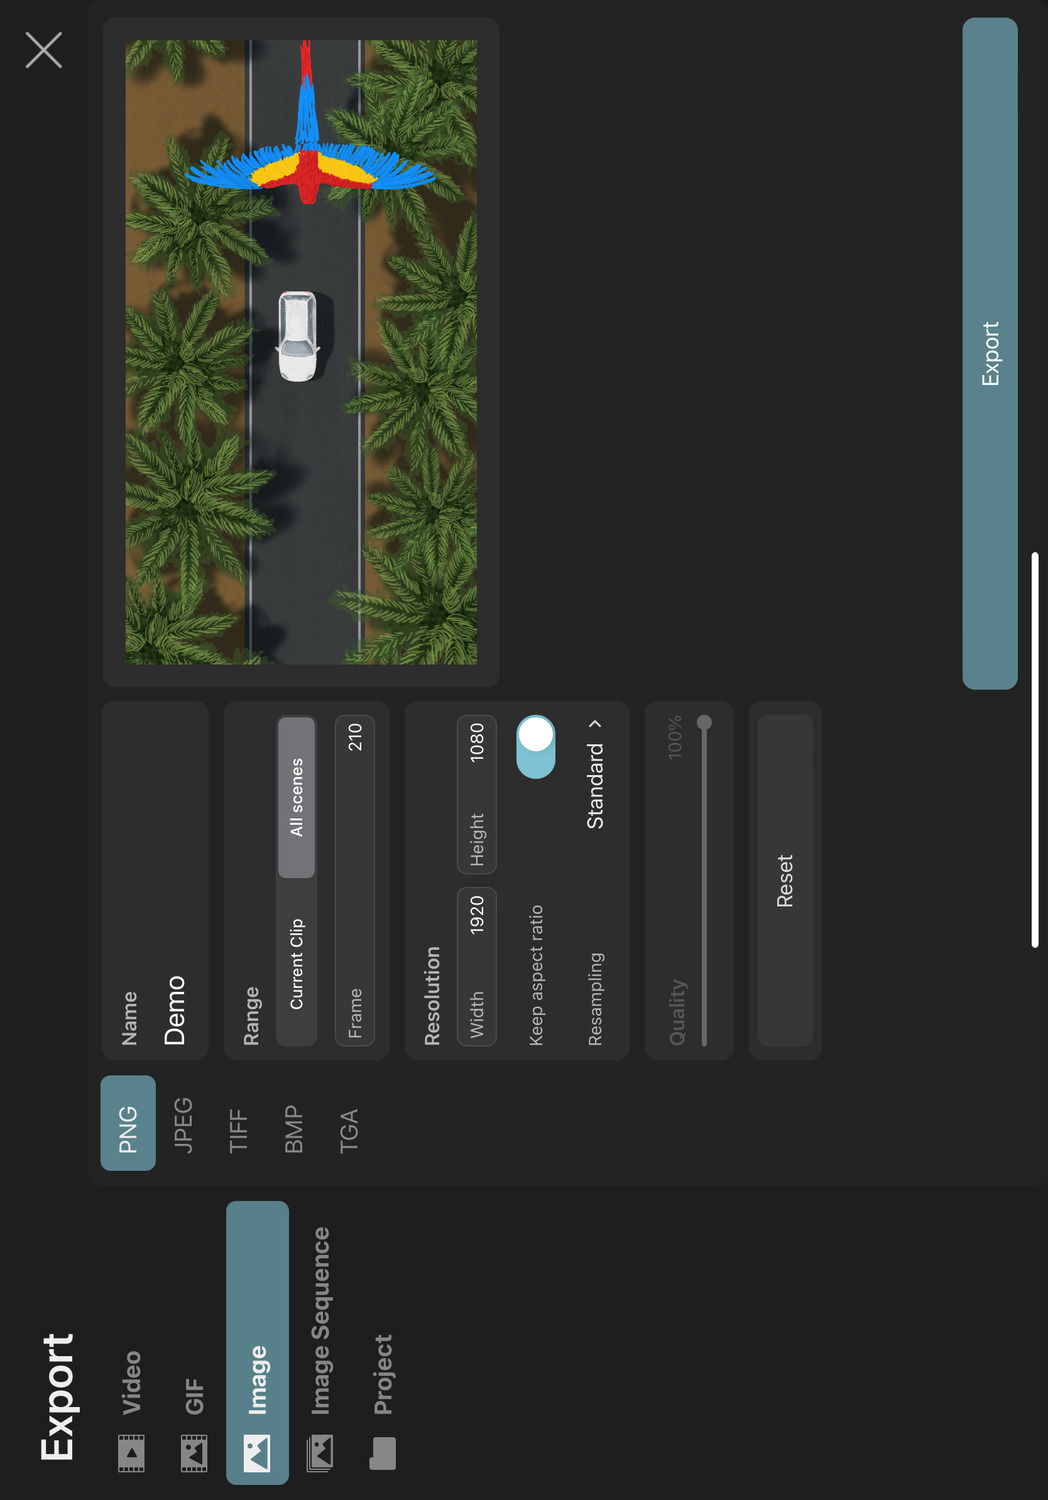
Available File Formats#
You can export your ToonSquid animation as images in the following formats
- PNG
- JPEG (no transparency)
- TIFF
- BMP (no transparency)
- TGA
Settings#
Name#
This will be the name of the exported image file.
Range#
Controls which part of your timeline should be exported.
Current Clip#
The frame specified below only refers to the clip or scene currently selected in the editor.
All Scenes#
The frame specified below refers to the range of all scenes in the current project.
Frame#
The frame of the animation to be exported.
Resolution#
The resolution of the exported image. Choosing a different value here will simply scale the export and not crop anything. Changing the resolution disproportionately will therefore stretch the animation in the final export.
Keep Aspect Ratio#
Whether changing the resolution's width or height should also update the other value proportionally to keep the current resolution's aspect ratio.
Resampling#
How the animation contents should be rendered and resampled at the export resolution.
Standard#
Vector contents are rasterized at the export resolution, which keeps their edges perfectly sharp and prevents upscaling artifacts.
Pixel contents are scaled using either bilinear interpolation or nearest neighbor interpolation, depending on the magnitude of the scaling factor.
Nearest Neighbor#
The animation is first rendered at the project resolution and then resampled to the export resolution using nearest neighbor interpolation.
The nearest neighbor interpolation is also applied when sampling pixel layer contents during the initial render at the project resolution, which prevents blurring if they are animated with keyframes.
Vector contents other than text are rendered without antialiasing.
Nearest With Sharp Vectors#
Nearest neighbor interpolation is applied when sampling pixel layer contents at the export resolution.
Vector contents - including text - are rasterized at the export resolution as opposed to the project resolution.
Vector contents other than text are rendered without antialiasing.
The Nearest Neighbor and Nearest With Sharp Vectors options are recommended when exporting pixel art.
Quality#
The quality slider controls the amount of JPEG compression that should be applied to the exported image. Setting it to 100% results in the highest quality output but also the largest file size, whereas setting it to 0% results in the smallest file sizes but also the worst visual quality.
Anti-Aliasing Quality#
The quality of the anti-aliasing that should be applied to the rendered export output to avoid jagged edges and other aliasing artefacts. Higher quality settings result in smoother edges but also significantly increase the export time.
Note that anti-aliasing is only applied to a frame if necessary, e.g. when it contains vector contents or certain effects, so this setting has no impact on scenes without such contents.
Reset#
Use this button to reset all settings back to their defaults.
#
Export
Image Sequence
You can export your ToonSquid animation as a sequence of images - one for each frame.
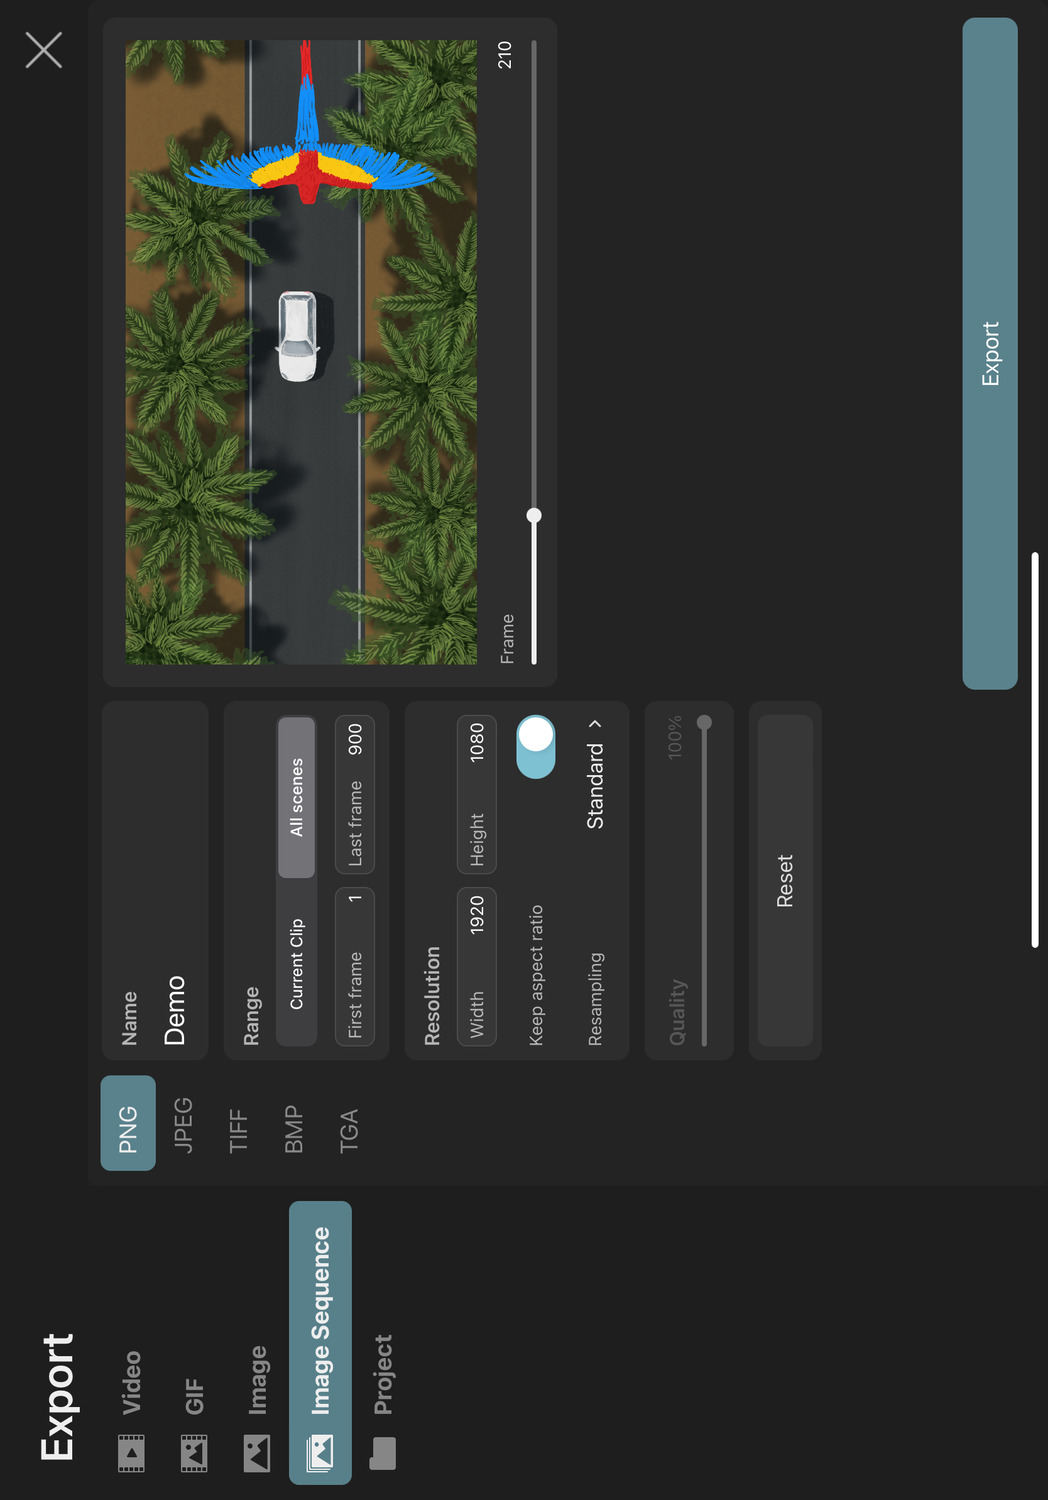
Available File Formats#
You can export your ToonSquid animation as images in the following formats
- PNG
- JPEG (no transparency)
- TIFF
- BMP (no transparency)
- TGA
Settings#
Name#
This will be the name of the exported image file.
Range#
Controls which part of your timeline should be exported.
Current Clip#
Only frames from the clip or scene currently selected in the editor should be exported.
All Scenes#
Every scene of the current project should be exported.
First Frame / Last Frame#
The range of frames to be exported.
Resolution#
The resolution of the exported images. Choosing a different value here will simply scale the export and not crop anything. Changing the resolution disproportionately will therefore stretch the animation in the final export.
Keep Aspect Ratio#
Whether changing the resolution's width or height should also update the other value proportionally to keep the current resolution's aspect ratio.
Resampling#
How the animation contents should be rendered and resampled at the export resolution.
Standard#
Vector contents are rasterized at the export resolution, which keeps their edges perfectly sharp and prevents upscaling artifacts.
Pixel contents are scaled using either bilinear interpolation or nearest neighbor interpolation, depending on the magnitude of the scaling factor.
Nearest Neighbor#
The animation is first rendered at the project resolution and then resampled to the export resolution using nearest neighbor interpolation.
The nearest neighbor interpolation is also applied when sampling pixel layer contents during the initial render at the project resolution, which prevents blurring if they are animated with keyframes.
Vector contents other than text are rendered without antialiasing.
Nearest With Sharp Vectors#
Nearest neighbor interpolation is applied when sampling pixel layer contents at the export resolution.
Vector contents - including text - are rasterized at the export resolution as opposed to the project resolution.
Vector contents other than text are rendered without antialiasing.
The Nearest Neighbor and Nearest With Sharp Vectors options are recommended when exporting pixel art.
Quality#
The quality slider controls the amount of JPEG compression that should be applied to the exported image. Setting it to 100% results in the highest quality output but also the largest file size, whereas setting it to 0% results in the smallest file sizes but also the worst visual quality.
Anti-Aliasing Quality#
The quality of the anti-aliasing that should be applied to the rendered export output to avoid jagged edges and other aliasing artefacts. Higher quality settings result in smoother edges but also significantly increase the export time.
Note that anti-aliasing is only applied to a frame if necessary, e.g. when it contains vector contents or certain effects, so this setting has no impact on scenes without such contents.
Only Export Drawings#
If this option is enabled, each drawing will be exported as a separate image file. If a drawing lasts for more than one frame, only its first frame will be exported.
Each exported image's name is prefixed with the name of the animation layer that the drawing is in.
Reset#
Use this button to reset all settings back to their defaults.
Preview#
You can use the frame slider under the preview on the right to preview the range of the animation that will be exported.
#
Export
PSD
You can export your ToonSquid animation as a layered PSD file, which can be opened in Adobe® Photoshop® or other compatible software.
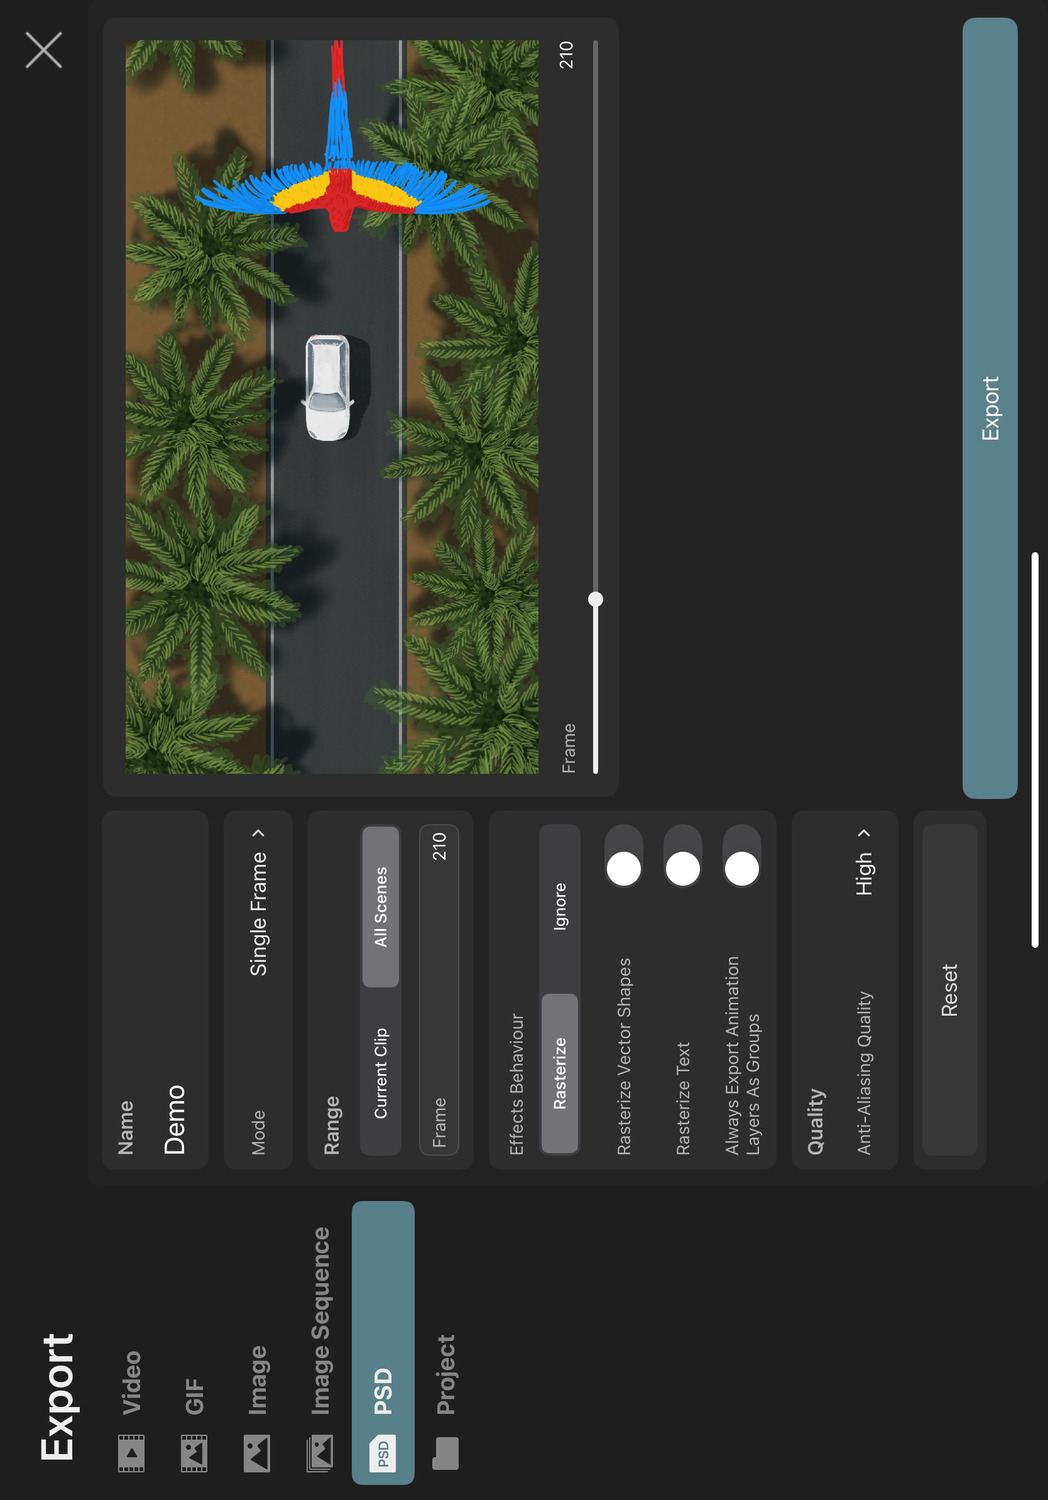
Settings#
Name#
This will be the name of the exported file.
Mode#
Controls how the animation should be exported using the PSD file format.
Single Frame#
A single selected frame of the animation will be exported as a static layered PSD file.
Frame Timeline#
The layered contents of each frame of the ToonSquid animation will be exported and placed in separate layer groups in an animated PSD file with a "frame timeline". This allows you to play the animation in Adobe® Photoshop®.
Video Timeline#
The layered content of the ToonSquid animation will be exported as an animated PSD file with a "video timeline". This allows you to play the animation in Adobe® Photoshop®.
PSD Sequence#
Each frame of the ToonSquid animation will be exported as a separate layered PSD file. The resulting PSD files are combined into a ZIP archive.
Range#
Controls which part of your timeline should be exported.
Current Clip#
Only frames from the clip or scene currently selected in the editor should be exported.
All Scenes#
Every scene of the current project should be exported.
Frame#
The frame of the animation to be exported when the export mode is Single Frame.
First Frame / Last Frame#
The range of frames to be exported. These options are only available when the export mode is Frame Timeline or PSD Sequence.
Effects Behaviour#
Controls how layers with effects should be exported.
Rasterize#
Layers with effects will be rasterized (and flattened if necessary) and exported as pixel layers. This keeps the effect appearance intact.
Ignore#
Effects will be ignored when exporting the PSD. The effect appearance is lost, but the original layer contents and structure are preserved.
Rasterize Vector Shapes#
Whether vector shapes (from path layers and vector layers) should be rasterized and exported as pixel layers in the PSD. This can be useful if the software you want to import the PSD into has compatibility issues with shape layers. With vector layers in particular, enabling this setting also ensures that you end up with a single layer for each vector layer in the PSD, instead of a group of vector shapes.
Rasterize Text#
Whether text layers should be rasterized and exported as pixel layers in the PSD. This can be useful if the software you want to import the PSD into has compatibility issues with text layers.
Always Export Animation Layers As Groups#
By default, ToonSquid will only convert animation layers to group layers in the PSD if the blending properties of the animation layer modify the appearance of the drawing layers inside. Enable this setting to represent every animation layer as a group layer in the PSD.
Anti-Aliasing Quality#
The quality of the anti-aliasing that should be applied to the rendered export output to avoid jagged edges and other aliasing artefacts. Higher quality settings result in smoother edges but also significantly increase the export time.
Note that anti-aliasing is only applied to a frame if necessary, e.g. when it contains vector contents or certain effects, so this setting has no impact on scenes without such contents.
Reset#
Use this button to reset all settings back to their defaults.
Limitations#
Since the PSD format is a third-party file format designed for Adobe® Photoshop® and not specifically for ToonSquid, there are some compatibility limitations to be aware of. Not all of ToonSquid's features can be exported to PSD:
- Gradient fills or strokes in shape layers don't support custom gradient positions, so gradients might look different in the exported PSD than in ToonSquid.
- In Adobe® Photoshop®, group layers cannot be masked to other layers. Such group layer masking configurations in ToonSquid will not be masked in the exported PSD.
- The
Video Timelineexport mode does not include ToonSquid keyframes. Each drawing in the exported video timeline will show the first frame of the corresponding ToonSquid drawing, so this mode is generally best suited for animations that do not use keyframes. - Drawings with multiple drawing layers will be flattened to a single pixel layer in the exported PSD when using the video timeline export mode.
- When a shape layer has multiple subpaths with fills and strokes, Adobe® Photoshop® treats the subpaths as closed and draws the stroke all the way around, regardless of whether the subpaths are actually open or closed.
- Vector layers in ToonSquid are exported as groups of shape layers in the PSD. Consider enabling the
Rasterize Vector Shapessetting to export each vector layer as a single pixel layer instead. - ToonSquid animations with lots of layers and / or vector shapes might exceed the PSD's layer limit, in particular when exporting using the
Frame Timelinemode, in which case the export will fail. If you encounter this issue, consider reducing the number of layers in your ToonSquid animation or exporting using theSingle FrameorPSD Sequencemodes instead. If you are using vector layers, consider enabling theRasterize Vector Shapessetting to reduce the number of generated shape layers in the exported PSD. - Hidden or inverted mask layers are not supported and behave like regular visible mask layers in the exported PSD.
#
Export
Project
The Project tab allows you to export the current project as a .tsproj file. This can be used as a backup or to later import the project on a different iPad.
There are no configuration options available when you export the entire project.
This page instead shows general information about your project, for example, the size of the project folder.
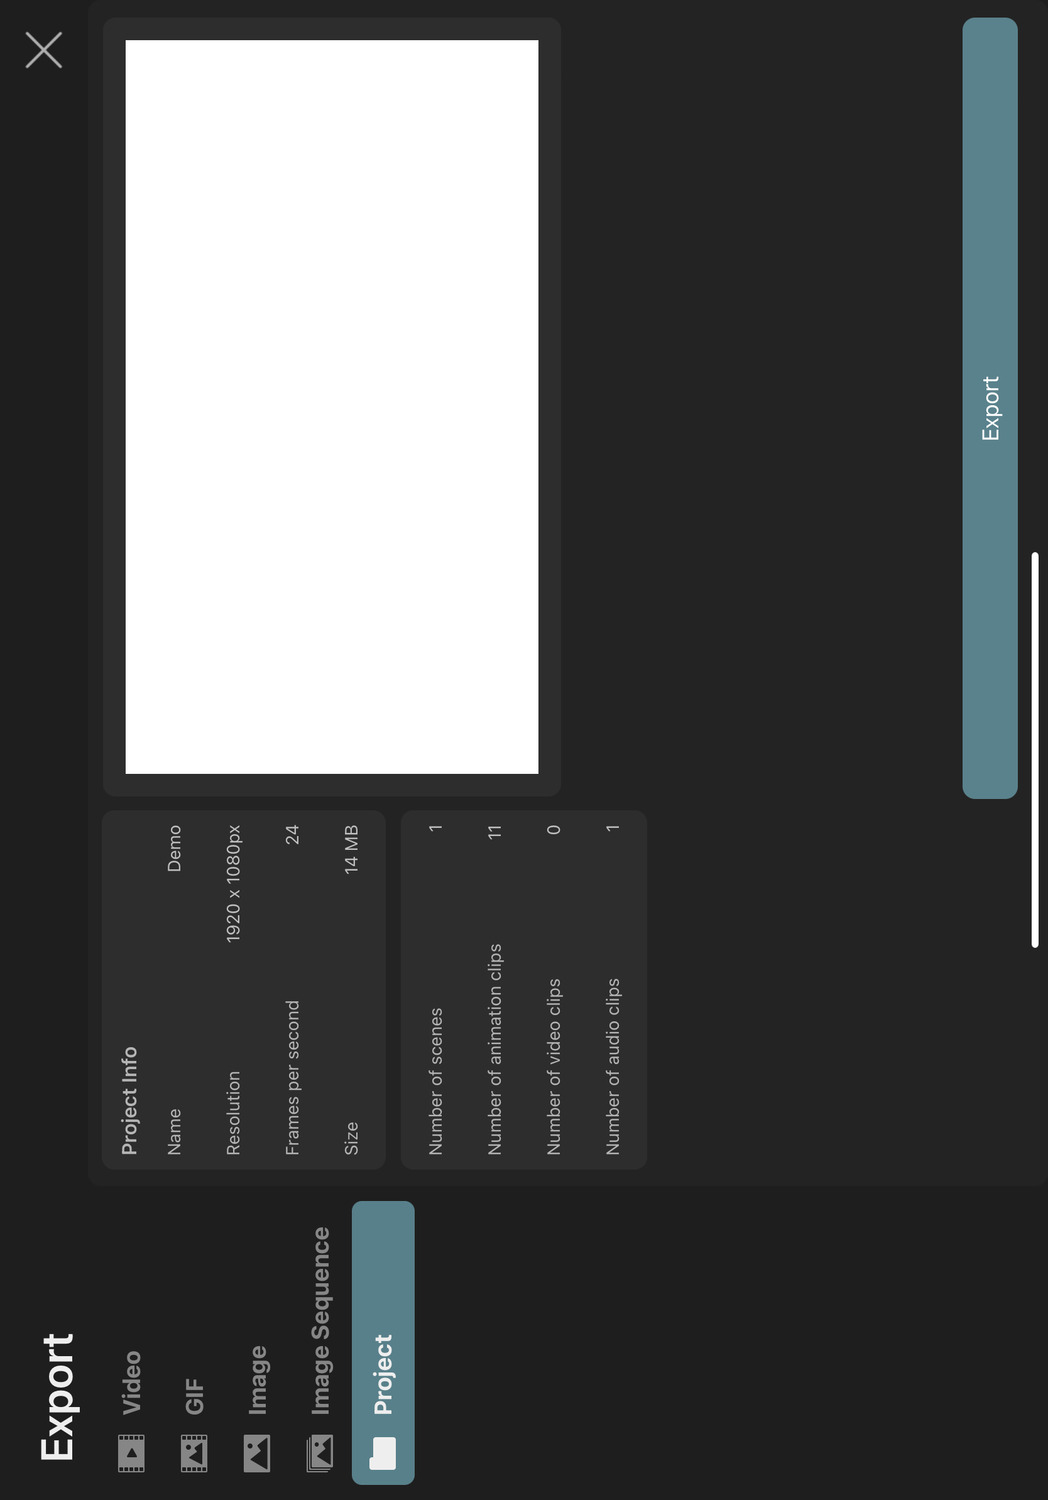
Export and Import Asset Libraries#
ToonSquid also allows you to export only a selection of assets from a project to then import them into other projects. This way, you can build up larger libraries of easily reusable animation assets, including animation clips, videos and audio clips.
Select assets to export#
Open the library and select the assets that you want to export into a separate file.
Export#
Tap the Export button to open the export interface and switch to the Project tab. ToonSquid automatically determines which other assets your selected assets depend on and will include those in the exported project as well.
Before exporting, you can also edit the name of the project to be exported.
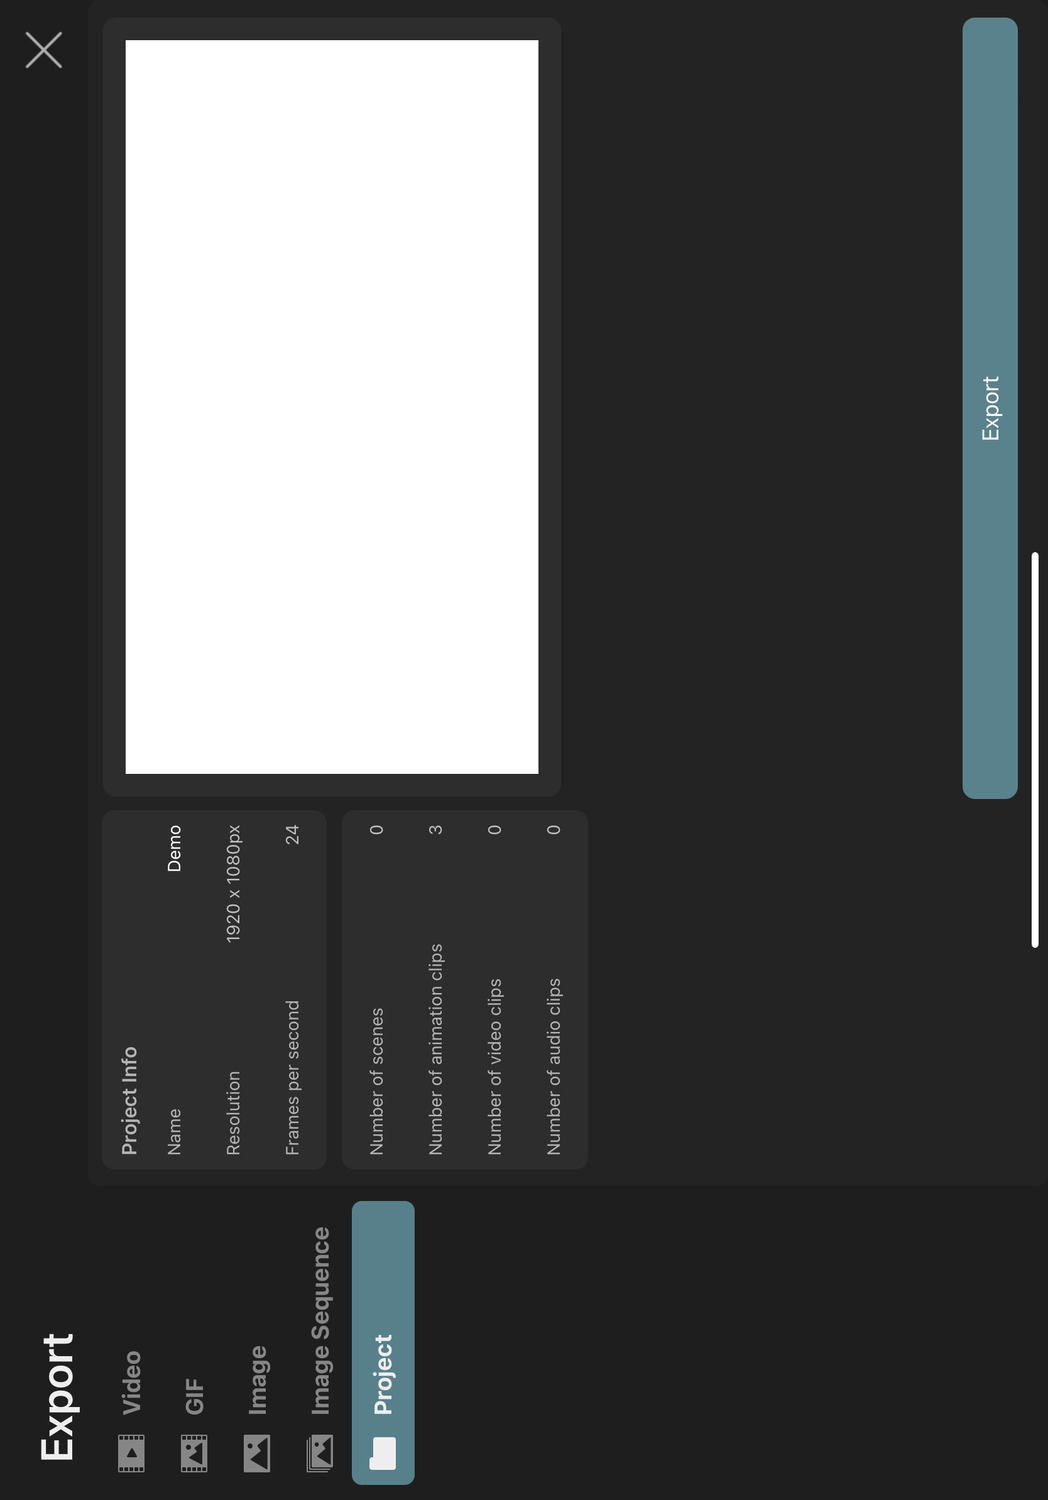
The exported file is a regular ToonSquid project file (.tsproj), only without any scenes.
Import#
You can import the contents of any ToonSquid project file into another project via the library.
- Open the library.
- Tap the
+button in the top right corner. - Tap
Import from Filesand select the.tsprojfile you want to import.
All of the animation clips, videos and audio clips of the imported project will be added to the library of the target project.
If the imported project has scenes, then how they are imported depends on the frame rate and resolution of the two projects. If the frame rate and resolution of both projects are the same, then the scenes are imported as scenes. Otherwise, they will appear as animation clips in the target project's library.
#
Settings
Overview
The ToonSquid editor can be customized to better fit your needs in the settings menu.
General
This tab contains general editor behavior settings, such as whether keyframes should be added automatically.
Tools
Configure the behavior of ToonSquid's tools to your liking.
Import
Customize how certain asset types are imported into your ToonSquid projects.
Appearance
Use the appearance settings to customize the ToonSquid interface.
Gestures
Customize the various touch gestures in ToonSquid to create the most efficient workflow for you.
Backup
This tab is where you can modify ToonSquid's project backup settings and also create a backup immediately.
Project Info
View general information about your project, such as how much memory it currently uses.
#
Settings
General
This page contains the general app settings with which you can configure ToonSquid's editor behavior to your needs.
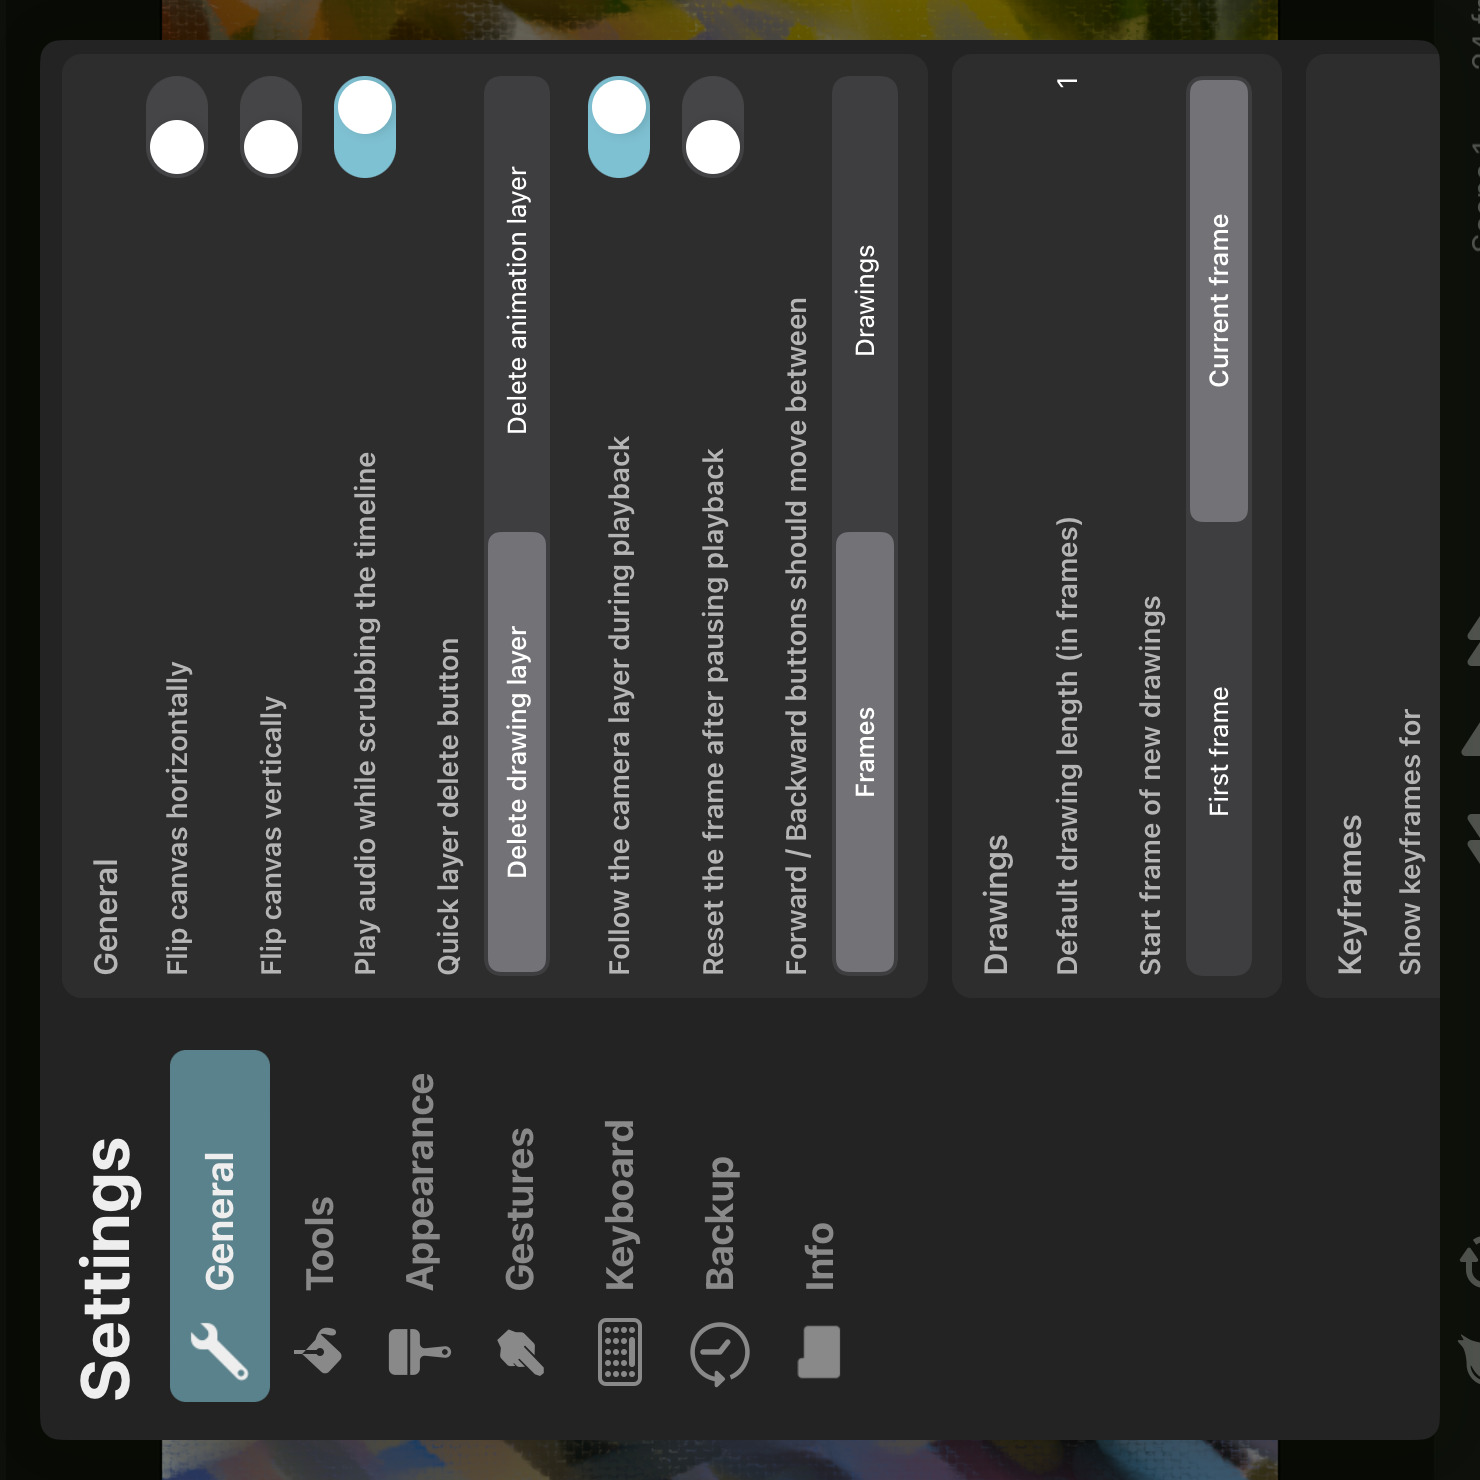
Flip Canvas Horizontally / Vertically#
These settings allow you to temporarily flip the canvas. This can for example be useful if you want to check your drawing for symmetry errors.
Note that this is only a temporary change that affects how your project is displayed in the editor. It neither edits the contents of the timeline nor does it affect the export. Both of these settings are automatically reset when you close the project.
Play Audio While Scrubbing the Timeline#
By default, whenever you change the selected frame, you will hear the portion of the audio that corresponds to that frame in the editor. Disable this setting to only play audio during playback.
Quick Layer Delete Button#
This setting defines what should be deleted when the delete button (trash icon) in the sidebar is pressed.
Delete Drawing Layer#
The selected drawing layer is deleted.
Delete Animation Layer#
The entire selected animation layer is deleted, including all drawings inside.
Follow the Camera Layer During Playback#
If this option is enabled and a camera layer exists, the camera will stay focused on the canvas during playback of the animation. This makes it easier to visualize the final output when there is an animated camera.
Once the playback stops, the canvas is automatically reset to its state before the playback.
Reset the Frame After Pausing Playback#
If this option is enabled and you pause the playback, the selected frame of the editor will automatically reset to its value before you hit play.
Forward / Backward Buttons Should Move Between#
This setting defines how the selected frame should change when you tap the forward and backward buttons on the left edge of the timeline.
Frames#
The play cursor should move to the next or previous frame in the timeline.
Drawings#
The play cursor should move to the beginning of the next or previous drawing in the selected layer.
Vector Workflow Preference#
This setting controls whether tools such as the brush tool or the fill tool should prefer creating vector layers or vector groups by default when working with vectors.
Drawings#
The drawing settings belong to the scene or clip that is currently open in the editor. You can define a different value for this in each scene and animation clip of the project.
Default Drawing Length (in Frames)#
The default duration of new drawings that you add to the timeline, specified as a number of frames. This value is initially selected based on your default workflow choice when configuring the project or animation clip.
Start Frame of New Drawings#
Whether new drawings and audio clips in empty layers should begin on the first frame of the timeline or on the currently selected frame.
This value is initially selected based on your default workflow choice when configuring the project or animation clip.
Split Existing Drawings When Adding New Drawings#
Whether the Add Drawing and Duplicate buttons should split or shorten existing drawings in order to place the new drawing on the current frame.
If this is disabled, the new drawings are inserted after the current drawing.
Keyframes#
Show Keyframes for#
This setting controls which keyframes are shown in the timeline if the keyframing mode is enabled.
The Selected Layer#
The timeline only shows keyframes for the selected drawing layer.
All Layers#
The timeline shows keyframes in all layers in the timeline.
In the selected animation layer, keyframes for the selected drawing layer are shown. In other animation layers, the keyframes for the first drawing layer in the first drawing are shown.
Only Show Properties of the Selected Effect#
If this setting is enabled and an effect is selected in the inspector, only the properties of the selected effect are shown in the timeline. Otherwise, the properties of the selected layer and all of its effects are shown.
Automatically Add Keyframes#
This can be used to disable the automatic keyframe insertion behavior.
Note that disabling this setting only prevents the insertion of the first keyframe of each layer property. If a property already has keyframes and you make further edits to it on other frames, new keyframes will be added regardless of this setting.
Always Add a Keyframe on the First Frame#
When this setting is enabled and you add the first keyframe to a property, a keyframe is automatically added to the first frame of the layer if it doesn't already have one.
Animation Layer Merging#
Drawing Layer Merge Behaviour#
This setting controls if and how drawing layers should be merged when merging animation layers in the timeline. Note that sometimes layers have to be rasterized in order to keep their combined visual appearance the same as when they used to be in two different animation layers, for example if one animation layer has an opacity below 100%. In such cases, this setting is ignored.
Separate#
The drawing layers remain as separate layers when drawings are merged.
Separate if Animated#
The drawing layers remain as separate layers if any of them contains a keyframe animation, in order to keep the animation editable after the animation layer merge.
Drawing layers without an animation are merged together.
Always Rasterize#
The drawing layers are rasterized and merged into a single pixel layer.
Copy & Paste#
Merge Down Pixel and Vector Layers After Pasting#
Pasting a previously copied layer or selected region of a layer always creates a new layer.
Enable this setting so that the new pixel layer, vector layer or vector group is automatically merged with the pixel layer / vector layer / vector group below after you had the opportunity to move it with the transform tool.
This can be useful if you prefer to only have a single drawing layer in each drawing but still want to frequently use the copy and paste functionality.
Effects#
Effect Render Quality#
The quality with which effects are rendered both in the editor and in the export. The default is High.
Lower quality settings can cause layers with effects to appear pixelated or blurry. Higher quality settings cause higher memory usage and potentially reduced performance. If you are using a lot of effects in a project and are experiencing performance issues, try to lower this setting while you work on the animation in the editor and then increase it again before you export.
#
Settings
Tools
This tab is where you can find advanced settings for the various tools in ToonSquid.
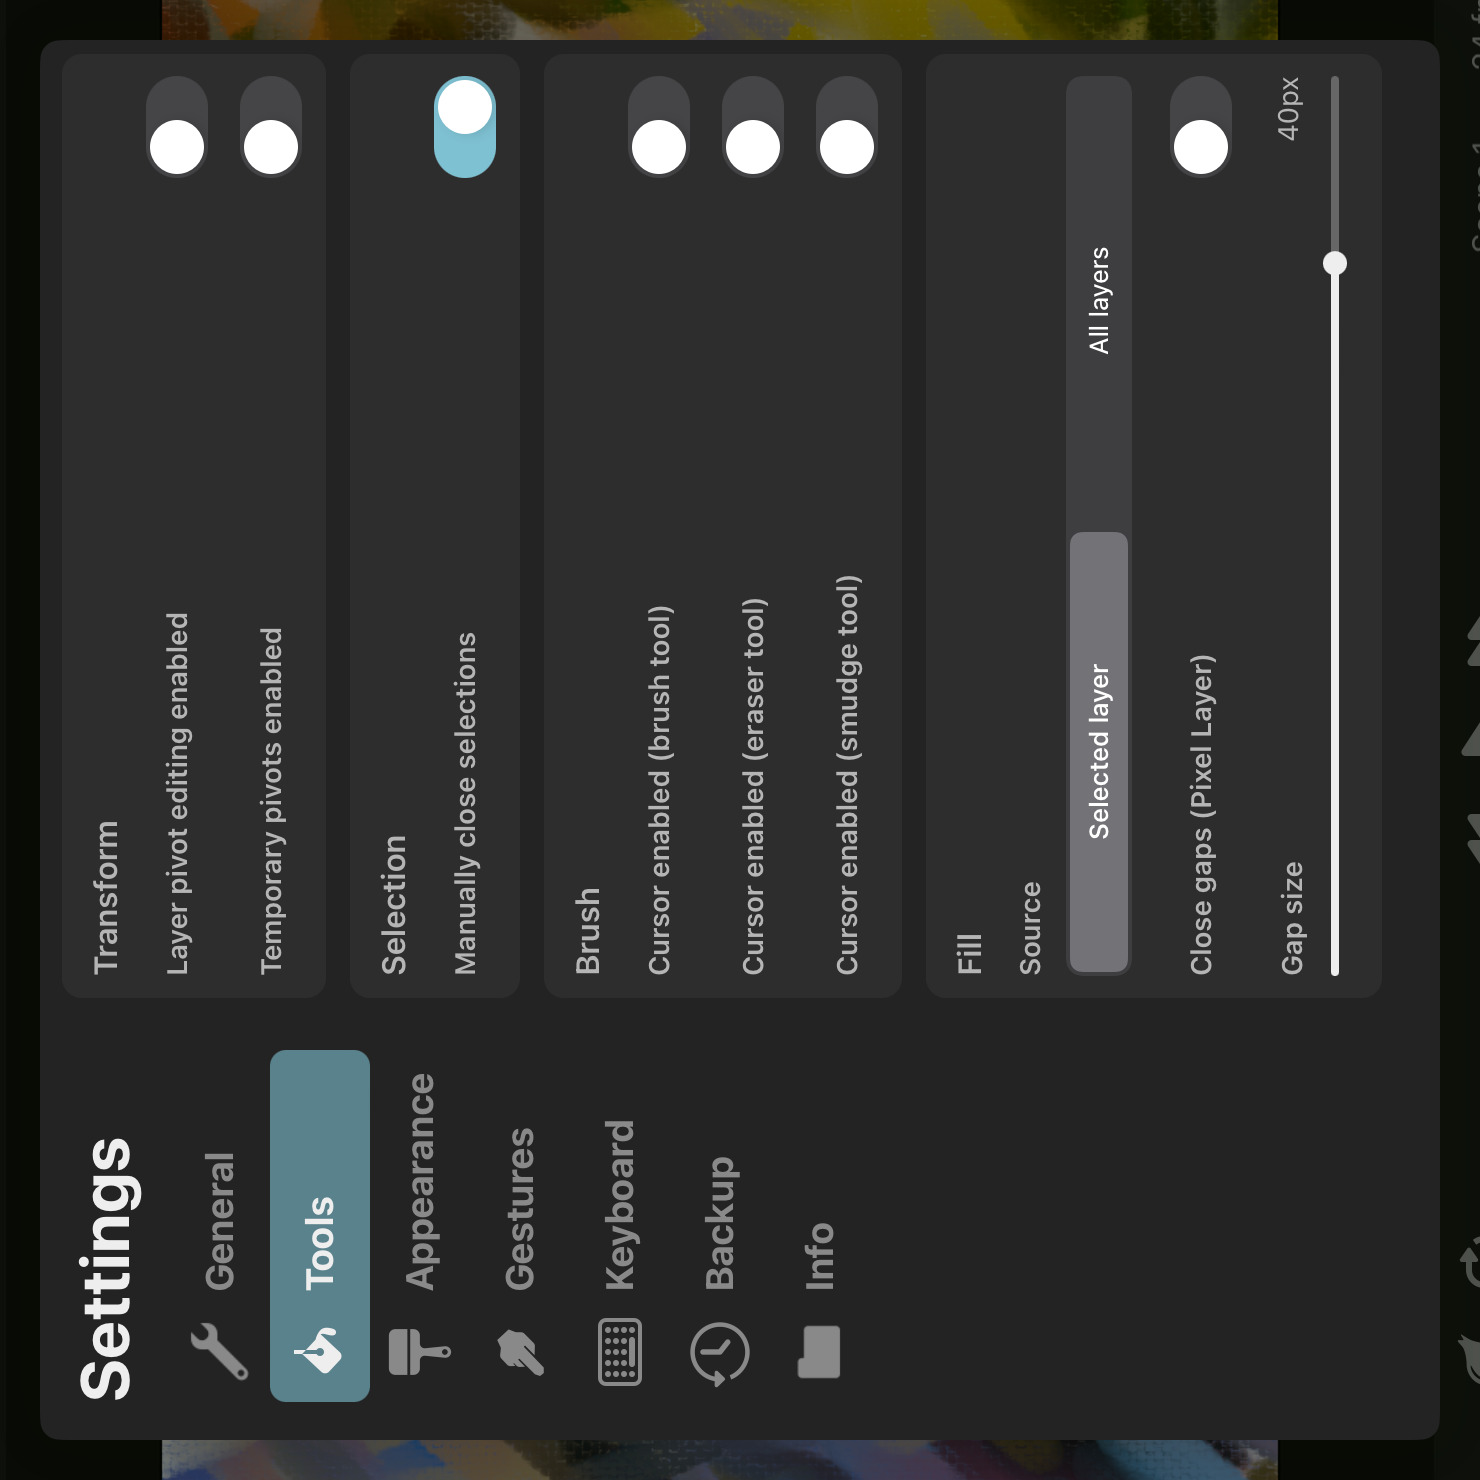
Transform#
Layer Pivot Editing Enabled#
Whether the layer pivot should be editable in the transform tool.
Temporary Pivots Enabled#
Whether the transform tool should show a temporary pivot when you are not editing a layer's transform properties, e.g. when editing the pixels within a pixel layer. This temporary pivot is used to define the center of rotation and scaling for the transform tool.
When this setting is disabled, rotation will always be performed around the center of the selected region and scaling will always be performed around the opposite handle of the one being dragged.
Show Motion Path#
Whether the layer's motion path should be displayed in the transform tool when the layer has position keyframes.
Quick Selection with Second Button Tap#
Whether a second tap on the transform tool button should create a selection area covering all contents of the selected layer.
Automatic Pixel Edit Mode Switching#
Whether the transform tool should try to automatically determine whether to edit a selected pixel layer's pixel contents instead of its transform.
When drawing on pixel layers, you often want to shift, scale, rotate or distort the pixels within the layer instead of moving the whole pixel layer including its entire drawable region. Other times - for example when keyframing or building rigs using the transform hierarchy - you need to edit the layer transform instead of its pixel contents.
This settings tries to automatically determine which transform editing mode you want to use based on the current context.
If there is an active selection area, the tool will always edit the pixels within the selection area.
If there is no selection area and this setting is enabled, the tool will edit the pixel contents, unless either of the following is the case:
- Keyframing mode is currently enabled.
- The pixel layer already has transform keyframes.
- The pixel layer has a perspective or warp effect applied.
- The animation layer is part of a transform hierarchy.
If this setting is disabled, you have to create a selection area to edit the pixel contents of a pixel layer. Otherwise, the tool will edit the layer's transform properties, just like with any other layer type.
Selection#
Manually Close Selections#
By default, when you create freehand selections in the selection tool you have to manually tap the start point of the open selection region to close it.
If you disable this setting, selection regions are closed automatically once you lift your finger or Apple Pencil off the screen.
Brush#
Cursor Enabled#
You can enable these options in order for the brush, eraser and smudge tools to show the outline of the tip of your brush.
Cursor Hover Preview#
Whether the brush, eraser and smudge tools should show a preview of the brush tip when hovering over the canvas with Apple Pencil.
Note
Hover features are only available on iPadOS 16.1 or later and require a compatible Apple Pencil and iPad model with hover support.
Only Erase Selected Path Layers#
By default, the vector eraser erases from all path layers in a vector group when a path layer inside the group is selected. If you enable this setting, the eraser will only erase from the selected path layer.
Only Smudge Selected Path Layers#
By default, the vector smudge tool smudges all path layers in a vector group when a path layer inside the group is selected. If you enable this setting, the smudge tool will only smudge the selected path layer.
Merge Vector Brush Strokes If Possible#
Whether vector brush strokes should be automatically merged into the contents of an existing path layer in the vector groups or the existing shapes in a vector layer. If this setting is disabled, each brush stroke results in a separate path layer in the vector group / a separate shape in the vector layer.
Since a path layer only has a single set of fill and stroke properties, this automatic merge is only possible if the brush stroke uses the same fill and stroke properties as the existing path layer. If it doesn't, the new stroke will be placed in a separate layer.
Pressure Curve#
You can adjust the pressure curve to customize how the amount of force you apply with your Apple Pencil affects pressure-sensitive brush settings while drawing. The horizontal axis represents the force applied to the Apple Pencil, while the vertical axis represents the resulting pressure value of the brush.
By default, the pressure curve is a straight line which simply forwards the Apple Pencil pressure values directly to the brush without modification. You can either drag to edit the existing two control points or touch and drag somewhere else on the curve to insert and start editing a new control point.
When there are more than two control points, a control point can be deleted by tapping on it and then selecting Delete . You can also press the Reset button at any time to reset the curve back to its default state.
Example
If you would like to apply less force with your Apple Pencil to achieve the maximum brush pressure control, you can grab the top right control point of the pressure curve and drag it towards the left.
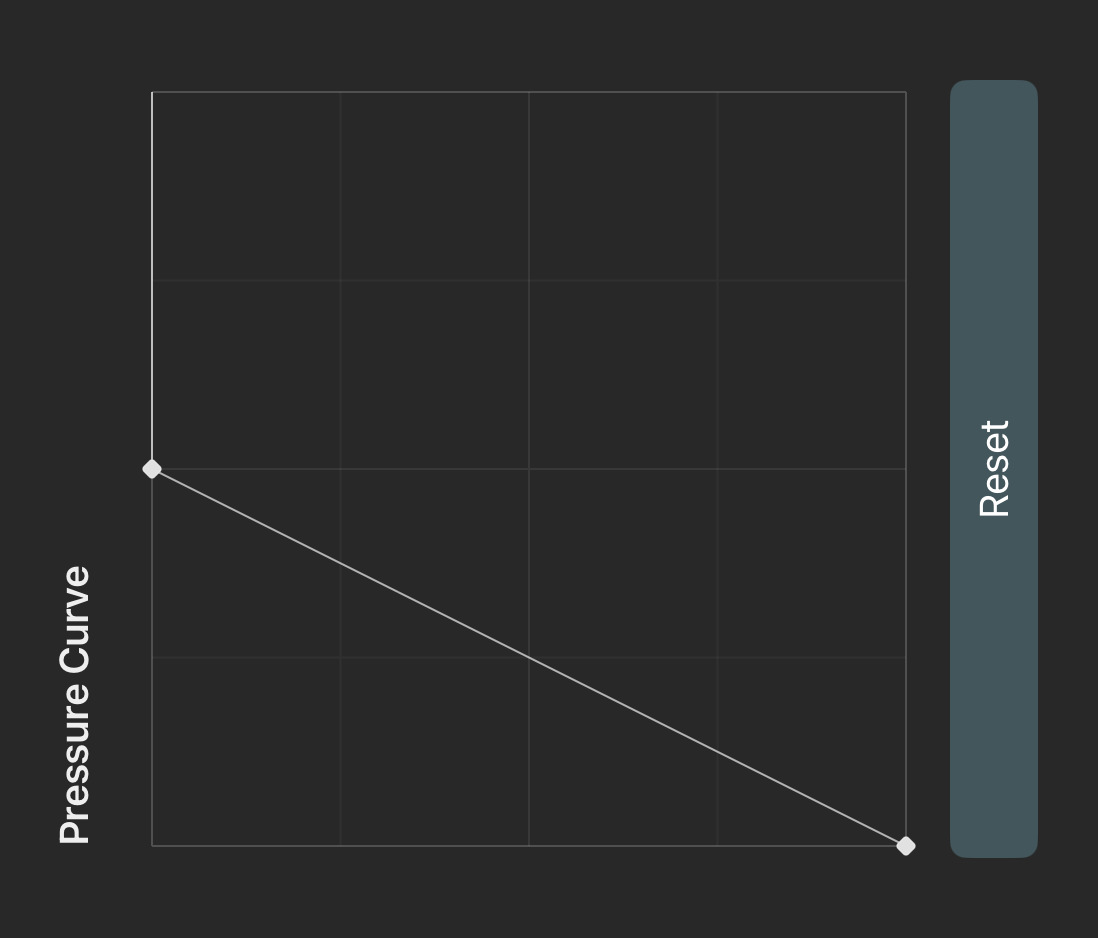
Minimum Smoothing#
The minimum amount of smoothing that should be applied to brush strokes drawn with all brushes, regardless of whether the individual brush's smoothing intensity setting is lower.
Override Smoothing Settings#
Whether the Show Gap, Catch Up When Stroke Ends and Adjust With Speed smoothing settings of all individual brushes should be ignored in favor of using the following global smoothing settings for all brushes.
Show Smoothing Gap#
The value of the Show Gap smoothing setting to be used for all brushes.
Catch Up When Stroke Ends#
The value of the Catch Up When Stroke Ends smoothing setting to be used for all brushes.
Adjust With Speed#
The value of the Adjust With Speed smoothing setting to be used for all brushes.
Fill#
Source#
The source setting of the fill tool controls which layer contents should define the limits of the fill region.
Note that this setting is ignored if you have manually selected a reference layer.
Selected Layer#
The fill region limits are only defined by the contents of the selected layer.
All Layers#
The fill region limits are defined by the contents of all layers on the current frame.
Pixel Fill#
The following are fill tool settings that only apply when filling pixel layers.
Expand#
The amount of pixels by which the edge of the filled region should be automatically expanded outwards. This can be useful for preventing thin gaps from appearing around the filled area when a higher threshold value cannot be used or when dealing with very textured or very soft line art.
Blend Mode#
Defines how the filled region is blended with the existing colors in the layer.
Automatic#
The fill tool automatically chooses the best blend mode based on the region being filled. If the filled region is completely transparent, the fill tool uses the Behind blend mode to blend the fill underneath the edge of the surrounding line art. If the region being filled is not transparent, the fill tool uses the In Front blend mode to keep the fill color visible on top of the existing colors.
In Front#
The filled region is blended on top of the existing colors in the layer.
Behind#
The filled region is blended underneath the existing colors in the layer.
Erase#
The filled region is used to erase the existing colors in the layer.
Anti-Aliasing#
Whether anti-aliasing should be applied to smoothen the edges of the filled region. When this is disabled, the filled region will have a hard edge.
Blur#
The amount by which the filled region should be blurred before being applied to the layer. This can be useful when you want to achieve a soft blend between the fill region and an existing boundary that has a soft edge or is not fully opaque.
Smart Recolor#
When enabled, the fill tool will preserve the existing opacity of the filled region and only change its color by smoothly replacing the previous colors of the region with the new fill color, rather than simply painting over the existing colors with the new fill.
This setting has no effect if the region being filled was previously transparent or if the fill blend mode is set to Behind or Erase.
Close Gaps#
When this setting is enabled, the fill tool will try to prevent the fill color from leaking out of small gaps in your line art.
Gap closing is currently only supported when filling pixel layers, not when filling path layers. It can also lead to lower quality fills under certain circumstances and has a noticeable performance cost for larger gap sizes, so it is recommended to only temporarily enable this option when really necessary.
Gap Size#
If gap closing is enabled, this setting defines the maximum size of gaps that will be closed automatically.
Vector Fill#
The following are fill tool settings that only apply when filling vector groups or vector layers.
Vector Fill Mode#
Controls how the fill tool should behave when you tap on an existing path layer in a vector group or a shape in a vector layer. (The explanations below describe the behaviour when working with vector groups containing individual path layers but they apply equivalently to the individual vector shapes inside of vector layers.)
Tapping in a gap between path layers will always create a new path layer with the fill shape.
Recolor Connected Shapes#
The fill tool will recolor the tapped layer and all other overlapping path layers that have the same color as the tapped layer. Overlapping path layers with a different color do not stop the fill.
Recolor Tapped Shape#
The fill tool will only recolor the tapped layer. Overlapping path layers with a different color do not stop the fill.
Add New Shapes#
The fill tool will always create a new path layer with the fill region shape, even if the shape is exactly the same as that of the tapped path layer. Overlapping path layers with a different color form boundaries for the fill region, in the same way as when filling an empty region or when filling pixel layers.
Merge New Shapes If Possible#
Whether the fill tool should try to automatically merge new fill vector shapes into an existing path layer / vector shape when filling a region of a vector group / vector layer. If this setting is disabled, each new fill shape results in a separate path layer.
Since a path layer only has a single set of fill and stroke properties, this automatic merge is only possible if the fill shape uses the same fill and stroke properties as the existing path layer. If it doesn't, the new shape will be placed in a separate layer.
Path#
Add Subpaths in Freehand Mode#
Whether the path tool should create new subpaths in the selected layer if the existing subpath is closed and you try to add a new control point in freehand mode. If this is disabled, the tool creates a new path layer for the new control point.
Create Vector Groups#
Whether the path tool and the shape library should automatically create a vector group when adding a new path layer.
Bones#
Select the Closest Bone When Dragging#
Whether touching and dragging on the canvas with the Transform Bones Tool selected should automatically select the closest bone to the touch position. When disabled, you have to manually tap to select a bone before you can edit its position, rotation or scale.
This can be very useful for quickly animating a rig with multiple bones, as you can drag the bones directly without having to manually select them first. However, this behaviour can also get in the way if your rig contains many small or overlapping bones, causing other bones to get selected unintentionally when you just want to edit the already selected bone.
Color#
The color with which bones that are not selected should be visualized in the bone tools.
Selected Color#
The color with which selected bones should be visualized in the bone tools.
#
Settings
Import
These settings let you customize how assets are imported into your ToonSquid project.
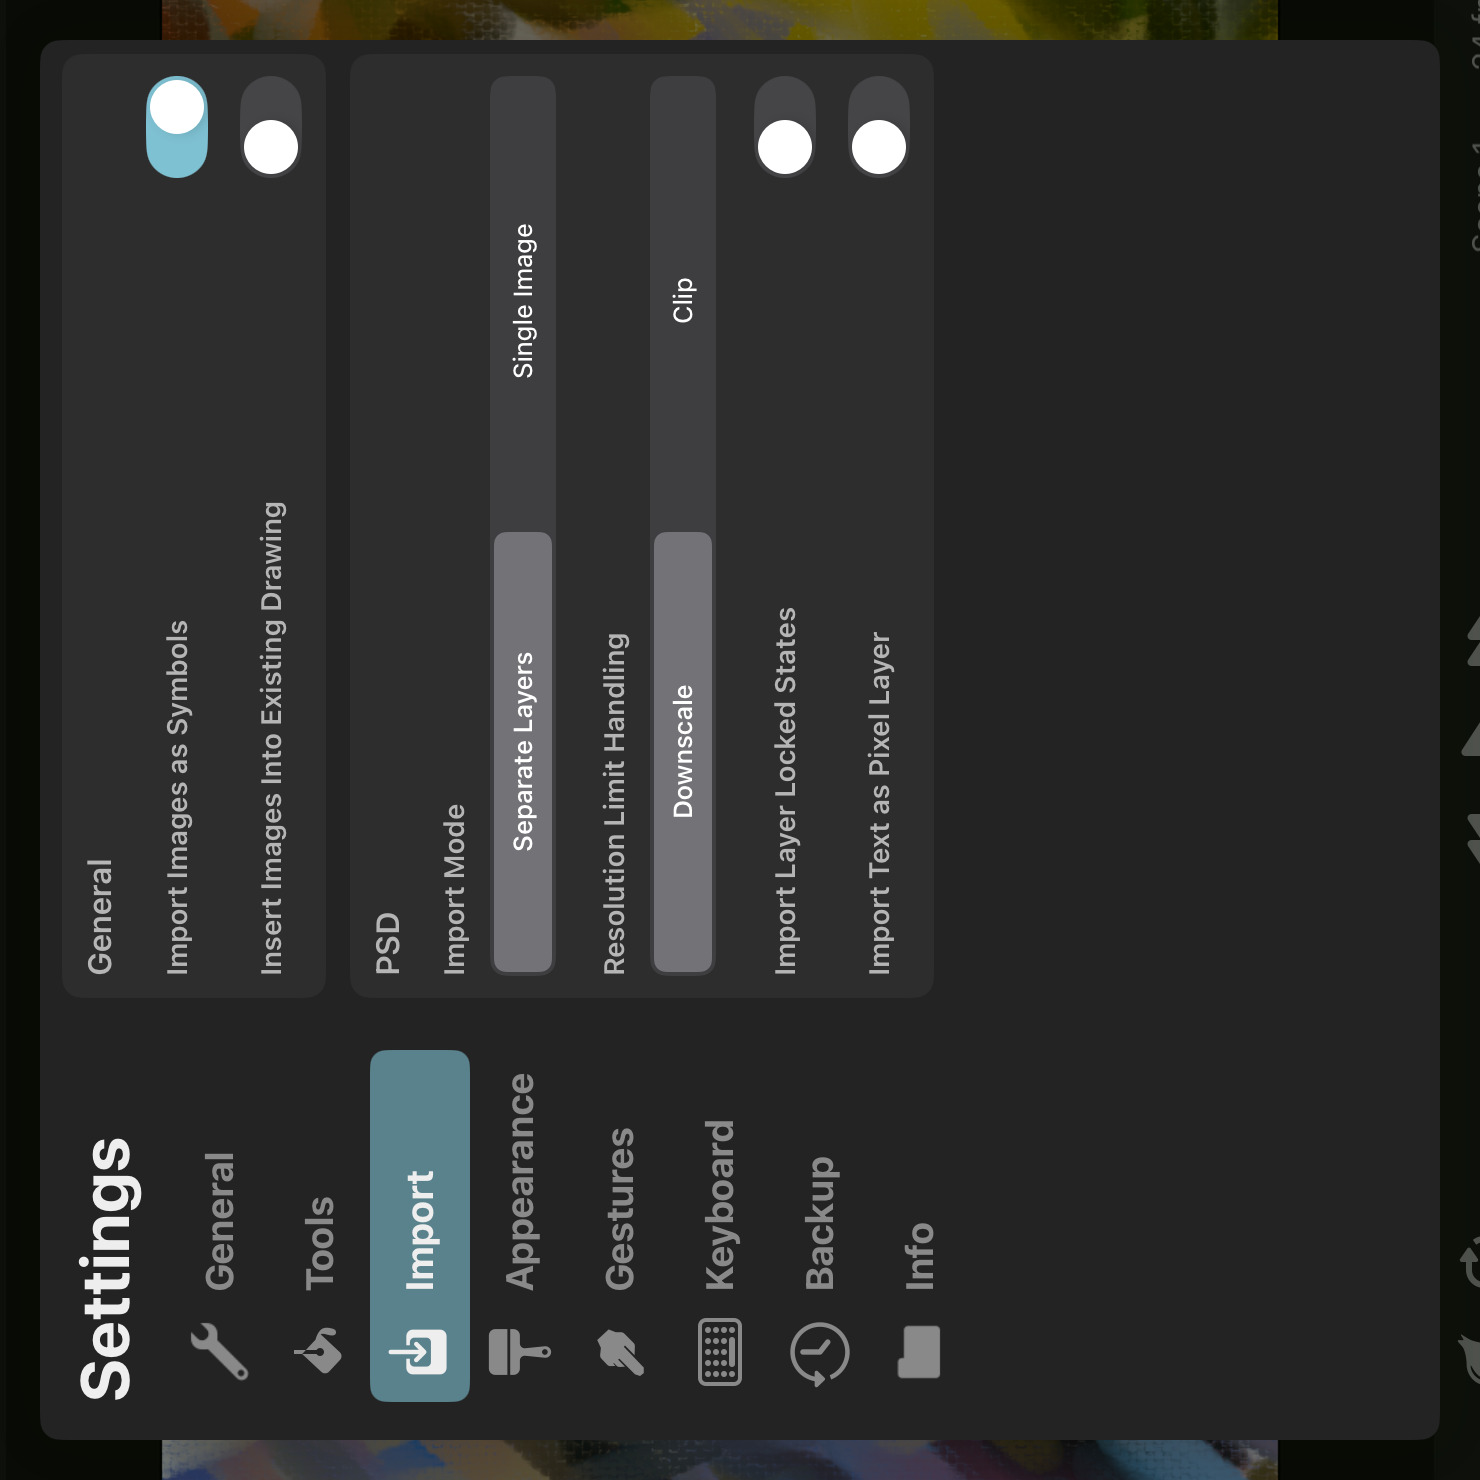
General#
Import Images as Symbols#
Whether images imported into ToonSquid should each be placed into a separate animation clip and inserted into the current timeline as a symbol. This is the default behaviour.
You can disable this setting to instead import images as pixel layers directly into the current timeline without creating any separate animation clips. Note that this might require the images to be downscaled into the resolution of the current timeline.
This setting does not affect the image sequence import. When importing image sequences, the images are always imported as pixel layers directly into the current timeline.
Insert Images Into Existing Drawing#
By default, when you import an image or insert a symbol of a single-frame animation clip into your project, ToonSquid will add a separate animation layer to the timeline. Enable this setting to instead insert the image in the existing animation layer and drawing if possible.
This setting does not affect inserting symbol layers whose clips are longer than one frame. In that case, a new animation layer is always created.
PSD#
You can import PSD files either into an existing project via the image import workflow or via the Import button in the project library, which automatically creates a new project for the imported PSD.
The contents of a static PSD are imported as drawing layers into a new drawing. If the PSD file contains timeline data, the PSD contents will be imported into one or more animation layers and drawings in the ToonSquid timeline.
Import Mode#
Whether the PSD should be imported as separate layers or as a single flattened image.
Not all features of Adobe® Photoshop® are supported by ToonSquid. If you import a PSD file as separate layers, any unsupported features used by those layers will simply be ignored by ToonSquid. This can lead to visual differences compared to how the file looks inside of Adobe® Photoshop®.
Importing the file as a flattened image results in a single pixel layer containing the visually equivalent result to what you see in Adobe® Photoshop®, but you lose the ability to edit the original layer contents and properties.
Note
A PSD can only be imported as a single image if it contains a flattened image representation of its contents. ToonSquid will let you know if this is not the case and will import PSD files with missing image data as separate layers instead.
In order to make sure that your PSD files contain a flattened image of its contents, enable the "Maximize Compatibility" setting when saving your PSD file in Adobe® Photoshop®.
Supported PSD Features#
The following features used by PSD files are either fully or partially supported by ToonSquid when importing PSD files:
- 8-bit depth (16-bit and 32-bit contents are automatically converted into 8-bit)
- RGB color mode
- sRGB color space (ToonSquid assumes all PSD colors are in the sRGB color space. No color conversion is performed.)
- Pixel layers
- Layer opacity and visibility
- Blend modes
- Clipping masks
- Layer position lock
- Layer transparency lock
- Group layers
- Text layers (Rich text is not supported. The first run style is used for the entire text.)
- Letter spacing, line spacing, text alignment
- Vector shapes with fills and/or strokes
- Linear and radial gradients for vector shape fills or strokes
- Vector line cap and line join styles
- Drop shadow layer effects (properties not supported by the ToonSquid Drop Shadow effect are ignored.)
- Smart objects containing nested PSD or PSB contents
- Smart objects containing supported image file formats. SVG files embedded within the PSD are currently not supported.
- Gaussian blur smart filters
- Frame animation timelines
- Video timelines
- Transform, position and opacity keyframes
Resolution Limit Handling#
How pixel layers whose contents exceed the resolution or region limit of pixel layers in the ToonSquid project should be imported.
Downscale#
The layer contents are downscaled into the available pixel layer region. The layer transform is adjusted to scale up the entire layer and to position it to match the original region of the PSD layer relative to the rest of the document.
This is the default behaviour.
Clip#
All contents that exceed the pixel layer region limit are clipped away. The remaining contents are imported without modification.
Import Layer Locked States#
By default, the position lock states of PSD layers are ignored. This is mainly because the background layer in a PSD is locked by default which would prevent you from quickly selecting all imported layers and moving them.
You can enable this setting so that locked layers in the PSD will also be locked after being imported into ToonSquid.
Import Text as Pixel Layer#
Whether text layers in a PSD should be imported as rasterized pixel layers instead of as editable text.
By default, imported text layers remain editable in ToonSquid and retain their resolution-independence. However, due to potentially missing fonts or differences in text layouting behaviours between ToonSquid and Adobe® Photoshop®, the imported text can look slightly different when imported into ToonSquid. You can enable this setting to import the text as a pixel layer instead. This ensures that the text looks exactly like it does in Adobe® Photoshop® at the cost of losing the ability to edit the text in ToonSquid and the resolution-independence of the text layer.
#
Settings
Appearance
This page contains the app settings with which you can configure ToonSquid's editor appearance.
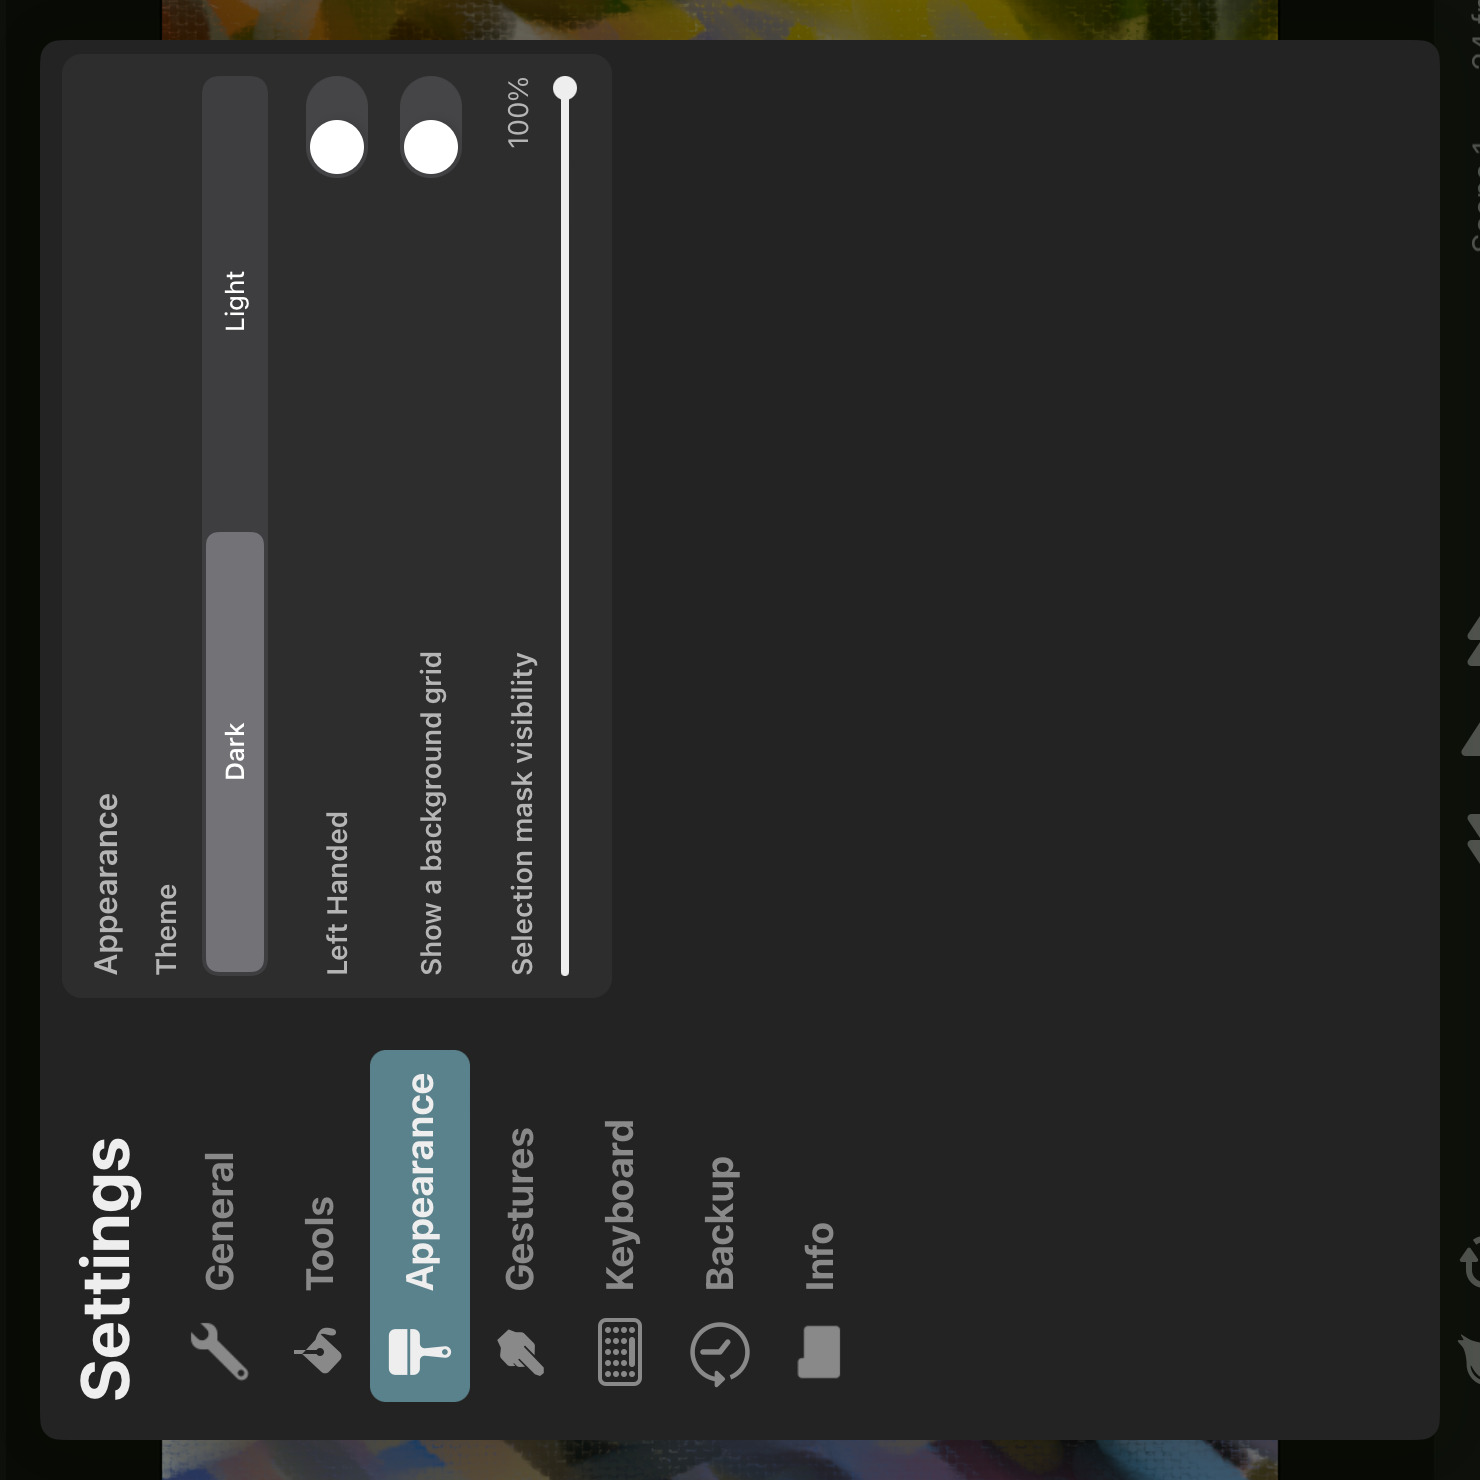
Theme#
You can switch the colors of the user interface between dark mode and light mode based on your personal preference.
Left Handed#
Flips the position of the toolbars on the left and right side of the screen and moves the timeline toggle to the left and the next / previous frame buttons to the right.

Show a Background Grid#
When this is enabled, a screen-aligned grid is displayed as the background of the canvas.

Show Symbol Context in Editor Background#
When this is enabled and you enter into a symbol layer's animation clip in the editor through the Edit Clip action, the background of the editor will continue to show the previously selected frame of the parent timeline. This helps you keep context of how the symbol is being used in the parent timeline while you are editing the symbol clip's contents.
Symbol Context Opacity#
This slider controls the opacity with which a symbol clip's parent timeline is shown in the background of the editor when the Show Symbol Context in Editor Background option is enabled.

Checker Pattern in Thumbnails#
Whether layer thumbnails and the first frame of drawing thumbnails should have a checker pattern background.
Selection Mask Visibility#
This slider controls how visible the lines should be that highlight the outside of the selection region on the canvas.
Bones#
Color#
The color with which bones that are not selected should be visualized in the bone tools.
Selected Color#
The color with which selected bones should be visualized in the bone tools.
Reset#
Use the reset button to reset all appearance settings back to their default values.
#
Settings
Gestures
This tab contains settings regarding touch gestures in the ToonSquid editor.
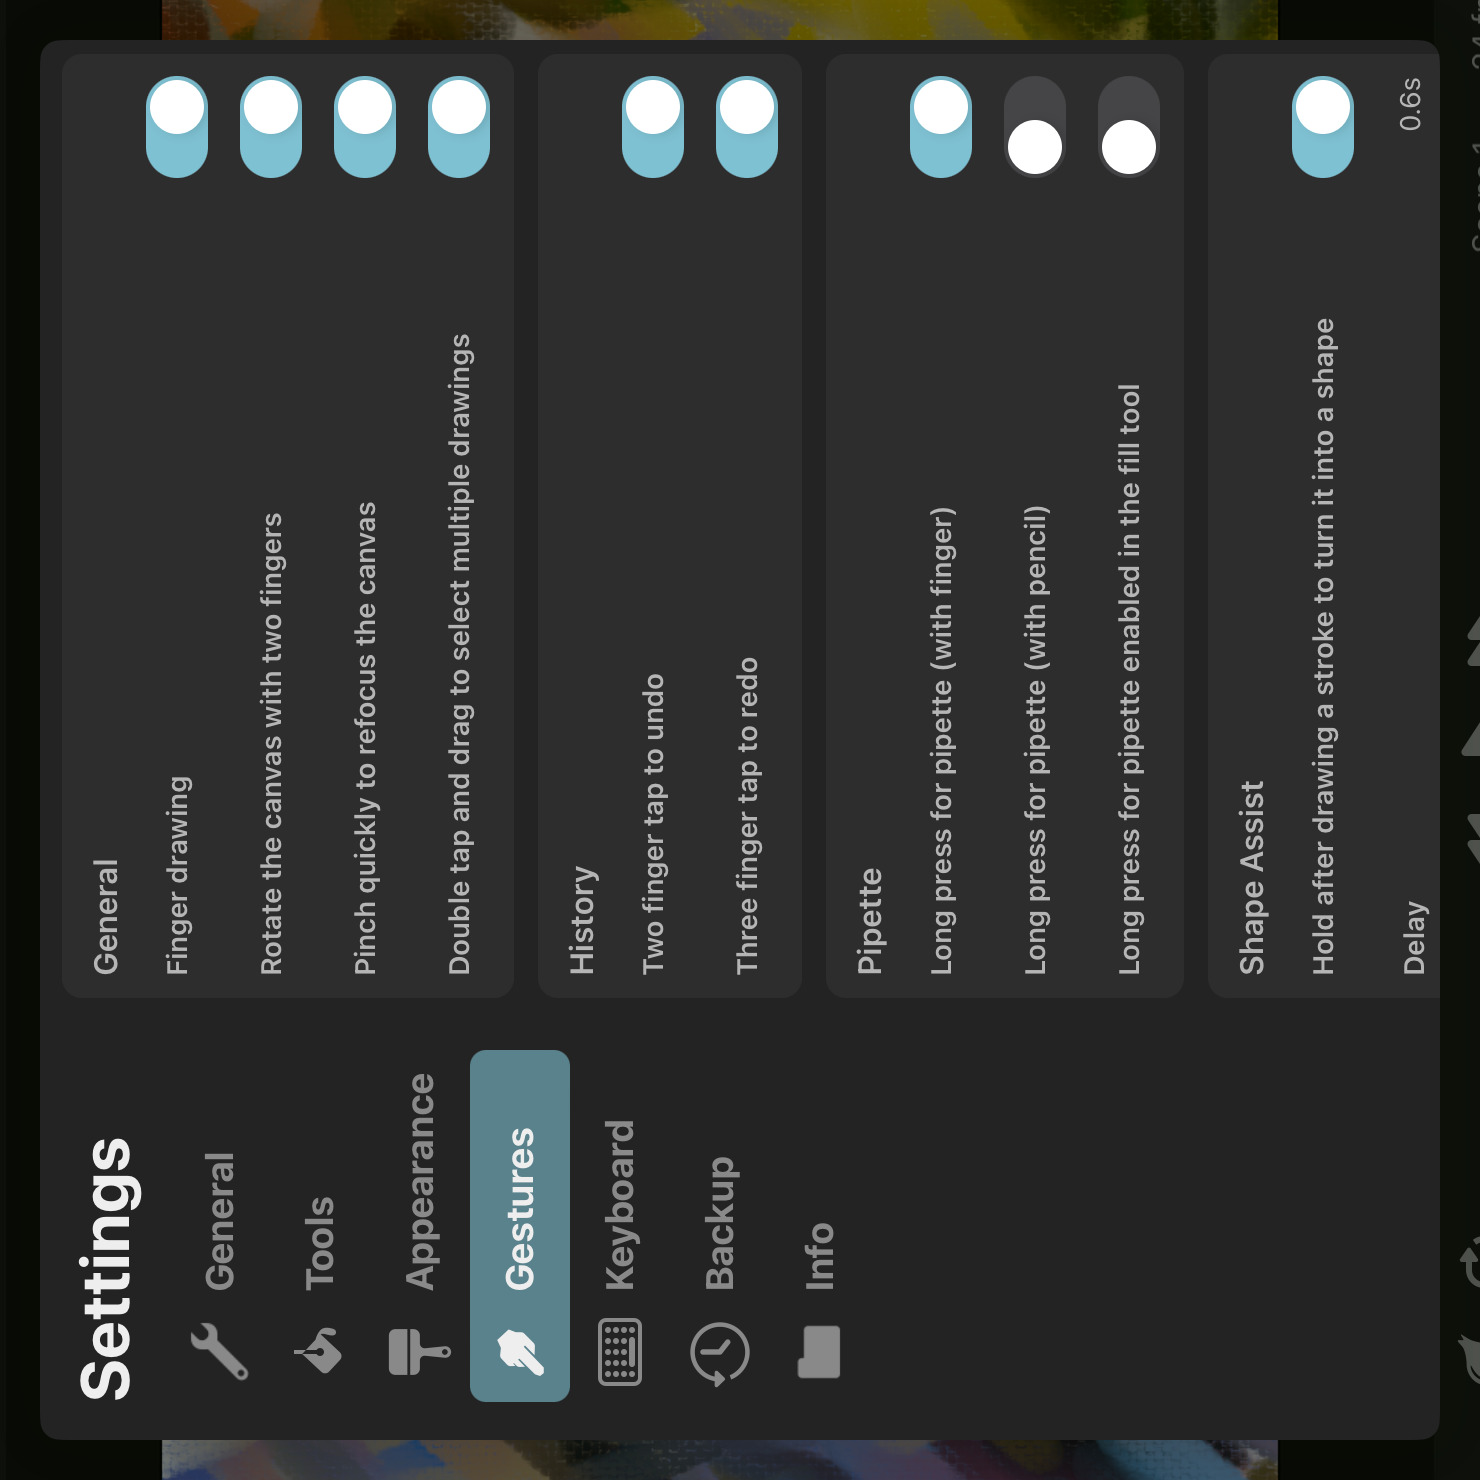
General#
Finger Drawing#
When this option is disabled, only Apple Pencil can be used in the brush, eraser, smudge and selection tools. Touches with a finger will not result in brush strokes but can still be used for performing other gestures such as zooming or undo and redo.
Rotate the Canvas With Two Fingers#
Whether pinching to zoom with two fingers should also allow you to rotate the canvas.
Pinch Quickly to Refocus the Canvas#
Whether pinching out quickly should refocus the canvas and center the default pixel layer drawing area on the screen.
Double Tap and Drag to Select Multiple Drawings#
Whether the double tap and drag gesture to select multiple drawings or keyframes in the timeline should be enabled or not.
Select Layers on the Canvas#
Whether tapping or dragging on the canvas with the transform tool selected should automatically change the layer selection to the layer that was touched.
Touch Detection Sensitivity#
Controls how large the surface area of a touch is allowed to be in order to be recognized as a valid tap gesture or button press.
Palm rejection functionality is built into the iPad and iPadOS itself and automatically filters out unintentional touches that are likely caused by your palm touching the screen. However, there are still cases when the iPad will report touches that it believes to be intentional to ToonSquid, even though in reality they are caused by your palm, which can trigger unwanted gestures or button presses (e.g. an undo gesture on the canvas). The information about these touches provided to ToonSquid by iPadOS is very limited and often unreliable, so ToonSquid cannot reliably perform any complex and accurate palm rejection on its own without accidentally filtering out lots of intended touches as well.
The Touch Detection Sensitivity setting allows you to choose how much of an additional touch filtering you would like ToonSquid to perform on top of the built-in palm rejection of iPadOS, at the expense of ignoring certain intended touches as well. At the default value of 100%, ToonSquid will not perform any additional filtering at all. It is recommended to only lower this value if you are frequently experiencing unwanted gestures or button presses that you believe are caused by your palm touching the screen.
Note#
If you tend to perform the two finger tap to undo gesture with the side of your thumb and another finger, lowering the touch detection sensitivity may cause the thumb touch to be ignored, preventing the undo gesture from being recognized properly.
History#
Two Finger Tap to Undo
Whether tapping the screen with two fingers should undo the previous edit.
Three Finger Tap to Redo
Whether tapping the screen with three fingers should re-apply the previously undone edit.
Pipette#
Whether long pressing with a finger or Apple Pencil should temporarily switch to the pipette tool. By default, only long presses with a finger cause the pipette to appear.
Long Press for Pipette Enabled in the Fill Tool#
Whether the long press gesture to switch to the pipette should be enabled in the fill tool.
Shape Assist#
Hold After Drawing a Stroke to Turn It Into a Shape#
Whether the shape assist feature should be enabled or not.
Delay#
How many seconds the brush must be held on the same point for the current stroke to be automatically turned into a shape.
Page Flip#
These are settings for the page flip gesture, which allows you to flick through neighboring frames of the animation by swiping three fingers up or down on the screen.
Three Finger Swipe (Up / Down) to Flick Through Frames#
This setting controls whether the page flip gesture should be enabled or not.
Number of Frames Before and After to Flip Through#
Controls the range of frames that can be reached by the flip gesture.
Swipe Sensitivity#
A lower sensitivity requires a larger swipe distance to flip through the same number of frames than with a higher sensitivity.
Invert Swipe Direction#
By default, swiping up moves backwards in the timeline and swiping down moves forwards. Toggle this option to invert that behavior.
Reset to Original Frame After Swipe#
If this option is enabled, the timeline will jump back to the frame that was selected before the swipe gesture began once the fingers are lifted from the screen.
Flip Through Drawings Instead Of Frames#
When this option is enabled, the page flip gesture will flip through the surrounding drawings in the current layer instead of flipping through each frame.
Text#
Drag in Text Tool#
This setting defines whether dragging on the screen in the text tool should move the selected text layer or select a range of text instead.
#
Settings
Backup
This is where you configure all settings related to ToonSquid's built-in project backup management. You can read all about ToonSquid backups here.
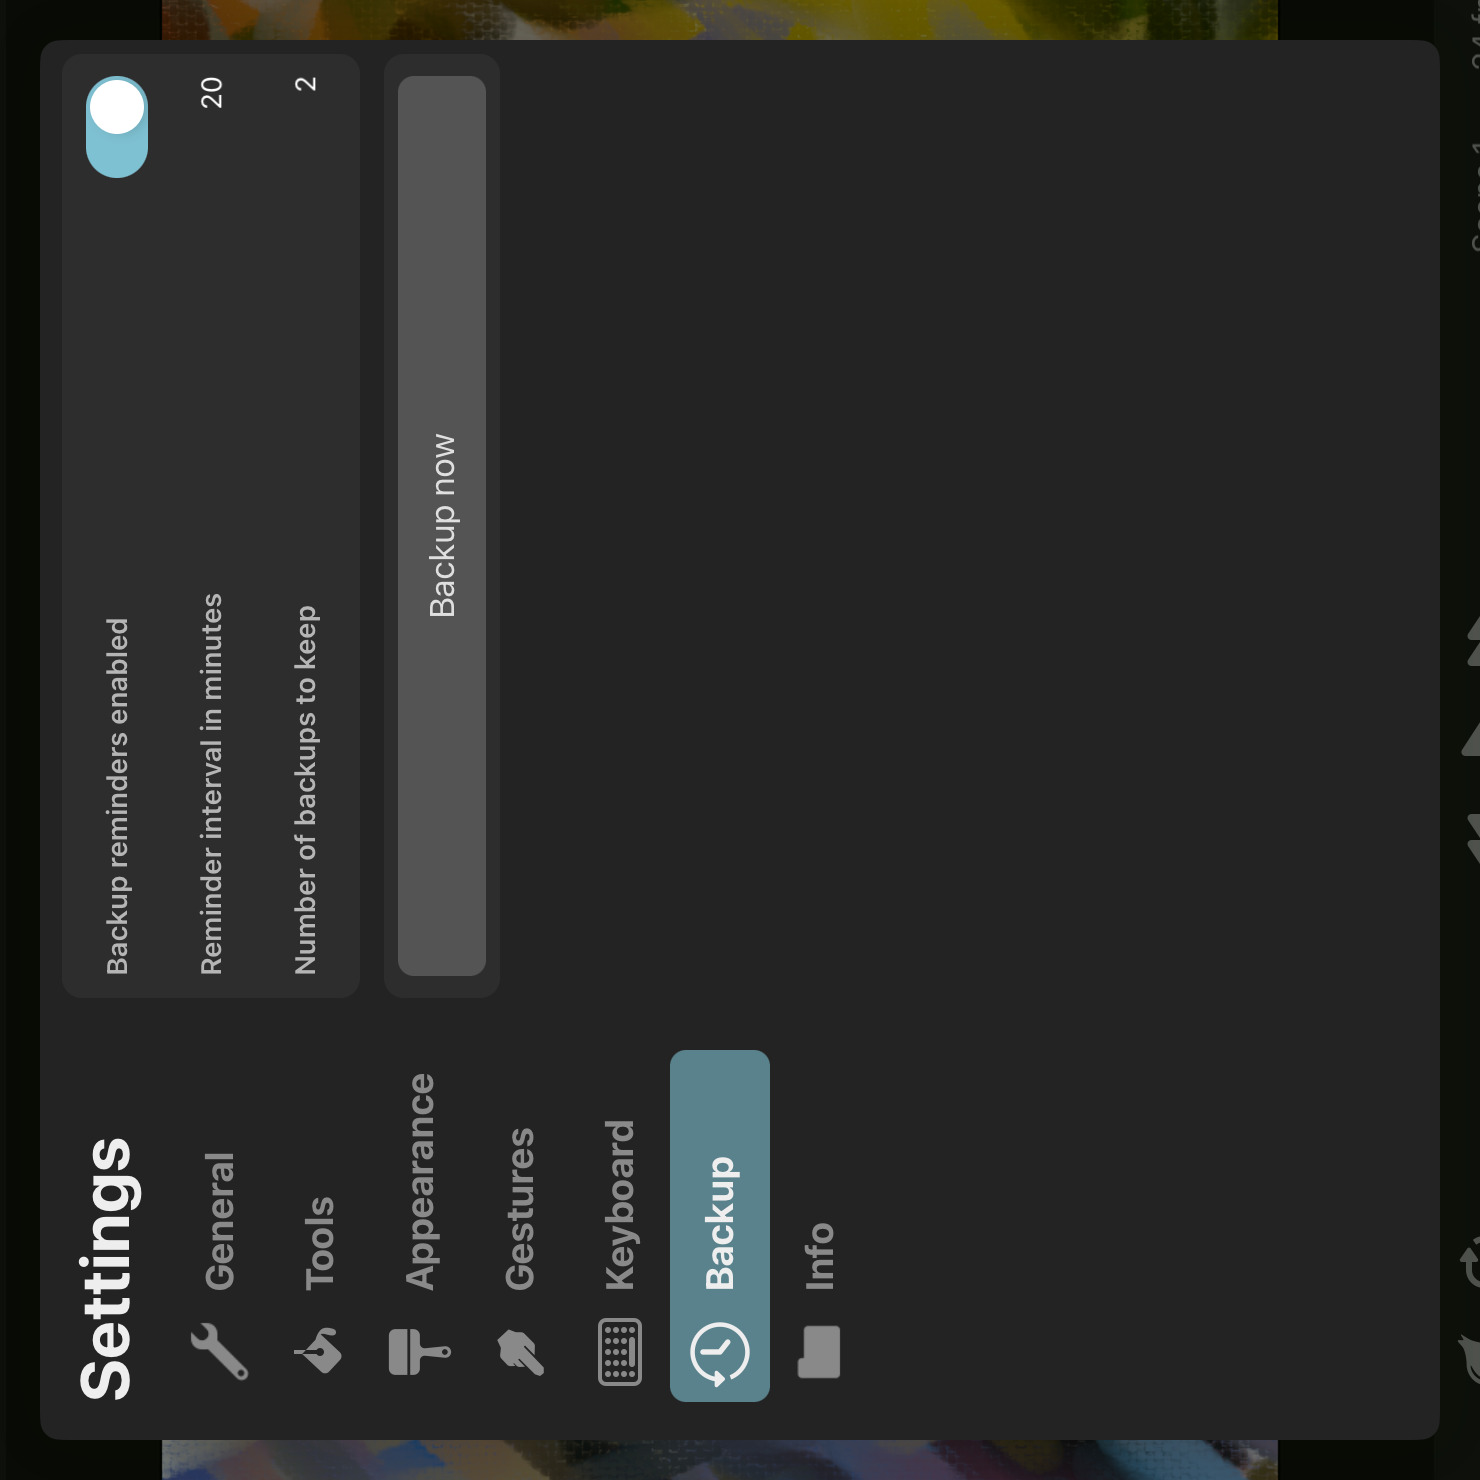
Backup Reminders Enabled#
If this is enabled, ToonSquid will regularly show you a reminder to backup the current project that you are working on. You can then create the backup with a single button press from the reminder or skip that backup.
Tip
It is highly recommended that you do not turn this off but to use this reminder in order to regularly create a safety backup of your projects.
Reminder Interval in Minutes#
Controls after how many minutes of working on a project a backup reminder is shown.
Number of Backups to Keep#
Determines how many separate backups of each project will be kept by ToonSquid. When this number is exceeded, the oldest backup is automatically deleted to free up storage space on your iPad.
Backup Now#
Use this button in order to immediately create a backup of the current project.
#
Settings
Project Info
This tab displays general information about the current project. Most fields here are just labels and are not editable.
Name#
The name of the project. This can also be edited here.
Resolution and FPS#
The resolution and frame rate of the project.
Crop#
Tap this button to switch to the crop tool in order to change the resolution of the project or the currently open animation clip.
Memory#
Storage Usage#
This is the size of the project folder on disk.
Cache Usage#
The amount of iPad storage that is being used for cached files for this project.
Some files that are generated during the editing of a project are cached for better performance. Cached files can always be safely deleted since they can be regenerated whenever needed.
Clean Up Project Storage#
Performs various cleanup tasks and attempts to reduce the amount of storage space that is taken up by the current project.
For example, if the application is quit (either manually by the user or because of a crash) while certain editing operations are in progress, the project size can become bloated due to data that was partially added to the project but cannot be used now because the operation did not complete safely. Deleting such leftovers can sometimes reduce the project size by a lot.
Since this kind of project analysis and cleanup can take a noticeable amount of time for large projects and is usually not needed for the vast majority of projects, it is not performed automatically but is left to the user to run at their convenience.
Clear Cache#
Deletes all currently cached files for this project.
Number of Scenes / Animation Clips / Video Clips / Audio Clips#
These labels show the number of various assets in this project.
Thumbnail#
Frame#
The frame number that is currently used as the project thumbnail.
Set to Current Frame#
Tapping this button will use the current frame of the selected scene or clip as the thumbnail of the project or the selected clip.
Project Actions#
Remove Partial Vector Overlaps#
Inserts new vector path control points in all vector layers and path layers of all scenes and clips of the project wherever necessary to remove partial overlaps between curves in the same vector layer or vector group. Path layers with keyframes or visible strokes are ignored.
Partial curve overlaps can result in undesirable rendering artefacts such as hairline gaps in the final export. Such partially overlapping curves were commonly caused by the vector fill tool in previous versions of ToonSquid. Projects that were created with ToonSquid version 2.0 or later should not require this action. It is also generally recommended to avoid this action unless you can see noticeable rendering artefacts caused by partial vector curve overlaps.
This action is not undoable and clears the undo history of the project.
Convert Vector Groups to Vector Layers#
Converts all vector groups in the project into vector layers if possible. This action is not undoable and clears the undo history of the project.
This action is not undoable and clears the undo history of the project.
Quick Guides#
Reset All Quick Guides#
When you use certain parts of the editor for the first time, ToonSquid shows you quick guides for a short introduction. Use this button to reset all quick guides and see them again the next time you use those functionalities.
#
Guides
Overview
Frequently Asked Questions
A list of answers to the most commonly asked questions about ToonSquid.
Animate with Frame Markers
Frame markers, symbols and keyframes can be used to quickly switch between different variations of parts of your animation, for example, different mouth shapes of a character during lip-syncing. Learn all about this process in this chapter.
Animate with Bones
This guide will give you an introduction to animating using the bones effect in ToonSquid.
#
Guides
Frequently Asked Questions
- Does ToonSquid require a subscription?
- How much does ToonSquid cost?
- Is there a trial version of ToonSquid?
- Who is the developer of ToonSquid?
- Will there be Android, Windows, macOS or iPhone versions of ToonSquid?
- Does ToonSquid own the rights to the art that I create with it?
- Can I sell custom brushes that I create with ToonSquid?
- I created art with ToonSquid. Would you like to see it?
- Does ToonSquid require an internet connection?
- I have an idea for a new feature.
- I want to edit the contents of my pixel layer but the transform tool is moving the entire layer instead
- Why is there a thin black border around my pixel layer?
- I'm trying to animate a pixel layer but it's not adding any keyframes
- I'm trying to resize a vector shape without changing the stroke width
- Why does my exported video not have a transparent background?
- Is it possible to change the resolution of a project after it was created?
- Can you use keyframes and frame-by-frame animation in the same project?
- Can you import SVGs into ToonSquid?
- Can you import PSD files into ToonSquid?
- What are all of the file types that can be imported into ToonSquid?
- Does ToonSquid have a layer limit?
- Do ToonSquid animations have a length limit?
- What is the resolution limit of ToonSquid projects?
- What are the system requirements for ToonSquid?
- Will ToonSquid be available in other languages?
- Why can I not see the “Select From Markers” option?
- What happened to my vector layers after the 2.0 update?
- I'm trying to export a project with video layers but the export failed
- Why does the “Save Video” option not show up for some projects after the export finishes?
- Where can I find more information about the commercial distribution of video files that use patented video codecs?
- When will the next ToonSquid update come out and what features will it have?
- Are there forums to discuss ToonSquid?
- I have more questions about ToonSquid
Does ToonSquid require a subscription?#
No.
A single one-time purchase at a very affordable price will get you ToonSquid with all of its features. Once you have bought ToonSquid, all future updates are free.
There are no hidden fees, no subscriptions, no features locked behind in-app purchases and no ads.
How much does ToonSquid cost?#
Simply click the "Download" link at the top of this page. This will take you to ToonSquid's App Store page, where you can see the current price of ToonSquid in your region and your currency.
Is there a trial version of ToonSquid?#
No, there is neither a trial version nor a free version with ads. I would recommend searching sites such as YouTube, Twitter, Instagram and TikTok for ToonSquid or #toonsquid, reading App Store reviews, watching the tutorial and feature announcement videos on the official YouTube channel and reading this handbook to get a better sense of what you can and can't do with ToonSquid before you purchase it.
Who is the developer of ToonSquid?#
ToonSquid is entirely made by one person, Keiwan Donyagard.
You can contact me directly about ToonSquid by sending an e-mail to contact@toonsquid.com.
Will there be Android, Windows, macOS or iPhone versions of ToonSquid?#
There are currently no plans for the development of alternative versions of ToonSquid for Android, Windows, macOS or iPhone.
ToonSquid has been engineered and designed from the ground up with the goal of providing the best 2D animation experience on the iPad. In order to do so, the app takes full advantage of and relies on the specific technological capabilities of the iPad and therefore cannot be run on other platforms.
Does ToonSquid own the rights to the art that I create with it?#
No! ToonSquid does not claim ownership of any of the art that you create with the app.
Can I sell custom brushes that I create with ToonSquid?#
Yes!
When you create your own custom brushes in ToonSquid, you can export them as individual files, share them with others and also sell them. ToonSquid takes no cut from any of the revenue from the sale of those brushes.
Such brushes may also use the default brush textures that come with ToonSquid.
However, you may not sell those default brush texture images separately from the brush that they are used by.
I created art with ToonSquid. Would you like to see it?#
Yes, please! I would love to see the drawings and animations that you make with ToonSquid!
If you would like to share your work on social media, you can tag the Twitter and Instagram accounts or use the hashtag #toonsquid.
Does ToonSquid require an internet connection?#
No.
You can use all ToonSquid features completely offline and your ToonSquid projects are all stored locally on your device.
I have an idea for a new feature.#
Please share all of your feature ideas! You can create a new discussion thread or comment on an existing one, where you can discuss the idea with other members of the community. You can also contact me directly with your idea at contact@toonsquid.com.
Of course, not all requested features are guaranteed to be implemented.
I want to edit the contents of my pixel layer but the transform tool is moving the entire layer instead#
By default, the transform tool edits the transform properties of the layer. If you want to edit the pixels within a pixel layer instead, you need to first select the region that you want to edit using the selection tool and then use the transform tool.
You can quickly create such a selection by tapping the transform tool button again while the transform tool is already active.
Why is there a thin black border around my pixel layer?#
That grey box shows the limits within which you can draw on a pixel layer and it is displayed if the layer is not in its default position in the global coordinate system.
This can be because you have moved the pixel layer itself e.g. using the transform properties in the inspector or by using the transform tool without an active selection area.
In this case, you can use this tip to quickly reset the position of the layer.
It can also be that the layer is inside of a transform hierarchy and one of the parent layers has an offset, a rotation or a scale that is not 1, which by definition propagates down to the child layer as well.
I'm trying to animate a pixel layer but it's not adding any keyframes#
Make sure that you have enabled keyframing mode in the timeline and that you are using the transform tool without an active selection area. If you have a selection area active, the transform tool will edit the selected pixels within the layer instead of the layer's transform properties, which is what you are trying to animate using keyframes.
For further information, please read the handbook sections on the topics of Transforming Selections and the Automatic Pixel Edit Mode Switching setting.
I'm trying to resize a vector shape without changing the stroke width#
If you edit the scale of a path layer, the scale factor will apply to all contents of the layer, including the stroke width. Instead of scaling the layer, you can edit the positions of the individual path control points, which keeps the stroke width constant.
Create a selection in order for the transform tool to edit the path control points instead of the layer's transform properties. The fastest way to create such a selection is to tap the transform tool button again while the transform tool is already active.
Why does my exported video not have a transparent background?#
The first thing to make sure of is that you have manually hidden the background layer in the timeline before exporting the video.
If you have selected the video export option, the MOV file format and have enabled the Include Transparency setting, then the exported video should have the .mov extension and the H.265/HEVC codec with transparency.
You won't see the transparency of the video if you just play it in the Photos app, the Files app or on your computer. There, it will play with either a solid white or a solid black background.
The easiest way to verify that the exported file contains the correct transparency information is to import it back into another ToonSquid project and draw something on a layer underneath. You can also check the codec of the video. On a Mac, you can open the video in Quicktime and press the command + i keys on the keyboard to see detailed information about the file.
The most common cause of confusion around videos with transparency comes from the fact that a lot of other software either does not support transparent videos at all or does not support the H.265/HEVC or ProRes 4444 codec. Please confirm with the documentation or the developers of the programs that you are trying to import the video into that they support the selected video codec.
Is it possible to change the resolution of a project after it was created?#
Yes, you can change the resolution of an existing project using the crop tool. You can find more information about this here.
Can you use keyframes and frame-by-frame animation in the same project?#
Yes, it is always possible to use all of ToonSquid's features in every project.
The default workflow that you choose when creating a project only configures a few default project settings to be more in line with typical traditional or keyframing workflows. All of these settings can be changed afterward as well.
Can you import SVGs into ToonSquid?#
Yes. You can learn more about SVG import and its limitations here.
Can you import PSD files into ToonSquid?#
Yes. You can learn more about PSD import and its limitations here.
What are all of the file types that can be imported into ToonSquid?#
You can find up-to-date lists of the supported file types that can be imported into ToonSquid projects on these pages of the handbook:
Does ToonSquid have a layer limit?#
ToonSquid projects do not have a fixed layer limit, but that also doesn't mean that you can have an infinite number of layers on each frame of your animation.
There is no simple formula to calculate how many layers your iPad can handle on a single frame. The exact number heavily depends on many different factors, such as the resolution, the type of the layers, the size of the region in the pixel layers that contain visible pixels, your screen resolution if you use vector-based layers, various layer settings such as opacity, blend modes, groups with blending settings, onion skin settings etc. All of these and more contribute to how much memory ToonSquid needs to show that frame and still have memory left to let you make edits.
Generally, the more RAM your iPad has, the more layers you can have on each frame.
Do ToonSquid animations have a length limit?#
No, there is no fixed limit to how long your ToonSquid animations can be.
As long as your iPad has enough free storage space to be able to save all of your drawings and enough space for when you want to export the animation into a single video file, you can keep adding more frames to your animation.
Note that this also does not depend on how much RAM your iPad has. The RAM amount only limits how many layers can be visible on the canvas at the same time. That being said, you might experience reduced performance during playback if not all drawings can fit into RAM at the same time.
What is the resolution limit of ToonSquid projects?#
You can create ToonSquid projects with resolutions up to 4096x4096 pixels.
This is also the export resolution limit.
What are the system requirements for ToonSquid?#
ToonSquid requires an iPad running iPadOS 15 or later. Please refer to Apple's support pages for the list of devices that are compatible with iPadOS 15.
ToonSquid does not officially support beta versions of iPadOS.
The app can be used without Apple Pencil, but it is highly recommended to use one for the best drawing experience. Drawing with your finger does not provide brush features such as pressure sensitivity and tilt controls.
Third-party styluses may or may not work with ToonSquid, depending on their features and how they are integrated with iPadOS. While various customers have reported that their third-party stylus worked without any issues, no official compatibility guarantees can be made about any specific third-party stylus.
Encoding videos with the HEVC codec is only supported on devices with an A10 chip or above. If you are using an older device, you can still export videos with the H.264 codec, but they will not have transparency.
Encoding videos with the ProRes 4444 codec requires hardware support by your iPad model. Please refer to Apple support if you are unsure whether your specific device provides hardware support for encoding ProRes 4444.
Will ToonSquid be available in other languages?#
At the moment, ToonSquid is available in English and Simplified Chinese, but localizations for other languages might be added in the future. Please reach out via the contact e-mail address and mention which language you would like to see ToonSquid translated into so that the most common requests can be prioritized. Thank you!
The ToonSquid handbook and customer support via e-mail are exclusively offered in English.
Why can I not see the “Select From Markers” option?#
Make sure that you have added the frame markers inside of the animation clip that is referenced by your symbol layer and not in the main timeline.
For example, in this guide about animating with frame markers, notice that the markers for the mouth are inside of the mouth animation clip that only contains the various mouth shapes. They mark the frames in that clip that correspond to different mouth shapes. When you add a symbol layer that references the mouth clip to your main timeline, the Select From Markers option lets you conveniently choose which frames of the mouth clip should be visible at which points in your main timeline.
You can open an animation clip in the editor to add frame markers to it by either
- Selecting it in the library and choosing the
Editoption at the bottom, or - Using the layer actions of the symbol layer and choosing
Edit Clip.
What happened to my vector layers after the 2.0 update?#
After updating to ToonSquid 2.0, you might have noticed that the vector layers in your old projects had been replaced with group layers containing path layers. This is because initially the ToonSquid 2.0 update had removed the concept of vector layers completely in favor of only having vector groups and path layers. A vector group can be edited in the same ways as a single vector layer.
However, by popular demand, the ToonSquid 2.0.4 update (which was released soon afterwards) reintroduced the vector layer as the default drawing destination for vector brushes while still keeping the option to use the new powerful vector groups, which enable various new workflows that are not possible with vector layers.
If you had opened an old project in ToonSquid 2 before the 2.0.4 update and would like to convert the automatically created vector groups back to vector layers, follow these steps:
- Open the project.
- Tap on
Actionsat the top. - Tap on
Settings. - Select the
Infotab on the left. - Scroll down and select
Convert Vector Groups to Vector Layers.
I'm trying to export a project with video layers but the export failed#
Please try the following steps:
- In the iPad Settings app, go to
ToonSquid > Resources > Video Decoding Memory Usage - Change that setting from
MediumtoLow. - Retry the export.
If the export still fails, please reach out via the contact e-mail address and include the following information:
- The iPad model that you are using
- The iPadOS version that you are using
- The ToonSquid version that you are using
- The Log.txt file, which you can find in the Files app under
On my iPad > ToonSquid > Logs - If possible, a copy of the project file that you are trying to export
Why does the “Save Video” option not show up for some projects after the export finishes?#
Whether or not the Save Video option shows up in the share sheet is fully determined by the Photos app without ToonSquid having any control over it. The Photos app appears to have certain limitations for the files that it is willing to accept, but unfortunately, there is no public definitive information on what the exact limitations are.
You might be hitting a video resolution limit of the Photos app. You can try to export at a lower resolution and see if that makes the Save Video option show up.
Also make sure that the export name of the project is not empty since the Photos app will otherwise not accept the file.
Regardless of the quirks of the Photos app, you can always save the exported file to the Files app on your iPad using the Save to Files option.
Where can I find more information about the commercial distribution of video files that use patented video codecs?#
When exporting video files using MPEG-4; H.264/AVC or HEVC technology, ToonSquid uses the video encoding functionality provided to you by your operating system. You can find all the details about the terms of use of this encoding functionality in the Software License Agreements of your operating system.
Depending on the specific details of your commercial video distribution use case, additional licenses and potential royalty payments between you and the patent rights holders of these video technologies might be necessary. For more information about this topic, please contact Via Licensing Alliance LLC (Via LA) directly. See https://www.via-la.com/contact-2/.
As mentioned further above, ToonSquid itself does not claim any ownership of the art that you create with it, nor does it take any cut from any revenue that you generate from the sale of your art or the distribution of your videos.
When will the next ToonSquid update come out and what features will it have?#
As mentioned above, ToonSquid is entirely made by one person and I am working on it in addition to other projects, so I can neither give a time estimate for when the next update will be ready, nor whether and when any specific feature will be added.
Many unpredictable factors can delay the next feature release, such as high-priority bugs popping up that need to be fixed as quickly as possible or large amounts of general support requests via e-mail.
A big thank you here as well to everyone who has been actively answering questions of other ToonSquid users in the discussion forums and on other public platforms. This has a very noticeable impact on my ability to focus more of the little time I have on the development of the app.
The best way to stay up-to-date with the latest news about new versions of ToonSquid is to subscribe to the ToonSquid YouTube channel and to follow the Bluesky and Instagram accounts. Announcements are posted there whenever a new feature version is released.
Are there forums to discuss ToonSquid?#
Yes, ToonSquid Discussions is a public forum where you can have conversations and ask questions about ToonSquid. Simply click on the "Discussions" link at the top of this page.
This forum is hosted on GitHub and requires you to create a GitHub account if you want to post to the forum. You can read all existing discussion threads without creating an account.
GitHub is a very large platform owned by Microsoft that is trusted by millions of developers (including the developer of ToonSquid). Please refer to GitHub's privacy policy before creating an account. The developer of ToonSquid will have no insight into or control over the personal data associated with your GitHub account.
I have more questions about ToonSquid#
You can search existing discussions to see if other users of ToonSquid have already asked and answered your questions. If not, you can create a new discussion where you will get help from the community or the developer.
You can also contact the developer directly at contact@toonsquid.com.
#
Guides
Animate with Frame Markers

Frame markers, symbols and keyframes can be used to quickly switch between different variations of parts of your animation.
Let's look at how this can help us to speed up a lip-syncing workflow. Our scene contains an audio layer with the spoken sentences to which we want to sync the mouth of a character.
Creating a Mouth Symbol#
We create a symbol which will hold all of the different mouth shapes that are needed for lip-syncing. Each mouth shape lives in a separate drawing.
We then add frame markers to each one of the frames with the drawings and use the marker comments to highlight which sounds / letters each mouth shape corresponds to.
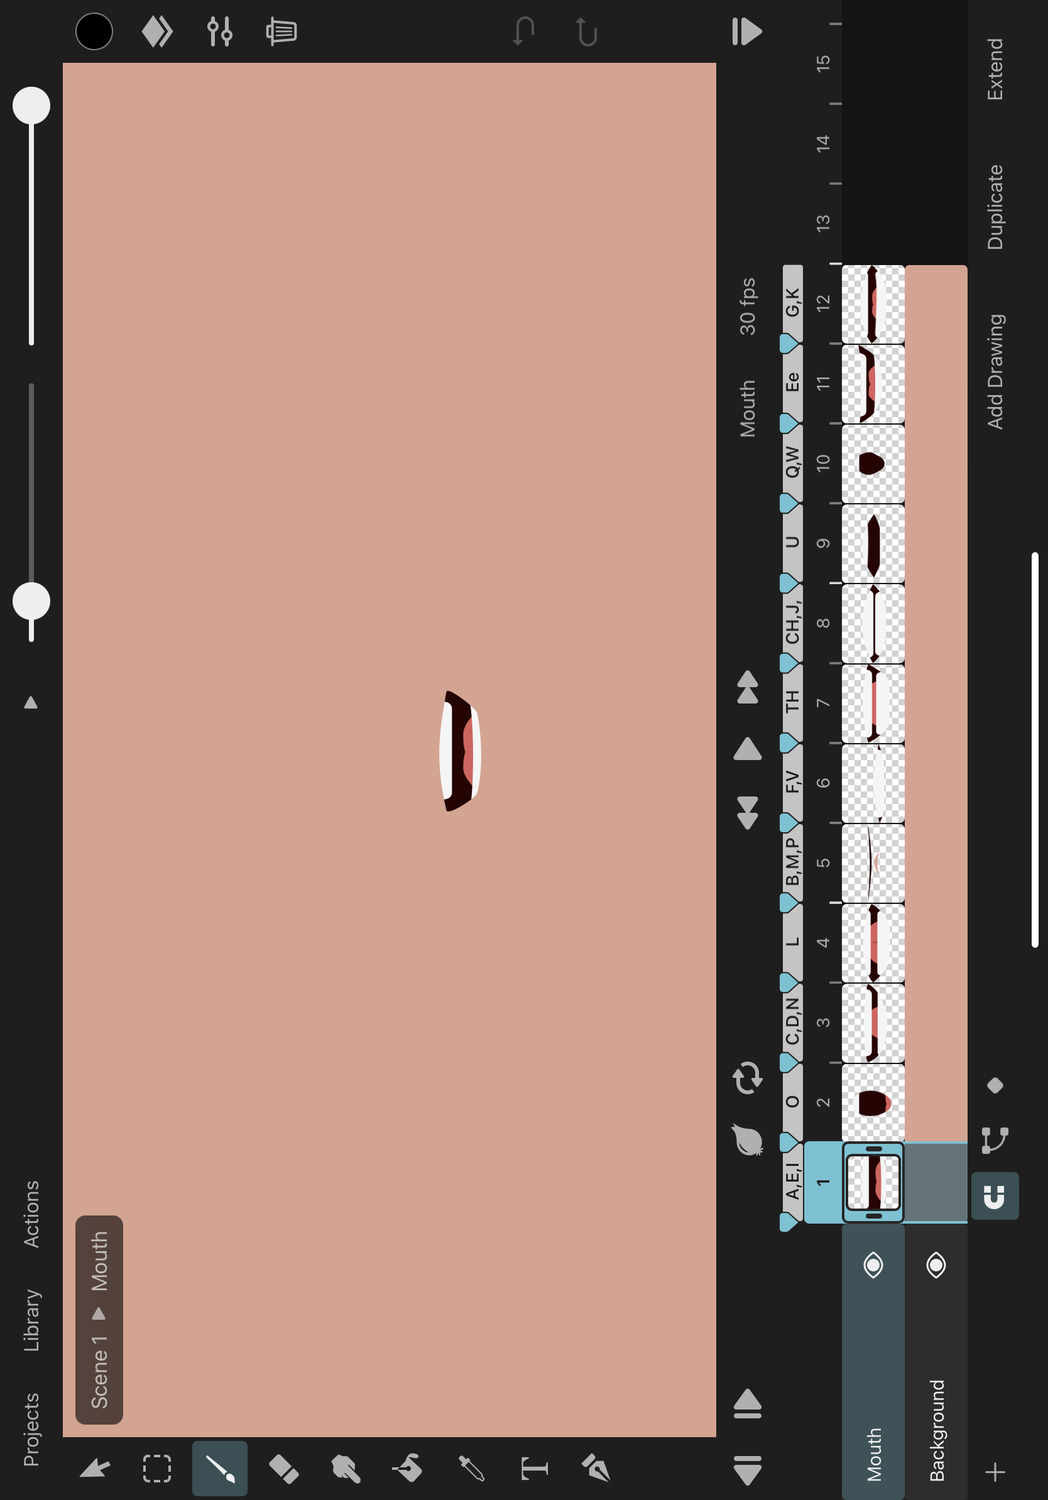
Adding Time Keyframes using Markers#
We can now return to our main scene in which we have placed the mouth symbol on our character's face.
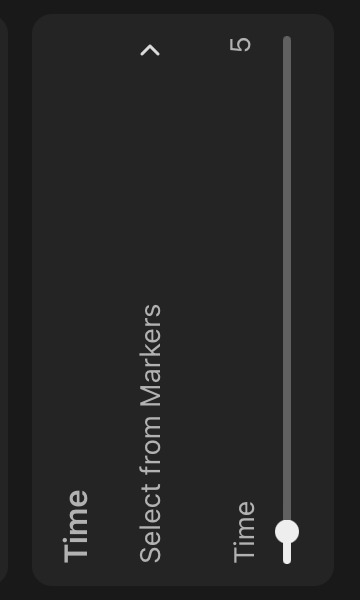
When you add frame markers to an animation clip that is used as a symbol, you get the option to edit the time property of the symbol layer by selecting from the list of frame markers instead of having to use a slider or having to manually input the frame numbers by hand.
Whenever we select a marker from this grid, a new keyframe is added to the time property on the current frame. This means that we can now just scrub through our timeline while listening to the sounds of the audio layer at each frame and then simply pick the corresponding mouth shape for each moment from the inspector.
Frame Marker Ranges#
When you select a marker that only spans a single frame, the new time keyframe will have a Hold easing curve which causes that same frame to remain visible until the next keyframe.
If you select a marker that spans a range of multiple frames, two time keyframes are inserted which will cause the entire marked range to be played.
One way to use this is shown below. We move the eyes of our character into their own separate symbol, where we then create two animations. On the first frame, we keep the eyes in their normal open state and annotate this frame with a marker. Between frames 2 and 6, we animate the eyes blinking and also annotate this range.
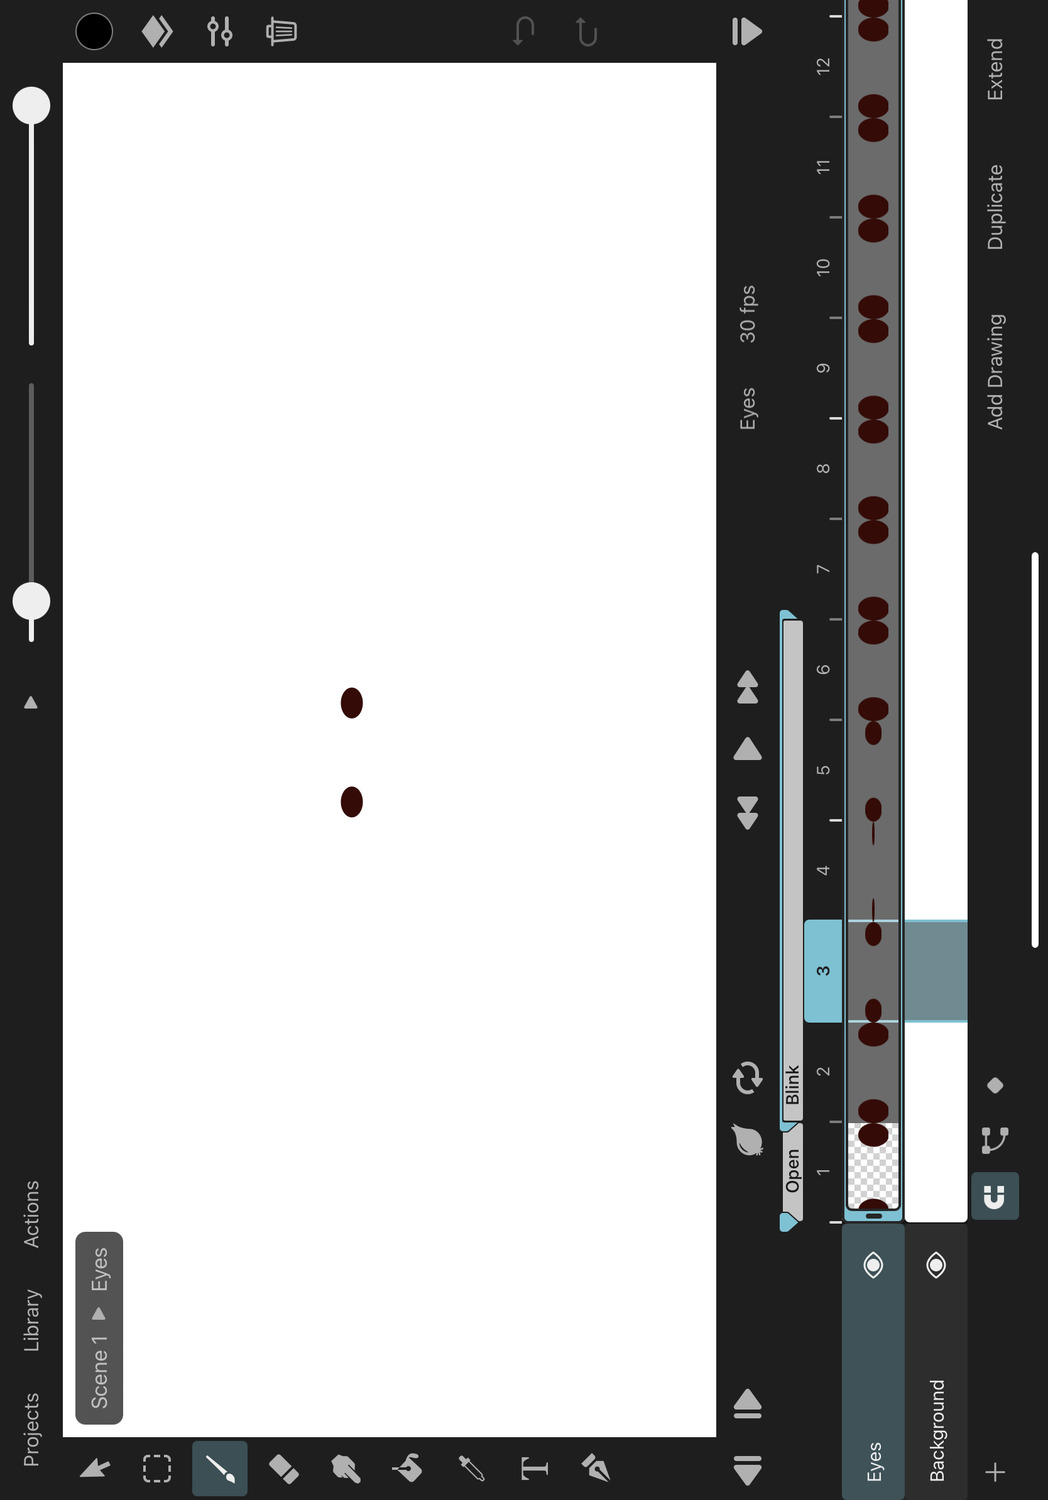
In our main scene we can now select the "Open" frame marker on the first frame of the eyes' symbol layer and whenever we want our character to play the blinking animation instead, we just move the play cursor to that frame and then select the "Blink" marker.
#
Guides
Animate with Bones
This guide will give you an introduction to animating with bones in ToonSquid. For a full in-depth explanation of all the details surrounding bones and rigging in ToonSquid, please refer to the handbook page of the bones effect.
What are Bones in Animation?#
In digital animation, bones are a widely used tool to simplify certain animation tasks.
When we want to animate a character that is made up of shapes or meshes with many control points, it would not only be time-consuming to animate each point individually with keyframes, but it would also be very difficult to maintain the correct proportions and shapes of the character at all times. Instead, we can separate the problem into two parts using the concept of skeletal animation.
We create a skeleton of bones – also called a "rig" – that forms the basic structure of the character and we define how this skeleton is connected to the character's visual parts – the layers, shapes and meshes. This connection to the bones (also called the "binding") allows us to simply animate the bones of the skeleton and the character will follow along.
A Bendable Arm With Vectors#
As a simple first example, let's try to use bones to create a rig for a bendable arm with a vector shape.
We start with a path layer that contains a stroked line with two control points.
To add bones to this line, we open the inspector, tap the + next to Effects and select Bones from the list. Now we have a bones effect on our path layer. You can also see that the editor automatically switched to the Add Bones tool.
We want the arm structure to consist of two bones - one for the upper arm and one for the lower arm - so that the arm bends in the middle. To create such a rig, we touch and drag from the base of where the upper arm bone should start to the center of the arm. This adds our first bone. Next, we drag from the center of the arm to its other end to add the second bone.
Because the first bone was selected when we added the second bone, a hierarchy between them is automatically created and the lower arm is added as a child of the upper arm bone. This means that rotating and moving the upper arm will also affect the lower arm.
If you want to add a bone without connecting it to another one in the hierarchy, deselect the selected bone first by tapping somewhere else on the canvas.
In order to move and rotate the bones to try out the rig, we switch to the Transform Bones tool. Now we can grab a bone to rotate it or drag the circular handle at its base to move it around.
When rotating the lower arm bone, we immediately see that the arm isn't behaving quite as we wanted. Instead of bending at the center, we still end up with a straight line between the base of the first bone and the tip of the second bone, even though there is now an angle between the two bones.
This is because the vector shape only has two control points. The bones bind to the existing control points of the vector shape. The amount by which a control point is affected by the movements of the bones depends on the distance between the control point and each bone and the strength of the bones.
In order to make our line bend when we rotate the bone, we have to add another control point in the middle of the line.
Tap the back arrow on the left above the tools and select the path tool.
At this point, you should immediately notice something: The line jumped back to its initial horizontal state, even though the layer still has a bones effect. That's because effects are automatically disabled in the editor when you switch to certain tools, such as the path tool. You can also see that effects are disabled because the FX button at the bottom is not highlighted.
We add a third control point in the middle of the line and then select the bones effect in the inspector. This automatically enables effects again and switches to the Transform Bones tool. Now, the line shape can bend around that new control point.
If we want the bend around the elbow to be smooth instead of a sharp corner, for example, to animate in a "rubber hose" style, we can go back to the path tool, select the middle control point and change its mode to Symmetric. The extended handles of the bezier curves will now keep the line smooth when you bend the bones.
Binding Bones To Multiple Layers#
In the previous example, we only had a single layer we wanted to animate with bones. However, most of the time when you create a rig, you want the bones to affect multiple layers at once. For that purpose, the bone and layer setup has to be slightly different.
In order to animate multiple layers at once with a rig, you have to create a group layer, place all layers that should be affected by the bones inside that group and then add the bones effect to the group layer. If necessary, you can then manually define which of the bones should bind to which layers in the group.
Important#
It is important that you don't add separate bones effects to the individual layers of your character but instead create the entire rig in a single bones effect on the group layer. Bones in separate bones effects cannot interact with each other or form a hierarchy and will therefore most likely not provide the results that you are looking for.
Also avoid creating a layer setup where some layers are controlled by multiple bones effects. This will lead to unpredictable results.
For example, let's take a look at this stick figure character. Its body consists of separate path layers inside of a group. We want to create a character rig that allows us to animate this entire stick figure using bones.
We select the group and add a bones effect to it. Then we add all of the bones that we need for our rig. Remember to select the bone which should become the parent of the bone you add next, but don't worry if you forget and end up with the wrong connections. You can always edit the bone hierarchy in the inspector without having to delete any bones.
There is still something we need to adjust. With this setup, all of the bones are bound to all of the layers, which is not entirely what we want. For example, when moving the bones of the right leg, we don't want the left leg, the arms or the head to be affected at all.
To customize the binding of a bone, we tap the bone and choose Edit Bone Binding. Next, we select a layer that should be bound to this bone. We repeat this step for all layers that should be bound to the bone and then move on to the next bone that requires a custom layer binding.
Bones and layers that are part of such a manually defined binding are only bound to the layers / bones that are part of this binding. They are not automatically bound to any other layer / bone any more.
With this step completed, we now have a rigged stick figure that we can animate by moving and rotating the bones.
Editing the Bind Pose and Fixing Mistakes#
Sometimes you need to make adjustments to a bone in the bind pose of a rig, for example because you realize that you didn't place the bone correctly or because some layer contents have changed. To do this, you don't have to delete the bone and start over. If you disable effects in the editor, you can use the Transform Bones Tool to edit the bind pose transform of each bone instead of animating the bones with keyframes.
Inverse Kinematics#
With inverse kinematics (IK), you can use a single bone - the IK target - to define where you want the tip of the last bone in a chain of bones to be. The positions and rotations of all of the bones in the chain are then automatically calculated to try to get the tip of the last bone as close as possible to the IK target position. This calculation is also referred to as "solving" the IK chain.
One way that we can make use of this for our stick figure rig is by adding IK targets to the feet of the character. That would have two benefits:
- It would allow us to simply animate the feet and have the legs follow instead of having to keyframe all of the leg bones individually.
- Placing the feet targets on the ground and moving the hip bone up and down would automatically update the legs to keep the feet on the ground. Doing this by hand would be very difficult to get right without ending up with feet that slide or feel floaty.
To add an IK target bone to one leg, we first have to make sure that no other bone is selected. If a bone is already selected, tap somewhere else on the canvas to deselect it.
Important#
The IK target must not be part of the bone hierarchy that it should control.
With the Add Bones Tool selected, we then add a new bone at the foot. Since we only want this bone to act as an IK target for the lower leg bone without influencing any of the character's layers directly, we reduce its strength to 0. We can also rename the bone to Right Leg IK Target to make it easier to select later.
Next we have to connect the leg to the new IK target bone. We tap the lower leg bone, in the inspector tap on IK Target and then select our IK target bone from the list. That's it. Now we can move the IK target bone and the leg will follow along.
You can learn more about inverse kinematics in ToonSquid on the bones effect handbook page.
IK Chains Bending The Wrong Way#
When animating with the help of the inverse kinematics constraint, you might sometimes notice that the bones in an IK chain suddenly bend in the wrong direction when you move the IK target, for example causing the knees of your character to bend inwards instead of outwards.
There are two reasons for this:
- The IK solver does not know anything about the visuals and semantics of your animation, so any solution that gets the IK target as close as possible to the tip of the last bone is considered valid.
- The solution of an IK chain on a given frame does not depend on the orientations of the bones on the previous frame. The solution is always determined from the current keyframed positions of the bones and the IK target.
Fortunately, we can use this knowledge to always manually point the solver towards the correct solution that we are looking for.
When you notice that the bones in an IK chain are bent in the wrong direction on a certain frame, you can grab the bones (optimally starting at the base of the chain) and drag the bone towards the direction that you want the chain to bend. The bone will not immediately follow your finger as you drag it, because its final position is still determined by the IK solver. However, dragging the bone still inserts rotation keyframes, which change the initial direction of the bone in which the IK solver will try to look for a solution. This way, once you drag the bones far enough, the IK chain should snap into another correct solution (if such a solution exists). You can repeat this process with the other bones if necessary until all bones are oriented correctly.
Adding Custom Meshes#
Not all layer types automatically deform in the same way that vector shapes do when they are bound to bones.
Pixel layers that are bound to bones are warped as if they had a warp effect attached to them. When bones are bound to any other layer that has transform properties (e.g. symbol layers or text layers), the bones will control the position, rotation and scale of the entire layer.
In order to have full control over how a layer deforms - and to make symbol and text layers deform at all - you have to add a mesh effect to the layer. The mesh effect allows you to define a custom triangle mesh on top of which the contents of your layer will be displayed. The bones effect will bind to the individual vertices of the mesh and move them around, which then in turn deforms the layer contents.
When creating the mesh, try to create smaller triangles covering the layer regions with fine details and where you expect heavy deformations to take place. Smaller triangles result in smoother deformations and less visible seams caused by distortion differences between neighboring triangles. You can use larger triangles in areas where you don't expect much deformation or areas that only contain a single color.
No search results