ToonSquid 2.0
06 February 2025
ToonSquid 2.0 is finally here and it's the biggest update to ToonSquid yet! Here's everything that's new or changed:
Effects#
One of the most significant new features in ToonSquid 2.0 is the new powerful effects system. Add nondestructive effects to your layers to dynamically modify their appearance and animate them to create stunning visuals.
From visual filters like Gaussian Blur and Adjustments, over utilities such as the Parallax effect, to an entire bone rigging system including inverse kinematics, the new effects system is a game-changer for ToonSquid. Not only does it introduce many of the most requested features since the launch of ToonSquid, it also opens the door to many more exciting possibilities in the future.
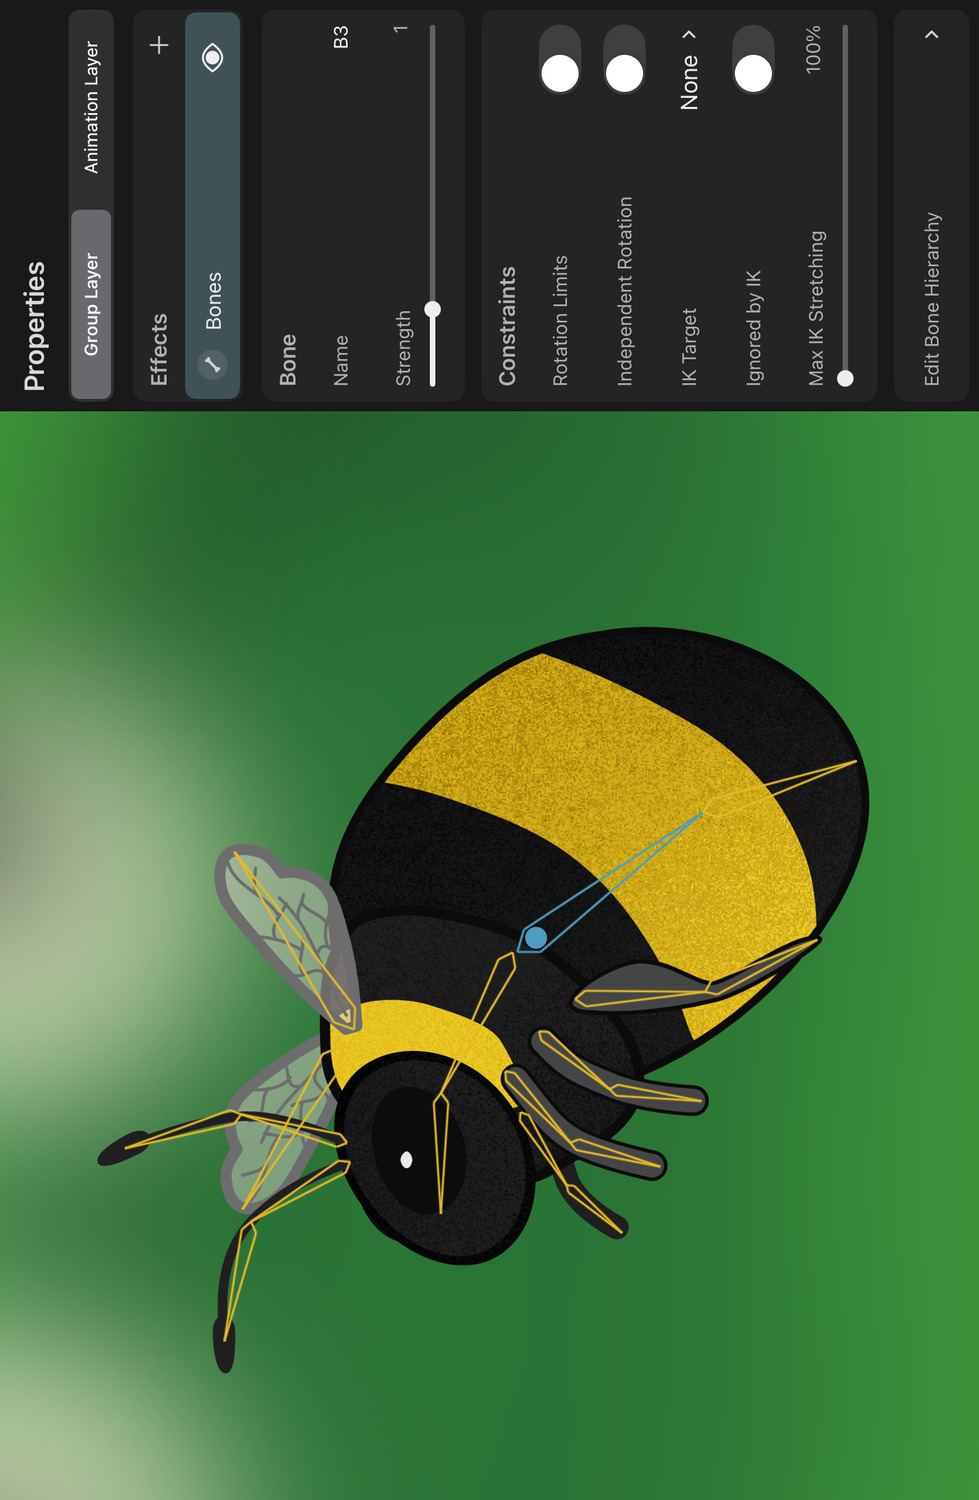
Bones#
The Bones effect brings skeletal animation to ToonSquid. Create a bone rig to control and animate your layers by moving the bones instead. Add the effect to a group layer to bind the rig to all of the layers in the group. You can also still fine-tune the binding between individual bones and layers in the group manually.
The inverse kinematics constraint makes it possible to animate an entire chain of bones by simply moving a single IK target bone.
Learn all about working with bones in the ToonSquid handbook.
Gaussian Blur#
Blur the contents of your layer using the Gaussian Blur effect. As with all effects in ToonSquid, the blur is nondestructive by default and its intensity can be animated with keyframes, but you can also make destructive edits by rasterizing the blurred result into a pixel layer.
Animatable Perspective and Warp Effects#
The Perspective and Warp scaling modes have been a part of ToonSquid for a while, but they could only be used to destructively edit the contents of a pixel layer. Many had wished to be able to animate such distortions and the new effects system in ToonSquid finally makes this possible with the new Perspective and Warp effects.
Mesh#
With the Mesh effect you can define a custom mesh for full control over how a layer's contents can be deformed. This is mainly useful when binding a bone rig to layers without vector contents, such as pixel layers, text layers or symbol layers.
Parallax#
The Parallax effect makes it easy to achieve a parallax effect by automatically moving the layer in the opposite direction of the camera movement. This is useful for creating a sense of depth in your scene without having to manually animate the position of each individual layer exactly opposite to the camera movement.
Drop Shadow#
Add drop shadows to your layer contents.
Adjustments#
Change the hue, saturation, brightness and contrast of a layer with the Adjustments effect.
Pixelate#
Pixelate the contents of a layer with the Pixelate effect.
Chroma Key#
Have you ever wanted to import a green screen video directly into ToonSquid without having to key out the background with a separate tool first? Now that's possible thanks to the Chroma Key effect.
Sharpness#
Change the sharpness of a layer with the Sharpness effect.
Halftone#
The Halftone effect simulates the look of a printed image by converting the layer contents into a pattern of black dots.
Noise#
Combine a noise signal with a layer property of your choice with the Noise effect. The possibilities are endless.
Orient Along Motion Path#
Automatically rotate a layer to point in the direction of its movement with the Orient Along Motion Path effect.
Spin#
Rotate a layer at a fixed or animated speed with the Spin effect.
Groups#
Group layers in ToonSquid are now more powerful and useful than ever before.
Animate Group Transforms#
Group layers now have transform properties. This means you can now animate the position, rotation and scale of multiple layers at once by simply placing them in a group and animating the group's transform. No symbols or transform layers are required.
Loop Drawings Without Symbols#
Previously, you could only loop drawings by moving them into a symbol clip and then looping the symbol layer. This has the big downside that your drawings are now in a separate clip and editing them afterwards in the context of the main scene becomes cumbersome.
Now, group layers in the timeline have a loop option that allows you to loop the drawings within the group without any need to move them into a separate clip. Simply select the drawings you want to loop, tap the selection again, select Loop Drawings and the looping group layer is created automatically.
Retime Group Layers in the Timeline#
With the ability to loop the drawings within a group layer, you can now also change the start and end frame of the group layer in the timeline.
Vector#
ToonSquid 2.0 comes with a massive overhaul of the vector tools and layer types, bringing more consistency and introducing numerous new workflows that were not possible in previous versions.
In previous versions of ToonSquid the main two layer types when working with vectors were the vector layer and the path layer. The vector layer is the default drawing destination for vector brushes. In ToonSquid 1, it could only contain closed, filled shapes with a solid color. You could erase its contents with the eraser tool, fill closed regions with the fill tool and cut and paste selection areas similar to pixel layers. The vector layer did not support strokes or gradients and the individual shapes inside could not be manually selected or edited using the path tool.
In ToonSquid 2.0, the vector layer can also contain open subpaths, strokes and gradients.
The path tool and shape library on the other hand create path layers, each of which represent a single vector shape with a stroke and/or fill (both of which could be gradients) with stroke and trim properties and whose individual control points could be selected, edited and animated with keyframes. In ToonSquid 1, the shapes could only have a single subpath and did not support the eraser and fill tools or the selection cut and paste feature.
In ToonSquid 2.0, path layers can have multiple subpaths and they can be edited and created with the brush, eraser, smudge, fill and transform tools, similar to vector layers - mostly thanks to the new concept of vector groups.
Vector Groups#
In ToonSquid 2.0, group layers that only contain path layers are now called Vector Groups. The editor provides special treatment for such vector groups and allows you to edit them in the same way that you can edit vector layers, with the additional benefit that you also get to directly access and edit the individual shapes inside the group.
Vector layers can be converted to vector groups and most vector groups can be converted to vector layers, which gives you the flexibility to start working with vector layers and then later convert any of of them to a vector group for more fine-grained editing options, or in order to animate your vector brush strokes. You can read a more detailed comparison between vector groups and vector layers here.
Other than this, vector groups are the same as other group layers.
Multiple Subpaths in Path Layers#
Path layers can now contain multiple subpaths, allowing you to create more complex shapes with holes and other features that were not possible before. This is also one of the many new changes that made it possible to replace vector layer contents with path layers, as mentioned above.
SVG Import#
Now that path layers can have multiple subpaths and group layers have animatable transform properties, it is finally time to introduce one of the most requested features yet: The ability to import SVGs.
For the first time, you can create vector designs outside of ToonSquid and import them into a ToonSquid project for animation.
Select and Transform Shape Control Points#
Previously, you could only transform an entire shape of a path layer at once. Now you can also use the selection tool to manually select a set of control points and then transform that selection with the transform tool.
Perspective and Warp Scaling Modes#
The Perspective and Warp scaling modes of the transform tool used to require you to first rasterize your vector layers into pixel layers. Now you can use these modes to edit the vector control points of a path layer directly.
Vector Stroke Brushes#
ToonSquid has had vector brushes that could draw filled vector shapes since its first release. ToonSquid 2.0 introduces vector stroke brushes, a new type of vector brush which draws stroked paths instead of filled shapes.
Vector Trimming#
Sometimes you have two overlapping vector shapes and want to clip away the parts of the top shape that protrude past the bottom shape. This is now possible with ToonSquid's new vector trimming feature. All vector stroke brushes automatically act as a vector trimming tool when they are selected as an eraser.
Vector Fill Modes#
The fill tool for vector contents introduces new fill modes in ToonSquid 2.0. Previously, it would always add new vector shapes to the vector layer being filled, which over time could add up to create performance drops and reliability issues for subsequent fills due to a high number of overlapping vector shapes.
By default in ToonSquid 2.0, the vector fill tool will add a new shape when filling holes but will change the color of an existing shape if one was tapped. You can of course change this mode back to the previous behaviour of always adding new shapes as well.
Path Layer Merging#
If two path layers have the same visual properties, the Merge Down action will merge their shapes together without rasterization, unlike in previous versions of ToonSquid where this action would always rasterize the path layers.
Changes to Path Control Point Keyframes#
Depending on how you have previously used the path tool for keyframing your vector shapes, you might notice a change regarding path control point keyframes in ToonSquid 2.0.
Previously, each keyframe of the Control Points property of the path layer could contain a shape with a different number of control points and a different open or closed state. This is not possible any more for new path layers in ToonSquid 2.0. The shape of a path layer must now have the same number of subpaths and control points throughout the timeline.
There are multiple reasons for this change:
- ToonSquid 2.0 has an overhauled keyframing system and timeline which allows for layers and effects to have a variable number of properties. Path control point keyframes are now stored for each control point of a shape individually, instead of always storing the entire shape. This allows you to set keyframes on different frames for individual control points and even assign different easing curves to them to create vector animations that were not possible with previous versions of ToonSquid.
- Storing the control point keyframes for each individual control point and having the guarantee that the number of subpaths and control points doesn't change over time for a single path layer is an important basis for some features that are planned for future updates of ToonSquid.
- The same exact visual results that could previously be achieved by keyframes with different numbers of control points can still be achieved in ToonSquid 2.0 by simply splitting the drawing at the time when the number of control points should change and therefore working with multiple path layers. For animations that were trying to morph one shape into another, you can achieve the same results by creating a shape with the maximum necessary number of control points and overlapping some of the points to create shapes that need fewer control points. For example, when morphing a triangle shape into a square, create a path with four control points and overlap two of them at the start to form the triangle shape. This approach is superior to keyframes with different control point numbers since it gives you a lot more control over the exact movement of each individual control point.
Note that you do not have to worry about the appearance of your old ToonSquid projects changing when you open them after updating to the new version. If an old path layer had control point keyframes with different numbers of control points or different closed states, it will be loaded as a legacy control points property with the same behaviour as previously. However, unlike with newly created path layers, you will not be able to expand this Control Points property to see or edit the keyframes of individual control points and certain other new or future features of path layers and effects will not be available until you choose the Migrate Legacy Keyframes action to replace those keyframes with the new control point keyframes of ToonSquid 2.0.
Together with this change, the Replace option of the path tool has also been removed in ToonSquid 2.0.
Other Changes#
Fullscreen Mode#
ToonSquid 2.0 comes with a fullscreen button in the top right corner of the editor. Tap this button to hide all of the UI and focus on the canvas where you are drawing or animating. This can also help avoid accidental button presses while drawing.
Loop Keyframes#
The times of tediously copying and pasting your keyframes just to loop an animation segment are finally over with this update. Select the keyframes you want to loop, tap them again and choose the Loop action.
Changes to the Edit Pixels and Edit Path Transform Tool Modes#
When using the transform tool with pixel layers or vector / path layers in previous versions of ToonSquid, you had to use the Edit Pixels or Edit Path buttons of the tool to control whether the tool should be editing the animatable transform properties of the layer or its contents.
This frequently caused confusion among a large number of users who did not realize that they had the transform tool set to the wrong mode for what they were trying to achieve. There was confusion such as:
- Why aren't keyframes being inserted when I'm trying to animate my pixel layers?
- Why is the transform tool moving the drawable region of a pixel layer if I just want to shift or resize its contents?
- Why are child layers in my transform hierarchy not moving when I move a parent layer with the transform tool?
In ToonSquid 2.0 the Edit Pixels and Edit Path buttons are gone, but all of the same types of edits as before are still possible.
ToonSquid now relies on the fact that it has already been possible to distinguish between editing the layer transform or the layer's contents using a selection area. With an active selection, the contents of the layer are edited.
Instead of always having to use the selection tool to manually draw a selection region, in ToonSquid 2.0 you can simply tap the transform tool button a second time to automatically create a selection that covers the entire layer region. This way you can quickly switch between the different editing modes.
In addition to this, pixel layers are treated as a special case by default and thanks to the new Automatic Pixel Edit Mode Switching setting, ToonSquid tries to automatically determine whether you likely want to edit the pixel contents or the layer transform, without you having to think about it at all.
Delete Keyframes on the First Frame#
ToonSquid 2.0 does not force a keyframe to exist on the first frame of each layer any more, so you can delete it or shift it to another frame. By default, ToonSquid will still automatically insert a keyframe on the first frame when you add a keyframe on any other frame so that you immediately end up with an animation, but you can now turn this behaviour off with the Always Add a Keyframe on the First Frame setting.
Import Assets with Drag and Drop#
Assets can now be imported into ToonSquid with a drag and drop gesture from other apps.
New Onion Skin Default Behaviour#
Starting with ToonSquid 2.0, onion skins are only shown for the selected animation layer by default, which is most of the time what you want rather than seeing onion skins for all layers. In cases where you want to see onion skins for other layers as well, you can enable them on each layer individually.
Looped Onion Skins#
The onion skin options now include a Loop setting which shows an onion skin of the first drawing in the layer after the last drawing and vice versa. This is particularly useful when animating loops, where you would otherwise have to temporarily copy and paste the first drawing to the end of the loop while drawing the in-betweens.
Default Easing Curve#
Previously, new keyframes always had a linear easing by default. Now you can save any easing curve configuration as the default for all new keyframes.
Image Sequence Drawing Export Mode#
The new Only Export Drawings setting of the image sequence export makes it possible to export the individual drawings of your animations from ToonSquid while keeping the animation layers separated and only exporting a single image per drawing, no matter its duration in the timeline.
Add and Duplicate Drawings Without Splitting#
You can now disable the Split Existing Drawings When Adding New Drawings setting to prevent drawings that are longer than one frame from being split when you press the Add Drawing or Duplicate buttons. The new drawing is instead added after the selected drawing.
Hide Motion Paths#
Sometimes, the motion path of a layer can clutter up the canvas and make it hard to see what's going on. Now you can temporarily hide it with the Show Motion Path setting.
Enter Brush Size and Strength Manually#
Tap the brush size and strength sliders to enter the exact size or strength values you are looking for manually if you are having trouble selecting the value with the slider.
Faster Access To The Canvas Flip Buttons#
The buttons for temporarily flipping the entire canvas horizontally or vertically can now be accessed directly from the editor actions list instead of having to open the settings every time.
Performance and Stability Improvements#
Most of the features listed above are made possible by extensive changes and improvements to the core of ToonSquid, which also result in numerous performance and stability improvements all over the app.
Demo Projects#
To show off and provide reference for many of the new features, there are five new demo projects, which can be viewed and downloaded from toonsquid.com/demo-projects.
Thank You!#
Thank you to all of the beta testers who tried the new features and changes in this update ahead of time and provided a lot of valuable feedback! The update is better because of you.
Lastly, thank you to everybody who has downloaded ToonSquid, recommended it to somebody else, left a review on the App Store, left a comment on social media, reached out directly via e-mail or has in any other way supported this app. You have made this update possible!